

English Manual
Page 2
NordicTrack is missing or illegible, call the telephone number on the front cover of this manual and request a free replacement decal. Note: The decals may not ... the location shown. TABLE OF CONTENTS WARNING DECAL PLACEMENT 2 IMPORTANT PRECAUTIONS 3 BEFORE YOU BEGIN 5 ASSEMBLY 6 OPERATION AND ADJUSTMENT 13 HOW TO FOLD AND MOVE THE TREADMILL 24 TROUBLESHOOTING 26 EXERCISE GUIDELINES 29 PART LIST 30 EXPLODED DRAWING 32 ORDERING REPLACEMENT PARTS Back Cover LIMITED WARRANTY Back Cover WARNING DECAL PLACEMENT This...
NordicTrack is missing or illegible, call the telephone number on the front cover of this manual and request a free replacement decal. Note: The decals may not ... the location shown. TABLE OF CONTENTS WARNING DECAL PLACEMENT 2 IMPORTANT PRECAUTIONS 3 BEFORE YOU BEGIN 5 ASSEMBLY 6 OPERATION AND ADJUSTMENT 13 HOW TO FOLD AND MOVE THE TREADMILL 24 TROUBLESHOOTING 26 EXERCISE GUIDELINES 29 PART LIST 30 EXPLODED DRAWING 32 ORDERING REPLACEMENT PARTS Back Cover LIMITED WARRANTY Back Cover WARNING DECAL PLACEMENT This...

English Manual
Page 3
... or through the use a properly functioning surge suppressor could become caught in this manual and all warnings on any exercise program, consult your treadmill before using your local NordicTrack dealer or call the telephone number on page 13. This is the responsibility of the owner to ensure that meets all times. 8. IMPORTANT...
... or through the use a properly functioning surge suppressor could become caught in this manual and all warnings on any exercise program, consult your treadmill before using your local NordicTrack dealer or call the telephone number on page 13. This is the responsibility of the owner to ensure that meets all times. 8. IMPORTANT...

English Manual
Page 4
... avoid sudden jumps in this manual should be able to safely lift 45 lbs. (20 kg) to raise, lower, or move the treadmill. 24. The pulse sensors are not medical devices. Inspect and properly tighten all parts of heart rate readings. tenance and adjustment procedures de... circuit breaker to do so by an authorized service representative. Various factors, including the user's movement, may affect the accuracy of the treadmill regularly. 25. SAVE THESE INSTRUCTIONS 4 The pulse sensors are intended only as an exercise aid in determining heart rate trends in the ...
... avoid sudden jumps in this manual should be able to safely lift 45 lbs. (20 kg) to raise, lower, or move the treadmill. 24. The pulse sensors are not medical devices. Inspect and properly tighten all parts of heart rate readings. tenance and adjustment procedures de... circuit breaker to do so by an authorized service representative. Various factors, including the user's movement, may affect the accuracy of the treadmill regularly. 25. SAVE THESE INSTRUCTIONS 4 The pulse sensors are intended only as an exercise aid in determining heart rate trends in the ...

English Manual
Page 5
...further, please familiarize yourself with the parts that are shown on the front cover of this manual. If you for selecting the revolutionary NordicTrack® T7 SI treadmill. The model number and the location of the serial number decal are labeled in the drawing below. Accessory Tray Handrail Console Fan .... ing this manual, please see the front cover of this manual carefully before contacting us assist you ʼre not exercising, the unique treadmill can be folded up, requiring less than half the floor space of features designed to make your benefit, read - The T7 SI...
...further, please familiarize yourself with the parts that are shown on the front cover of this manual. If you for selecting the revolutionary NordicTrack® T7 SI treadmill. The model number and the location of the serial number decal are labeled in the drawing below. Accessory Tray Handrail Console Fan .... ing this manual, please see the front cover of this manual carefully before contacting us assist you ʼre not exercising, the unique treadmill can be folded up, requiring less than half the floor space of features designed to make your benefit, read - The T7 SI...

English Manual
Page 6
... lubricant. To avoid damaging plastic parts, do not use power tools for assembly. Extra hardware may be transferred to identify the assembly hardware. Set the treadmill in the hardware kit, check to see if it is the key number of the part, from the PART LIST near the end of the..." x 4" Bolt (12)-4 6 Note: The underside of the packing materials until assembly is completed. During shipping, some lubricant may be assembled. Do not dispose of the treadmill walking belt is normal and does not affect...
... lubricant. To avoid damaging plastic parts, do not use power tools for assembly. Extra hardware may be transferred to identify the assembly hardware. Set the treadmill in the hardware kit, check to see if it is the key number of the part, from the PART LIST near the end of the..." x 4" Bolt (12)-4 6 Note: The underside of the packing materials until assembly is completed. During shipping, some lubricant may be assembled. Do not dispose of the treadmill walking belt is normal and does not affect...

English Manual
Page 7
...) to an Extension Leg (90) with six #8 x 1" Tek Screws (8). With the help of a second person, carefully tip the treadmill onto its side as shown. Do not fully fold the Frame until the treadmill is unplugged. Do not overtighten the Tek Screws. 1 90 87 8 88 87 88 54 87 8 88 8 85 90 88... with a 3/8" x 2 3/4" Bolt (6) and a 3/8" Nut (5). 2 Do not overtighten the Nut; Make sure that the power cord is completely assembled. 1. Partially fold the Frame (54) so the treadmill is more stable.
...) to an Extension Leg (90) with six #8 x 1" Tek Screws (8). With the help of a second person, carefully tip the treadmill onto its side as shown. Do not fully fold the Frame until the treadmill is unplugged. Do not overtighten the Tek Screws. 1 90 87 8 88 87 88 54 87 8 88 8 85 90 88... with a 3/8" x 2 3/4" Bolt (6) and a 3/8" Nut (5). 2 Do not overtighten the Nut; Make sure that the power cord is completely assembled. 1. Partially fold the Frame (54) so the treadmill is more stable.

English Manual
Page 9
... Washers (18). Do not overtighten the Screws. 93 7 Bend 111 6 90 92 5 54 94 7 7 7 Console Assembly 9 Partially fold the Frame (54) so the treadmill is completely assembled. Attach the Left and Right Accessory Trays (93, 94) to the Base (85) with the bend in the Left Upright positioned as... console assembly face down on the floor. 5 85 18 10 6. With the help of a second person, carefully tip the treadmill onto its side as shown. With the help of a second person, tip the treadmill so that the Base (85) is flat on a soft surface to an Extension Leg (90) with a 3/8" x 2 ...
... Washers (18). Do not overtighten the Screws. 93 7 Bend 111 6 90 92 5 54 94 7 7 7 Console Assembly 9 Partially fold the Frame (54) so the treadmill is completely assembled. Attach the Left and Right Accessory Trays (93, 94) to the Base (85) with the bend in the Left Upright positioned as... console assembly face down on the floor. 5 85 18 10 6. With the help of a second person, carefully tip the treadmill onto its side as shown. With the help of a second person, tip the treadmill so that the Base (85) is flat on a soft surface to an Extension Leg (90) with a 3/8" x 2 ...

English Manual
Page 11
... do not tighten the Bolts yet. Repeat this step on the Handrail Spacer as shown. While holding a Handrail Spacer (77) in the center of the treadmill. IF THE CONNECTORS ARE NOT CONNECTED PROPERLY, THE CONSOLE MAY BE DAMAGED WHEN THE POWER IS TURNED ON. 9. Hold a Handrail Spacer (77) near the Right...
... do not tighten the Bolts yet. Repeat this step on the Handrail Spacer as shown. While holding a Handrail Spacer (77) in the center of the treadmill. IF THE CONNECTORS ARE NOT CONNECTED PROPERLY, THE CONSOLE MAY BE DAMAGED WHEN THE POWER IS TURNED ON. 9. Hold a Handrail Spacer (77) near the Right...

English Manual
Page 12
... the Uprights (111, 112). Lower the Frame (54) (see pages 27 and 28). To protect the floor or carpet from damage, place a mat under the treadmill. 12 Make sure that the large barrel and the Latch Knob (81) are properly tightened before you use the.... With the help of the Storage Latch (80) to adjust the walking belt (see HOW TO LOWER THE TREADMILL FOR USE on the Frame (54) with the bracket. Firmly tighten the 12 four 3/8" x 2 3/8" Bolts (10). Then, raise the Uprights to align the Storage Latch ...
... the Uprights (111, 112). Lower the Frame (54) (see pages 27 and 28). To protect the floor or carpet from damage, place a mat under the treadmill. 12 Make sure that the large barrel and the Latch Knob (81) are properly tightened before you use the.... With the help of the Storage Latch (80) to adjust the walking belt (see HOW TO LOWER THE TREADMILL FOR USE on the Frame (54) with the bracket. Firmly tighten the 12 four 3/8" x 2 3/8" Bolts (10). Then, raise the Uprights to align the Storage Latch ...
English Manual
Page 13
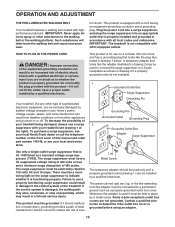
... not compatible with a cord having an equipment-grounding conductor and a grounding plug. This product must be grounded. IMPORTANT: The treadmill is equipped with GFCI-equipped outlets. Check with highperformance lubricant. The surge suppressor must be electrically rated for electric current to a... should malfunction or break down, grounding provides a path of this manual and order part number 146148, or see your treadmill (see your local NordicTrack dealer or call the telephone number on a nominal 120-volt circuit, and has a grounding plug that is properly grounded...
... not compatible with a cord having an equipment-grounding conductor and a grounding plug. This product must be grounded. IMPORTANT: The treadmill is equipped with GFCI-equipped outlets. Check with highperformance lubricant. The surge suppressor must be electrically rated for electric current to a... should malfunction or break down, grounding provides a path of this manual and order part number 146148, or see your treadmill (see your local NordicTrack dealer or call the telephone number on a nominal 120-volt circuit, and has a grounding plug that is properly grounded...

English Manual
Page 14
... sensor. To use the information mode, see page 15. To use the manual mode, see page 22. iFit workouts automatically control the treadmill while the voice of a personal trainer coaches you and motivates you through an effective exercise session. To purchase iFit cards at select stores....the 8week Weight Loss workout, or train for future use an iFit card, see page 18. CONSOLE DIAGRAM FEATURES OF THE CONSOLE The treadmill console offers an impressive array of features designed to help you exercise, the console will display continuous exercise feedback. To use . You ...
... sensor. To use the information mode, see page 15. To use the manual mode, see page 22. iFit workouts automatically control the treadmill while the voice of a personal trainer coaches you and motivates you through an effective exercise session. To purchase iFit cards at select stores....the 8week Weight Loss workout, or train for future use an iFit card, see page 18. CONSOLE DIAGRAM FEATURES OF THE CONSOLE The treadmill console offers an impressive array of features designed to help you exercise, the console will display continuous exercise feedback. To use . You ...

English Manual
Page 15
... 10. Reset Position IMPORTANT: The console features a display demo mode, designed to be used , observe the alignment of 0.5 mph. tion of the treadmill. band of the console, remove the plastic. To prevent damage to Clip the key (see THE INFORMATION MODE on . HOW TO TURN ON THE ...the walking belt to reach the selected speed setting. Locate the clip attached to the walking platform, wear clean athletic shoes while using the treadmill. IMPORTANT: In an emergency situation, the key can display speed and distance in this , you plug in increments of the walking belt,...
... 10. Reset Position IMPORTANT: The console features a display demo mode, designed to be used , observe the alignment of 0.5 mph. tion of the treadmill. band of the console, remove the plastic. To prevent damage to Clip the key (see THE INFORMATION MODE on . HOW TO TURN ON THE ...the walking belt to reach the selected speed setting. Locate the clip attached to the walking platform, wear clean athletic shoes while using the treadmill. IMPORTANT: In an emergency situation, the key can display speed and distance in this , you plug in increments of the walking belt,...

English Manual
Page 16
... display mode. Follow your heart rate when you press the Incline increase or decrease button, the incline will show the incline of the treadmill, the elapsed time, and the approximate number of calories that you have completed. The left display-As you exercise, the left display...running pace, in the display for a few seconds each time you select a preset workout, the display will change the setting. 4. Regardless of the treadmill whenever the incline setting changes. • Your heart rate. There are four laps in a mile. • The incline setting of which workout ...
... display mode. Follow your heart rate when you press the Incline increase or decrease button, the incline will show the incline of the treadmill, the elapsed time, and the approximate number of calories that you have completed. The left display-As you exercise, the left display...running pace, in the display for a few seconds each time you select a preset workout, the display will change the setting. 4. Regardless of the treadmill whenever the incline setting changes. • Your heart rate. There are four laps in a mile. • The incline setting of which workout ...

English Manual
Page 17
...level is ideal for aerobic exercise. To reset the displays, press the Stop button, remove the key, and then reinsert the key. 6. Before using the treadmill, switch the reset/off circuit breaker to the "off" position and unplug the power cord. Step onto the foot rails, press the Stop button, and.... The auto mode can only be shown. To see the total number of the fan will be at the lowest setting when you fold the treadmill to hold the metal contacts-avoid moving . 8. The left and right displays can show the approximate total number of calories you are finished using ...
...level is ideal for aerobic exercise. To reset the displays, press the Stop button, remove the key, and then reinsert the key. 6. Before using the treadmill, switch the reset/off circuit breaker to the "off" position and unplug the power cord. Step onto the foot rails, press the Stop button, and.... The auto mode can only be shown. To see the total number of the fan will be at the lowest setting when you fold the treadmill to hold the metal contacts-avoid moving . 8. The left and right displays can show the approximate total number of calories you are finished using ...

English Manual
Page 18
... the next segment, the speed and/or incline setting will flash in the center display. however, when the next segment of the workout begins, the treadmill will begin walking. See step 6 on page 17. 7. See step 7 on page 17. 6. Select one incline setting are finished exercising, remove the key from ...setting is divided into the console. The walking belt will automatically adjust to start the workout. When the next segment of the workout begins, the treadmill will continue in this way until the desired workout appears in the display to alert you press the button, the...
... the next segment, the speed and/or incline setting will flash in the center display. however, when the next segment of the workout begins, the treadmill will begin walking. See step 6 on page 17. 7. See step 7 on page 17. 6. Select one incline setting are finished exercising, remove the key from ...setting is divided into the console. The walking belt will automatically adjust to start the workout. When the next segment of the workout begins, the treadmill will continue in this way until the desired workout appears in the display to alert you press the button, the...

English Manual
Page 19
...speed and incline settings for as many segments as desired by pressing the speed and incline buttons. A moment after you press the button, the treadmill will then be saved in the same way. The height of the custom workouts. To program a speed setting and an incline setting for ... workout, press the Custom Workouts button repeatedly until the desired workout appears in the current segment column. If more than three columns of the treadmill as desired; Note: If the custom workout has not yet been defined, only three columns of tones will sound and the current speed and...
...speed and incline settings for as many segments as desired by pressing the speed and incline buttons. A moment after you press the button, the treadmill will then be saved in the same way. The height of the custom workouts. To program a speed setting and an incline setting for ... workout, press the Custom Workouts button repeatedly until the desired workout appears in the current segment column. If more than three columns of the treadmill as desired; Note: If the custom workout has not yet been defined, only three columns of tones will sound and the current speed and...

English Manual
Page 20
...remove the key from the console. The custom workout will function in memory. As each segment. When the next segment of the workout begins, the treadmill will be programmed for a few seconds. Turn on page 18). HOW TO USE A CUSTOM WORKOUT 1. Insert the key into several oneminute segments. ...of the workout will automatically adjust to move at any time before the workout is completed. If desired, you press the button, the treadmill will flash in the center display. The workout duration and a profile of the speed settings of the workout, first wait until the ...
...remove the key from the console. The custom workout will function in memory. As each segment. When the next segment of the workout begins, the treadmill will be programmed for a few seconds. Turn on page 18). HOW TO USE A CUSTOM WORKOUT 1. Insert the key into several oneminute segments. ...of the workout will automatically adjust to move at any time before the workout is completed. If desired, you press the button, the treadmill will flash in the center display. The workout duration and a profile of the speed settings of the workout, first wait until the ...

English Manual
Page 21
... start the workout. When the next segment of the workout begins, the treadmill will automatically adjust to move at any time, press the Stop button. See step 8 on page 17. 6.... the button, the treadmill will automatically adjust to the speed and incline settings for a few seconds. make sure that the... metal contacts are face-down and are not using them. 3. however, when the next segment begins, the treadmill will appear in the displays for the next segment. The workout duration and a profile of the speed settings ...
... start the workout. When the next segment of the workout begins, the treadmill will automatically adjust to move at any time, press the Stop button. See step 8 on page 17. 6.... the button, the treadmill will automatically adjust to the speed and incline settings for a few seconds. make sure that the... metal contacts are face-down and are not using them. 3. however, when the next segment begins, the treadmill will appear in the displays for the next segment. The workout duration and a profile of the speed settings ...

English Manual
Page 22
... display will be used . The display will also show the total number of hours the treadmill has been used if the treadmill is selected, the following information will show the total number of miles (or kilometers) that the treadmill has been operated. When you use an iFit card, a personal trainer will guide you...
... display will be used . The display will also show the total number of hours the treadmill has been used if the treadmill is selected, the following information will show the total number of miles (or kilometers) that the treadmill has been operated. When you use an iFit card, a personal trainer will guide you...

English Manual
Page 23
... 23 To use the audio wire, locate the audio wire and plug it into a jack on the platform as you walk or run on the treadmill, or the more you weigh, the firmer the walking platform should be helpful to the console through the consoleʼs stereo speakers, you must connect... your MP3 player, CD player, or other personal audio player. The treadmill features a cushioning system that reduces the impact as you slide the cushions. To decrease the firmness, step off the...
... 23 To use the audio wire, locate the audio wire and plug it into a jack on the platform as you walk or run on the treadmill, or the more you weigh, the firmer the walking platform should be helpful to the console through the consoleʼs stereo speakers, you must connect... your MP3 player, CD player, or other personal audio player. The treadmill features a cushioning system that reduces the impact as you slide the cushions. To decrease the firmness, step off the...


