
User Manual
Page 2
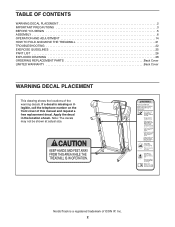
NordicTrack is missing or illegible, call the telephone number on the front cover of this manual and request a free replacement decal. TABLE OF CONTENTS WARNING DECAL PLACEMENT 2 IMPORTANT PRECAUTIONS 3 BEFORE YOU BEGIN 5 ASSEMBLY 6 OPERATION AND ADJUSTMENT 14 HOW TO FOLD AND MOVE THE TREADMILL 21 TROUBLESHOOTING 22 EXERCISE GUIDELINES 25 PART LIST 26 EXPLODED...
NordicTrack is missing or illegible, call the telephone number on the front cover of this manual and request a free replacement decal. TABLE OF CONTENTS WARNING DECAL PLACEMENT 2 IMPORTANT PRECAUTIONS 3 BEFORE YOU BEGIN 5 ASSEMBLY 6 OPERATION AND ADJUSTMENT 14 HOW TO FOLD AND MOVE THE TREADMILL 21 TROUBLESHOOTING 22 EXERCISE GUIDELINES 25 PART LIST 26 EXPLODED...
User Manual
Page 4
...intended for the location of the treadmill regularly. Inspect and properly tighten all parts of the circuit breaker.) 21. Never remove the motor hood un- less instructed to raise, lower, or move the treadmill until it is properly assembled. (See ASSEMBLY on page 6, and HOW TO... FOLD AND MOVE THE TREADMILL on page 5 for in use this manual. This treadmill is holding the frame securely in a commercial, rental, or institutional ...
...intended for the location of the treadmill regularly. Inspect and properly tighten all parts of the circuit breaker.) 21. Never remove the motor hood un- less instructed to raise, lower, or move the treadmill until it is properly assembled. (See ASSEMBLY on page 6, and HOW TO... FOLD AND MOVE THE TREADMILL on page 5 for in use this manual. This treadmill is holding the frame securely in a commercial, rental, or institutional ...
User Manual
Page 6
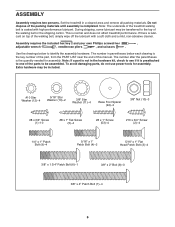
... off the lubricant with high-performance lubricant. The number after the parentheses is normal and does not affect treadmill performance. During shipping, some lubricant may be assembled. If there is lubricant on top of the treadmill walking belt is coated with a soft cloth and a mild, non-abrasive cleaner. Use the drawings below each...
... off the lubricant with high-performance lubricant. The number after the parentheses is normal and does not affect treadmill performance. During shipping, some lubricant may be assembled. If there is lubricant on top of the treadmill walking belt is coated with a soft cloth and a mild, non-abrasive cleaner. Use the drawings below each...

User Manual
Page 10
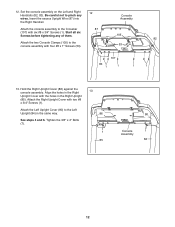
...Cover onto the Left Upright (84). 7 Identify the Left Handrail (82). Attach the Right Handrail (83) to avoid scratching the console assembly. Set the console assembly face down on the bottom of the Right Handrail. Hold the Right Handrail (83) near the Right Upright (85). Do not tighten the... Patch Bolts yet. 8 87 Bracket 3 83 Tie 4 13 86 85 9. Lift off the Crossbar (107). 9 Console Assembly 1 107 10 7. Remove the tie from the bracket on the Left Handrail. Insert the Upright Wire (87) through the bracket on a soft surface to the...
...Cover onto the Left Upright (84). 7 Identify the Left Handrail (82). Attach the Right Handrail (83) to avoid scratching the console assembly. Set the console assembly face down on the bottom of the Right Handrail. Hold the Right Handrail (83) near the Right Upright (85). Do not tighten the... Patch Bolts yet. 8 87 Bracket 3 83 Tie 4 13 86 85 9. Lift off the Crossbar (107). 9 Console Assembly 1 107 10 7. Remove the tie from the bracket on the Left Handrail. Insert the Upright Wire (87) through the bracket on a soft surface to the...

User Manual
Page 11
... (102) into place. First 102 Orient the Crossbar (107) as shown. Attach the 29 Crossbar to the Console Ground Wire (109). 11 Console Assembly Console Wire 87 Wire Tie 4 3 Console Wire 87 Ground Wire 109 83 11 The connectors should slide together easily and snap into the Handrails (82..., 83). do not, turn one side is shown). Remove the wire tie from the console assembly to the Handrails (82, 83) with four 1/4" x 1" Patch Bolts (9); do not tighten the Patch Bolts yet. Connect the ground wire from the Upright ...
... (102) into place. First 102 Orient the Crossbar (107) as shown. Attach the 29 Crossbar to the Console Ground Wire (109). 11 Console Assembly Console Wire 87 Wire Tie 4 3 Console Wire 87 Ground Wire 109 83 11 The connectors should slide together easily and snap into the Handrails (82..., 83). do not, turn one side is shown). Remove the wire tie from the console assembly to the Handrails (82, 83) with four 1/4" x 1" Patch Bolts (9); do not tighten the Patch Bolts yet. Connect the ground wire from the Upright ...
User Manual
Page 12
... Wire (87) into the Right Handrail. Attach the Left Upright Cover (80) to the Crossbar (107) with two #8 x 3/4" Screws (1). Set the console assembly on the Left and Right Handrails (82, 83). Attach the Right Upright Cover with six #8 x 3/4" Screws (1). Align the holes in the Right Upright Cover... with four #8 x 1" Screws (53). 12 87 Console Assembly 105 53 107 83 1 1 1 82 1 13. Start all six Screws before tightening any wires. 12. Be careful not to the console...
... Wire (87) into the Right Handrail. Attach the Left Upright Cover (80) to the Crossbar (107) with two #8 x 3/4" Screws (1). Set the console assembly on the Left and Right Handrails (82, 83). Attach the Right Upright Cover with six #8 x 3/4" Screws (1). Align the holes in the Right Upright Cover... with four #8 x 1" Screws (53). 12 87 Console Assembly 105 53 107 83 1 1 1 82 1 13. Start all six Screws before tightening any wires. 12. Be careful not to the console...
User Manual
Page 13
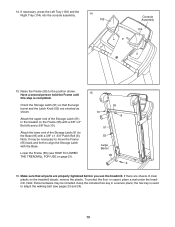
..., place a mat under the treadmill. Orient the Storage Latch (51) so that all parts are oriented as shown. Note: Extra hardware may be included. If necessary, press the Left Tray (103) and the Right Tray (104) into the console assembly. 14 103 Console Assembly 104 15. Make sure that ...the large barrel and the Latch Knob (52) are properly tightened before you use the treadmill. Attach the upper end of the Storage Latch (51) to the position shown...
..., place a mat under the treadmill. Orient the Storage Latch (51) so that all parts are oriented as shown. Note: Extra hardware may be included. If necessary, press the Left Tray (103) and the Right Tray (104) into the console assembly. 14 103 Console Assembly 104 15. Make sure that ...the large barrel and the Latch Knob (52) are properly tightened before you use the treadmill. Attach the upper end of the Storage Latch (51) to the position shown...


