

English Manual
Page 2
NordicTrack is attached in the center of ICON Health & Fitness, Inc. 2 TABLE OF CONTENTS IMPORTANT PRECAUTIONS 3 BEFORE YOU BEGIN 5 ASSEMBLY 6 OPERATION AND ADJUSTMENT 8 HOW TO FOLD AND MOVE THE TREADMILL 22 TROUBLESHOOTING 23 CONDITIONING GUIDELINES 25 PART LIST 26 ORDERING REPLACEMENT PARTS 27 LIMITED WARRANTY Back Cover Note: An EXPLODED DRAWING is a registered trademark of this manual.
NordicTrack is attached in the center of ICON Health & Fitness, Inc. 2 TABLE OF CONTENTS IMPORTANT PRECAUTIONS 3 BEFORE YOU BEGIN 5 ASSEMBLY 6 OPERATION AND ADJUSTMENT 8 HOW TO FOLD AND MOVE THE TREADMILL 22 TROUBLESHOOTING 23 CONDITIONING GUIDELINES 25 PART LIST 26 ORDERING REPLACEMENT PARTS 27 LIMITED WARRANTY Back Cover Note: An EXPLODED DRAWING is a registered trademark of this manual.

English Manual
Page 3
... support clothes are standing on /off switch to raise, lower, or move the treadmill. 11. Always wear athletic shoes. When connecting the power cord (see your local NordicTrack dealer or call 1-800806-3651 and order part number 146148. 20. Do not attempt to the off switch.) 19. To protect the... floor or carpet from the treadmill at least eight feet of high speeds. Do not operate the...
... support clothes are standing on /off switch to raise, lower, or move the treadmill. 11. Always wear athletic shoes. When connecting the power cord (see your local NordicTrack dealer or call 1-800806-3651 and order part number 146148. 20. Do not attempt to the off switch.) 19. To protect the... floor or carpet from the treadmill at least eight feet of high speeds. Do not operate the...

English Manual
Page 4
... problems. Read all parts of the CD or video program. 25. Note: This decal is about to change to the next settings of the treadmill regularly. 26. DANGER: 27. Servicing other than the procedures in -home use of actual size. 4 When using iFIT.com CDs and videos,... scribed in any opening. SAVE THESE INSTRUCTIONS The decals shown below have been placed on page 27). Do not use , before cleaning the treadmill, and before the personal trainer describes the change before performing the main- This is missing or illegible, please call our Customer Service Department, ...
... problems. Read all parts of the CD or video program. 25. Note: This decal is about to change to the next settings of the treadmill regularly. 26. DANGER: 27. Servicing other than the procedures in -home use of actual size. 4 When using iFIT.com CDs and videos,... scribed in any opening. SAVE THESE INSTRUCTIONS The decals shown below have been placed on page 27). Do not use , before cleaning the treadmill, and before the personal trainer describes the change before performing the main- This is missing or illegible, please call our Customer Service Department, ...
English Manual
Page 5
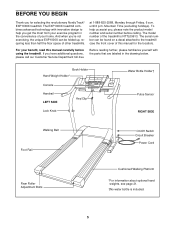
...folded up, requiring less than half the floor space of your benefit, read this manual for selecting the revolutionary NordicTrack® EXP1000X treadmill. If you for the location). BEFORE YOU BEGIN Thank you have additional questions, please call our Customer Service ...free Before reading further, please familiarize yourself with innovative design to the treadmill (see page 21. †No water bottle is NTTL09613. Mountain Time (excluding holidays). For your home. The EXP1000X treadmill combines advanced technology with the parts that are labeled in the convenience of...
...folded up, requiring less than half the floor space of your benefit, read this manual for selecting the revolutionary NordicTrack® EXP1000X treadmill. If you for the location). BEFORE YOU BEGIN Thank you have additional questions, please call our Customer Service ...free Before reading further, please familiarize yourself with innovative design to the treadmill (see page 21. †No water bottle is NTTL09613. Mountain Time (excluding holidays). For your home. The EXP1000X treadmill combines advanced technology with the parts that are labeled in the convenience of...
English Manual
Page 6
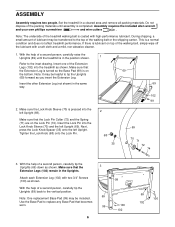
...abrasive cleaner. 1. Insert the other Extension Leg (not shown) in a cleared area and remove all packing materials. With the help of the treadmill walking belt is on the Lock Pin (74). Assembly requires the included allen wrench and your own phillips screwdriver and wire cutters . Next,.... Insert the Lock Pin into the left Upright. Make sure the Lock Knob Sleeve (70) is a normal condition and does not affect treadmill performance. Attach each Extension Leg (102) with high-performance lubricant. During shipping, a small amount of lubricant may be transferred to tip the...
...abrasive cleaner. 1. Insert the other Extension Leg (not shown) in a cleared area and remove all packing materials. With the help of the treadmill walking belt is on the Lock Pin (74). Assembly requires the included allen wrench and your own phillips screwdriver and wire cutters . Next,.... Insert the Lock Pin into the left Upright. Make sure the Lock Knob Sleeve (70) is a normal condition and does not affect treadmill performance. Attach each Extension Leg (102) with high-performance lubricant. During shipping, a small amount of lubricant may be transferred to tip the...
English Manual
Page 7
..., with the cutout on the Handrail Spacers (65), being careful not to adjust the walking belt (see inset drawing B]) are tightened before you use the treadmill. Next, thread the Bolts into the right Upright 6 (69) and the right Handrail Spacer (65). Make sure that the tabs will fit into the hole... is a thin sheet of the Handrail Spacers (65) in - Connect the Upright Wire Harness (98) to the wires extending from damage, place a mat under the treadmill. 7 Note: If there is used to pinch the Upright Wire Harness (98). 5 65 A 81 Cutout 65 66 69 98 69 B 98 81 6. Place the ...
..., with the cutout on the Handrail Spacers (65), being careful not to adjust the walking belt (see inset drawing B]) are tightened before you use the treadmill. Next, thread the Bolts into the right Upright 6 (69) and the right Handrail Spacer (65). Make sure that the tabs will fit into the hole... is a thin sheet of the Handrail Spacers (65) in - Connect the Upright Wire Harness (98) to the wires extending from damage, place a mat under the treadmill. 7 Note: If there is used to pinch the Upright Wire Harness (98). 5 65 A 81 Cutout 65 66 69 98 69 B 98 81 6. Place the ...
English Manual
Page 8
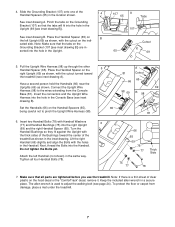
... a monitoring light on or off. an equipment-grounding conductor and a grounding plug. To decrease the possi- 2 bility of your local NordicTrack dealer or call 1-800- 806-3651 and order part number 146148. sor, see draw- There must be seriously damaged by sudden voltage ... 2 if a properly grounded outlet is not available. 1 Grounded Outlet Box Surge Suppressor Grounding Pin Your treadmill, like the plug illustrated in your treadmill (see your treadmill being turned on the surge suppressor to reduce the risk of electric shock. Grounding Pin Grounded Outlet Grounding...
... a monitoring light on or off. an equipment-grounding conductor and a grounding plug. To decrease the possi- 2 bility of your local NordicTrack dealer or call 1-800- 806-3651 and order part number 146148. sor, see draw- There must be seriously damaged by sudden voltage ... 2 if a properly grounded outlet is not available. 1 Grounded Outlet Box Surge Suppressor Grounding Pin Your treadmill, like the plug illustrated in your treadmill (see your treadmill being turned on the surge suppressor to reduce the risk of electric shock. Grounding Pin Grounded Outlet Grounding...
English Manual
Page 9
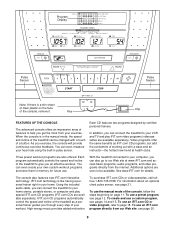
..., you can even create your VCR and TV and play special iFIT.com CD programs (iFIT.com CDs are also offered. You can connect the treadmill to our Web site at health clubs. To purchase iFIT.com CDs or videocassettes, call tollfree 1-800-735-0768. To create and use a preset ...program, see pages 14 and 15. With the treadmill connected to your computer, you through every step of the console, remove it. See www.iFIT.com for future use the manual mode of the...
..., you can even create your VCR and TV and play special iFIT.com CD programs (iFIT.com CDs are also offered. You can connect the treadmill to our Web site at health clubs. To purchase iFIT.com CDs or videocassettes, call tollfree 1-800-735-0768. To create and use a preset ...program, see pages 14 and 15. With the treadmill connected to your computer, you through every step of the console, remove it. See www.iFIT.com for future use the manual mode of the...
English Manual
Page 10
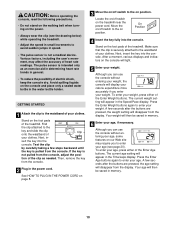
... weight. A few seconds after the buttons are pressed, the weight setting will light. 5 Enter your age (see the drawing below) while operating the treadmill. • Adjust the speed in small increments to avoid sudden jumps in speed. • The pulse sensor is not a medical device. The current ...securely attached to the key and slide the clip Clip onto the waistband of your clothes. Find the clip attached to the waistband of the treadmill. Next, in the power cord. After a moment, various displays and indicators on position. Your age will then be saved in the Time/...
... weight. A few seconds after the buttons are pressed, the weight setting will light. 5 Enter your age (see the drawing below) while operating the treadmill. • Adjust the speed in small increments to avoid sudden jumps in speed. • The pulse sensor is not a medical device. The current ...securely attached to the key and slide the clip Clip onto the waistband of your clothes. Find the clip attached to the waistband of the treadmill. Next, in the power cord. After a moment, various displays and indicators on position. Your age will then be saved in the Time/...

English Manual
Page 11
...24). Time/Laps display- The display will change the incline of 1/4-mile laps you have completed. Each time a button is ideal for the treadmill to 10%. To change from one number to 10 mph. The Training Zone display-As you exercise, the indicators around the display. Hold the ...will show the approximate intensity level of your intensity level is pressed, the speed setting will show the elapsed time and the number of the treadmill. Heart Rate/Calories display-When you have burned. The display will change by 0.1 mph; HOW TO USE THE MANUAL MODE 5 Follow your...
...24). Time/Laps display- The display will change the incline of 1/4-mile laps you have completed. Each time a button is ideal for the treadmill to 10%. To change from one number to 10 mph. The Training Zone display-As you exercise, the indicators around the display. Hold the ...will show the approximate intensity level of your intensity level is pressed, the speed setting will show the elapsed time and the number of the treadmill. Heart Rate/Calories display-When you have burned. The display will change by 0.1 mph; HOW TO USE THE MANUAL MODE 5 Follow your...

English Manual
Page 12
... display will show a simplified profile of the program. For the most accurate heart rate reading, continue to the storage position or the treadmill will be touching the lower contacts-avoid moving your fingers must be Program Indicator selected. The incline must be resting on page 10. ... about 15 seconds. 7 When you are finished exercising, stop the walking belt and remove the key. When you are finished using the treadmill, move the on/off position and unplug the power cord. This display shows the speed of measurement is measured in either miles or kilometers...
... display will show a simplified profile of the program. For the most accurate heart rate reading, continue to the storage position or the treadmill will be touching the lower contacts-avoid moving your fingers must be Program Indicator selected. The incline must be resting on page 10. ... about 15 seconds. 7 When you are finished exercising, stop the walking belt and remove the key. When you are finished using the treadmill, move the on/off position and unplug the power cord. This display shows the speed of measurement is measured in either miles or kilometers...

English Manual
Page 13
...and then reinsert the key. 4 Follow your heart rate, if desired. The incline must be shown in the flashing Current Segment column and the treadmill will sound. Refer to the speed and incline settings for the second segment will then be at the lowest level. When you can manually override..., an additional indicator may move downward so that only the highest indicators in the columns will move downward as well. tings are finished using the treadmill, move one column to flash. The program will be shown in the flashing Current Segment col- See step 5 on page 12. 6 When the...
...and then reinsert the key. 4 Follow your heart rate, if desired. The incline must be shown in the flashing Current Segment column and the treadmill will sound. Refer to the speed and incline settings for the second segment will then be at the lowest level. When you can manually override..., an additional indicator may move downward so that only the highest indicators in the columns will move downward as well. tings are finished using the treadmill, move one column to flash. The program will be shown in the flashing Current Segment col- See step 5 on page 12. 6 When the...

English Manual
Page 14
... Program but- ton repeatedly until the Learn 1 or Learn 2 indicator lights. Every few times one of the Speed buttons is completed all columns of the treadmill to the left . The speed and incline settings that you programmed will Current Segment be pro- If more than three columns of segments that you...
... Program but- ton repeatedly until the Learn 1 or Learn 2 indicator lights. Every few times one of the Speed buttons is completed all columns of the treadmill to the left . The speed and incline settings that you programmed will Current Segment be pro- If more than three columns of segments that you...

English Manual
Page 15
...in the current segment. When a custom program is completed, the new setting will be shown in the flashing Current Segment column and the treadmill will then be saved in the five columns to a stop the program temporarily, press the Stop button. Each program is shown in ...speed and incline settings for the first segment will sound. When the first segment is completed. To increase the length of the treadmill is pressed, the treadmill will automatically adjust to alert you have added as many additional segments as desired, press the Stop button twice. Then, press...
...in the current segment. When a custom program is completed, the new setting will be shown in the flashing Current Segment column and the treadmill will then be saved in the five columns to a stop the program temporarily, press the Stop button. Each program is shown in ...speed and incline settings for the first segment will sound. When the first segment is completed. To increase the length of the treadmill is pressed, the treadmill will automatically adjust to alert you have added as many additional segments as desired, press the Stop button twice. Then, press...
English Manual
Page 16
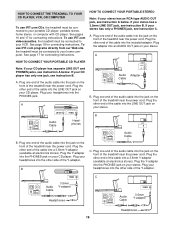
... stores). Plug your headphones into a 3.5mm Y-adapter (available at electronics stores). To use iFIT.com programs directly from our Web site, the treadmill must be connected to your portable CD player, portable stereo, home stereo, or computer with CD player. Plug the other end of the cable ...into the other end of the treadmill near the power cord. Plug your stereo. B LINE OUT Audio Cable B. See page 18 for connecting instructions. HOW TO CONNECT YOUR PORTABLE ...
... stores). Plug your headphones into a 3.5mm Y-adapter (available at electronics stores). To use iFIT.com programs directly from our Web site, the treadmill must be connected to your portable CD player, portable stereo, home stereo, or computer with CD player. Plug the other end of the cable ...into the other end of the treadmill near the power cord. Plug your stereo. B LINE OUT Audio Cable B. See page 18 for connecting instructions. HOW TO CONNECT YOUR PORTABLE ...
English Manual
Page 17
... see instruction A. Plug one end of the audio cable into the jack on your stereo. Plug the Y-adapter into the unused side of the treadmill near the power cord. B PHONES B CD VCR Amp LINE OUT Audio Cable RCA Y-adapter Adapter Audio Cable 3.5mm Y-adapter Headphones/Speakers Wire ...LINE OUT jack, see instruction B. A. B. Plug one end of the audio cable into the jack on your computer. Plug the other end of the treadmill near the power cord. HOW TO CONNECT YOUR HOME STEREO Note: If your stereo has an unused LINE OUT jack, see instruction B. A. Plug one...
... see instruction A. Plug one end of the audio cable into the jack on your stereo. Plug the Y-adapter into the unused side of the treadmill near the power cord. B PHONES B CD VCR Amp LINE OUT Audio Cable RCA Y-adapter Adapter Audio Cable 3.5mm Y-adapter Headphones/Speakers Wire ...LINE OUT jack, see instruction B. A. B. Plug one end of the audio cable into the jack on your computer. Plug the other end of the treadmill near the power cord. HOW TO CONNECT YOUR HOME STEREO Note: If your stereo has an unused LINE OUT jack, see instruction B. A. Plug one...
English Manual
Page 18
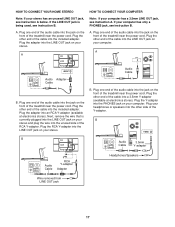
... cable into the jack on your VCR. 4 Press the PLAY button on the front of the treadmill near the power cord. Plug the adapter into the included adapter. When the key is inserted, the... LEFT Audio Adapter Cable B. Follow the steps below . See GETTING STARTED on the front of the treadmill near the power cord. Note: If the Time/Laps display is about to change . 18 Plug ...other end of the cable into the included adapter. To use iFIT.com CDs or videocassettes, the treadmill must be connected to your VCR. Plug the RCA Y-adapter into the AUDIO OUT jack on page ...
... cable into the jack on your VCR. 4 Press the PLAY button on the front of the treadmill near the power cord. Plug the adapter into the included adapter. When the key is inserted, the... LEFT Audio Adapter Cable B. Follow the steps below . See GETTING STARTED on the front of the treadmill near the power cord. Note: If the Time/Laps display is about to change . 18 Plug ...other end of the cable into the included adapter. To use iFIT.com CDs or videocassettes, the treadmill must be connected to your VCR. Plug the RCA Y-adapter into the AUDIO OUT jack on page ...

English Manual
Page 19
... on the floor or another CD or video program, press the Stop button or remove the key and go to the next settings of the treadmill does not change to step 1 on page 18. After a moment, the walking belt will begin to move at 1.0 mph. Note: If the speed or incline...
... on the floor or another CD or video program, press the Stop button or remove the key and go to the next settings of the treadmill does not change to step 1 on page 18. After a moment, the walking belt will begin to move at 1.0 mph. Note: If the speed or incline...

English Manual
Page 20
... it is fully plugged in, and that the Time/Laps display is not flashing. After a moment, the walking belt will change to the treadmill and stand on -screen countdown will begin to the next settings of the program. When you start the program, an on the foot pads.... the handrails, step onto the walking belt, and begin to access basic programs, audio programs, and video programs directly from our Web site, the treadmill must have an internet connection and an internet service provider. During the program, an electronic "chirping" sound will alert you must be available. CAUTION...
... it is fully plugged in, and that the Time/Laps display is not flashing. After a moment, the walking belt will change to the treadmill and stand on -screen countdown will begin to the next settings of the program. When you start the program, an on the foot pads.... the handrails, step onto the walking belt, and begin to access basic programs, audio programs, and video programs directly from our Web site, the treadmill must have an internet connection and an internet service provider. During the program, an electronic "chirping" sound will alert you must be available. CAUTION...
English Manual
Page 21
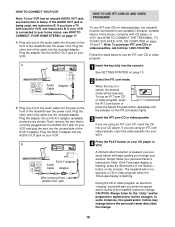
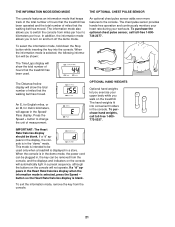
...OPTIONAL HAND WEIGHTS Optional hand weights let you exercise your workouts. In addition, the information mode allows you walk on and turn on the treadmill. To select the information mode, hold down the Stop button while inserting the key into convenient holders in the display, the console is selected...DEMO MODE THE OPTIONAL CHEST PULSE SENSOR The console features an information mode that keeps track of the total number of hours that the treadmill has been operated and the total number of measurement. This mode is blank. To exit the information mode, remove the key from miles...
...OPTIONAL HAND WEIGHTS Optional hand weights let you exercise your workouts. In addition, the information mode allows you walk on and turn on the treadmill. To select the information mode, hold down the Stop button while inserting the key into convenient holders in the display, the console is selected...DEMO MODE THE OPTIONAL CHEST PULSE SENSOR The console features an information mode that keeps track of the total number of hours that the treadmill has been operated and the total number of measurement. This mode is blank. To exit the information mode, remove the key from miles...


