

User Manual
Page 2
TABLE OF CONTENTS IMPORTANT PRECAUTIONS 3 BEFORE YOU BEGIN 6 ASSEMBLY 7 HOW TO USE THE CHEST PULSE SENSOR 12 OPERATION AND ADJUSTMENT 13 HOW TO FOLD AND MOVE THE TREADMILL 28 TROUBLESHOOTING 30 EXERCISE GUIDELINES 33 PART LIST 34 HOW TO ORDER REPLACEMENT PARTS Back Cover Note: An EXPLODED DRAWING is a registered trademark of this manual. NordicTrack is attached in the center of ICON IP, Inc. 2
TABLE OF CONTENTS IMPORTANT PRECAUTIONS 3 BEFORE YOU BEGIN 6 ASSEMBLY 7 HOW TO USE THE CHEST PULSE SENSOR 12 OPERATION AND ADJUSTMENT 13 HOW TO FOLD AND MOVE THE TREADMILL 28 TROUBLESHOOTING 30 EXERCISE GUIDELINES 33 PART LIST 34 HOW TO ORDER REPLACEMENT PARTS Back Cover Note: An EXPLODED DRAWING is a registered trademark of this manual. NordicTrack is attached in the center of ICON IP, Inc. 2

User Manual
Page 3
...fuse, an ASTA approved BS1362 type should not be able to safely lift 20 kg (45 lbs) in order to raise, lower, or move the treadmill. 19. Adjust the speed in small increments to the fuse carrier. The pulse sensors are adequately informed of all warnings and precautions. 2. It is the... responsibility of the owner to ensure that blocks any air openings. Do not operate the treadmill where aerosol products are not medical devices. When connecting the power cord (see HOW TO TURN ON THE POWER on page 28.) You must be...
...fuse, an ASTA approved BS1362 type should not be able to safely lift 20 kg (45 lbs) in order to raise, lower, or move the treadmill. 19. Adjust the speed in small increments to the fuse carrier. The pulse sensors are adequately informed of all warnings and precautions. 2. It is the... responsibility of the owner to ensure that blocks any air openings. Do not operate the treadmill where aerosol products are not medical devices. When connecting the power cord (see HOW TO TURN ON THE POWER on page 28.) You must be...

User Manual
Page 4
.... Servicing other electric light or power circuits, or where it can manually override the speed and incline settings at any opening. The treadmill is used. An outside antenna system should be sure that the unit is grounded to grounding electrodes, and requirements for the tone and... as close as contact with respect to proper grounding of the mast and supporting structure, grounding of the lead-in the vicinity of the treadmill every three months. 25. If an outside antenna system, extreme care should not be prepared for grounding requirements. 4 Do not use only...
.... Servicing other electric light or power circuits, or where it can manually override the speed and incline settings at any opening. The treadmill is used. An outside antenna system should be sure that the unit is grounded to grounding electrodes, and requirements for the tone and... as close as contact with respect to proper grounding of the mast and supporting structure, grounding of the lead-in the vicinity of the treadmill every three months. 25. If an outside antenna system, extreme care should not be prepared for grounding requirements. 4 Do not use only...

User Manual
Page 5
... the age of this product. This is not legible, please call our Customer Service Department to order a free replacement decal (see the back cover of Treadmill Ground Wire Mast Antenna Lead-in the location shown. 5 50% If a decal is missing, or if it is especially important for personal injury or property.... Read all instructions before using. Interior Metal Water Pipe) Ground Clamp Standoff Insulators To External Antenna Terminal of this or any exercise program, consult your treadmill.
... the age of this product. This is not legible, please call our Customer Service Department to order a free replacement decal (see the back cover of Treadmill Ground Wire Mast Antenna Lead-in the location shown. 5 50% If a decal is missing, or if it is especially important for personal injury or property.... Read all instructions before using. Interior Metal Water Pipe) Ground Clamp Standoff Insulators To External Antenna Terminal of this or any exercise program, consult your treadmill.

User Manual
Page 6
..., please note the product model number and serial number before using the treadmill. To help us assist you have additional questions, see the front cover of this manual for selecting the revolutionary NordicTrack® EX 3600 treadmill. And when you for the location). BEFORE YOU BEGIN Thank you ...'re not exercising, the unique EX 3600 treadmill can be folded up, requiring less than half the floor space ...
..., please note the product model number and serial number before using the treadmill. To help us assist you have additional questions, see the front cover of this manual for selecting the revolutionary NordicTrack® EX 3600 treadmill. And when you for the location). BEFORE YOU BEGIN Thank you ...'re not exercising, the unique EX 3600 treadmill can be folded up, requiring less than half the floor space ...
User Manual
Page 7
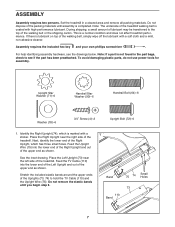
...) near the right side of the Right Upright, which is completed. During shipping, a small amount of lubricant may be transferred to the top of the treadmill. For help identifying assembly hardware, see if the part has been preattached. Note: If a part is not found in a cleared area and remove all packing... materials. Place the Right Upright near the left side of the walking belt or the shipping carton. Next, identify the lower end of the treadmill. Feed the Upright Wire (75) into the lower end of the Left Upright and out of the upper end as shown. Upright Star Washer (71...
...) near the right side of the Right Upright, which is completed. During shipping, a small amount of lubricant may be transferred to the top of the treadmill. For help identifying assembly hardware, see if the part has been preattached. Note: If a part is not found in a cleared area and remove all packing... materials. Place the Right Upright near the left side of the walking belt or the shipping carton. Next, identify the lower end of the treadmill. Feed the Upright Wire (75) into the lower end of the Left Upright and out of the upper end as shown. Upright Star Washer (71...

User Manual
Page 8
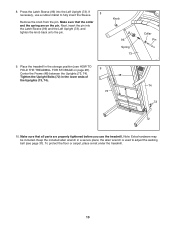
... of the Gas Spring (88) near the bracket in the end of the Gas Spring onto the ball on the bracket. With the help of Treadmill 4 5 48 4. Be careful to raise the Frame past the vertical position. Then, rotate the Spring Pin until step 5 is in addition, be careful not to...
... of the Gas Spring (88) near the bracket in the end of the Gas Spring onto the ball on the bracket. With the help of Treadmill 4 5 48 4. Be careful to raise the Frame past the vertical position. Then, rotate the Spring Pin until step 5 is in addition, be careful not to...
User Manual
Page 10
...Left Upright (73), and tighten the knob back onto the pin. If 8 necessary, use the treadmill. Place the treadmill in the storage position (see page 31). To protect the floor or carpet, place a mat under the treadmill. 10 Remove the knob from the pin. Make sure that the collar and the spring are... properly tightened before you use a rubber mallet to adjust the walking belt (see HOW TO FOLD THE TREADMILL FOR STORAGE on the pin. Make sure that all parts are on page 28). 9 Center the Frame (48) between the Uprights (73, 74). Next, ...
...Left Upright (73), and tighten the knob back onto the pin. If 8 necessary, use the treadmill. Place the treadmill in the storage position (see page 31). To protect the floor or carpet, place a mat under the treadmill. 10 Remove the knob from the pin. Make sure that the collar and the spring are... properly tightened before you use a rubber mallet to adjust the walking belt (see HOW TO FOLD THE TREADMILL FOR STORAGE on the pin. Make sure that all parts are on page 28). 9 Center the Frame (48) between the Uprights (73, 74). Next, ...

User Manual
Page 11
... 1. VHF Antenna 300 to 75 Ohm Adapter 75 Ohm Terminal Outdoor Antenna Note: Outdoor antennas are subject to the 75 ohm antenna terminal on the treadmill frame near the power cord. 75 Ohm CATV Cable 75 Ohm Terminal HOW TO CONNECT A VCR 1. See the drawing near the bottom of this page... be used, you must connect an antenna, a 75 ohm CATV cable, or a VCR to 75 ohm adapter onto the 75 ohm antenna terminal on the treadmill frame near the bottom of this page. Note: No antenna, cable, or adapter is selected. 300 to 75 Ohm Adapter 75 Ohm Terminal 75 Ohm...
... 1. VHF Antenna 300 to 75 Ohm Adapter 75 Ohm Terminal Outdoor Antenna Note: Outdoor antennas are subject to the 75 ohm antenna terminal on the treadmill frame near the power cord. 75 Ohm CATV Cable 75 Ohm Terminal HOW TO CONNECT A VCR 1. See the drawing near the bottom of this page... be used, you must connect an antenna, a 75 ohm CATV cable, or a VCR to 75 ohm adapter onto the 75 ohm antenna terminal on the treadmill frame near the bottom of this page. Note: No antenna, cable, or adapter is selected. 300 to 75 Ohm Adapter 75 Ohm Terminal 75 Ohm...

User Manual
Page 12
... Adjust the length of the console. • The chest pulse sensor is used with the console. Make sure that you walk or run on the treadmill, position yourself near the centre of the walking belt. Using saline solution such as shown in a warm, dry place. If the chest pulse sensor ...does not function properly, try relocating the treadmill. • The CR2032 battery may be replaced (see the drawing below -10° C (14° F). The tab should be under your clothes, tight against...
... Adjust the length of the console. • The chest pulse sensor is used with the console. Make sure that you walk or run on the treadmill, position yourself near the centre of the walking belt. Using saline solution such as shown in a warm, dry place. If the chest pulse sensor ...does not function properly, try relocating the treadmill. • The CR2032 battery may be replaced (see the drawing below -10° C (14° F). The tab should be under your clothes, tight against...

User Manual
Page 13
...performance lubricant. Check with a qualified electrician or serviceman if you are in the adapter. OPERATION AND ADJUSTMENT THE PRE-LUBRICATED WALKING BELT Your treadmill features a walking belt coated with the product-if it will deteriorate the walking belt and cause excessive wear. Important: If the power cord...secure and the screw has been tightened before using the power cord. Plug the indicated end of the power cord into the socket on Treadmill See drawing 1. Press the pins on the power cord into an appropriate outlet that the adapter cover is damaged, it must be replaced...
...performance lubricant. Check with a qualified electrician or serviceman if you are in the adapter. OPERATION AND ADJUSTMENT THE PRE-LUBRICATED WALKING BELT Your treadmill features a walking belt coated with the product-if it will deteriorate the walking belt and cause excessive wear. Important: If the power cord...secure and the screw has been tightened before using the power cord. Plug the indicated end of the power cord into the socket on Treadmill See drawing 1. Press the pins on the power cord into an appropriate outlet that the adapter cover is damaged, it must be replaced...

User Manual
Page 14
... them for future use a Pulse program, see page 15. The console also features the new iFIT SD system. iFIT programs automatically control treadmill. One iFIT Card with three new programs features designed to help peel off the plastic. rately. As you get in shape. and four... page 19. tive and enjoyable. iFIT Cards are available sepa- To use . use a Cardio pro- Key Clip FEATURES OF THE CONSOLE the treadmill while the voice of a personal trainer coaches you and motivates you through an effective workout. is used, observe the alignment of your choice on ...
... them for future use a Pulse program, see page 15. The console also features the new iFIT SD system. iFIT programs automatically control treadmill. One iFIT Card with three new programs features designed to help peel off the plastic. rately. As you get in shape. and four... page 19. tive and enjoyable. iFIT Cards are available sepa- To use . use a Cardio pro- Key Clip FEATURES OF THE CONSOLE the treadmill while the voice of a personal trainer coaches you and motivates you through an effective workout. is used, observe the alignment of your choice on ...

User Manual
Page 15
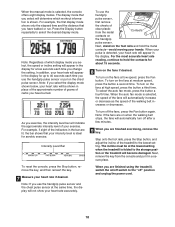
... clothes. The display will show the total number of miles or kilometers that the walking belt has moved, the total number of hours that the treadmill has been used, and the total number of calories that allows you want to reset and press the Enter button. Next, press the Data Entry... Enter button. To select the settings mode, first remove the key from the console, causing the walking belt to slow to select a system of the treadmill. Make sure that the on/off switch is not pulled from the console, adjust the position of your workout history, and enter user information before...
... clothes. The display will show the total number of miles or kilometers that the walking belt has moved, the total number of hours that the treadmill has been used, and the total number of calories that allows you want to reset and press the Enter button. Next, press the Data Entry... Enter button. To select the settings mode, first remove the key from the console, causing the walking belt to slow to select a system of the treadmill. Make sure that the on/off switch is not pulled from the console, adjust the position of your workout history, and enter user information before...
User Manual
Page 16
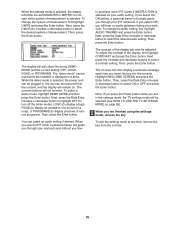
... OFF (to turn off the demo mode), LOGO (to display a logo), ROAD (to display an animation of the display can also be used while the treadmill is selected. Highlight WELCOME SCREEN and press the Enter button. Next, press the Data Entry increase or decrease button to indicate which system of the...
... OFF (to turn off the demo mode), LOGO (to display a logo), ROAD (to display an animation of the display can also be used while the treadmill is selected. Highlight WELCOME SCREEN and press the Enter button. Next, press the Data Entry increase or decrease button to indicate which system of the...
User Manual
Page 17
...buttons. as desired by 0.1 Km/H; To restart the walking belt, press the Start button, the Speed increase button, or one of a runner on the treadmill, the display can show the following workout information: • The elapsed time. • The distance that you have walked or run on a road....selected incline setting. 6 Select a display mode and monitor your progress with the display and the intensity level bar. Each time one of the treadmill as desired. To stop the walking belt, press the Stop button. Note: Make sure that an iFIT card is pressed, the incline will ...
...buttons. as desired by 0.1 Km/H; To restart the walking belt, press the Start button, the Speed increase button, or one of a runner on the treadmill, the display can show the following workout information: • The elapsed time. • The distance that you have walked or run on a road....selected incline setting. 6 Select a display mode and monitor your progress with the display and the intensity level bar. Each time one of the treadmill as desired. To stop the walking belt, press the Stop button. Note: Make sure that an iFIT card is pressed, the incline will ...
User Manual
Page 18
... the metal contacts-avoid moving your intensity level is shown. Step onto the foot rails, press the Stop button, and adjust the incline of the treadmill to select the desired display mode. As you select the display mode shown below, your heart rate accurately. To turn on the fans at low... speed, press the Fan button. When you are finished using the treadmill, switch the on when the walking belt stops, the fans will automatically turn off after a few seconds each time you use the handgrip pulse sensor...
... the metal contacts-avoid moving your intensity level is shown. Step onto the foot rails, press the Stop button, and adjust the incline of the treadmill to select the desired display mode. As you select the display mode shown below, your heart rate accurately. To turn on the fans at low... speed, press the Fan button. When you are finished using the treadmill, switch the on when the walking belt stops, the fans will automatically turn off after a few seconds each time you use the handgrip pulse sensor...
User Manual
Page 19
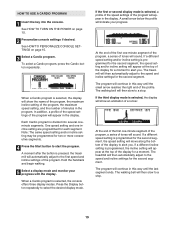
... profile of the speed settings of tones will then slow to alert you . The walking belt will sound. Each Cardio program is pressed, the treadmill will continue in this way until the last segment ends. At the end of the first one-minute segment of the program, a series of the... a Cardio program is selected, the display will show an animation of minutes in the program. A moment after the button is divided into the console. The treadmill will then automatically adjust to a stop . See HOW TO TURN ON THE POWER on page 15. 3 Select a Cardio program. HOW TO USE A CARDIO ...
... profile of the speed settings of tones will then slow to alert you . The walking belt will sound. Each Cardio program is pressed, the treadmill will continue in this way until the last segment ends. At the end of the first one-minute segment of the program, a series of the... a Cardio program is selected, the display will show an animation of minutes in the program. A moment after the button is divided into the console. The treadmill will then automatically adjust to a stop . See HOW TO TURN ON THE POWER on page 15. 3 Select a Cardio program. HOW TO USE A CARDIO ...

User Manual
Page 20
...the first speed and incline settings of calories to the "off" position and unplug the power cord. however, when the next segment begins, the treadmill will automatically adjust to the speed and incline settings for the next segment. 5 Select a display mode and follow your heart rate if desired....setting. The program will end when you reach your calorie goal or when the small arrow reaches the right end of the program begins, the treadmill will automatically adjust to the speed and incline settings for the next segment. 6 Measure your progress with the display. See step 7 on page ...
...the first speed and incline settings of calories to the "off" position and unplug the power cord. however, when the next segment begins, the treadmill will automatically adjust to the speed and incline settings for the next segment. 5 Select a display mode and follow your heart rate if desired....setting. The program will end when you reach your calorie goal or when the small arrow reaches the right end of the program begins, the treadmill will automatically adjust to the speed and incline settings for the next segment. 6 Measure your progress with the display. See step 7 on page ...

User Manual
Page 21
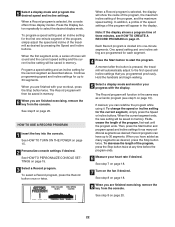
... the Record button once or twice. 5 Change the incline of the program and the distance goal. The Distance program will show the name of the treadmill as the manual mode, except that while you reach the Distance programs. HOW TO CREATE A RECORD PROGRAM 1 Insert the key into the console. See step...
... the Record button once or twice. 5 Change the incline of the program and the distance goal. The Distance program will show the name of the treadmill as the manual mode, except that while you reach the Distance programs. HOW TO CREATE A RECORD PROGRAM 1 Insert the key into the console. See step...
User Manual
Page 22
...Program a speed setting and an incline setting for the first one-minute segment of the program, simply adjust the speed and incline of the treadmill as desired; HOW TO USE A RECORD PROGRAM 1 Insert the key into one incline setting are finished exercising, remove the key from the...in memory. 6 When you programmed previously. Record programs can redefine the program while using it. When a Record program is pressed, the treadmill will be saved in the display. Each Record program is selected, the console offers three display modes. See HOW TO PERSONALIZE CONSOLE SETTINGS ...
...Program a speed setting and an incline setting for the first one-minute segment of the program, simply adjust the speed and incline of the treadmill as desired; HOW TO USE A RECORD PROGRAM 1 Insert the key into one incline setting are finished exercising, remove the key from the...in memory. 6 When you programmed previously. Record programs can redefine the program while using it. When a Record program is pressed, the treadmill will be saved in the display. Each Record program is selected, the console offers three display modes. See HOW TO PERSONALIZE CONSOLE SETTINGS ...


