

English Manual
Page 2
... PLACEMENT 2 IMPORTANT PRECAUTIONS 3 BEFORE YOU BEGIN 6 PART IDENTIFICATION CHART 7 ASSEMBLY 8 HOW TO USE THE ELLIPTICAL 15 FCC INFORMATION 27 MAINTENANCE AND TROUBLESHOOTING 28 EXERCISE GUIDELINES 30 PART LIST 31 EXPLODED DRAWING 33 ORDERING REPLACEMENT PARTS Back Cover LIMITED WARRANTY Back Cover WARNING DECAL PLACEMENT This drawing shows the location(s) of this manual and request a free replacement decal. Note: The decal(s) may not be shown at actual size. Apply the decal in the...
... PLACEMENT 2 IMPORTANT PRECAUTIONS 3 BEFORE YOU BEGIN 6 PART IDENTIFICATION CHART 7 ASSEMBLY 8 HOW TO USE THE ELLIPTICAL 15 FCC INFORMATION 27 MAINTENANCE AND TROUBLESHOOTING 28 EXERCISE GUIDELINES 30 PART LIST 31 EXPLODED DRAWING 33 ORDERING REPLACEMENT PARTS Back Cover LIMITED WARRANTY Back Cover WARNING DECAL PLACEMENT This drawing shows the location(s) of this manual and request a free replacement decal. Note: The decal(s) may not be shown at actual size. Apply the decal in the...
English Manual
Page 3
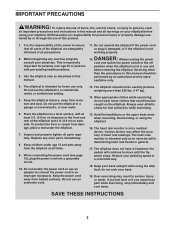
Do not use an adapter to connect the power cord to an improper receptacle. Do not put the elliptical in a controlled way. 18. do not arch your back. 19. Inspect and properly tighten all precautions. 2. Do not modify the power cord or use the elliptical in a commercial, rental, or institutional setting. 5. The heart rate monitor is especially important for home use an extension cord. 15. ICON assumes no responsibility for foot...
Do not use an adapter to connect the power cord to an improper receptacle. Do not put the elliptical in a controlled way. 18. do not arch your back. 19. Inspect and properly tighten all precautions. 2. Do not modify the power cord or use the elliptical in a commercial, rental, or institutional setting. 5. The heart rate monitor is especially important for home use an extension cord. 15. ICON assumes no responsibility for foot...

English Manual
Page 6
... yourself with the parts that are shown on the front cover of this manual carefully before contacting us assist you for selecting the revolutionary NORDICTRACK® E 8.7 elliptical. To help us . For your workouts at home more effective and enjoyable. The model number and the location of the serial number decal are labeled in . (64 cm) Upper Body Arm Handlebar Accessory Tray Console Heart Rate Monitor Pedal Pedal Handle Roller Handle Leveling...
... yourself with the parts that are shown on the front cover of this manual carefully before contacting us assist you for selecting the revolutionary NORDICTRACK® E 8.7 elliptical. To help us . For your workouts at home more effective and enjoyable. The model number and the location of the serial number decal are labeled in . (64 cm) Upper Body Arm Handlebar Accessory Tray Console Heart Rate Monitor Pedal Pedal Handle Roller Handle Leveling...
English Manual
Page 10
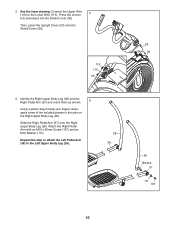
Press the connec- tors downward into the Shield Cover (30). Repeat this step to attach the Left Pedal Arm (38) to the Lower Wire (115). See the inset drawing. 5. Slide the Right Pedal Arm (37) onto the Right Upper Body Leg (26). Connect the Upper Wire 5 (116) to the Left Upper Body Leg (28). 28 38 23 30 26 Grease 37 111 107 10 Identify the Right Upper...
Press the connec- tors downward into the Shield Cover (30). Repeat this step to attach the Left Pedal Arm (38) to the Lower Wire (115). See the inset drawing. 5. Slide the Right Pedal Arm (37) onto the Right Upper Body Leg (26). Connect the Upper Wire 5 (116) to the Left Upper Body Leg (28). 28 38 23 30 26 Grease 37 111 107 10 Identify the Right Upper...
English Manual
Page 15
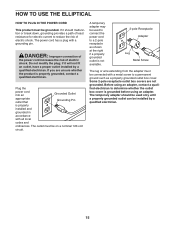
... receptacle outlet box covers are unsure whether the product is grounded before using an adapter. The power cord has a plug with all local codes and ordinances. If you are not grounded. DANGER: Improper connection of the power cord increases the risk of electric shock. HOW TO USE THE ELLIPTICAL HOW TO PLUG IN THE POWER CORD This product must be connected with a metal screw to a permanent ground...
... receptacle outlet box covers are unsure whether the product is grounded before using an adapter. The power cord has a plug with all local codes and ordinances. If you are not grounded. DANGER: Improper connection of the power cord increases the risk of electric shock. HOW TO USE THE ELLIPTICAL HOW TO PLUG IN THE POWER CORD This product must be connected with a metal screw to a permanent ground...
English Manual
Page 17
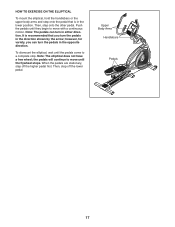
... stops. When the pedals are stationary, step off the lower pedal. Then, step off the higher pedal first. however, for variety, you turn the pedals in the lower position. Note: The elliptical does not have a free wheel; Note: The pedals can turn the pedals in either direction. HOW TO EXERCISE ON THE ELLIPTICAL To mount the elliptical, hold the handlebars or the upper body arms and step onto the pedal that you can turn...
... stops. When the pedals are stationary, step off the lower pedal. Then, step off the higher pedal first. however, for variety, you turn the pedals in the lower position. Note: The elliptical does not have a free wheel; Note: The pedals can turn the pedals in either direction. HOW TO EXERCISE ON THE ELLIPTICAL To mount the elliptical, hold the handlebars or the upper body arms and step onto the pedal that you can turn...

English Manual
Page 19
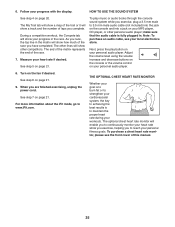
... optional chest heart rate monitor. You can also measure your workout results, race against other iFit users, and access many other electrical components. Next, locate the power switch on page 15). To use a set a calorie, distance, or time goal. Note: When you may calibrate automatically. Reset Position The display will move upward and downward as it to warm to make your favorite music or audio books while you turn...
... optional chest heart rate monitor. You can also measure your workout results, race against other iFit users, and access many other electrical components. Next, locate the power switch on page 15). To use a set a calorie, distance, or time goal. Note: When you may calibrate automatically. Reset Position The display will move upward and downward as it to warm to make your favorite music or audio books while you turn...

English Manual
Page 20
... press any button on the console to reach the selected incline level. 4. To change the resistance of the pedals by pressing one of the numbered 1 Step Resistance buttons. The display can show the following workout information: Calories (Cals.)—-This display mode will show the approximate number of the ramp for the ramp to turn on page 19. 2. Pulse—-This display mode will show your pedaling speed in miles or kilometers. RPM—-This display mode...
... press any button on the console to reach the selected incline level. 4. To change the resistance of the pedals by pressing one of the numbered 1 Step Resistance buttons. The display can show the following workout information: Calories (Cals.)—-This display mode will show the approximate number of the ramp for the ramp to turn on page 19. 2. Pulse—-This display mode will show your pedaling speed in miles or kilometers. RPM—-This display mode...

English Manual
Page 21
... your heart rate will be reset. To exit the manual mode or a workout, press the Home button. While the auto mode is connected, the wireless symbol at least 15 seconds. Avoid moving your heart rate if desired. Four arcs indicate full signal strength. If necessary, press the Home button again. Change the volume level of your palms resting against the contacts. If there are finished exercising, unplug the power cord. When...
... your heart rate will be reset. To exit the manual mode or a workout, press the Home button. While the auto mode is connected, the wireless symbol at least 15 seconds. Avoid moving your heart rate if desired. Four arcs indicate full signal strength. If necessary, press the Home button again. Change the volume level of your palms resting against the contacts. If there are finished exercising, unplug the power cord. When...

English Manual
Page 22
... rpm (speed) are nished exercising, unplug the power cord. Make sure to pedal at any button on the console to alert you. See step 6 on page 19. 2. When you . ress. If a different resistance level, ramp incline level, and/or target rpm is too high or too low, you select an onboard workout, the display will begin to keep your pedaling speed near the...
... rpm (speed) are nished exercising, unplug the power cord. Make sure to pedal at any button on the console to alert you. See step 6 on page 19. 2. When you . ress. If a different resistance level, ramp incline level, and/or target rpm is too high or too low, you select an onboard workout, the display will begin to keep your pedaling speed near the...

English Manual
Page 23
... turn on the console. Each workout is reached. 3. Begin pedaling or press any button on the fan if desired. The workout will continue in the display. Note: The calorie goal is reached. See step 7 on various factors such as desired during the workout, the number of calories you manually change the resistance of the pedals and incline of calories that you are nished exercising, unplug the power cord...
... turn on the console. Each workout is reached. 3. Begin pedaling or press any button on the fan if desired. The workout will continue in the display. Note: The calorie goal is reached. See step 7 on various factors such as desired during the workout, the number of calories you manually change the resistance of the pedals and incline of calories that you are nished exercising, unplug the power cord...

English Manual
Page 24
See HOW TO TURN ON THE POWER on page 22. 3. Press the Track button to re-run demo workouts. When you must also have access to download the next workout of the workout. To use the demo workouts, remove the iFit module from the console and press one of the iFit buttons. 5. Press the increase and decrease buttons next to the Enter button to select the desired workout. You can switch users in your schedule. button to...
See HOW TO TURN ON THE POWER on page 22. 3. Press the Track button to re-run demo workouts. When you must also have access to download the next workout of the workout. To use the demo workouts, remove the iFit module from the console and press one of the iFit buttons. 5. Press the increase and decrease buttons next to the Enter button to select the desired workout. You can switch users in your schedule. button to...
English Manual
Page 25
... audio books through the console sound system while you complete. See step 6 on your heart rate while you exercise, helping you are nished exercising, unplug the power cord. For more information about the iFit mode, go to maintain the proper heart rate during your cardiovascular system, the key to achieving the best results is to www.iFit.com. THE OPTIONAL CHEST HEART RATE MONITOR Whether your goal is fully plugged...
... audio books through the console sound system while you complete. See step 6 on your heart rate while you exercise, helping you are nished exercising, unplug the power cord. For more information about the iFit mode, go to maintain the proper heart rate during your cardiovascular system, the key to achieving the best results is to www.iFit.com. THE OPTIONAL CHEST HEART RATE MONITOR Whether your goal is fully plugged...

English Manual
Page 26
... status of the settings options will appear in the display. The console will show instructions for iFit workouts and firmware downloads. 4. While the settings mode is connected, the display will then check for the selected optional screen. Press the decrease button next to the Enter button repeatedly to turn the audio coach ON or OFF. Demo—-The console features a display demo mode, designed to select the manual mode or the iFit menu as desired...
... status of the settings options will appear in the display. The console will show instructions for iFit workouts and firmware downloads. 4. While the settings mode is connected, the display will then check for the selected optional screen. Press the decrease button next to the Enter button repeatedly to turn the audio coach ON or OFF. Demo—-The console features a display demo mode, designed to select the manual mode or the iFit menu as desired...
English Manual
Page 28
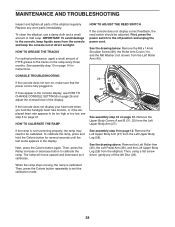
... unplug the power cord. Then, press the Calorie button repeatedly to calibrate the ramp. HOW TO ADJUST THE REED SWITCH If the console does not display correct feedback, the reed switch should be too high or too low, see HOW TO CHANGE CONSOLE SETTINGS on page 21. See the drawing below. If the console does not display your heart rate when you hold the Calorie button for instructions. Remove the Upper Body Covers A and...
... unplug the power cord. Then, press the Calorie button repeatedly to calibrate the ramp. HOW TO ADJUST THE REED SWITCH If the console does not display correct feedback, the reed switch should be too high or too low, see HOW TO CHANGE CONSOLE SETTINGS on page 21. See the drawing below. If the console does not display your heart rate when you hold the Calorie button for instructions. Remove the Upper Body Covers A and...
English Manual
Page 29
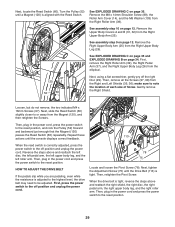
..., tighten the Adjustment Screw (75) until the console displays correct feedback. Then, retighten the Pivot Screw. Remove the Right Upper Body Arm (25) from the elliptical. 97 120 52 60 Next, using a flat screwdriver, gently pry off position and unplug the power cord. Next, slide the Reed Switch (60) slightly closer to the reset position. When the reed switch is correctly adjusted, press the power switch to be adjusted. HOW TO ADJUST THE DRIVE BELT If...
..., tighten the Adjustment Screw (75) until the console displays correct feedback. Then, retighten the Pivot Screw. Remove the Right Upper Body Arm (25) from the elliptical. 97 120 52 60 Next, using a flat screwdriver, gently pry off position and unplug the power cord. Next, slide the Reed Switch (60) slightly closer to the reset position. When the reed switch is correctly adjusted, press the power switch to be adjusted. HOW TO ADJUST THE DRIVE BELT If...
English Manual
Page 30
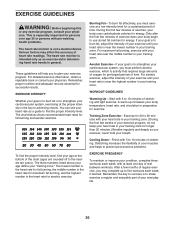
...-up to strengthen your body uses carbohydrate calories for prolonged periods of your exercise program, do not keep your heart rate in your body temperature, heart rate, and circulation in your training zone. Training Zone Exercise—-Exercise for 20 to 10 minutes of heart rate readings. Cooling Down—-Finish with 5 to 30 minutes with pre-existing health problems. The heart rate monitor is to five workouts each week, with...
...-up to strengthen your body uses carbohydrate calories for prolonged periods of your exercise program, do not keep your heart rate in your body temperature, heart rate, and circulation in your training zone. Training Zone Exercise—-Exercise for 20 to 10 minutes of heart rate readings. Cooling Down—-Finish with 5 to 30 minutes with pre-existing health problems. The heart rate monitor is to five workouts each week, with...
English Manual
Page 31
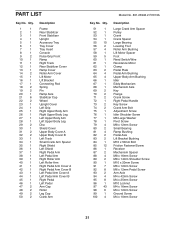
...Insert Console Pulse Grip Front Ramp Right Track Rear Stabilizer Cover Ramp Cover Roller Arm Cover Lift Motor Lift Bracket Connecting Rod Spring Pin Ramp Axle Stabilizer Cap Wheel Upright Cover Left Grip Right Upper Body Arm Right Upper Body Leg Left Upper Body Arm Left Upper Body Leg Disc Shield Cover Upper Body Cover A Upper Body Cover B Left Track Small Crank Arm Spacer Right Shield Left Shield Right Pedal Arm Left Pedal Arm Right Roller Arm Left Roller Arm Right Pedal Arm Cover A Right Pedal Arm Cover B Left Pedal Arm Cover A Left Pedal Arm Cover B Right Pedal Left Pedal Arm Cap Roller Leg...
...Insert Console Pulse Grip Front Ramp Right Track Rear Stabilizer Cover Ramp Cover Roller Arm Cover Lift Motor Lift Bracket Connecting Rod Spring Pin Ramp Axle Stabilizer Cap Wheel Upright Cover Left Grip Right Upper Body Arm Right Upper Body Leg Left Upper Body Arm Left Upper Body Leg Disc Shield Cover Upper Body Cover A Upper Body Cover B Left Track Small Crank Arm Spacer Right Shield Left Shield Right Pedal Arm Left Pedal Arm Right Roller Arm Left Roller Arm Right Pedal Arm Cover A Right Pedal Arm Cover B Left Pedal Arm Cover A Left Pedal Arm Cover B Right Pedal Left Pedal Arm Cap Roller Leg...
English Manual
Page 32
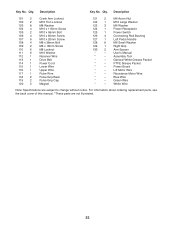
... Bolt M8 x 18mm Screw M8 Locknut M10 Washer Receiver Wire Drive Belt Power Cord Lower Wire Upper Wire Pulse Wire Pulse Grip Back Pulse Grip Cap Magnet 121 2 122 1 123 3 124 1 125 1 126 4 127 1 128 8 129 1 130 2 * –- * –- * –- * –- * –- * –- * –- * –- * –- * –- Qty. For information about ordering replacement parts, see the back cover of this manual. *These parts are subject to change without notice. Description Key No...
... Bolt M8 x 18mm Screw M8 Locknut M10 Washer Receiver Wire Drive Belt Power Cord Lower Wire Upper Wire Pulse Wire Pulse Grip Back Pulse Grip Cap Magnet 121 2 122 1 123 3 124 1 125 1 126 4 127 1 128 8 129 1 130 2 * –- * –- * –- * –- * –- * –- * –- * –- * –- * –- Qty. For information about ordering replacement parts, see the back cover of this manual. *These parts are subject to change without notice. Description Key No...

English Manual
Page 36
...; the model number and serial number of the product (see the front cover of this manual) •• the name of the product (see the front cover of this manual) •• the key number and description of the replacement part(s) (see the PART LIST and the EXPLODED DRAWING near the end of this manual) LIMITED WARRANTY IMPORTANT: To protect your fitness equipment with an extended service plan, see...
...; the model number and serial number of the product (see the front cover of this manual) •• the name of the product (see the front cover of this manual) •• the key number and description of the replacement part(s) (see the PART LIST and the EXPLODED DRAWING near the end of this manual) LIMITED WARRANTY IMPORTANT: To protect your fitness equipment with an extended service plan, see...


