
Canadian English Manual
Page 2
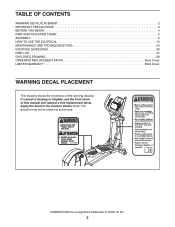
...(s) may not be shown at actual size. If a decal is a registered trademark of ICON IP, Inc. 2 ATTENTION Part # 166295 NORDICTRACK is missing or illegible, see the front cover of the warning decal(s). TABLE OF CONTENTS WARNING DECAL PLACEMENT 2 IMPORTANT PRECAUTIONS 3 BEFORE YOU ...BEGIN 4 PART IDENTIFICATION CHART 5 ASSEMBLY 6 HOW TO USE THE ELLIPTICAL 15 MAINTENANCE AND TROUBLESHOOTING 24 EXERCISE GUIDELINES 26 PART LIST 27 EXPLODED DRAWING 29 ORDERING REPLACEMENT PARTS Back Cover LIMITED WARRANTY Back Cover...
...(s) may not be shown at actual size. If a decal is a registered trademark of ICON IP, Inc. 2 ATTENTION Part # 166295 NORDICTRACK is missing or illegible, see the front cover of the warning decal(s). TABLE OF CONTENTS WARNING DECAL PLACEMENT 2 IMPORTANT PRECAUTIONS 3 BEFORE YOU ...BEGIN 4 PART IDENTIFICATION CHART 5 ASSEMBLY 6 HOW TO USE THE ELLIPTICAL 15 MAINTENANCE AND TROUBLESHOOTING 24 EXERCISE GUIDELINES 26 PART LIST 27 EXPLODED DRAWING 29 ORDERING REPLACEMENT PARTS Back Cover LIMITED WARRANTY Back Cover...
Canadian English Manual
Page 3
... of clearance in the front and rear of batteries in general. 13. Reduce your back straight while using the elliptical; Keep children under the elliptical. 7. Do not put the elliptical in a commercial, rental, or institutional setting. 5. Various factors may result in a controlled way. 6. the ... to ensure that could become caught on a level surface, with at all local codes and ordinances. 3 Place the elliptical on the elliptical. The elliptical does not have a freewheel; To protect the floor or carpet from damage, place a mat under age 12 and pets...
... of clearance in the front and rear of batteries in general. 13. Reduce your back straight while using the elliptical; Keep children under the elliptical. 7. Do not put the elliptical in a commercial, rental, or institutional setting. 5. Various factors may result in a controlled way. 6. the ... to ensure that could become caught on a level surface, with at all local codes and ordinances. 3 Place the elliptical on the elliptical. The elliptical does not have a freewheel; To protect the floor or carpet from damage, place a mat under age 12 and pets...
Canadian English Manual
Page 4
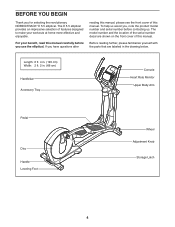
... manual, please see the front cover of this manual. If you , note the product model number and serial number before you for selecting the revolutionary NORDICTRACK® E 5.5 elliptical. To help us . Before reading further, please familiarize yourself with the parts that are shown on the front cover of the serial number decal...
... manual, please see the front cover of this manual. If you , note the product model number and serial number before you for selecting the revolutionary NORDICTRACK® E 5.5 elliptical. To help us . Before reading further, please familiarize yourself with the parts that are shown on the front cover of the serial number decal...
Canadian English Manual
Page 6
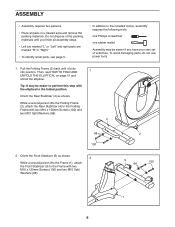
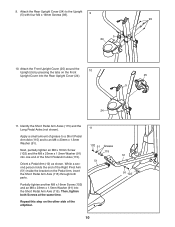
...“"R”" or “"Right.”" •• To identify small parts, see HOW TO FOLD AND 1 UNFOLD THE ELLIPTICAL on page 15 and unfold the elliptical. Pull the Folding Frame (2) back until you have your own set of the packing materials until it locks into position. Orient the... x 120mm Screws (100) and two M10 Split Washers (88). 2 3 88 100 1 6 Tip: It may be easier to the Folding Frame with the elliptical in a cleared area and remove the packing materials. To avoid damaging parts, do not use power tools. 1. While a second person lifts the Folding Frame (2), ...
...“"R”" or “"Right.”" •• To identify small parts, see HOW TO FOLD AND 1 UNFOLD THE ELLIPTICAL on page 15 and unfold the elliptical. Pull the Folding Frame (2) back until you have your own set of the packing materials until it locks into position. Orient the... x 120mm Screws (100) and two M10 Split Washers (88). 2 3 88 100 1 6 Tip: It may be easier to the Folding Frame with the elliptical in a cleared area and remove the packing materials. To avoid damaging parts, do not use power tools. 1. While a second person lifts the Folding Frame (2), ...
Canadian English Manual
Page 10
... M8 x 23mm x 1.5mm Washer (91). Next, partially tighten an M8 x 16mm Screw (102) and the M8 x 23mm x 1.5mm Washer (91) into one end of the elliptical. 11 102 91 Grease 115 51 12 91 102 10 Then, tighten both parts. Identify the Short Pedal Arm Axles (115) and the Long Pedal...
... M8 x 23mm x 1.5mm Washer (91). Next, partially tighten an M8 x 16mm Screw (102) and the M8 x 23mm x 1.5mm Washer (91) into one end of the elliptical. 11 102 91 Grease 115 51 12 91 102 10 Then, tighten both parts. Identify the Short Pedal Arm Axles (115) and the Long Pedal...
Canadian English Manual
Page 11
... the Left Pedal (not shown) to the right Pedal Arm (12) with an M4 x 16mm Screw (93). While a second person holds the end of the elliptical. 112 102 91 12 6 106 Grease 91 102 14. Attach the Left Inner and Outer Leg Covers (49, 50) in the same way. 14 12...
... the Left Pedal (not shown) to the right Pedal Arm (12) with an M4 x 16mm Screw (93). While a second person holds the end of the elliptical. 112 102 91 12 6 106 Grease 91 102 14. Attach the Left Inner and Outer Leg Covers (49, 50) in the same way. 14 12...
Canadian English Manual
Page 12
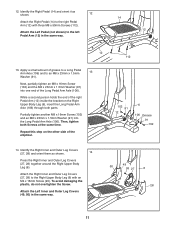
15. Repeat this step on the other side of the elliptical before tightening the other four Screws. Tighten the six M8 x 45mm Bolts (104). 16 See step 5. Tighten the six M8 x 16mm Screws (102). Tip: Tighten ... the Left Rear and Front Leg Covers (31, 32) in the same way. Remove and discard the cap (not shown) on the front of the elliptical. 45 111 44 46 16. Attach the Right Front Leg Cover (30) to the right Adjustment Pin (44) with two M4 x 16mm Screws (93). Then...
15. Repeat this step on the other side of the elliptical before tightening the other four Screws. Tighten the six M8 x 45mm Bolts (104). 16 See step 5. Tighten the six M8 x 16mm Screws (102). Tip: Tighten ... the Left Rear and Front Leg Covers (31, 32) in the same way. Remove and discard the cap (not shown) on the front of the elliptical. 45 111 44 46 16. Attach the Right Front Leg Cover (30) to the right Adjustment Pin (44) with two M4 x 16mm Screws (93). Then...
Canadian English Manual
Page 14
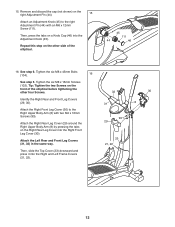
... Screws (93). 21 33 93 11 22. 20. Attach the Console Cover (11) to the Pulse Wires (79). Make sure that all parts of the elliptical. 22 59 Note: To plug the Power Adapter (59) into the Handlebar (10). Tip: Avoid pinching the wires. Plug the Power Adapter (59) into the.... Insert the excess wire into the Console (33) or into an outlet, see HOW TO PLUG IN THE POWER ADAPTER on the frame of the elliptical are properly tightened. To protect the floor or carpet from damage, place a mat under the...
... Screws (93). 21 33 93 11 22. 20. Attach the Console Cover (11) to the Pulse Wires (79). Make sure that all parts of the elliptical. 22 59 Note: To plug the Power Adapter (59) into the Handlebar (10). Tip: Avoid pinching the wires. Plug the Power Adapter (59) into the.... Insert the excess wire into the Console (33) or into an outlet, see HOW TO PLUG IN THE POWER ADAPTER on the frame of the elliptical are properly tightened. To protect the floor or carpet from damage, place a mat under the...
Canadian English Manual
Page 15
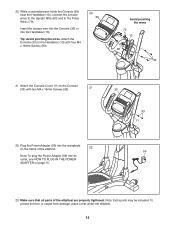
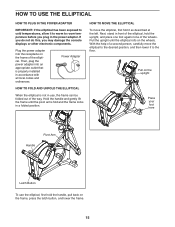
... into the receptacle on the frame, press the latch button, and lower the frame. 15 Hold the handle and gently lift the frame until the elliptical rolls on the wheels. Pull the upright until the pivot arms fold and the frame locks in a folded position. Power Adapter HOW TO FOLD AND... UNFOLD THE ELLIPTICAL When the elliptical is properly installed in front of the elliptical, hold the handle, pull back on the frame of the wheels. Pull on the upright Place your foot here Pivot...
... into the receptacle on the frame, press the latch button, and lower the frame. 15 Hold the handle and gently lift the frame until the elliptical rolls on the wheels. Pull the upright until the pivot arms fold and the frame locks in a folded position. Power Adapter HOW TO FOLD AND... UNFOLD THE ELLIPTICAL When the elliptical is properly installed in front of the elliptical, hold the handle, pull back on the frame of the wheels. Pull on the upright Place your foot here Pivot...

Canadian English Manual
Page 16
... lowest position. It is eliminated. however, for variety, you turn in the direction shown by the arrow; HOW TO LEVEL THE ELLIPTICAL If the elliptical rocks slightly on the other pedal. Crank Arm Pedals Adjust the stride length on your floor during use , turn one of the... pedals until the pedals come to move until the rocking motion is recommended that both of the elliptical are stationary, step off the lowest pedal. Leveling Feet Leveling Foot To dismount the elliptical, wait until they begin to a complete stop. Then, step off the highest pedal first. ...
... lowest position. It is eliminated. however, for variety, you turn in the direction shown by the arrow; HOW TO LEVEL THE ELLIPTICAL If the elliptical rocks slightly on the other pedal. Crank Arm Pedals Adjust the stride length on your floor during use , turn one of the... pedals until the pedals come to move until the rocking motion is recommended that both of the elliptical are stationary, step off the lowest pedal. Leveling Feet Leveling Foot To dismount the elliptical, wait until they begin to a complete stop. Then, step off the highest pedal first. ...
Canadian English Manual
Page 22
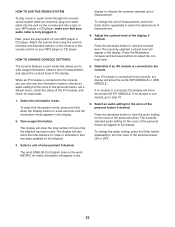
...your MP3 player or CD player; Press the decrease button to the console. The console features a user mode that has been pedaled on the elliptical. 5. The display will show the words WIFI MODULE or USB MODULE. Press the decrease button to select the desired unit of measurement. 4. ...player or CD player. The currently selected audio setting for a few seconds until the information mode appears in the display. make sure that the elliptical has been used. To change the audio setting, press the Enter button repeatedly to view usage information, select a unit of measurement, and ...
...your MP3 player or CD player; Press the decrease button to the console. The console features a user mode that has been pedaled on the elliptical. 5. The display will show the words WIFI MODULE or USB MODULE. Press the decrease button to select the desired unit of measurement. 4. ...player or CD player. The currently selected audio setting for a few seconds until the information mode appears in the display. make sure that the elliptical has been used. To change the audio setting, press the Enter button repeatedly to view usage information, select a unit of measurement, and ...
Canadian English Manual
Page 24
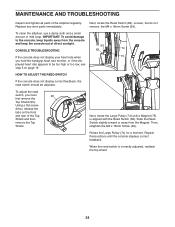
driver, release the tabs on page 19. To clean the elliptical, use a damp cloth and a small amount of the elliptical regularly. To adjust the reed switch, you hold the handgrip heart rate monitor, or if the dis- Rotate the Large Pulley (74) for a moment. MAINTENANCE ...
driver, release the tabs on page 19. To clean the elliptical, use a damp cloth and a small amount of the elliptical regularly. To adjust the reed switch, you hold the handgrip heart rate monitor, or if the dis- Rotate the Large Pulley (74) for a moment. MAINTENANCE ...


