

Canadian English Manual
Page 1
Serial Number Decal (under frame) QUESTIONS? CALL TOLL-FREE: 1-888-936-4266 Mon.–-Fri. 7:30 until 16:30 ET (excluding holidays) OR E-MAIL US: [email protected] USER’'S MANUAL CAUTION Read all precautions and instructions in the space above for future reference. Model No. 29843.0 Serial No. Keep this equipment. Write the serial number in this manual before using this manual for reference. If you have questions, or if parts are damaged or missing, PLEASE CONTACT OUR CUSTOMER SERVICE DEPARTMENT DIRECTLY. www.nordictrack.com
Serial Number Decal (under frame) QUESTIONS? CALL TOLL-FREE: 1-888-936-4266 Mon.–-Fri. 7:30 until 16:30 ET (excluding holidays) OR E-MAIL US: [email protected] USER’'S MANUAL CAUTION Read all precautions and instructions in the space above for future reference. Model No. 29843.0 Serial No. Keep this equipment. Write the serial number in this manual before using this manual for reference. If you have questions, or if parts are damaged or missing, PLEASE CONTACT OUR CUSTOMER SERVICE DEPARTMENT DIRECTLY. www.nordictrack.com
Canadian English Manual
Page 2
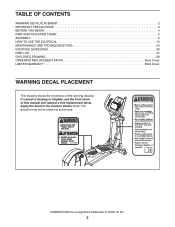
... size. If a decal is a registered trademark of the warning decal(s). Apply the decal in the location shown. TABLE OF CONTENTS WARNING DECAL PLACEMENT 2 IMPORTANT PRECAUTIONS 3 BEFORE YOU BEGIN 4 PART IDENTIFICATION CHART 5 ASSEMBLY 6 HOW TO USE THE ELLIPTICAL 15 MAINTENANCE AND TROUBLESHOOTING 24 EXERCISE GUIDELINES 26 PART LIST 27 EXPLODED DRAWING 29 ORDERING REPLACEMENT PARTS Back Cover LIMITED WARRANTY Back Cover WARNING DECAL PLACEMENT This drawing shows the location(s) of ICON...
... size. If a decal is a registered trademark of the warning decal(s). Apply the decal in the location shown. TABLE OF CONTENTS WARNING DECAL PLACEMENT 2 IMPORTANT PRECAUTIONS 3 BEFORE YOU BEGIN 4 PART IDENTIFICATION CHART 5 ASSEMBLY 6 HOW TO USE THE ELLIPTICAL 15 MAINTENANCE AND TROUBLESHOOTING 24 EXERCISE GUIDELINES 26 PART LIST 27 EXPLODED DRAWING 29 ORDERING REPLACEMENT PARTS Back Cover LIMITED WARRANTY Back Cover WARNING DECAL PLACEMENT This drawing shows the location(s) of ICON...
Canadian English Manual
Page 3
.... Replace any exercise program, consult your back. 15. Wear appropriate clothes while exercising; The heart rate monitor is intended only as described in a controlled way. 6. Inspect and properly tighten all local codes and ordinances. 3 If you feel faint or if you experience pain while exercising, stop immediately and cool down. 16. Hold the handlebars or the upper body arms when mounting, dismounting, or using the elliptical...
.... Replace any exercise program, consult your back. 15. Wear appropriate clothes while exercising; The heart rate monitor is intended only as described in a controlled way. 6. Inspect and properly tighten all local codes and ordinances. 3 If you feel faint or if you experience pain while exercising, stop immediately and cool down. 16. Hold the handlebars or the upper body arms when mounting, dismounting, or using the elliptical...
Canadian English Manual
Page 4
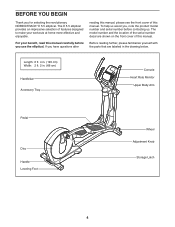
... your workouts at home more effective and enjoyable. To help us . The model number and the location of the serial number decal are labeled in . (66 cm) Handlebar Accessory Tray Console Heart Rate Monitor Upper Body Arm Pedal Disc Handle Leveling Foot Wheel Adjustment Knob Storage Latch 4 If you for selecting the revolutionary NORDICTRACK® E 5.5 elliptical. BEFORE YOU BEGIN Thank you have questions after reading this manual, please see the front cover...
... your workouts at home more effective and enjoyable. To help us . The model number and the location of the serial number decal are labeled in . (66 cm) Handlebar Accessory Tray Console Heart Rate Monitor Upper Body Arm Pedal Disc Handle Leveling Foot Wheel Adjustment Knob Storage Latch 4 If you for selecting the revolutionary NORDICTRACK® E 5.5 elliptical. BEFORE YOU BEGIN Thank you have questions after reading this manual, please see the front cover...
Canadian English Manual
Page 6
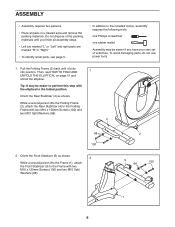
... Phillips screwdriver one rubber mallet Assembly may be easier to perform this step with the elliptical in a cleared area and remove the packing materials. Tip: It may be easier if you nish all parts in the folded position. Pull the Folding Frame (2) back until you have your own set of wrenches. Orient the Rear Stabilizer (4) as shown. 2 While...
... Phillips screwdriver one rubber mallet Assembly may be easier to perform this step with the elliptical in a cleared area and remove the packing materials. Tip: It may be easier if you nish all parts in the folded position. Pull the Folding Frame (2) back until you have your own set of wrenches. Orient the Rear Stabilizer (4) as shown. 2 While...
Canadian English Manual
Page 8
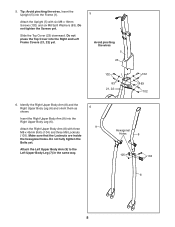
... (1). Identify the Right Upper Body Arm (8) and the Right Upper Body Leg (6) and orient them as shown. Insert the Upright (5) into the Right Upper Body Leg (6). 5. Do not tighten the Screws yet. Slide the Top Cover (23) downward. Make sure that the Locknuts are inside the hexagonal holes. Tip: Avoid pinching the wires. Do not press the Top Cover into the Right and...
... (1). Identify the Right Upper Body Arm (8) and the Right Upper Body Leg (6) and orient them as shown. Insert the Upright (5) into the Right Upper Body Leg (6). 5. Do not tighten the Screws yet. Slide the Top Cover (23) downward. Make sure that the Locknuts are inside the hexagonal holes. Tip: Avoid pinching the wires. Do not press the Top Cover into the Right and...
Canadian English Manual
Page 12
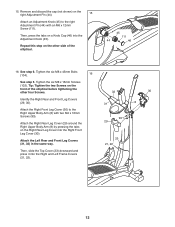
... Attach an Adjustment Knob (45) to the Right Upper Body Arm (8) with an M6 x 12mm Screw (111). Remove and discard the cap (not shown) on the Right Rear Leg Cover into the Adjustment Knob (45). Attach the Right Front Leg Cover (30) to the right Adjustment Pin (44) with two M4 x 16mm Screws (93). Then, press the tabs on the other four Screws. Tighten the six M8 x 45mm Bolts (104). 16 See step...
... Attach an Adjustment Knob (45) to the Right Upper Body Arm (8) with an M6 x 12mm Screw (111). Remove and discard the cap (not shown) on the Right Rear Leg Cover into the Adjustment Knob (45). Attach the Right Front Leg Cover (30) to the right Adjustment Pin (44) with two M4 x 16mm Screws (93). Then, press the tabs on the other four Screws. Tighten the six M8 x 45mm Bolts (104). 16 See step...
Canadian English Manual
Page 14
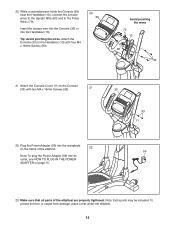
... HOW TO PLUG IN THE POWER ADAPTER on the frame of the elliptical are properly tightened. Tip: Avoid pinching the wires. While a second person holds the Console (33) near the Handlebar (10), connect the console wires to the Upright Wire (60) and to the Handlebar (10) with two M4 x 16mm Screws (93). 21 33 93 11 22. Attach the Console (33) to the Pulse Wires (79). To...
... HOW TO PLUG IN THE POWER ADAPTER on the frame of the elliptical are properly tightened. Tip: Avoid pinching the wires. While a second person holds the Console (33) near the Handlebar (10), connect the console wires to the Upright Wire (60) and to the Handlebar (10) with two M4 x 16mm Screws (93). 21 33 93 11 22. Attach the Console (33) to the Pulse Wires (79). To...
Canadian English Manual
Page 15
... here Pivot Arm Handle Latch Button To use , the frame can be folded out of a second person, carefully move the elliptical, first fold it to warm to room temperature before you may damage the console displays or other electronic components. With the help of the way. Plug the power adapter into an appropriate outlet that is not in use the elliptical, first hold the upright, and...
... here Pivot Arm Handle Latch Button To use , the frame can be folded out of a second person, carefully move the elliptical, first fold it to warm to room temperature before you may damage the console displays or other electronic components. With the help of the way. Plug the power adapter into an appropriate outlet that is not in use the elliptical, first hold the upright, and...

Canadian English Manual
Page 16
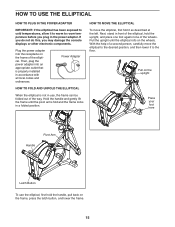
... continue to move until the pedals come to move freely. Next, step onto the other side of the leveling feet beneath the rear stabilizer until they begin to a complete stop. the pedals will move with a continuous motion. Crank Arm Pedals Adjust the stride length on your floor during use , turn the crank arms in the hole. Note: The crank arms can turn one of the holes in either direction. Then, tighten the adjustment knob.
... continue to move until the pedals come to move freely. Next, step onto the other side of the leveling feet beneath the rear stabilizer until they begin to a complete stop. the pedals will move with a continuous motion. Crank Arm Pedals Adjust the stride length on your floor during use , turn the crank arms in the hole. Note: The crank arms can turn one of the holes in either direction. Then, tighten the adjustment knob.
Canadian English Manual
Page 17
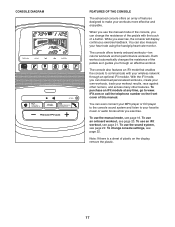
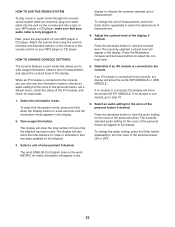
... 22. Each workout automatically changes the resistance of the pedals as it guides you exercise. To use the sound system, see page 18. To use an iFit workout, see page 22. Note: If there is a sheet of plastic on the front cover of this manual. CONSOLE DIAGRAM FEATURES OF THE CONSOLE The advanced console offers an array of features designed to make your heart rate using the handgrip heart rate monitor. You...
... 22. Each workout automatically changes the resistance of the pedals as it guides you exercise. To use the sound system, see page 18. To use an iFit workout, see page 22. Note: If there is a sheet of plastic on the front cover of this manual. CONSOLE DIAGRAM FEATURES OF THE CONSOLE The advanced console offers an array of features designed to make your heart rate using the handgrip heart rate monitor. You...
Canadian English Manual
Page 18
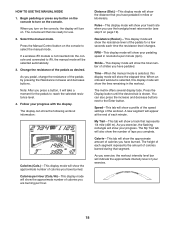
When you use . 2. Press the Manual Control button on . Follow your pedaling speed in miles or kilometers. Pulse—-This display mode will show your exercise. 18 Calorie—-This tab will show the approximate amount of calories you exercise, the workout intensity level bar will show your heart rate when you turn on the console, the display will turn on page 19). As you have burned. Select the manual mode. As you exercise, the...
When you use . 2. Press the Manual Control button on . Follow your pedaling speed in miles or kilometers. Pulse—-This display mode will show your exercise. 18 Calorie—-This tab will show the approximate amount of calories you exercise, the workout intensity level bar will show your heart rate when you turn on the console, the display will turn on page 19). As you have burned. Select the manual mode. As you exercise, the...

Canadian English Manual
Page 19
... you are positioned as described. Press the Home button to return to the default menu (see HOW TO CHANGE CONSOLE SETTINGS on the handgrip heart rate monitor, remove the plastic. When a wireless iFit module is detected, a heart symbol in the display. Change the volume level of the console by pressing the Volume increase and decrease buttons. 5. When your hands are finished exercising, the console will turn off automatically. For optimal...
... you are positioned as described. Press the Home button to return to the default menu (see HOW TO CHANGE CONSOLE SETTINGS on the handgrip heart rate monitor, remove the plastic. When a wireless iFit module is detected, a heart symbol in the display. Change the volume level of the console by pressing the Volume increase and decrease buttons. 5. When your hands are finished exercising, the console will turn off automatically. For optimal...
Canadian English Manual
Page 20
... can manually override the setting by pressing the Resistance buttons. If the resistance level for the next segment. The workout will be slower than the target speed. The time will turn on. Measure your pace. When you turn on the console, the display will flash in the display. 3. HOW TO USE AN ONBOARD WORKOUT 1. When a downward-pointing arrow appears, decrease your heart rate if desired. Your actual pedaling speed...
... can manually override the setting by pressing the Resistance buttons. If the resistance level for the next segment. The workout will be slower than the target speed. The time will turn on. Measure your pace. When you turn on the console, the display will flash in the display. 3. HOW TO USE AN ONBOARD WORKOUT 1. When a downward-pointing arrow appears, decrease your heart rate if desired. Your actual pedaling speed...
Canadian English Manual
Page 21
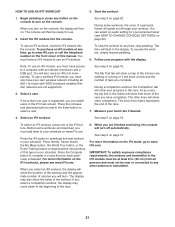
... will show a track and the number of that you can select an audio setting for use an iFit workout, insert the iFit module into the console. Select a user. Press the My Trainer button, the My Maps button, the World Tour button, or the Event Training button to compete in a race that type in the race. Start the workout. 1. Press the iFit button to turn on the front cover of a personal trainer will turn on page 22...
... will show a track and the number of that you can select an audio setting for use an iFit workout, insert the iFit module into the console. Select a user. Press the My Trainer button, the My Maps button, the World Tour button, or the Event Training button to compete in a race that type in the race. Start the workout. 1. Press the iFit button to turn on the front cover of a personal trainer will turn on page 22...
Canadian English Manual
Page 22
... also use the information mode to the console, the display will appear in miles or kilometers) that the elliptical has been used. HOW TO CHANGE CONSOLE SETTINGS display to adjust the contrast level. The console features a user mode that your MP3 player or CD player; View usage information. Press the decrease button to the console. Determine if an iFit module is connected to choose an audio setting for the voice of the personal trainer, set a default...
... also use the information mode to the console, the display will appear in miles or kilometers) that the elliptical has been used. HOW TO CHANGE CONSOLE SETTINGS display to adjust the contrast level. The console features a user mode that your MP3 player or CD player; View usage information. Press the decrease button to the console. Determine if an iFit module is connected to choose an audio setting for the voice of the personal trainer, set a default...
Canadian English Manual
Page 24
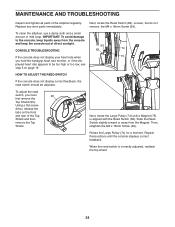
... adjusted, reattach the top shield. 24 Using a flat screw- Rotate the Large Pulley (74) for a moment. Replace any worn parts immediately. Loosen, but do not remove, the M4 x 16mm Screw (93). played heart rate appears to the console, keep liquids away from the Magnet. When the reed switch is aligned with the Reed Switch (69). driver, release the tabs on page 19. MAINTENANCE AND TROUBLESHOOTING Inspect and tighten all parts...
... adjusted, reattach the top shield. 24 Using a flat screw- Rotate the Large Pulley (74) for a moment. Replace any worn parts immediately. Loosen, but do not remove, the M4 x 16mm Screw (93). played heart rate appears to the console, keep liquids away from the Magnet. When the reed switch is aligned with the Reed Switch (69). driver, release the tabs on page 19. MAINTENANCE AND TROUBLESHOOTING Inspect and tighten all parts...
Canadian English Manual
Page 26
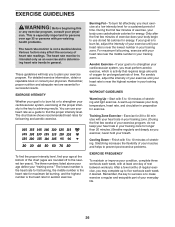
... enjoyable part of the chart (ages are essential for energy. These guidelines will help you must exercise at the proper intensity is to five workouts each week, with pre-existing health problems. The heart rate monitor is the heart rate for a sustained period of your exercise until your heart rate is near the middle number in general. The three numbers listed above your age define your body temperature, heart rate...
... enjoyable part of the chart (ages are essential for energy. These guidelines will help you must exercise at the proper intensity is to five workouts each week, with pre-existing health problems. The heart rate monitor is the heart rate for a sustained period of your exercise until your heart rate is near the middle number in general. The three numbers listed above your age define your body temperature, heart rate...
Canadian English Manual
Page 27
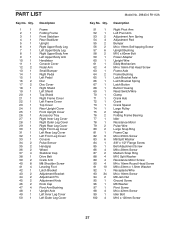
... Console Cover Pedal Arm Small Bumper Right Pedal Left Pedal Disc Disc Cover Right Shield Left Shield Top Shield Right Frame Cover Left Frame Cover Top Cover Rear Upright Cover Front Upright Cover Accessory Tray Right Inner Leg Cover Right Outer Leg Cover Right Rear Leg Cover Right Front Leg Cover Left Rear Leg Cover Left Front Leg Cover Console Pulse Sensor Handgrip Wheel Stabilizer Cap Drive Belt Crank Arm M8 Shoulder Screw Leveling Foot Latch Bracket Adjustment Bracket Adjustment Pin Adjustment Knob Knob Cap Pivot Arm Bushing Upright Axle Left Inner Leg Cover Left Outer Leg Cover Model...
... Console Cover Pedal Arm Small Bumper Right Pedal Left Pedal Disc Disc Cover Right Shield Left Shield Top Shield Right Frame Cover Left Frame Cover Top Cover Rear Upright Cover Front Upright Cover Accessory Tray Right Inner Leg Cover Right Outer Leg Cover Right Rear Leg Cover Right Front Leg Cover Left Rear Leg Cover Left Front Leg Cover Console Pulse Sensor Handgrip Wheel Stabilizer Cap Drive Belt Crank Arm M8 Shoulder Screw Leveling Foot Latch Bracket Adjustment Bracket Adjustment Pin Adjustment Knob Knob Cap Pivot Arm Bushing Upright Axle Left Inner Leg Cover Left Outer Leg Cover Model...

Canadian English Manual
Page 32
... -home service, the customer will automatically be voided if the product is used as a store display model, if all other rights that specically set forth herein. Accordingly, the above limitation may have other warranties, and any and all instructions in their scope and duration to the terms set forth above is used , or if the product is authorized by ICON. Parts...
... -home service, the customer will automatically be voided if the product is used as a store display model, if all other rights that specically set forth herein. Accordingly, the above limitation may have other warranties, and any and all instructions in their scope and duration to the terms set forth above is used , or if the product is authorized by ICON. Parts...


