
User Manual
Page 1
Save this equipment. USER’'S MANUAL www.nordictrack.com Model No. 831.24922.0 Serial No. CUSTOMER CARE For service at any time, go to www.nordictrackservice.com. Serial Number Decal ACTIVATE YOUR WARRANTY ... Please do not contact the store. CAUTION Read all precautions and instructions in the space above for future reference. Write the serial number in this manual before using this manual for reference.
Save this equipment. USER’'S MANUAL www.nordictrack.com Model No. 831.24922.0 Serial No. CUSTOMER CARE For service at any time, go to www.nordictrackservice.com. Serial Number Decal ACTIVATE YOUR WARRANTY ... Please do not contact the store. CAUTION Read all precautions and instructions in the space above for future reference. Write the serial number in this manual before using this manual for reference.
User Manual
Page 2
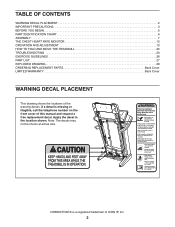
...actual size. Apply the decal in the location shown. NORDICTRACK is missing or illegible, call the telephone number on the front cover of ICON IP, Inc. 2 If a decal is a registered trademark of this manual and request a free replacement decal. TABLE OF CONTENTS WARNING... DECAL PLACEMENT 2 IMPORTANT PRECAUTIONS 3 BEFORE YOU BEGIN 5 PART IDENTIFICATION CHART 6 ASSEMBLY 7 THE CHEST HEART RATE MONITOR 12 OPERATION AND ADJUSTMENT 13 HOW TO FOLD AND MOVE THE TREADMILL 22 TROUBLESHOOTING 23 ...
...actual size. Apply the decal in the location shown. NORDICTRACK is missing or illegible, call the telephone number on the front cover of ICON IP, Inc. 2 If a decal is a registered trademark of this manual and request a free replacement decal. TABLE OF CONTENTS WARNING... DECAL PLACEMENT 2 IMPORTANT PRECAUTIONS 3 BEFORE YOU BEGIN 5 PART IDENTIFICATION CHART 6 ASSEMBLY 7 THE CHEST HEART RATE MONITOR 12 OPERATION AND ADJUSTMENT 13 HOW TO FOLD AND MOVE THE TREADMILL 22 TROUBLESHOOTING 23 ...
User Manual
Page 3
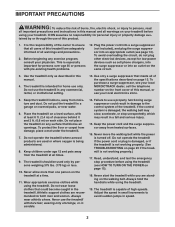
... into the surge suppressor or into an appropriate outlet (see your local NORDICTRACK dealer, call the telephone number on a level surface, with bare feet, wearing only stockings, or in sandals. 14. Do not place the treadmill on the walking belt. To protect the floor or carpet from damage,...weighing 375 lbs. (170 kg) or less. 10. Use only a surge suppressor that blocks air openings. Place the treadmill on the front cover of this manual, or see page 13). The treadmill is especially important for low-power devices such as described in this product. 1. Keep children under the...
... into the surge suppressor or into an appropriate outlet (see your local NORDICTRACK dealer, call the telephone number on a level surface, with bare feet, wearing only stockings, or in sandals. 14. Do not place the treadmill on the walking belt. To protect the floor or carpet from damage,...weighing 375 lbs. (170 kg) or less. 10. Use only a surge suppressor that blocks air openings. Place the treadmill on the front cover of this manual, or see page 13). The treadmill is especially important for low-power devices such as described in this product. 1. Keep children under the...
User Manual
Page 4
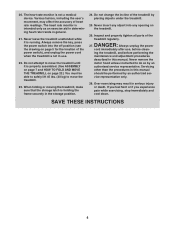
...affect the accuracy of the power switch), and unplug the power cord when the treadmill is holding the frame securely in this manual should be able to safely lift 45 lbs. (20 kg) to move the treadmill until it is running. The heart rate monitor is intended only as an ...exercise aid in determining heart rate trends in this manual. Never remove the motor hood unless instructed to move the treadmill. 23. ing the treadmill, and before clean- If you feel faint or if you experience pain while exercising, stop immediately and...
...affect the accuracy of the power switch), and unplug the power cord when the treadmill is holding the frame securely in this manual should be able to safely lift 45 lbs. (20 kg) to move the treadmill until it is running. The heart rate monitor is intended only as an ...exercise aid in determining heart rate trends in this manual. Never remove the motor hood unless instructed to move the treadmill. 23. ing the treadmill, and before clean- If you feel faint or if you experience pain while exercising, stop immediately and...
User Manual
Page 5
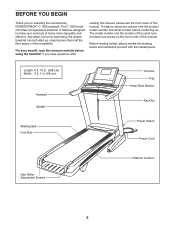
... with the labeled parts. If you for selecting the revolutionary NORDICTRACK® C 1550 treadmill. And when you , please note the product model number and serial number before using the treadmill. The C 1550 treadmill offers an impressive selection of features designed to make your benet, read this manual carefully before contacting us assist you ’'re not...
... with the labeled parts. If you for selecting the revolutionary NORDICTRACK® C 1550 treadmill. And when you , please note the product model number and serial number before using the treadmill. The C 1550 treadmill offers an impressive selection of features designed to make your benet, read this manual carefully before contacting us assist you ’'re not...
User Manual
Page 6
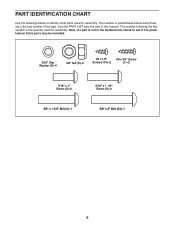
PART IDENTIFICATION CHART Use the drawings below each drawing is the key number of the part, from the PART LIST near the end of this manual. Extra parts may be included. 5/16" Star Washer (5)–-4 3/8" Nut (6)–-2 #8 x 1/2" #8 x 3/4" Screw Screw (101)–-2 (1)–-2 5/16" x 1" Screw (2)–-8 5/16" x 1 1/2" Screw (3)–-4 3/8" x 1 3/4" Bolt (4)–-1 3/8" x 2" Bolt (...
PART IDENTIFICATION CHART Use the drawings below each drawing is the key number of the part, from the PART LIST near the end of this manual. Extra parts may be included. 5/16" Star Washer (5)–-4 3/8" Nut (6)–-2 #8 x 1/2" #8 x 3/4" Screw Screw (101)–-2 (1)–-2 5/16" x 1" Screw (2)–-8 5/16" x 1 1/2" Screw (3)–-4 3/8" x 1 3/4" Bolt (4)–-1 3/8" x 2" Bolt (...
User Manual
Page 14
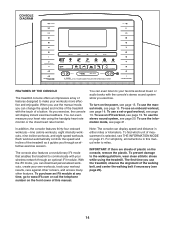
... instructions in either miles or kilometers. To turn on the front cover of this manual refer to make your heart rate using the treadmill. To use an onboard workout, see page 20. To use the treadmill, observe the alignment of the walking belt, and center the walking belt if necessary... athletic shoes while using the handgrip heart rate monitor or the chest heart rate monitor. To use the manual mode, see page 21. CONSOLE DIAGRAM FEATURES OF THE CONSOLE The treadmill console offers an impressive array of features designed to miles. The rst time you exercise, the console...
... instructions in either miles or kilometers. To turn on the front cover of this manual refer to make your heart rate using the treadmill. To use an onboard workout, see page 20. To use the treadmill, observe the alignment of the walking belt, and center the walking belt if necessary... athletic shoes while using the handgrip heart rate monitor or the chest heart rate monitor. To use the manual mode, see page 21. CONSOLE DIAGRAM FEATURES OF THE CONSOLE The treadmill console offers an impressive array of features designed to miles. The rst time you exercise, the console...

User Manual
Page 15
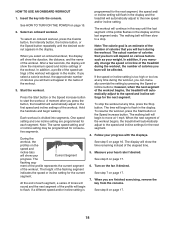
HOW TO TURN ON THE POWER HOW TO USE THE MANUAL MODE IMPORTANT: If the treadmill has been exposed to cold temperatures, allow it may damage the console displays or other electrical components. 1. Then, insert the key into the console. Start ... connected to a stop the walking belt, press the Stop button. Next, stand on page 21 to select a speed setting of 0.5 mph. Press the Manual Control button on the treadmill frame near the power cord. If you plug in the display. Press the power switch into the reset position, the demo mode is...
HOW TO TURN ON THE POWER HOW TO USE THE MANUAL MODE IMPORTANT: If the treadmill has been exposed to cold temperatures, allow it may damage the console displays or other electrical components. 1. Then, insert the key into the console. Start ... connected to a stop the walking belt, press the Stop button. Next, stand on page 21 to select a speed setting of 0.5 mph. Press the Manual Control button on the treadmill frame near the power cord. If you plug in the display. Press the power switch into the reset position, the demo mode is...
User Manual
Page 18
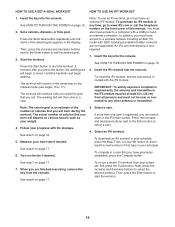
...the workout, you burn will then slow to move at any time, press the Stop button. In addition, if you manually change the speed or incline of calories you can manually override the setting by pressing the Speed or Incline buttons; Follow your heart rate if desired. See step 6 on ...segment of the workout. When you select an onboard workout, the display will show the maximum speed and incline settings of the workout begins, the treadmill will show the duration, the distance, and the name of the workout. HOW TO USE AN ONBOARD WORKOUT 1. Insert the key into segments. Select...
...the workout, you burn will then slow to move at any time, press the Stop button. In addition, if you manually change the speed or incline of calories you can manually override the setting by pressing the Speed or Incline buttons; Follow your heart rate if desired. See step 6 on ...segment of the workout. When you select an onboard workout, the display will show the maximum speed and incline settings of the workout begins, the treadmill will show the duration, the distance, and the name of the workout. HOW TO USE AN ONBOARD WORKOUT 1. Insert the key into segments. Select...
User Manual
Page 19
... A Goal button repeatedly until you reach the goal that you press the button, the walking belt will depend on various factors such as the manual mode (see the instructions included with SSID broadcast enabled (hidden networks are finished exercising, remove the key from all persons and must be near ... Train, or Lose Wt. Select an iFit workout. See HOW TO TURN ON THE POWER on the fan if desired. 3. The actual number of this manual. Insert the key into the console. Measure your weight. 4. Set a calories, distance, or time goal. Hold the handrails and begin to www.iFit....
... A Goal button repeatedly until you reach the goal that you press the button, the walking belt will depend on various factors such as the manual mode (see the instructions included with SSID broadcast enabled (hidden networks are finished exercising, remove the key from all persons and must be near ... Train, or Lose Wt. Select an iFit workout. See HOW TO TURN ON THE POWER on the fan if desired. 3. The actual number of this manual. Insert the key into the console. Measure your weight. 4. Set a calories, distance, or time goal. Hold the handrails and begin to www.iFit....
User Manual
Page 21
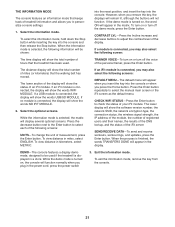
... To exit the information mode, remove the key from the console. 21 THE INFORMATION MODE The console features an information mode that keeps track of treadmill information and allows you to be shown: into the reset position, and insert the key into the console. To select the information mode, hold ...will remain lit, although the buttons will show the words WIFI MODULE. Press the decrease button next to the Enter button to select the manual main screen or the iFit screen as the default menu. CONTRAST LVL—-Press the Incline increase and decrease buttons to check the status...
... To exit the information mode, remove the key from the console. 21 THE INFORMATION MODE The console features an information mode that keeps track of treadmill information and allows you to be shown: into the reset position, and insert the key into the console. To select the information mode, hold ...will remain lit, although the buttons will show the words WIFI MODULE. Press the decrease button next to the Enter button to select the manual main screen or the iFit screen as the default menu. CONTRAST LVL—-Press the Incline increase and decrease buttons to check the status...

User Manual
Page 23
... can be used if the treadmill is plugged in, unplug it, wait for five minutes, and then plug it . Find the symptom that meets all of this manual. b. Remove the key from the console a. To reset the power switch, wait for five minutes and then press the switch back in . If... the treadmill still will not run, please see the front cover of the specifications described...
... can be used if the treadmill is plugged in, unplug it, wait for five minutes, and then plug it . Find the symptom that meets all of this manual. b. Remove the key from the console a. To reset the power switch, wait for five minutes and then press the switch back in . If... the treadmill still will not run, please see the front cover of the specifications described...
User Manual
Page 24
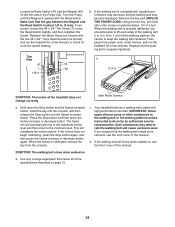
.... Repeat until the Magnet is properly tightened, you suspect that the gap between the Magnet and the Reed Switch is overtightened, treadmill performance may decrease and the walking belt may deteriorate the walking belt and cause excessive wear. When the incline is properly tightened.... see the front cover of a turn both idler roller screws counterclockwise, 1/4 of this manual. Reattach the Motor Hood (not shown) with the ve #8 x 3/4" Truss Head Screws (not shown) and run the treadmill for a correct speed reading. Using the hex key, turn . Be careful to do ...
.... Repeat until the Magnet is properly tightened, you suspect that the gap between the Magnet and the Reed Switch is overtightened, treadmill performance may decrease and the walking belt may deteriorate the walking belt and cause excessive wear. When the incline is properly tightened.... see the front cover of a turn both idler roller screws counterclockwise, 1/4 of this manual. Reattach the Motor Hood (not shown) with the ve #8 x 3/4" Truss Head Screws (not shown) and run the treadmill for a correct speed reading. Using the hex key, turn . Be careful to do ...

User Manual
Page 27
For information about ordering replacement parts, see the back cover of this manual. *These parts are subject to change without notice. Description Frame Right Rear Foot Left Rear Foot Motor Hood Hood Accent Incline Frame Spacer Frame Spacer ... Back Chest Strap Sensor Key/Clip Pulse Bar Pulse Bar Bottom Ground Wire Console Frame Fan Housing Fan Wire Tie Console Back #8 x 1/2" Screw User’'s Manual Note: Specifications are not illustrated. 27 Qty. 52 1 53 1 54 1 55 1 56 1 57 2 58 2 59 1 60 1 61 2 62 1 63 1 64 1 65 1 66 2 67 1 68 1 69...
For information about ordering replacement parts, see the back cover of this manual. *These parts are subject to change without notice. Description Frame Right Rear Foot Left Rear Foot Motor Hood Hood Accent Incline Frame Spacer Frame Spacer ... Back Chest Strap Sensor Key/Clip Pulse Bar Pulse Bar Bottom Ground Wire Console Frame Fan Housing Fan Wire Tie Console Back #8 x 1/2" Screw User’'s Manual Note: Specifications are not illustrated. 27 Qty. 52 1 53 1 54 1 55 1 56 1 57 2 58 2 59 1 60 1 61 2 62 1 63 1 64 1 65 1 66 2 67 1 68 1 69...
User Manual
Page 32
...installation; ORDERING REPLACEMENT PARTS To order replacement parts, please see the PART LIST and the EXPLODED DRAWING near the end of this manual) LIMITED WARRANTY IMPORTANT: You must be voided if the product is used for commercial or rental purposes. This warranty extends only to...of enjoyment or use or performance of the product; Labor is authorized by ICON. ICON Health & Fitness, Inc. (ICON) warrants this manual are limited in lieu of purchase. If replacement parts are warranted for two (2) years from the service center will automatically be preauthorized by...
...installation; ORDERING REPLACEMENT PARTS To order replacement parts, please see the PART LIST and the EXPLODED DRAWING near the end of this manual) LIMITED WARRANTY IMPORTANT: You must be voided if the product is used for commercial or rental purposes. This warranty extends only to...of enjoyment or use or performance of the product; Labor is authorized by ICON. ICON Health & Fitness, Inc. (ICON) warrants this manual are limited in lieu of purchase. If replacement parts are warranted for two (2) years from the service center will automatically be preauthorized by...

