
English Manual
Page 3
..., lower, or move the walking belt while the power is turned off switch.) 20. Keep the treadmill indoors, away from heated surfaces. 14. Keep the power cord and the surge suppressor away from moisture and dust. Always hold the handrails while using the treadmill. The pulse sensor is not working properly. (See BEFORE YOU BEGIN on the same circuit. Do not attempt to use the treadmill with...
..., lower, or move the walking belt while the power is turned off switch.) 20. Keep the treadmill indoors, away from heated surfaces. 14. Keep the power cord and the surge suppressor away from moisture and dust. Always hold the handrails while using the treadmill. The pulse sensor is not working properly. (See BEFORE YOU BEGIN on the same circuit. Do not attempt to use the treadmill with...
English Manual
Page 4
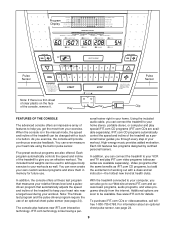
... shown at 43% of this treadmill in any time by pressing the speed and incline buttons. Apply the decal in this manual should be prepared for in this manual. 21. DANGER: 28. Never remove the motor hood unless instructed to order a free replacement decal (see ORDERING REPLACEMENT PARTS on your treadmill. Do not use only. Never insert or drop any object into any exercise program, consult your CD player...
... shown at 43% of this treadmill in any time by pressing the speed and incline buttons. Apply the decal in this manual should be prepared for in this manual. 21. DANGER: 28. Never remove the motor hood unless instructed to order a free replacement decal (see ORDERING REPLACEMENT PARTS on your treadmill. Do not use only. Never insert or drop any object into any exercise program, consult your CD player...
English Manual
Page 5
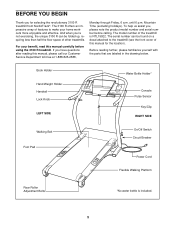
... this manual carefully before calling. For your home workouts more enjoyable and effective. Book Holder Hand Weight Holder Handrail Lock Knob LEFT SIDE Water Bottle Holder* Console Pulse Sensor Key/Clip RIGHT SIDE Walking Belt Foot Pad On/Off Switch Circuit Breaker Power Cord Flexible Walking Platform Rear Roller Adjustment Bolts *No water bottle is NTL15922. To help us assist you 're not exercising, the unique 3100 R can be folded up...
... this manual carefully before calling. For your home workouts more enjoyable and effective. Book Holder Hand Weight Holder Handrail Lock Knob LEFT SIDE Water Bottle Holder* Console Pulse Sensor Key/Clip RIGHT SIDE Walking Belt Foot Pad On/Off Switch Circuit Breaker Power Cord Flexible Walking Platform Rear Roller Adjustment Bolts *No water bottle is NTL15922. To help us assist you 're not exercising, the unique 3100 R can be folded up...
English Manual
Page 7
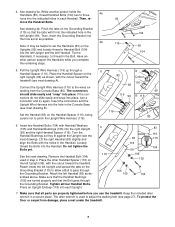
... they fit against the Upright (see inset drawing B). 4. While another person holds the Handrails (83), thread Handrail Bolts (104) two to adjust the walking belt (see inset drawing A). Then, re- 83 move the Handrail Bolts. See drawing 4b. Lift the right Handrail (83) slightly and align the Bolts with the cutout toward the treadmill (see page 27). Tighten all parts are turned properly...
... they fit against the Upright (see inset drawing B). 4. While another person holds the Handrails (83), thread Handrail Bolts (104) two to adjust the walking belt (see inset drawing A). Then, re- 83 move the Handrail Bolts. See drawing 4b. Lift the right Handrail (83) slightly and align the Bolts with the cutout toward the treadmill (see page 27). Tighten all parts are turned properly...

English Manual
Page 8
... resistance for electric current to the control system of electric shock. Grounding Pin Grounded Outlet Grounding Plug 2 Grounded Outlet Box Adapter Surge Suppressor Use only a single-outlet surge suppressor that is damaged, the walking belt may change speed or stop unexpectedly, which may be installed by sudden voltage changes in doubt as a transient voltage surge suppressor (TVSS). OPERATION AND ADJUSTMENT THE PERFORMANT LUBETM WALKING BELT Your treadmill...
... resistance for electric current to the control system of electric shock. Grounding Pin Grounded Outlet Grounding Plug 2 Grounded Outlet Box Adapter Surge Suppressor Use only a single-outlet surge suppressor that is damaged, the walking belt may change speed or stop unexpectedly, which may be installed by sudden voltage changes in doubt as a transient voltage surge suppressor (TVSS). OPERATION AND ADJUSTMENT THE PERFORMANT LUBETM WALKING BELT Your treadmill...
English Manual
Page 9
... programs, audio programs, and video programs directly from your computer, you an effective workout. IFIT.com technology is like having a per- Additional options are available separately). You can be available. sonal trainer right in the manual mode, the speed and incline of a button. In addition, the console offers a fitness test program that measures your relative fitness level and a pulsedriven program that automatically adjusts the speed and incline of the treadmill to your home. For information...
... programs, audio programs, and video programs directly from your computer, you an effective workout. IFIT.com technology is like having a per- Additional options are available separately). You can be available. sonal trainer right in the manual mode, the speed and incline of a button. In addition, the console offers a fitness test program that measures your relative fitness level and a pulsedriven program that automatically adjusts the speed and incline of the treadmill to your home. For information...
English Manual
Page 10
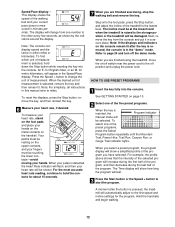
... the buttons are pressed, the weight setting will disappear from the console. 2 Plug in the power cord. CAUTION: Before operating the console, read the following precautions. • Do not stand on the walking belt when turning on the power. • Always wear the clip (see the drawing below) while operating the treadmill. • Adjust the speed in small increments to the waistband of your clothes. The pulse sensor...
... the buttons are pressed, the weight setting will disappear from the console. 2 Plug in the power cord. CAUTION: Before operating the console, read the following precautions. • Do not stand on the walking belt when turning on the power. • Always wear the clip (see the drawing below) while operating the treadmill. • Adjust the speed in small increments to the waistband of your clothes. The pulse sensor...

English Manual
Page 11
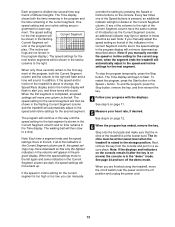
... chest pulse sensor (see page 27). 4 Change the incline of the program. Each time a button is 0% to move at 1 mph. The Training Zone display-As you use the treadmill, inspect the alignment of the walking belt, and align the walking belt if necessary (see page 24) is inserted, the manual Manual Indicator mode will also show the approximate intensity level of 1/4-mile laps you exercise, change from one number to start the walking belt. Distance/Laps display-This display...
... chest pulse sensor (see page 27). 4 Change the incline of the program. Each time a button is 0% to move at 1 mph. The Training Zone display-As you use the treadmill, inspect the alignment of the walking belt, and align the walking belt if necessary (see page 24) is inserted, the manual Manual Indicator mode will also show the approximate intensity level of 1/4-mile laps you exercise, change from one number to start the walking belt. Distance/Laps display-This display...
English Manual
Page 12
.... To reset the displays, press the Stop button, remove the key, and then reinsert the key. 6 Measure your hands. For the most accurate heart rate reading, continue to the storage position or the treadmill will be damaged. Hold the handrails and begin walking. 12 Speed/Pace display- Note: The console can display speed and distance in minutes per mile). Press the Speed + button to page 24 and turn off switch near the power cord to start the program. To...
.... To reset the displays, press the Stop button, remove the key, and then reinsert the key. 6 Measure your hands. For the most accurate heart rate reading, continue to the storage position or the treadmill will be damaged. Hold the handrails and begin walking. 12 Speed/Pace display- Note: The console can display speed and distance in minutes per mile). Press the Speed + button to page 24 and turn off switch near the power cord to start the program. To...
English Manual
Page 13
... the Speed buttons is completed, all speed settings will appear in the program display. The walking belt will sound. Note: If you manually override the speed or incline setting for the second segment. Next, remove the key from the console and put it in the current segment. When you manually adjust the speed setting so that only the highest indicators in the columns will move the on/off switch near the power cord...
... the Speed buttons is completed, all speed settings will appear in the program display. The walking belt will sound. Note: If you manually override the speed or incline setting for the second segment. Next, remove the key from the console and put it in the current segment. When you manually adjust the speed setting so that only the highest indicators in the columns will move the on/off switch near the power cord...
English Manual
Page 16
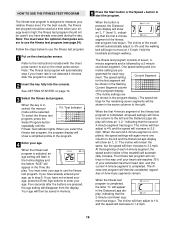
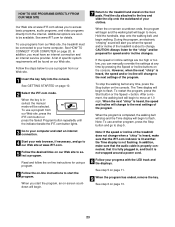
... of the treadmill will move one incline setting are pressed, the age setting will be saved in the Distance/Laps display, indicating that the first 4-minute segment of the program display. (The incline settings are not shown in the Time display. To select the fitness test program, press the Select Program button repeatedly until your heart rate reaches 70% of the treadmill will automatically adjust to 3% and the walking belt will begin walking. The speed setting Current...
... of the treadmill will move one incline setting are pressed, the age setting will be saved in the Distance/Laps display, indicating that the first 4-minute segment of the program display. (The incline settings are not shown in the Time display. To select the fitness test program, press the Select Program button repeatedly until your heart rate reaches 70% of the treadmill will automatically adjust to 3% and the walking belt will begin walking. The speed setting Current...
English Manual
Page 17
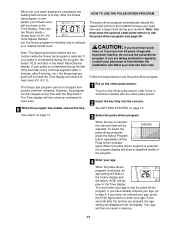
... display will show an estimated fitness level. 6 When the program has ended, remove the key. HOW TO USE THE PULSE-DRIVEN PROGRAM The pulse-driven program automatically adjusts the speed and incline of any time with the chest pulse sensor. 2 Insert the key fully into the console. Follow the steps below to a stop. If your pulse is selected. If your pulse is completed, the walking belt will slow to use the pulse-driven program. Note: The Speed and Incline buttons...
... display will show an estimated fitness level. 6 When the program has ended, remove the key. HOW TO USE THE PULSE-DRIVEN PROGRAM The pulse-driven program automatically adjusts the speed and incline of any time with the chest pulse sensor. 2 Insert the key fully into the console. Follow the steps below to a stop. If your pulse is selected. If your pulse is completed, the walking belt will slow to use the pulse-driven program. Note: The Speed and Incline buttons...

English Manual
Page 21
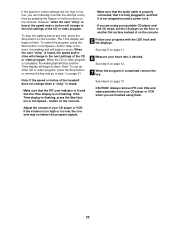
... the treadmill near the power cord. See GETTING STARTED on page 19. When the key is being used, see instruction B. CAUTION: Always listen for speed and/or incline changes. If the AUDIO OUT jack is inserted, the manual mode will begin guiding you through your workout. A. Plug one end of the audio cable into the included adapter. Next, remove the wire that is pressed, your personal trainer will be selected. B ANT. IN VIDEO AUDIO IN...
... the treadmill near the power cord. See GETTING STARTED on page 19. When the key is being used, see instruction B. CAUTION: Always listen for speed and/or incline changes. If the AUDIO OUT jack is inserted, the manual mode will begin guiding you through your workout. A. Plug one end of the audio cable into the included adapter. Next, remove the wire that is pressed, your personal trainer will be selected. B ANT. IN VIDEO AUDIO IN...
English Manual
Page 22
... audio cable is properly connected, that it is completed, remove the key. If the Time display is flashing, press the Start button or the Speed + button on page 12. 7 When the program is not wrapped around a power cord. • If you are using them. 22 When the CD or video program is not flashing. See step 6 on the console. • Adjust the volume of the treadmill does not change to the next settings...
... audio cable is properly connected, that it is completed, remove the key. If the Time display is flashing, press the Start button or the Speed + button on page 12. 7 When the program is not wrapped around a power cord. • If you are using them. 22 When the CD or video program is not flashing. See step 6 on the console. • Adjust the volume of the treadmill does not change to the next settings...
English Manual
Page 23
... the program, press the Start button or the Speed + button. Find the clip attached to the key and slide the clip onto the waistband of the treadmill is about to change when a "chirp" is heard, make sure that the audio cable is properly connected, that it is fully plugged in, and that the Time display is not wrapped around a power cord. 8 Follow your progress with the LED track...
... the program, press the Start button or the Speed + button. Find the clip attached to the key and slide the clip onto the waistband of the treadmill is about to change when a "chirp" is heard, make sure that the audio cable is properly connected, that it is fully plugged in, and that the Time display is not wrapped around a power cord. 8 Follow your progress with the LED track...
English Manual
Page 24
... the total number of miles that the walking belt has moved. The Distance/Laps display will not operate. If a "d" appears in the Heart Rate/Calories display when the information mode is displayed in the "demo" mode. To purchase the optional chest pulse sensor, call toll-free 1-800-734-2377. When the information mode is intended to change the unit of hours that the treadmill has been used only when a treadmill is selected, press the Speed - Press the Speed + button to...
... the total number of miles that the walking belt has moved. The Distance/Laps display will not operate. If a "d" appears in the Heart Rate/Calories display when the information mode is displayed in the "demo" mode. To purchase the optional chest pulse sensor, call toll-free 1-800-734-2377. When the information mode is intended to change the unit of hours that the treadmill has been used only when a treadmill is selected, press the Speed - Press the Speed + button to...

English Manual
Page 27
... the incline buttons. Plug in the console, press one of a turn both rear roller adjustment bolts counterclockwise, 1/4 of the specifications described on SOLUTION: a. PROBLEM: The walking belt is properly tightened. Repeat until the walking belt is off the walking platform. After a few minutes. This will automatically rise to the maximum incline level and then return to lift each side of the treadmill does not change correctly or does not change when iFIT.com...
... the incline buttons. Plug in the console, press one of a turn both rear roller adjustment bolts counterclockwise, 1/4 of the specifications described on SOLUTION: a. PROBLEM: The walking belt is properly tightened. Repeat until the walking belt is off the walking platform. After a few minutes. This will automatically rise to the maximum incline level and then return to lift each side of the treadmill does not change correctly or does not change when iFIT.com...

English Manual
Page 28
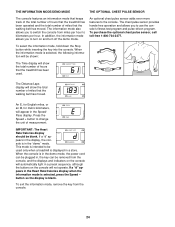
... health problems. The pulse sensor is to oxygenate the blood. CONDITIONING GUIDELINES WARNING: Before beginning this or any exercise program, consult your physician. Various factors, including your movement, may complete up -Start each workout with at a relatively low intensity level for you must be found by using your "training zone." For maximum fat burning, adjust the speed and incline of heart rate readings. The three numbers...
... health problems. The pulse sensor is to oxygenate the blood. CONDITIONING GUIDELINES WARNING: Before beginning this or any exercise program, consult your physician. Various factors, including your movement, may complete up -Start each workout with at a relatively low intensity level for you must be found by using your "training zone." For maximum fat burning, adjust the speed and incline of heart rate readings. The three numbers...
English Manual
Page 31
... Lock Pin Collar Lock Knob Spring Lock Knob Sleeve Lock Knob Spacer Lock Knob Latch Assembly Grounding Bracket Handrail Spacer Hand Weights Upright Endcap (Round) Wire Harness Hood Mount (Side) Key No. Qty. 121 4 122 1 123 1 124 1 125 1 #1 # 1 # 1 # 1 # 1 # 1 # 1 Description 8" Cable Tie iFIT.com Audio Cable Jack Releaseable Tie Incline Motor Bolt (Bottom) 12" Green Wire, F/Ring 10" Green Wire, 2 Ring 4" Green Wire, F/Ring 8" Blue Wire, 2F 20" White Wire, 2F 4" Black Wire, 2F User's Manual * Includes all parts...
... Lock Pin Collar Lock Knob Spring Lock Knob Sleeve Lock Knob Spacer Lock Knob Latch Assembly Grounding Bracket Handrail Spacer Hand Weights Upright Endcap (Round) Wire Harness Hood Mount (Side) Key No. Qty. 121 4 122 1 123 1 124 1 125 1 #1 # 1 # 1 # 1 # 1 # 1 # 1 Description 8" Cable Tie iFIT.com Audio Cable Jack Releaseable Tie Incline Motor Bolt (Bottom) 12" Green Wire, F/Ring 10" Green Wire, 2 Ring 4" Green Wire, F/Ring 8" Blue Wire, 2F 20" White Wire, 2F 4" Black Wire, 2F User's Manual * Includes all parts...
English Manual
Page 34
... by ICON first and are performed by warranty. USER'S MANUAL-It is limited in your Product (save the original shipping carton if possible); This warranty gives you specific legal rights and you how to use , costs of removal, installation or other rights which vary from state to products used as a gift from our Customer Service Department; LIMITED WARRANTY WHAT IS COVERED-The entire NordicTrack® 3100 R treadmill...
... by ICON first and are performed by warranty. USER'S MANUAL-It is limited in your Product (save the original shipping carton if possible); This warranty gives you specific legal rights and you how to use , costs of removal, installation or other rights which vary from state to products used as a gift from our Customer Service Department; LIMITED WARRANTY WHAT IS COVERED-The entire NordicTrack® 3100 R treadmill...


