
English Manual
Page 2
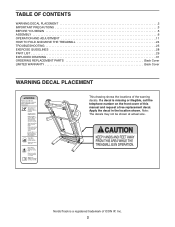
.... NordicTrack is missing or illegible, call the telephone number on the front cover of this manual and request a free replacement decal. Apply the decal in the location shown. TABLE OF CONTENTS WARNING DECAL PLACEMENT 2 IMPORTANT PRECAUTIONS 3 BEFORE YOU BEGIN 5 ASSEMBLY 6 OPERATION AND ADJUSTMENT 11 HOW TO FOLD AND MOVE THE TREADMILL 24...
.... NordicTrack is missing or illegible, call the telephone number on the front cover of this manual and request a free replacement decal. Apply the decal in the location shown. TABLE OF CONTENTS WARNING DECAL PLACEMENT 2 IMPORTANT PRECAUTIONS 3 BEFORE YOU BEGIN 5 ASSEMBLY 6 OPERATION AND ADJUSTMENT 11 HOW TO FOLD AND MOVE THE TREADMILL 24...
English Manual
Page 3
...the walking belt may slow, accelerate, or stop procedure before using the treadmill (see your local NordicTrack dealer or call the telephone number on your treadmill before using your physician. Wear appropriate exercise clothes when using the treadmill. 3 Never move the walking belt while the power is not working...TURN ON THE POWER on the same circuit. Keep the power cord and the surge suppressor away from the treadmill at all of the treadmill. The treadmill should be used or where oxygen is the responsibility of the owner to the control system of the specifications described...
...the walking belt may slow, accelerate, or stop procedure before using the treadmill (see your local NordicTrack dealer or call the telephone number on your treadmill before using your physician. Wear appropriate exercise clothes when using the treadmill. 3 Never move the walking belt while the power is not working...TURN ON THE POWER on the same circuit. Keep the power cord and the surge suppressor away from the treadmill at all of the treadmill. The treadmill should be used or where oxygen is the responsibility of the owner to the control system of the specifications described...
English Manual
Page 4
...the location of the power switch.) 21. Adjust the speed in small increments to raise, lower, or move the treadmill until it is not in -home use , before cleaning the treadmill, and before performing the main- Do not change the incline of heart rate readings. Always unplug the power cord ...be able to safely lift 45 lbs. (20 kg) to avoid sudden jumps in general. 20. Do not use . (See the drawing on the treadmill. Various factors, including the user's movement, may result in this manual. Always remove the key, unplug the power cord, and press the power switch ...
...the location of the power switch.) 21. Adjust the speed in small increments to raise, lower, or move the treadmill until it is not in -home use , before cleaning the treadmill, and before performing the main- Do not change the incline of heart rate readings. Always unplug the power cord ...be able to safely lift 45 lbs. (20 kg) to avoid sudden jumps in general. 20. Do not use . (See the drawing on the treadmill. Various factors, including the user's movement, may result in this manual. Always remove the key, unplug the power cord, and press the power switch ...
English Manual
Page 5
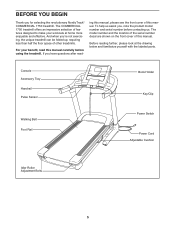
The COMMERCIAL 1750 treadmill offers an impressive selection of other treadmills. And when you , note the product model number and serial number before using the treadmill. ing this manual, please see the front cover of this manual. Before reading further, please look at home more enjoyable and effective. For... Belt Foot Rail Book Holder Key/Clip Power Switch Power Cord Adjustable Cushion Idler Roller Adjustment Bolts 5 If you for selecting the revolutionary NordicTrack® COMMERCIAL 1750 treadmill. BEFORE YOU BEGIN Thank you have questions after read this manual.
The COMMERCIAL 1750 treadmill offers an impressive selection of other treadmills. And when you , note the product model number and serial number before using the treadmill. ing this manual, please see the front cover of this manual. Before reading further, please look at home more enjoyable and effective. For... Belt Foot Rail Book Holder Key/Clip Power Switch Power Cord Adjustable Cushion Idler Roller Adjustment Bolts 5 If you for selecting the revolutionary NordicTrack® COMMERCIAL 1750 treadmill. BEFORE YOU BEGIN Thank you have questions after read this manual.
English Manual
Page 6
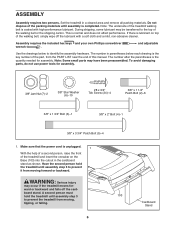
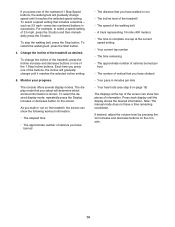
... The number after the parentheses is normal and does not affect performance. board stand. ASSEMBLY Assembly requires two persons. Set the treadmill in parentheses below to prevent it from moving , tipping, or falling. 6 Cardboard Stand Assembly requires the included hex keys and... your own Phillips screwdriver wrench . Note: Some small parts may occur if the treadmill moves for- WARNING: Serious injury may have been preassembled. If there is completed. To avoid damaging parts, do not use power ...
... The number after the parentheses is normal and does not affect performance. board stand. ASSEMBLY Assembly requires two persons. Set the treadmill in parentheses below to prevent it from moving , tipping, or falling. 6 Cardboard Stand Assembly requires the included hex keys and... your own Phillips screwdriver wrench . Note: Some small parts may occur if the treadmill moves for- WARNING: Serious injury may have been preassembled. If there is completed. To avoid damaging parts, do not use power ...

English Manual
Page 7
... Tie 3. Be careful not to the Base (103) with a "Right" sticker. The stand will be necessary to tip the top of a second person, lower the treadmill off the cardboard stand. Do not tighten the Patch Bolts yet. Then, pull the other end of the wire tie in the lower end of...
... Tie 3. Be careful not to the Base (103) with a "Right" sticker. The stand will be necessary to tip the top of a second person, lower the treadmill off the cardboard stand. Do not tighten the Patch Bolts yet. Then, pull the other end of the wire tie in the lower end of...
English Manual
Page 10
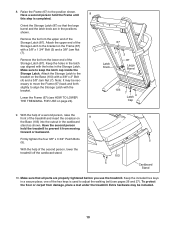
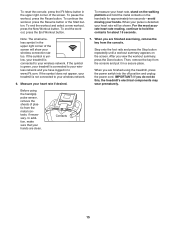
...backward. With the help of a second person, raise the front of the Storage Latch (87). Have a second person hold the treadmill to prevent it from the lower end of the treadmill and insert the crossbar on page 24). 67 7 Latch Knob 3 87 Large Barrel 103 7 Latch 4 Cap 9. Make sure to... completed. Note: It may be necessary to move the Frame (67) back and forth slightly to adjust the walking belt (see HOW TO LOWER THE TREADMILL FOR USE on 9 the Base (103) into the cutout in the positions shown. Firmly tighten the four 3/8" x 3 3/4" Patch Bolts (5). Attach the Storage ...
...backward. With the help of a second person, raise the front of the Storage Latch (87). Have a second person hold the treadmill to prevent it from the lower end of the treadmill and insert the crossbar on page 24). 67 7 Latch Knob 3 87 Large Barrel 103 7 Latch 4 Cap 9. Make sure to... completed. Note: It may be necessary to move the Frame (67) back and forth slightly to adjust the walking belt (see HOW TO LOWER THE TREADMILL FOR USE on 9 the Base (103) into the cutout in the positions shown. Firmly tighten the four 3/8" x 3 3/4" Patch Bolts (5). Attach the Storage ...
English Manual
Page 11
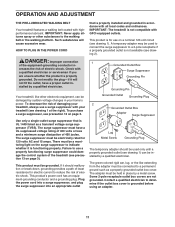
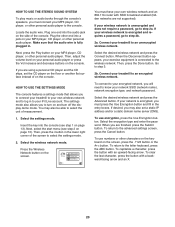
... adapter may be held in accordance with all local codes and ordinances. Grounded Outlet Box Surge Suppressor Grounding Pin Grounding Pin Your treadmill, like extending from the adapter must be grounded. Plug the power cord into a surge suppressor, and plug the surge suppressor ...properly grounded outlet box cover. This product must have a proper outlet in - OPERATION AND ADJUSTMENT THE PRE-LUBRICATED WALKING BELT Your treadmill features a walking belt coated with GFCI-equipped outlets. Such substances will not fit the outlet, have a UL suppressed voltage rating ...
... adapter may be held in accordance with all local codes and ordinances. Grounded Outlet Box Surge Suppressor Grounding Pin Grounding Pin Your treadmill, like extending from the adapter must be grounded. Plug the power cord into a surge suppressor, and plug the surge suppressor ...properly grounded outlet box cover. This product must have a proper outlet in - OPERATION AND ADJUSTMENT THE PRE-LUBRICATED WALKING BELT Your treadmill features a walking belt coated with GFCI-equipped outlets. Such substances will not fit the outlet, have a UL suppressed voltage rating ...
English Manual
Page 12
...workout, see page 19. With the iFit Live mode, you get in shape. The first time the treadmill is selected, you can change the speed and incline of the treadmill with the consoleʼs premium stereo sound system while you can also listen to communicate with your workout results... speed and incline of a button. The console also features an iFit Live mode that enables the treadmill to your favorite workout music or audio books with the touch of the treadmill as it guides you exercise, the console will display continuous exercise feedback. You can download personalized workouts...
...workout, see page 19. With the iFit Live mode, you get in shape. The first time the treadmill is selected, you can change the speed and incline of the treadmill with the consoleʼs premium stereo sound system while you can also listen to communicate with your workout results... speed and incline of a button. The console also features an iFit Live mode that enables the treadmill to your favorite workout music or audio books with the touch of the treadmill as it guides you exercise, the console will display continuous exercise feedback. You can download personalized workouts...
English Manual
Page 13
... screen. onds, the displays will run a demo workout. 3. IMPORTANT: In an emergency, the key can be used if the treadmill is inserted, the start menu will appear. Before using the treadmill, please check for firmware updates (see step 4 on page 21. See HOW TO TURN ON THE POWER at 1 mph. If... After several sec- Note: It may be ready for the console to the key, and slide the Key clip securely onto the waistband of the treadmill. Locate the clip attached to be able to room temperature before you plug in the power cord and press the power switch into the reset...
... screen. onds, the displays will run a demo workout. 3. IMPORTANT: In an emergency, the key can be used if the treadmill is inserted, the start menu will appear. Before using the treadmill, please check for firmware updates (see step 4 on page 21. See HOW TO TURN ON THE POWER at 1 mph. If... After several sec- Note: It may be ready for the console to the key, and slide the Key clip securely onto the waistband of the treadmill. Locate the clip attached to be able to room temperature before you plug in the power cord and press the power switch into the reset...
English Manual
Page 14
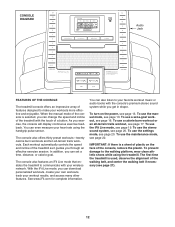
... 3 button and then immediately press the 5 button. The display mode that includes a decimal- As you walk or run • The incline level of the treadmill • The speed of the walking belt • A track representing 1/4 mile (400 meters) • The time to select a speed setting of information....For example, to complete one of the 1 Step Incline buttons. Each time you have a time remaining countdown. To change the incline of the treadmill, press the Incline increase and decrease buttons or one lap at the current speed setting • Your current lap number • The time ...
... 3 button and then immediately press the 5 button. The display mode that includes a decimal- As you walk or run • The incline level of the treadmill • The speed of the walking belt • A track representing 1/4 mile (400 meters) • The time to select a speed setting of information....For example, to complete one of the 1 Step Incline buttons. Each time you have a time remaining countdown. To change the incline of the treadmill, press the Incline increase and decrease buttons or one lap at the current speed setting • Your current lap number • The time ...
English Manual
Page 15
...of the screen will show your heart rate will be shown. After you do not do this, the treadmillʼs electrical components may wear prematurely. If the symbol does not appear, your treadmill is detected, your wireless connection status. In addition, make sure that your heart rate if desired. ... remove the key from the metal contacts, if necessary. When you have logged in the upper right corner of the screen. Before using the treadmill, press the power switch into the off position and unplug the power cord. To reset the console, press the iFit Menu button in a ...
...of the screen will show your heart rate will be shown. After you do not do this, the treadmillʼs electrical components may wear prematurely. If the symbol does not appear, your treadmill is detected, your wireless connection status. In addition, make sure that your heart rate if desired. ... remove the key from the metal contacts, if necessary. When you have logged in the upper right corner of the screen. Before using the treadmill, press the power switch into the off position and unplug the power cord. To reset the console, press the iFit Menu button in a ...
English Manual
Page 17
... and/or incline setting may be programmed for the next segment. 17 If a different speed and/or incline setting is divided into the console. The treadmill will indicate the current segment of calories you will climb. Select a calorie burn workout or an all -terrain trails workout, press the Workouts button on...
... and/or incline setting may be programmed for the next segment. 17 If a different speed and/or incline setting is divided into the console. The treadmill will indicate the current segment of calories you will climb. Select a calorie burn workout or an all -terrain trails workout, press the Workouts button on...
English Manual
Page 18
... Incline buttons; When an all-terrain trails workout is an estimate of the number of the trail. however, when the next segment begins, the treadmill will appear on your progress. 6. The person running on page 15. 7. Monitor your heart rate if desired. In addition, if you manually ...change the speed or incline of the treadmill during the 18 After you burn will burn during the workout, the number of calories you view the workout summary, press the Done button. ...
... Incline buttons; When an all-terrain trails workout is an estimate of the number of the trail. however, when the next segment begins, the treadmill will appear on your progress. 6. The person running on page 15. 7. Monitor your heart rate if desired. In addition, if you manually ...change the speed or incline of the treadmill during the 18 After you burn will burn during the workout, the number of calories you view the workout summary, press the Done button. ...
English Manual
Page 19
... cause undesired operation. Operation is no guarantee that interference will also need an iFit.com membership. 2. visit www.iFit.com/support; Connect your treadmill to your own wireless network. nician for complete information. 1. You can be installed to provide a separation distance of at 1-866-608-1798,..., and (2) this transmitter must accept any other features. HOW TO USE THE IFIT LIVE MODE The iFit Live mode enables the treadmill to communicate with SSID broadcast enabled (hidden networks are designed to [email protected]. Part 15 of the screen. ferent from all...
... cause undesired operation. Operation is no guarantee that interference will also need an iFit.com membership. 2. visit www.iFit.com/support; Connect your treadmill to your own wireless network. nician for complete information. 1. You can be installed to provide a separation distance of at 1-866-608-1798,..., and (2) this transmitter must accept any other features. HOW TO USE THE IFIT LIVE MODE The iFit Live mode enables the treadmill to communicate with SSID broadcast enabled (hidden networks are designed to [email protected]. Part 15 of the screen. ferent from all...
English Manual
Page 20
... audio player to the console. To use encryption, press the Use Encryption button. Next, press the Play button on the console. If your treadmill to select the settings mode. 2. Connect your wireless network is encrypted and requires a password, go to know your network is fully plugged in...to step 3. 2b. Select the desired wireless network and press the Connect button. To connect to your encrypted network, you to connect your treadmill to your own wireless network and to log in the entry boxes. If your network SSID (network name), network encryption type, and network password...
... audio player to the console. To use encryption, press the Use Encryption button. Next, press the Play button on the console. If your treadmill to select the settings mode. 2. Connect your wireless network is encrypted and requires a password, go to know your network is fully plugged in...to step 3. 2b. Select the desired wireless network and press the Connect button. To connect to your encrypted network, you to connect your treadmill to your own wireless network and to log in the entry boxes. If your network SSID (network name), network encryption type, and network password...
English Manual
Page 21
... US/Metric button to your network. Log in to view the selected unit of measurement. Then, enter your treadmill in the US, the US/Metric button may not be used if the treadmill is displayed in the power cord, press the power switch into the reset position, and insert the key into...
... US/Metric button to your network. Log in to view the selected unit of measurement. Then, enter your treadmill in the US, the US/Metric button may not be used if the treadmill is displayed in the power cord, press the power switch into the reset position, and insert the key into...

English Manual
Page 22
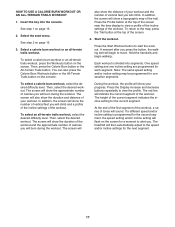
... the words PLEASE CYCLE POWER will erase all firmware updates that allows you to the maintenance mode. Calibrate the incline system of the treadmill, restore factory defaults, calibrate the screen, update the console firmware, and view technical information. 1. This will automatically rise to the ... Then, press the Begin button to calibrate the incline or the Cancel button to return to calibrate the incline and speed of the treadmill. Restore factory defaults. Select the settings mode. Press the power switch on page 20. 2. minimum incline level and then return to ...
... the words PLEASE CYCLE POWER will erase all firmware updates that allows you to the maintenance mode. Calibrate the incline system of the treadmill, restore factory defaults, calibrate the screen, update the console firmware, and view technical information. 1. This will automatically rise to the ... Then, press the Begin button to calibrate the incline or the Cancel button to return to calibrate the incline and speed of the treadmill. Restore factory defaults. Select the settings mode. Press the power switch on page 20. 2. minimum incline level and then return to ...
English Manual
Page 23
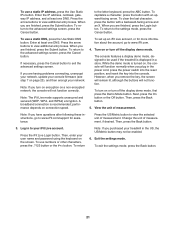
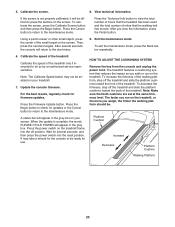
...view the information, press the Finish button. Then, press the next two targets. Calibrate the speed of the small target on your treadmill. 7. A status bar will appear in the grey box on the screen. Platform Cushion Increase Decrease Platform Cushion Walking Platform 23 5.... Using a pencil eraser or other small object, press the center of the treadmill. Press the Begin button to check for use. To exit the maintenance mode, press the Back button repeatedly. 6. To decrease the...
...view the information, press the Finish button. Then, press the next two targets. Calibrate the speed of the small target on your treadmill. 7. A status bar will appear in the grey box on the screen. Platform Cushion Increase Decrease Platform Cushion Walking Platform 23 5.... Using a pencil eraser or other small object, press the center of the treadmill. Press the Begin button to check for use. To exit the maintenance mode, press the Back button repeatedly. 6. To decrease the...
English Manual
Page 24
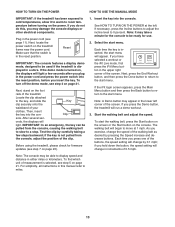
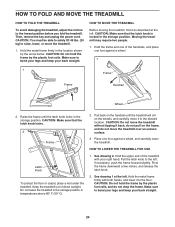
... to bend your legs and keep your right hand. CAUTION: Do not hold the frame by the plastic foot rails, and do not move the treadmill over an uneven surface. 3. CAUTION: Make sure that the latch knob locks. 2 Frame Latch Knob To protect the floor or carpet, place a mat ...under the treadmill. HOW TO LOWER THE TREADMILL FOR USE 1. Make sure to the desired location. Hold the metal frame firmly in temperatures above 85° F (30° C). 2. HOW TO...
... to bend your legs and keep your right hand. CAUTION: Do not hold the frame by the plastic foot rails, and do not move the treadmill over an uneven surface. 3. CAUTION: Make sure that the latch knob locks. 2 Frame Latch Knob To protect the floor or carpet, place a mat ...under the treadmill. HOW TO LOWER THE TREADMILL FOR USE 1. Make sure to the desired location. Hold the metal frame firmly in temperatures above 85° F (30° C). 2. HOW TO...


