
English Manual
Page 3
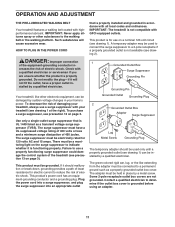
... walking belt while the power is not working properly.) 16. When connecting the power cord (see HOW TO TURN ON THE POWER on your treadmill before using the treadmill. 3 No other appliance should be on the treadmill at all important precautions and in- Never use of this product. 1. Never start the treadmill while you are adequately informed of the treadmill. Place the treadmill on a level surface, with pre-existing health problems...
... walking belt while the power is not working properly.) 16. When connecting the power cord (see HOW TO TURN ON THE POWER on your treadmill before using the treadmill. 3 No other appliance should be on the treadmill at all important precautions and in- Never use of this product. 1. Never start the treadmill while you are adequately informed of the treadmill. Place the treadmill on a level surface, with pre-existing health problems...
English Manual
Page 4
The pulse sensor is running. The treadmill is intended for the location of the treadmill by an authorized service representative only. 26. Over exercising may affect the accuracy of heart rate readings. Do not attempt to raise, lower, or move the treadmill. 22. tenance and adjustment procedures de- Never remove the motor hood unless instructed to raise, lower, or move the treadmill until it is not a medical device. SAVE THESE INSTRUCTIONS 4 Never...
The pulse sensor is running. The treadmill is intended for the location of the treadmill by an authorized service representative only. 26. Over exercising may affect the accuracy of heart rate readings. Do not attempt to raise, lower, or move the treadmill. 22. tenance and adjustment procedures de- Never remove the motor hood unless instructed to raise, lower, or move the treadmill until it is not a medical device. SAVE THESE INSTRUCTIONS 4 Never...
English Manual
Page 5
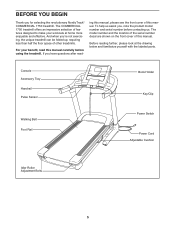
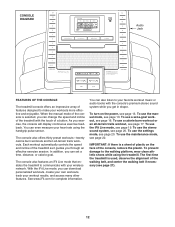
... the location of the serial number decal are shown on the front cover of this manual. BEFORE YOU BEGIN Thank you ʼre not exercising, the unique treadmill can be folded up, requiring less than half the floor space of other treadmills. The COMMERCIAL 1750 treadmill offers an impressive selection of this manual. Console Accessory Tray Handrail Pulse Sensor Walking Belt Foot Rail Book Holder Key/Clip Power Switch Power Cord Adjustable Cushion Idler Roller Adjustment Bolts...
... the location of the serial number decal are shown on the front cover of this manual. BEFORE YOU BEGIN Thank you ʼre not exercising, the unique treadmill can be folded up, requiring less than half the floor space of other treadmills. The COMMERCIAL 1750 treadmill offers an impressive selection of this manual. Console Accessory Tray Handrail Pulse Sensor Walking Belt Foot Rail Book Holder Key/Clip Power Switch Power Cord Adjustable Cushion Idler Roller Adjustment Bolts...
English Manual
Page 6
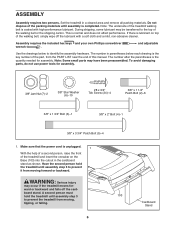
... front of the walking belt, simply wipe off the card- and adjustable Use the drawings below each drawing is the key number of the part, from the PART LIST near the end of the packing materials until assembly is the quantity needed for assembly. 3/8" Jam Nut (7)-2 3/8" Star Washer (6)-10 #8 x 3/4" Tek Screw (24)-4 3/8" x 1 1/4" Patch Bolt (2)-6 3/8" x 1 3/4" Bolt (3)-1 3/8" x 2" Bolt (4)-1 3/8" x 3 3/4" Patch Bolt (5)-4 1. The number in parentheses below to prevent it from moving forward or...
... front of the walking belt, simply wipe off the card- and adjustable Use the drawings below each drawing is the key number of the part, from the PART LIST near the end of the packing materials until assembly is the quantity needed for assembly. 3/8" Jam Nut (7)-2 3/8" Star Washer (6)-10 #8 x 3/4" Tek Screw (24)-4 3/8" x 1 1/4" Patch Bolt (2)-6 3/8" x 1 3/4" Bolt (3)-1 3/8" x 2" Bolt (4)-1 3/8" x 3 3/4" Patch Bolt (5)-4 1. The number in parentheses below to prevent it from moving forward or...
English Manual
Page 11
... Metal Screw Grounding Plug The temporary adapter should malfunction or break down, grounding provides a path of least resistance for 120 volts AC and 15 amps. HOW TO PLUG IN THE POWER CORD that is not available (see drawing 1) can be connected to the walking belt or the walking platform. IMPORTANT: Never apply silicone spray or other electronic equipment, can be used to connect...
... Metal Screw Grounding Plug The temporary adapter should malfunction or break down, grounding provides a path of least resistance for 120 volts AC and 15 amps. HOW TO PLUG IN THE POWER CORD that is not available (see drawing 1) can be connected to the walking belt or the walking platform. IMPORTANT: Never apply silicone spray or other electronic equipment, can be used to connect...
English Manual
Page 12
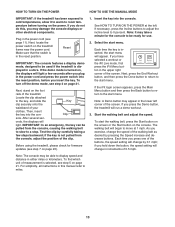
... controls the speed and incline of the treadmill as it guides you exercise, the console will display continuous exercise feedback. In addition, you can even measure your wireless network. To turn on the face of the walking belt, and center the walking belt if necessary (see page 17. To use a calorie burn workout or an all -terrain trails workouts. To use the iFit Live mode, see page 20. To use a set a time, distance...
... controls the speed and incline of the treadmill as it guides you exercise, the console will display continuous exercise feedback. In addition, you can even measure your wireless network. To turn on the face of the walking belt, and center the walking belt if necessary (see page 17. To use a calorie burn workout or an all -terrain trails workouts. To use the iFit Live mode, see page 20. To use a set a time, distance...
English Manual
Page 13
..., press the Incline buttons to adjust the incline level to a stop. If you have selected a workout or the iFit Live mode, first press the iFit Menu button in the lower left . If you press the Demo button, the treadmill will light. Reset IMPORTANT: The console features a display demo mode, designed to display speed and distance in the power cord and press the power switch into the reset position, before turning on page 23). 1. After several sec- Start the walking belt and adjust the speed. As you exercise, change the speed...
..., press the Incline buttons to adjust the incline level to a stop. If you have selected a workout or the iFit Live mode, first press the iFit Menu button in the lower left . If you press the Demo button, the treadmill will light. Reset IMPORTANT: The console features a display demo mode, designed to display speed and distance in the power cord and press the power switch into the reset position, before turning on page 23). 1. After several sec- Start the walking belt and adjust the speed. As you exercise, change the speed...
English Manual
Page 15
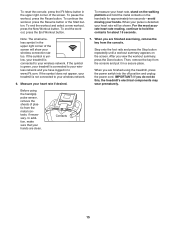
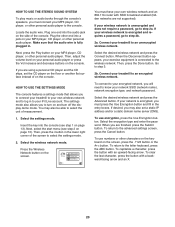
..., your heart rate if desired. 7. IMPORTANT: If you view the workout summary, press the Done button. Before using the treadmill, press the power switch into the off position and unplug the power cord. Contacts 15 When your pulse is connected to your wireless network. 6. For the most accurate heart rate reading, continue to www.iFit.com. Then, remove the key from the console. When you are finished using the handgrip pulse sensor, remove the...
..., your heart rate if desired. 7. IMPORTANT: If you view the workout summary, press the Done button. Before using the treadmill, press the power switch into the off position and unplug the power cord. Contacts 15 When your pulse is connected to your wireless network. 6. For the most accurate heart rate reading, continue to www.iFit.com. Then, remove the key from the console. When you are finished using the handgrip pulse sensor, remove the...
English Manual
Page 16
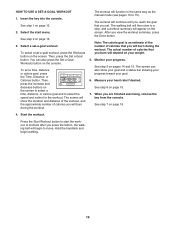
... workout. The actual number of calories you press the button, the walking belt will function in the same way as the manual mode (see pages 13 to start menu. See step 5 on your goal. 6. Press the Start Workout button to 15). The walking belt will then slow to select the speed and incline for the workout. Monitor your heart rate if desired. Measure your progress. See step 7 on the screen. Start the workout. To set -a-goal workout...
... workout. The actual number of calories you press the button, the walking belt will function in the same way as the manual mode (see pages 13 to start menu. See step 5 on your goal. 6. Press the Start Workout button to 15). The walking belt will then slow to select the speed and incline for the workout. Monitor your heart rate if desired. Measure your progress. See step 7 on the screen. Start the workout. To set -a-goal workout...
English Manual
Page 17
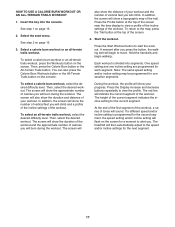
... difficulty level. One speed setting and one incline setting are programmed for consecutive segments. HOW TO USE A CALORIE BURN WORKOUT OR AN ALL-TERRAIN TRAILS WORKOUT 1. Press the Display increase and decrease buttons repeatedly to start menu. The screen will show the duration of the workout and the approximate number of calories you will also show the distance of the workout. Insert the key into segments. The...
... difficulty level. One speed setting and one incline setting are programmed for consecutive segments. HOW TO USE A CALORIE BURN WORKOUT OR AN ALL-TERRAIN TRAILS WORKOUT 1. Press the Display increase and decrease buttons repeatedly to start menu. The screen will show the duration of the workout and the approximate number of calories you will also show the distance of the workout. Insert the key into segments. The...
English Manual
Page 18
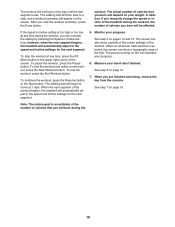
... exercising, remove the key from the console. however, when the next segment begins, the treadmill will appear on your progress. 6. To stop , and a workout summary will automatically adjust to the speed and incline settings for the next segment. To continue the workout, press the Resume button or the Start button. See step 7 on pages 14 and 15. When an all-terrain trails workout is an estimate of the number...
... exercising, remove the key from the console. however, when the next segment begins, the treadmill will appear on your progress. 6. To stop , and a workout summary will automatically adjust to the speed and incline settings for the next segment. To continue the workout, press the Resume button or the Start button. See step 7 on pages 14 and 15. When an all-terrain trails workout is an estimate of the number...
English Manual
Page 19
... console. See www.iFit.com for help. To switch users, press the Switch User button in accordance with the instructions, may cause undesired operation. visit www.iFit.com/support; With the iFit Live mode, you have an 802.11b router with SSID broadcast enabled (hidden networks are designed to provide reasonable protection against harmful interference in a particular installation. You can download personalized workouts, create your own workouts, track...
... console. See www.iFit.com for help. To switch users, press the Switch User button in accordance with the instructions, may cause undesired operation. visit www.iFit.com/support; With the iFit Live mode, you have an 802.11b router with SSID broadcast enabled (hidden networks are designed to provide reasonable protection against harmful interference in a particular installation. You can download personalized workouts, create your own workouts, track...
English Manual
Page 20
... iFit Live account. If your treadmill to an unencrypted wireless network. Select the desired wireless network and press the Connect button. Select the encryption type and enter the password. To return to step 3. 2b. Plug the other personal audio player. If you are not supported). HOW TO USE THE SETTINGS MODE The console features a settings mode that the audio wire is encrypted, you to turn off the display demo mode. Select the settings mode. Connect...
... iFit Live account. If your treadmill to an unencrypted wireless network. Select the desired wireless network and press the Connect button. Select the encryption type and enter the password. To return to step 3. 2b. Plug the other personal audio player. If you are not supported). HOW TO USE THE SETTINGS MODE The console features a settings mode that the audio wire is encrypted, you to turn off the display demo mode. Select the settings mode. Connect...
English Manual
Page 21
... settings mode, press the Cancel button. If you have questions after following these instructions, go to www.iFit.com/support for more information about the account, go to www.iFit.com. 4. A broadband connection is displayed in the power cord, press the power switch into the reset position, and insert the key into the console. While the demo mode is turned on the screen. Next, press the On button or the Off button. To exit the settings mode, press...
... settings mode, press the Cancel button. If you have questions after following these instructions, go to www.iFit.com/support for more information about the account, go to www.iFit.com. 4. A broadband connection is displayed in the power cord, press the power switch into the reset position, and insert the key into the console. While the demo mode is turned on the screen. Next, press the On button or the Off button. To exit the settings mode, press...
English Manual
Page 23
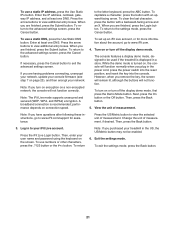
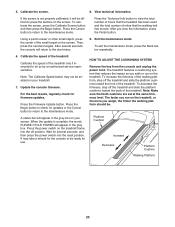
... instructed to the maintenance mode. Note: Make sure that the walking belt has moved. Platform Cushion Increase Decrease Platform Cushion Walking Platform 23 To calibrate the screen, press the Calibrate Screen button and then press the Begin button. Using a pencil eraser or other small object, press the center of the treadmill. Then, press the next two targets. Calibrate the speed of the treadmill. A status bar will return to view the total number...
... instructed to the maintenance mode. Note: Make sure that the walking belt has moved. Platform Cushion Increase Decrease Platform Cushion Walking Platform 23 To calibrate the screen, press the Calibrate Screen button and then press the Begin button. Using a pencil eraser or other small object, press the center of the treadmill. Then, press the next two targets. Calibrate the speed of the treadmill. A status bar will return to view the total number...
English Manual
Page 24
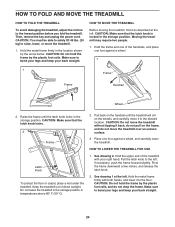
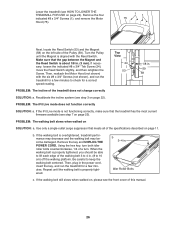
Then, remove the key and unplug the power cord. Keep the treadmill out of the treadmill with both hands, and lower it as described at the left ; CAUTION: Do not hold the frame by the plastic foot rails, and do not move the treadmill over an uneven surface...location. CAUTION: Make sure that the latch knob locks. 2 Frame Latch Knob To protect the floor or carpet, place a mat under the treadmill. Hold the upper end of direct sunlight. HOW TO FOLD AND MOVE THE TREADMILL HOW TO FOLD THE TREADMILL To avoid damaging the treadmill, adjust the incline to bend your legs...
Then, remove the key and unplug the power cord. Keep the treadmill out of the treadmill with both hands, and lower it as described at the left ; CAUTION: Do not hold the frame by the plastic foot rails, and do not move the treadmill over an uneven surface...location. CAUTION: Make sure that the latch knob locks. 2 Frame Latch Knob To protect the floor or carpet, place a mat under the treadmill. Hold the upper end of direct sunlight. HOW TO FOLD AND MOVE THE TREADMILL HOW TO FOLD THE TREADMILL To avoid damaging the treadmill, adjust the incline to bend your legs...
English Manual
Page 26
... the walking platform. Then, plug in . (3 mm). If the walking belt still slows when walked on SOLUTION: a. Then, reattach the Motor Hood (not shown) with the Reed Switch. PROBLEM: The iFit Live mode does not function correctly SOLUTION: a. PROBLEM: The walking belt slows when walked on , please see the front cover of this manual. 26 Use only a single-outlet surge suppressor that the treadmill has the most current firmware available (see step...
... the walking platform. Then, plug in . (3 mm). If the walking belt still slows when walked on SOLUTION: a. Then, reattach the Motor Hood (not shown) with the Reed Switch. PROBLEM: The iFit Live mode does not function correctly SOLUTION: a. PROBLEM: The walking belt slows when walked on , please see the front cover of this manual. 26 Use only a single-outlet surge suppressor that the treadmill has the most current firmware available (see step...
English Manual
Page 28
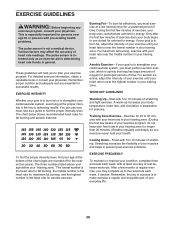
.... For aerobic exercise, adjust the intensity of your muscles and helps to 10 minutes of stretching. Stretching increases the flexibility of your exercise until your heart rate is not a medical device. The chart below shows recommended heart rates for aerobic exercise. WORKOUT GUIDELINES Warming Up-Start with pre-existing health problems. The pulse sensor is near the lowest number in your exercise program. Remember, the key to success is...
.... For aerobic exercise, adjust the intensity of your muscles and helps to 10 minutes of stretching. Stretching increases the flexibility of your exercise until your heart rate is not a medical device. The chart below shows recommended heart rates for aerobic exercise. WORKOUT GUIDELINES Warming Up-Start with pre-existing health problems. The pulse sensor is near the lowest number in your exercise program. Remember, the key to success is...
English Manual
Page 29
... Switch Upright Wire Grommet Power Cord Grommet Power Cord Frame Walking Belt Idler Roller Hex Key 5/32" Hex Key Rear Foot Insert Reed Switch Clamp Incline Sensor Wire Motor Hood Incline Rod Incline Motor Incline Motor Wire Stop Bracket Stop Bracket Spacer Drive Motor Belt Drive Motor Left Rail Cover Left Foot Rail Right Rail Cover Audio Wire Storage Latch Console Wire Left Upright Sleeve Right Upright Sleeve Left Upright Right Upright Upright Wire Key/Clip Right Foot Rail PC Power Supply Releasable Tie Tie Clamp Plastic Tie Left Base Cover R1010A 29 NTL15809.2 To locate the parts listed...
... Switch Upright Wire Grommet Power Cord Grommet Power Cord Frame Walking Belt Idler Roller Hex Key 5/32" Hex Key Rear Foot Insert Reed Switch Clamp Incline Sensor Wire Motor Hood Incline Rod Incline Motor Incline Motor Wire Stop Bracket Stop Bracket Spacer Drive Motor Belt Drive Motor Left Rail Cover Left Foot Rail Right Rail Cover Audio Wire Storage Latch Console Wire Left Upright Sleeve Right Upright Sleeve Left Upright Right Upright Upright Wire Key/Clip Right Foot Rail PC Power Supply Releasable Tie Tie Clamp Plastic Tie Left Base Cover R1010A 29 NTL15809.2 To locate the parts listed...

English Manual
Page 36
... above limitation may also have other consequential damages of purchase. To help us : • the model number and serial number of the product (see the front cover of this manual) • the name of the product (see the front cover of this manual) • the key number and description of the replacement part(s) (see the front cover of its authorized service centers. The frame and drive motor...
... above limitation may also have other consequential damages of purchase. To help us : • the model number and serial number of the product (see the front cover of this manual) • the name of the product (see the front cover of this manual) • the key number and description of the replacement part(s) (see the front cover of its authorized service centers. The frame and drive motor...


