
English Manual
Page 2
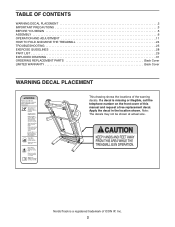
... actual size. TABLE OF CONTENTS WARNING DECAL PLACEMENT 2 IMPORTANT PRECAUTIONS 3 BEFORE YOU BEGIN 5 ASSEMBLY 6 OPERATION AND ADJUSTMENT 11 HOW TO FOLD AND MOVE THE TREADMILL 24 TROUBLESHOOTING 25 EXERCISE GUIDELINES 28 PART LIST 29 EXPLODED DRAWING 31 ORDERING REPLACEMENT PARTS Back Cover... LIMITED WARRANTY Back Cover WARNING DECAL PLACEMENT This drawing shows the locations of this manual and request a free replacement decal. NordicTrack is ...
... actual size. TABLE OF CONTENTS WARNING DECAL PLACEMENT 2 IMPORTANT PRECAUTIONS 3 BEFORE YOU BEGIN 5 ASSEMBLY 6 OPERATION AND ADJUSTMENT 11 HOW TO FOLD AND MOVE THE TREADMILL 24 TROUBLESHOOTING 25 EXERCISE GUIDELINES 28 PART LIST 29 EXPLODED DRAWING 31 ORDERING REPLACEMENT PARTS Back Cover... LIMITED WARRANTY Back Cover WARNING DECAL PLACEMENT This drawing shows the locations of this manual and request a free replacement decal. NordicTrack is ...
English Manual
Page 4
... you feel faint or if you experience pain while exercising, stop immediately and cool down. Never leave the treadmill unattended while it is properly assembled. (See ASSEMBLY on page 6, and HOW TO FOLD AND MOVE THE TREADMILL on page 24.) You must be performed by an authorized service representative only. 26. Always remove the...
... you feel faint or if you experience pain while exercising, stop immediately and cool down. Never leave the treadmill unattended while it is properly assembled. (See ASSEMBLY on page 6, and HOW TO FOLD AND MOVE THE TREADMILL on page 24.) You must be performed by an authorized service representative only. 26. Always remove the...
English Manual
Page 6
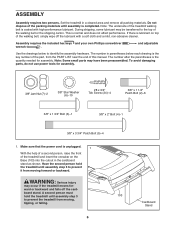
... unplugged. 1 With the help of a second person, raise the front of this manual. Have the second person hold the treadmill until assembly step 3 103 to prevent it from moving forward or backward. ward or backward and falls off the lubricant with high-performance lubricant.... During shipping, some lubricant may be transferred to the top of the packing materials until assembly step 3 to prevent the treadmill from moving , tipping, or falling. 6 Cardboard Stand Assembly requires the included hex keys and your own Phillips screwdriver wrench . To avoid damaging parts,...
... unplugged. 1 With the help of a second person, raise the front of this manual. Have the second person hold the treadmill until assembly step 3 103 to prevent it from moving forward or backward. ward or backward and falls off the lubricant with high-performance lubricant.... During shipping, some lubricant may be transferred to the top of the packing materials until assembly step 3 to prevent the treadmill from moving , tipping, or falling. 6 Cardboard Stand Assembly requires the included hex keys and your own Phillips screwdriver wrench . To avoid damaging parts,...

English Manual
Page 7
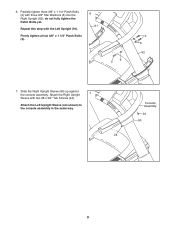
... 3/8" x 3 3/4" Patch Bolts (5) and two 3/8" Star Washers (6). The stand will be necessary to tip the top of a second person, lower the treadmill off the cardboard stand. Attach the Left Upright (91) in assembly step 9. With the help of the Right Upright forward slightly as you thread the Patch Bolts into it. Slide the...
... 3/8" x 3 3/4" Patch Bolts (5) and two 3/8" Star Washers (6). The stand will be necessary to tip the top of a second person, lower the treadmill off the cardboard stand. Attach the Left Upright (91) in assembly step 9. With the help of the Right Upright forward slightly as you thread the Patch Bolts into it. Slide the...

English Manual
Page 8
... (93) to the Console Wire (88). If they do not, turn one connector and try again. Console Assembly 91 88 93 93 Wire Tie 88 92 5. Make sure that no wires are 5 pinched. Console Assembly 110 91 110 92 8 The connectors should slide together easily and snap into the Uprights (91, 92...
... (93) to the Console Wire (88). If they do not, turn one connector and try again. Console Assembly 91 88 93 93 Wire Tie 88 92 5. Make sure that no wires are 5 pinched. Console Assembly 110 91 110 92 8 The connectors should slide together easily and snap into the Uprights (91, 92...
English Manual
Page 9
Attach the Right Upright 7 Sleeve with three 3/8" Star Washers (6) into the Right Upright (92); Partially tighten three 3/8" x 1 1/4" Patch Bolts (2) with two #8 x 3/4" Tek Screws (24). Repeat this step with the Left Upright (91). Attach the Left Upright Sleeve (not shown) to the console assembly in the same way. Console Assembly 24 90 24 9 do not fully tighten the Patch Bolts yet. Slide the Right Upright Sleeve (90) up against the console assembly. 6. Firmly tighten all six 3/8" x 1 1/4" Patch Bolts (2). 6 91 2 6 2 6 92 7.
Attach the Right Upright 7 Sleeve with three 3/8" Star Washers (6) into the Right Upright (92); Partially tighten three 3/8" x 1 1/4" Patch Bolts (2) with two #8 x 3/4" Tek Screws (24). Repeat this step with the Left Upright (91). Attach the Left Upright Sleeve (not shown) to the console assembly in the same way. Console Assembly 24 90 24 9 do not fully tighten the Patch Bolts yet. Slide the Right Upright Sleeve (90) up against the console assembly. 6. Firmly tighten all six 3/8" x 1 1/4" Patch Bolts (2). 6 91 2 6 2 6 92 7.


