
User Manual
Page 9
... d Button...10 Switching Between Tabs...10 Help Displays...11 Shutter-release Button ...11 Attaching the Camera Strap ...11 First Steps ...12 Charging the Battery ...12 Inserting the Battery ...14 Removing the Battery ...15 Turning On and Off the Camera...15 Setting Display Language, Date and Time 16 Inserting Memory Cards ...18 Removing Memory Cards...18 A Basic Photography and Playback: Auto Mode 20 Step 1 Turn the Camera On and Select A (Auto) Mode 20 Indicators Displayed in A (Auto) Mode 21 Step 2 Frame a Picture ...22 Using the Zoom...23 Step 3 Focus and Shoot ...24 Step 4 Playing...
... d Button...10 Switching Between Tabs...10 Help Displays...11 Shutter-release Button ...11 Attaching the Camera Strap ...11 First Steps ...12 Charging the Battery ...12 Inserting the Battery ...14 Removing the Battery ...15 Turning On and Off the Camera...15 Setting Display Language, Date and Time 16 Inserting Memory Cards ...18 Removing Memory Cards...18 A Basic Photography and Playback: Auto Mode 20 Step 1 Turn the Camera On and Select A (Auto) Mode 20 Indicators Displayed in A (Auto) Mode 21 Step 2 Frame a Picture ...22 Using the Zoom...23 Step 3 Focus and Shoot ...24 Step 4 Playing...

User Manual
Page 11
... Recordings...76 Deleting Sound Files...77 Copying Voice Recordings...78 Connecting to Televisions, Computers and Printers 79 Connecting to a TV...79 Connecting to a Computer...80 Before Connecting the Camera...80 Transferring Pictures from a Camera to a Computer 81 Connecting to a Printer...84 Connecting the Camera and Printer...85 Printing Pictures One at a Time ...86 Printing Multiple Pictures ...87 Creating a DPOF Print Order: Print Set 90 d Shooting, Playback and Setup Menus 92 Shooting Options: The Shooting Menu 92 Displaying the Shooting Menu ...92 A Image Mode...93 B White Balance...
... Recordings...76 Deleting Sound Files...77 Copying Voice Recordings...78 Connecting to Televisions, Computers and Printers 79 Connecting to a TV...79 Connecting to a Computer...80 Before Connecting the Camera...80 Transferring Pictures from a Camera to a Computer 81 Connecting to a Printer...84 Connecting the Camera and Printer...85 Printing Pictures One at a Time ...86 Printing Multiple Pictures ...87 Creating a DPOF Print Order: Print Set 90 d Shooting, Playback and Setup Menus 92 Shooting Options: The Shooting Menu 92 Displaying the Shooting Menu ...92 A Image Mode...93 B White Balance...
User Manual
Page 13
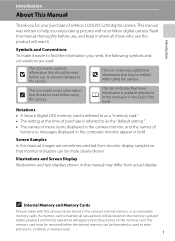
... before use, and keep it . Screen Samples In this manual, images are used to store pictures to the pictures on the memory card. Introduction Introduction About This Manual Thank you enjoy taking pictures with this camera can be stored in the camera's internal memory or on removable memory cards. This icon indicates that more clearly shown. Notations • A Secure Digital (SD) memory card is referred to as a "memory card." • The setting at the time of buttons or messages displayed in...
... before use, and keep it . Screen Samples In this manual, images are used to store pictures to the pictures on the memory card. Introduction Introduction About This Manual Thank you enjoy taking pictures with this camera can be stored in the camera's internal memory or on removable memory cards. This icon indicates that more clearly shown. Notations • A Secure Digital (SD) memory card is referred to as a "memory card." • The setting at the time of buttons or messages displayed in...

User Manual
Page 22
... or more menu items to follow Displayed when there are more previous menu items Shooting menu AF area mode Distortion control AF area mode Face priority Auto Manual Center Exit Press the k button or the multi selector K to proceed to the next set of options Exit Press the k button or the multi selector K to apply selection Switching Between Tabs Shooting menu Image mode White balance Continuous ISO sensitivity Color options Exit Shooting menu Image mode White balance Continuous ISO sensitivity Color options...
... or more menu items to follow Displayed when there are more previous menu items Shooting menu AF area mode Distortion control AF area mode Face priority Auto Manual Center Exit Press the k button or the multi selector K to proceed to the next set of options Exit Press the k button or the multi selector K to apply selection Switching Between Tabs Shooting menu Image mode White balance Continuous ISO sensitivity Color options Exit Shooting menu Image mode White balance Continuous ISO sensitivity Color options...
User Manual
Page 31
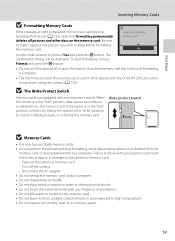
...insert the memory cards used in other data on the memory card. Write protect switch B Memory Cards • Use only Secure Digital memory cards. • Do not perform the following during data transfer to a computer. Note that formatting permanently deletes all pictures and other devices into the COOLPIX S203, be written to, or deleted from the memory card, or during formatting, while data is displayed, the memory card must be displayed. Take out the battery or memory card - Format card? First Steps Inserting Memory Cards B Formatting Memory Cards If the message at...
...insert the memory cards used in other data on the memory card. Write protect switch B Memory Cards • Use only Secure Digital memory cards. • Do not perform the following during data transfer to a computer. Note that formatting permanently deletes all pictures and other devices into the COOLPIX S203, be written to, or deleted from the memory card, or during formatting, while data is displayed, the memory card must be displayed. Take out the battery or memory card - Format card? First Steps Inserting Memory Cards B Formatting Memory Cards If the message at...

User Manual
Page 32
... A is displayed. 2 Press the A button. Proceed to charge or replace the battery. Auto mode 4 Check the battery level and the number of digital cameras. 1 Press the power switch to choose A and press the k button. The lens will light for first-time users of exposures remaining. The power-on the camera. Battery Level Battery level indicator Monitor NO INDICATOR B N Battery exhausted. Cannot take pictures in A (auto) mode, an automatic, "point-and-shoot" mode recommended for a moment and the monitor will turn on lamp (green) will...
... A is displayed. 2 Press the A button. Proceed to charge or replace the battery. Auto mode 4 Check the battery level and the number of digital cameras. 1 Press the power switch to choose A and press the k button. The lens will light for first-time users of exposures remaining. The power-on the camera. Battery Level Battery level indicator Monitor NO INDICATOR B N Battery exhausted. Cannot take pictures in A (auto) mode, an automatic, "point-and-shoot" mode recommended for a moment and the monitor will turn on lamp (green) will...

User Manual
Page 33
... Playback: Auto Mode 18 Internal memory indicator Indicates that images will turn green. Image mode The combination of camera shake in the monitor. Step 1 Turn the Camera On and Select A (Auto) Mode Indicators Displayed in A (Auto) Mode Shooting mode A displayed in which the effects of the subject movement and camera shake are reduced. D Functions Available in the setup menu and the camera detects camera shake and subject movement, the camera increases shutter speed to specify settings for the Motion detection option (A 120) in A (Auto) Mode In A (auto) mode, macro mode...
... Playback: Auto Mode 18 Internal memory indicator Indicates that images will turn green. Image mode The combination of camera shake in the monitor. Step 1 Turn the Camera On and Select A (Auto) Mode Indicators Displayed in A (Auto) Mode Shooting mode A displayed in which the effects of the subject movement and camera shake are reduced. D Functions Available in the setup menu and the camera detects camera shake and subject movement, the camera increases shutter speed to specify settings for the Motion detection option (A 120) in A (Auto) Mode In A (auto) mode, macro mode...
User Manual
Page 39
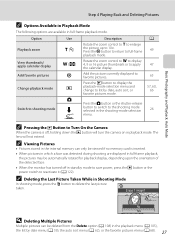
... selection menu and change to the shooting mode selected in the shooting-mode selection menu. Press the k button to return to favorite pictures. No Yes D Deleting Multiple Pictures Multiple pictures can only be viewed if no memory card is off in standby mode to save power, press the c button or the power switch to 10×. Add the picture currently displayed to full-frame playback mode. Option Playback zoom View thumbnails/ apply calendar display Add favorite pictures Change playback mode Switch to shooting mode Use g (i) f (h) k c A Description Rotate the zoom control...
... selection menu and change to the shooting mode selected in the shooting-mode selection menu. Press the k button to return to favorite pictures. No Yes D Deleting Multiple Pictures Multiple pictures can only be viewed if no memory card is off in standby mode to save power, press the c button or the power switch to 10×. Add the picture currently displayed to full-frame playback mode. Option Playback zoom View thumbnails/ apply calendar display Add favorite pictures Change playback mode Switch to shooting mode Use g (i) f (h) k c A Description Rotate the zoom control...

User Manual
Page 42
... important occasions (such as weddings) 2 s (two seconds): Suited for preventing camera shake The mode selected for self-timer is displayed. About one second before a picture is taken, press 30 the shutter-release button again. 1/125 F3.1 Focus and exposure will be set . 4 Press the shutter-release button the rest of seconds remaining before the shutter is released is released, the lamp remains lit and stops blinking. Taking Pictures...
... important occasions (such as weddings) 2 s (two seconds): Suited for preventing camera shake The mode selected for self-timer is displayed. About one second before a picture is taken, press 30 the shutter-release button again. 1/125 F3.1 Focus and exposure will be set . 4 Press the shutter-release button the rest of seconds remaining before the shutter is released is released, the lamp remains lit and stops blinking. Taking Pictures...

User Manual
Page 43
... the flash may be cancelled. 3 Rotate the zoom control to frame the picture. C The Macro Mode Setting The macro mode setting applied in A (auto) mode is stored in the camera's memory even after the camera is turned off, and reapplied the next time A (auto) mode is displayed. The camera can focus at a distance of less than 60 cm (2 ft.). 1 Press p (macro mode). The macro menu is positioned before K). If a setting is used for taking pictures of objects as close as 10...
... the flash may be cancelled. 3 Rotate the zoom control to frame the picture. C The Macro Mode Setting The macro mode setting applied in A (auto) mode is stored in the camera's memory even after the camera is turned off, and reapplied the next time A (auto) mode is displayed. The camera can focus at a distance of less than 60 cm (2 ft.). 1 Press p (macro mode). The macro menu is positioned before K). If a setting is used for taking pictures of objects as close as 10...

User Manual
Page 54
Shooting Suited for the Scene Shooting in the camera's memory even after the camera is turned off, and reapplied the next time food mode is disabled. C White Balance Setting in Food Mode • Increasing the amount of red or blue will decrease illumination effects. • Changing white balance in food mode will not affect white balance in the shooting menu (A 95). • The white balance setting applied in food mode is stored in Scene Mode B Note on Food Mode Flash mode is selected. 42 Macro mode setting (A 31) is fixed at ON.
Shooting Suited for the Scene Shooting in the camera's memory even after the camera is turned off, and reapplied the next time food mode is disabled. C White Balance Setting in Food Mode • Increasing the amount of red or blue will decrease illumination effects. • Changing white balance in food mode will not affect white balance in the shooting menu (A 95). • The white balance setting applied in food mode is stored in Scene Mode B Note on Food Mode Flash mode is selected. 42 Macro mode setting (A 31) is fixed at ON.
User Manual
Page 62
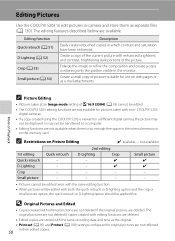
... only the portion visible in the internal memory or on the memory card. More on a different digital camera, the picture may not be displayed or may not be edited. • The COOLPIX S203 editing functions are deleted. COOLPIX S203 digital cameras. • If a copy created using the COOLPIX S203 is viewed on Playback C Picture Editing • Pictures taken at an Image mode setting of P 16:9 (3584) (A 93) cannot be transferred to edit pictures in-camera and store them as e-mail...
... only the portion visible in the internal memory or on the memory card. More on a different digital camera, the picture may not be displayed or may not be edited. • The COOLPIX S203 editing functions are deleted. COOLPIX S203 digital cameras. • If a copy created using the COOLPIX S203 is viewed on Playback C Picture Editing • Pictures taken at an Image mode setting of P 16:9 (3584) (A 93) cannot be transferred to edit pictures in-camera and store them as e-mail...

User Manual
Page 107
... Use when taking pictures under incandescent lighting. The effects of the light source. B Flash Mode At white-balance settings other than Auto or Flash, turn the flash off (W) (A 28). 95 a Auto (default setting) White balance automatically adjusted to achieve more information (A 96). Digital cameras can be previewed in the monitor (A 6). b Preset manual Neutral-colored object used under incandescent lighting. Shooting, Playback and Setup Menus Shooting Options: The Shooting Menu B White Balance Set to A (auto) M d (Shooting menu) M B White balance The color of light...
... Use when taking pictures under incandescent lighting. The effects of the light source. B Flash Mode At white-balance settings other than Auto or Flash, turn the flash off (W) (A 28). 95 a Auto (default setting) White balance automatically adjusted to achieve more information (A 96). Digital cameras can be previewed in the monitor (A 6). b Preset manual Neutral-colored object used under incandescent lighting. Shooting, Playback and Setup Menus Shooting Options: The Shooting Menu B White Balance Set to A (auto) M d (Shooting menu) M B White balance The color of light...

User Manual
Page 123
... sound settings. l/m Format memory/Format card A 123 Format internal memory or memory card. d Blink warning A 124 Set whether or not to default values. Basic Camera Setup: The Setup Menu The setup menu contains the following options. Shooting, Playback and Setup Menus U Motion detection A 120 Adjust the motion detection setting to television. d Date A 115 Set camera clock and choose home and destination time zones. o Video mode A 124 Adjust settings necessary for using digital zoom. a Menus A 114 Choose how menus are displayed. r Firmware...
... sound settings. l/m Format memory/Format card A 123 Format internal memory or memory card. d Blink warning A 124 Set whether or not to default values. Basic Camera Setup: The Setup Menu The setup menu contains the following options. Shooting, Playback and Setup Menus U Motion detection A 120 Adjust the motion detection setting to television. d Date A 115 Set camera clock and choose home and destination time zones. o Video mode A 124 Adjust settings necessary for using digital zoom. a Menus A 114 Choose how menus are displayed. r Firmware...
User Manual
Page 135
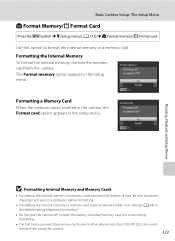
...Memory/m Format Card Press the d button M z (Setup menu) (A 112) M l Format memory/m Format card Use this camera. 123 The Format memory option appears in the setup menu. Be sure to transfer important pictures to a computer before formatting. • Formatting the internal memory or memory card restores favorites folder icon settings (A 64) to the default setting (displayed as number). • Do not turn the camera off, or open the battery-chamber/memory card slot cover during formatting. • The first time you insert the memory cards used in other devices into the COOLPIX S203...
...Memory/m Format Card Press the d button M z (Setup menu) (A 112) M l Format memory/m Format card Use this camera. 123 The Format memory option appears in the setup menu. Be sure to transfer important pictures to a computer before formatting. • Formatting the internal memory or memory card restores favorites folder icon settings (A 64) to the default setting (displayed as number). • Do not turn the camera off, or open the battery-chamber/memory card slot cover during formatting. • The first time you insert the memory cards used in other devices into the COOLPIX S203...

User Manual
Page 148
... file cannot be deleted. Disable protection. 108 This image cannot be played back. the current time zone. 117 - Error Messages Display Problem Solution A N Image cannot be viewed on this file. Select picture that the picture has been added. recording movie. playback mode, list by date, or favorite pictures mode. File cannot be modified. The copy 109 option screen will be played Playback pictures using the computer or any other devices which was used to - memory card, press the d button. No pictures are contained Select the folder 62...
... file cannot be deleted. Disable protection. 108 This image cannot be played back. the current time zone. 117 - Error Messages Display Problem Solution A N Image cannot be viewed on this file. Select picture that the picture has been added. recording movie. playback mode, list by date, or favorite pictures mode. File cannot be modified. The copy 109 option screen will be played Playback pictures using the computer or any other devices which was used to - memory card, press the d button. No pictures are contained Select the folder 62...
User Manual
Page 151
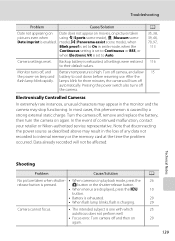
...; Focus error. In the event of any data not recorded to cool down before resuming use. Battery temperature is charging. A 35, 38, 39, 46, 70, 97, 113 116 15 Electronically Controlled Cameras In extremely rare instances, unusual characters may stop functioning. Camera settings reset. A button or the shutter-release button. • When menus are displayed, press the d button. • Battery is exhausted. • When flash lamp blinks, flash is high. mode), p (Panorama assist scene mode), when Blink...
...; Focus error. In the event of any data not recorded to cool down before resuming use. Battery temperature is charging. A 35, 38, 39, 46, 70, 97, 113 116 15 Electronically Controlled Cameras In extremely rare instances, unusual characters may stop functioning. Camera settings reset. A button or the shutter-release button. • When menus are displayed, press the d button. • Battery is exhausted. • When flash lamp blinks, flash is high. mode), p (Panorama assist scene mode), when Blink...
User Manual
Page 154
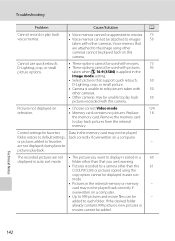
... folder. folder other than the 61 COOLPIX S203 or pictures copied using other cameras. • Other cameras may not be played back correctly if overwritten on a computer. • Up to 999 pictures and movie files can be played folder restore to default settings, back correctly if overwritten on television. • Choose correct Video mode. 124 • Memory card contains no pictures. added to favorites - Remove the memory card to play back pictures from the internal memory. Troubleshooting Problem Cause/Solution A Cannot record or play...
... folder. folder other than the 61 COOLPIX S203 or pictures copied using other cameras. • Other cameras may not be played back correctly if overwritten on a computer. • Up to 999 pictures and movie files can be played folder restore to default settings, back correctly if overwritten on television. • Choose correct Video mode. 124 • Memory card contains no pictures. added to favorites - Remove the memory card to play back pictures from the internal memory. Troubleshooting Problem Cause/Solution A Cannot record or play...

User Manual
Page 155
Use the printer to help information contained in Nikon Transfer. • Check the compatible operating systems. Memory card contains no pictures. Troubleshooting Problem Nikon Transfer does not start when camera is not set to start Nikon Transfer automatically. Replace the memory card. For more information on Nikon Transfer, refer to select paper size. A 20 20 81 - - 80 18 86, 87 Technical Notes 143 Remove the memory card to be selected from the internal memory. Paper size cannot be printed are not displayed. Cannot select paper...
Use the printer to help information contained in Nikon Transfer. • Check the compatible operating systems. Memory card contains no pictures. Troubleshooting Problem Nikon Transfer does not start when camera is not set to start Nikon Transfer automatically. Replace the memory card. For more information on Nikon Transfer, refer to select paper size. A 20 20 81 - - 80 18 86, 87 Technical Notes 143 Remove the memory card to be selected from the internal memory. Paper size cannot be printed are not displayed. Cannot select paper...

User Manual
Page 162
..., 20 Power switch 4, 20 Power-on lamp 4, 20 Preset manual 96 Print 86, 87, 90 Print set 90, 91 Print Set (Date) 91 Printer 84 Protect 108 R Rechargeable battery 129 Rechargeable Li-ion battery 12, 14 Recording movies 70 Red-eye reduction 28, 29 Reset all 126 Rotate image 109 S Scene auto selector x 34, 40 Scene mode 33, 34 Self-timer 30 Self-timer lamp 4, 30 Sepia 99 Setup menu 111 Shooting 20, 22, 24 Shooting menu 92 Shooting-mode selection menu 8 Shutter sound 121 Shutter-release button...
..., 20 Power switch 4, 20 Power-on lamp 4, 20 Preset manual 96 Print 86, 87, 90 Print set 90, 91 Print Set (Date) 91 Printer 84 Protect 108 R Rechargeable battery 129 Rechargeable Li-ion battery 12, 14 Recording movies 70 Red-eye reduction 28, 29 Reset all 126 Rotate image 109 S Scene auto selector x 34, 40 Scene mode 33, 34 Self-timer 30 Self-timer lamp 4, 30 Sepia 99 Setup menu 111 Shooting 20, 22, 24 Shooting menu 92 Shooting-mode selection menu 8 Shutter sound 121 Shutter-release button...


