
S1000pj User's Manual
Page 3
Introduction First Steps A Basic Photography and Playback: Auto Mode C Shooting Suited to Scenes F Shooting Smiling Faces (Smart Portrait) s Focusing on a Moving Subjects c More on Playback/In-Camera Editing D Movies Connecting to Televisions, Computers and Printers d Shooting, Playback and Setup Menus P Using the projector Technical Notes i
Introduction First Steps A Basic Photography and Playback: Auto Mode C Shooting Suited to Scenes F Shooting Smiling Faces (Smart Portrait) s Focusing on a Moving Subjects c More on Playback/In-Camera Editing D Movies Connecting to Televisions, Computers and Printers d Shooting, Playback and Setup Menus P Using the projector Technical Notes i

S1000pj User's Manual
Page 6
...; Do not look directly into the projector window or project in burns or fire. For Your Safety Use appropriate cables When connecting cables to the input and output jacks, use only the cables provided or sold by Nikon for the purpose, to maintain compliance with care Be careful that your ... or the hospital Turn the power off while inside the airplane during take off when using the flash Using the flash close to observe this camera may result in visual impairment. • Do not project towards the driver of a motor vehicle. Observe caution when using while in .) from the...
...; Do not look directly into the projector window or project in burns or fire. For Your Safety Use appropriate cables When connecting cables to the input and output jacks, use only the cables provided or sold by Nikon for the purpose, to maintain compliance with care Be careful that your ... or the hospital Turn the power off while inside the airplane during take off when using the flash Using the flash close to observe this camera may result in visual impairment. • Do not project towards the driver of a motor vehicle. Observe caution when using while in .) from the...

S1000pj User's Manual
Page 9
......4 Remote Control ML-L4...6 Attaching the Camera Strap ...7 The Monitor...8 Basic Operations...10 The A (Shooting Mode) Button...10 The c (Playback) Button...10 The Multi Selector...11 The d Button...12 Switching Between Tabs...12 Help Displays...13 The P (Projector) Button...13 First Steps ...14 Charging ...the Battery ...14 Inserting the Battery into the Camera 16 Removing the Battery ...17 Turning On and Off the Camera...17 Setting Display Language, Date and Time 18 Inserting Memory ...
......4 Remote Control ML-L4...6 Attaching the Camera Strap ...7 The Monitor...8 Basic Operations...10 The A (Shooting Mode) Button...10 The c (Playback) Button...10 The Multi Selector...11 The d Button...12 Switching Between Tabs...12 Help Displays...13 The P (Projector) Button...13 First Steps ...14 Charging ...the Battery ...14 Inserting the Battery into the Camera 16 Removing the Battery ...17 Turning On and Off the Camera...17 Setting Display Language, Date and Time 18 Inserting Memory ...
S1000pj User's Manual
Page 12
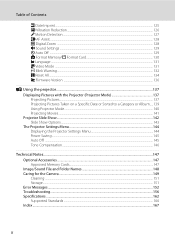
...Assist ...128 u Digital Zoom ...128 i Sound Settings ...129 k Auto Off ...129 l Format Memory/m Format Card 130 n Language ...131 o Video Mode ...131 d Blink Warning...132 p Reset All ...134 r Firmware Version ...136 P Using the projector...137 Displaying Pictures with the Projector (Projector Mode 137 Projecting ...The Projector Settings Menu ...144 Displaying the Projector Settings Menu 144 Power Saving...145 Auto Off ...145 Tone Compensation...146 Technical Notes...147 Optional Accessories ...147 Approved Memory Cards ...147 Image/Sound File and Folder Names 148 Caring for the Camera ...
...Assist ...128 u Digital Zoom ...128 i Sound Settings ...129 k Auto Off ...129 l Format Memory/m Format Card 130 n Language ...131 o Video Mode ...131 d Blink Warning...132 p Reset All ...134 r Firmware Version ...136 P Using the projector...137 Displaying Pictures with the Projector (Projector Mode 137 Projecting ...The Projector Settings Menu ...144 Displaying the Projector Settings Menu 144 Power Saving...145 Auto Off ...145 Tone Compensation...146 Technical Notes...147 Optional Accessories ...147 Approved Memory Cards ...147 Image/Sound File and Folder Names 148 Caring for the Camera ...

S1000pj User's Manual
Page 16
... slider 138 5 Built-in flash 30 6 Projector window 137 7 P (projector) button 137 8 Lens 151, 162 9 Infrared receiver (front 35, 138 10 Self-timer lamp 32 AF-assist illuminator 128 11 Lens cover 149 12 Built-in microphone 71, 81 13 Eyelet for camera strap 7 14 Connector cover 84, 86, 90 15 Cable connector...
... slider 138 5 Built-in flash 30 6 Projector window 137 7 P (projector) button 137 8 Lens 151, 162 9 Infrared receiver (front 35, 138 10 Self-timer lamp 32 AF-assist illuminator 128 11 Lens cover 149 12 Built-in microphone 71, 81 13 Eyelet for camera strap 7 14 Connector cover 84, 86, 90 15 Cable connector...

S1000pj User's Manual
Page 18
...the insulating sheet by pulling it in the direction indicated. 123 4 1 Infrared emitter Zoom button (shooting mode) f: wide g: tele 2 Zoom button (projector mode) h: thumbnail playback i: playback zoom -: decrease volume +: increase volume 3 Multi selector 4 Q (apply selection) button See the following pages for ...details of the operation of the Camera Remote Control ML-L4 The supplied remote control can be used to change the projected still pictures and to read and follow the ...
...the insulating sheet by pulling it in the direction indicated. 123 4 1 Infrared emitter Zoom button (shooting mode) f: wide g: tele 2 Zoom button (projector mode) h: thumbnail playback i: playback zoom -: decrease volume +: increase volume 3 Multi selector 4 Q (apply selection) button See the following pages for ...details of the operation of the Camera Remote Control ML-L4 The supplied remote control can be used to change the projected still pictures and to read and follow the ...

S1000pj User's Manual
Page 19
.... Introduction Replacing the Remote Control Battery 1 2 Parts of the Camera 3 Push the tab in the battery holder. B Note on the Projector Stand Do not carry the camera by the projector stand attached to the camera strap. Should the projector stand slip off the camera strap, the camera could fall. 7 Be sure that the "+" mark is facing up. Place...
.... Introduction Replacing the Remote Control Battery 1 2 Parts of the Camera 3 Push the tab in the battery holder. B Note on the Projector Stand Do not carry the camera by the projector stand attached to the camera strap. Should the projector stand slip off the camera strap, the camera could fall. 7 Be sure that the "+" mark is facing up. Place...

S1000pj User's Manual
Page 22
... shooting mode without switching playback mode. 10 Introduction Basic Operations The A (Shooting Mode) Button • Press the A button in playback mode or projector mode to enter shooting mode. • Press the A button in playback mode. A (auto) mode (A 22) 2 2. The Playback-mode .... • Press the c button in playback mode to display the playback-mode selection menu and switch playback modes. • If the camera is pressed with shooting-mode selection menu displayed, monitor display returns to playback mode without switching shooting mode. x Scene mode* (A 36)...
... shooting mode without switching playback mode. 10 Introduction Basic Operations The A (Shooting Mode) Button • Press the A button in playback mode or projector mode to enter shooting mode. • Press the A button in playback mode. A (auto) mode (A 22) 2 2. The Playback-mode .... • Press the c button in playback mode to display the playback-mode selection menu and switch playback modes. • If the camera is pressed with shooting-mode selection menu displayed, monitor display returns to playback mode without switching shooting mode. x Scene mode* (A 36)...

S1000pj User's Manual
Page 24
... when the menu contains two or more pages Top tab: Display the available menus in the current mode Bottom tab: Display the setup menu or projector settings menu Shooting menu Image mode White balance Continuous ISO sensitivity Color options Exit Displayed when there are one or more menu items to follow...
... when the menu contains two or more pages Top tab: Display the available menus in the current mode Bottom tab: Display the setup menu or projector settings menu Shooting menu Image mode White balance Continuous ISO sensitivity Color options Exit Displayed when there are one or more menu items to follow...

S1000pj User's Manual
Page 25
Introduction Basic Operations Help Displays Rotate the zoom control to g (j) when M/L is displayed at the lower right of the menu screen to end projector mode. Exit Back The P (Projector) Button • Press the P button in shooting mode or playback mode to switch to projector mode. • Press the P button again to view a description of the currently selected menu option. To return to the original menu, rotate the zoom control to g (j) again. Projector focus slider (A 138) 13 White balance For accurate color reproduction, choose a setting that matches the light source.
Introduction Basic Operations Help Displays Rotate the zoom control to g (j) when M/L is displayed at the lower right of the menu screen to end projector mode. Exit Back The P (Projector) Button • Press the P button in shooting mode or playback mode to switch to projector mode. • Press the P button again to view a description of the currently selected menu option. To return to the original menu, rotate the zoom control to g (j) again. Projector focus slider (A 138) 13 White balance For accurate color reproduction, choose a setting that matches the light source.
S1000pj User's Manual
Page 36
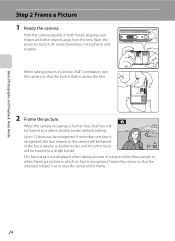
...of subjects other than one face is above the lens. 2 Frame the picture. When the camera recognizes a human face, that the built-in both hands, keeping your fingers and other faces...double border (default setting). Frame the picture so that the intended subject is recognized. Hold the camera steadily in flash is recognized, the face nearest to 12 faces can be framed by a ...and Playback: Auto Mode Step 2 Frame a Picture 1 Ready the camera. Up to the camera will be framed in portrait ("tall") orientation, turn the camera so that face will be framed by a double border, and ...
...of subjects other than one face is above the lens. 2 Frame the picture. When the camera recognizes a human face, that the built-in both hands, keeping your fingers and other faces...double border (default setting). Frame the picture so that the intended subject is recognized. Hold the camera steadily in flash is recognized, the face nearest to 12 faces can be framed by a ...and Playback: Auto Mode Step 2 Frame a Picture 1 Ready the camera. Up to the camera will be framed in portrait ("tall") orientation, turn the camera so that face will be framed by a double border, and ...
S1000pj User's Manual
Page 41
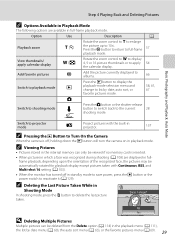
... in the internal memory can be automatically rotated for playback display except pictures taken with the built-in projector. 137 C Pressing the c Button to Turn On the Camera When the camera is inserted. • When pictures in which a face was recognized during shooting (A 108) are ...the picture currently displayed to albums. 66 Press the c button to display the Switch to playback mode c playback-mode selection menu and change to projector mode P Project pictures with Continuous, BSS, and Multi-shot 16 setting (A 103). • When the monitor has turned off , holding ...
... in the internal memory can be automatically rotated for playback display except pictures taken with the built-in projector. 137 C Pressing the c Button to Turn On the Camera When the camera is inserted. • When pictures in which a face was recognized during shooting (A 108) are ...the picture currently displayed to albums. 66 Press the c button to display the Switch to playback mode c playback-mode selection menu and change to projector mode P Project pictures with Continuous, BSS, and Multi-shot 16 setting (A 103). • When the monitor has turned off , holding ...

S1000pj User's Manual
Page 71
...zoom control to f (h) in full-frame 28 playback mode to return to project pictures taken on the selected date. 139 More on Playback/In-Camera Editing 59 Viewing Pictures by Date (List by Date Mode) Using List by Date Mode The following operations are available in the list by date... playbackmode selection menu. 10 Press the A button or the shutter-release button to return to the last shooting mode selected. 28 Switch to projector mode P Use the built-in projector to the list by date screen. To Use Description A Select date Press the multi selector H or I to select a date. 11 ...
...zoom control to f (h) in full-frame 28 playback mode to return to project pictures taken on the selected date. 139 More on Playback/In-Camera Editing 59 Viewing Pictures by Date (List by Date Mode) Using List by Date Mode The following operations are available in the list by date... playbackmode selection menu. 10 Press the A button or the shutter-release button to return to the last shooting mode selected. 28 Switch to projector mode P Use the built-in projector to the list by date screen. To Use Description A Select date Press the multi selector H or I to select a date. 11 ...

S1000pj User's Manual
Page 75
... last shooting mode 28 selected. Press the l button after selecting a category, l and a confirmation dialogue will be displayed. More on Playback/In-Camera Editing Switch to projector mode P Use the built-in projector to project pictures sorted to the selected category. 139 Auto Sort Menu Press the d button in full-frame playback mode or...
... last shooting mode 28 selected. Press the l button after selecting a category, l and a confirmation dialogue will be displayed. More on Playback/In-Camera Editing Switch to projector mode P Use the built-in projector to project pictures sorted to the selected category. 139 Auto Sort Menu Press the d button in full-frame playback mode or...

S1000pj User's Manual
Page 81
... Protect ➝A 114 Rotate image ➝A 115 Small picture ➝A 79 Voice memo ➝A 71 69 Switch to projector mode P Use the built-in projector to project pictures added to the selected album. 139 Favorite Pictures Menu Press the d button in full-frame playback mode or...release button to return to that album. To Use Description A Select album Press the multi selector H, I, J, or K. 11 More on Playback/In-Camera Editing Switch to full-frame playback Delete picture Change album icon Switch to another playback mode Switch to shooting mode k l d c A Press the...
... Protect ➝A 114 Rotate image ➝A 115 Small picture ➝A 79 Voice memo ➝A 71 69 Switch to projector mode P Use the built-in projector to project pictures added to the selected album. 139 Favorite Pictures Menu Press the d button in full-frame playback mode or...release button to return to that album. To Use Description A Select album Press the multi selector H, I, J, or K. 11 More on Playback/In-Camera Editing Switch to full-frame playback Delete picture Change album icon Switch to another playback mode Switch to shooting mode k l d c A Press the...

S1000pj User's Manual
Page 129
... be applied for the setup menu. • See "The Projector Settings Menu" (A 144) for more information on . n Language A 131 Choose the language used for saving power. u Digital zoom A 128 Enable or disable digital zoom. k Auto off A 129 Set time before camera enters standby mode for camera monitor display. 117 f Date imprint A 125 Imprint date on...
... be applied for the setup menu. • See "The Projector Settings Menu" (A 144) for more information on . n Language A 131 Choose the language used for saving power. u Digital zoom A 128 Enable or disable digital zoom. k Auto off A 129 Set time before camera enters standby mode for camera monitor display. 117 f Date imprint A 125 Imprint date on...

S1000pj User's Manual
Page 141
... 30 minutes when the AC adapter is connected. When On (default setting) is selected, a beep will also play when the camera is turned on. C Auto Off in Projector Mode Use the Auto off (A 145) option in the projector settings menu to specify the auto off setting for another three minutes, the... camera will enter standby mode (A 17) to elapse before the camera enters standby mode if no operations are performed from 30 s, 1 min (default setting), 5 min, and 30 min....
... 30 minutes when the AC adapter is connected. When On (default setting) is selected, a beep will also play when the camera is turned on. C Auto Off in Projector Mode Use the Auto off (A 145) option in the projector settings menu to specify the auto off setting for another three minutes, the... camera will enter standby mode (A 17) to elapse before the camera enters standby mode if no operations are performed from 30 s, 1 min (default setting), 5 min, and 30 min....

S1000pj User's Manual
Page 147
...) Motion detection (A 127) AF assist (A 128) Digital zoom (A 128) Button sound (A 129) Shutter sound (A 129) Auto off (A 129) Blink warning (A 132) Projector Menu Option Effects (A 143) Background music (A 143) Frame intvl (A 143) Projector Settings Menu Option Power saving (A 145) Auto off (A 145) Tone compensation (A 146) Basic Camera Setup: The Setup Menu Default value Text...
...) Motion detection (A 127) AF assist (A 128) Digital zoom (A 128) Button sound (A 129) Shutter sound (A 129) Auto off (A 129) Blink warning (A 132) Projector Menu Option Effects (A 143) Background music (A 143) Frame intvl (A 143) Projector Settings Menu Option Power saving (A 145) Auto off (A 145) Tone compensation (A 146) Basic Camera Setup: The Setup Menu Default value Text...
S1000pj User's Manual
Page 149
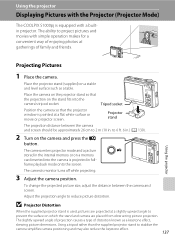
... should be approximately 26 cm to stabilize the camera simplifies camera positioning and may also reduce the keystone effect. 137 Using a tripod rather than the supplied projector stand to 2 m (10 in fullframe playback mode onto the screen. Using the projector Displaying Pictures with the Projector (Projector Mode) The COOLPIX S1000pj is equipped with simple operation makes for a convenient...
... should be approximately 26 cm to stabilize the camera simplifies camera positioning and may also reduce the keystone effect. 137 Using a tripod rather than the supplied projector stand to 2 m (10 in fullframe playback mode onto the screen. Using the projector Displaying Pictures with the Projector (Projector Mode) The COOLPIX S1000pj is equipped with simple operation makes for a convenient...

S1000pj User's Manual
Page 150
... is displayed, even 138 when the P button is pressed to switch to end projection. Allow the camera to cool before using it again when the projector has been used to operate the projector (A 140). 6 Press the P button to playback mode. Point the remote control at the infrared ...8226; Be aware that the camera and battery will become hot in projector mode. Slide the projector focus slider left or right to read and follow the projector warnings on Using the Projector • Be sure to adjust picture focus. 5 Switch the picture with the Projector (Projector Mode) 4 Adjust focus for...
... is displayed, even 138 when the P button is pressed to switch to end projection. Allow the camera to cool before using it again when the projector has been used to operate the projector (A 140). 6 Press the P button to playback mode. Point the remote control at the infrared ...8226; Be aware that the camera and battery will become hot in projector mode. Slide the projector focus slider left or right to read and follow the projector warnings on Using the Projector • Be sure to adjust picture focus. 5 Switch the picture with the Projector (Projector Mode) 4 Adjust focus for...
