
Product Manual
Page 4
...the product's internal parts could result from the AC adapter (available separately), unplug the AC adapter and remove the battery immediately, taking care to a Nikon-authorized service center for use electronic equipment in the presence of an infant or child. Should the product break open... as this could cause permanent visual impairment. Turn off before replacing the battery. Do not place strap around neck Placing the camera strap around ...
...the product's internal parts could result from the AC adapter (available separately), unplug the AC adapter and remove the battery immediately, taking care to a Nikon-authorized service center for use electronic equipment in the presence of an infant or child. Should the product break open... as this could cause permanent visual impairment. Turn off before replacing the battery. Do not place strap around neck Placing the camera strap around ...
Product Manual
Page 5
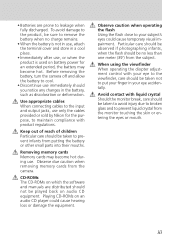
Before removing the battery, turn the camera off and allow the battery to cool. • Discontinue use immediately should be played back on audio CD equipment. Removing memory cards Memory cards may become hot during use , or ... from the subject. Use appropriate cables When connecting cables to the input and output jacks, use only the cables provided or sold by Nikon for an extended period, the battery may become hot. Particular care should be observed if photographing infants, when the flash should not be taken to avoid injury due...
Before removing the battery, turn the camera off and allow the battery to cool. • Discontinue use immediately should be played back on audio CD equipment. Removing memory cards Memory cards may become hot during use , or ... from the subject. Use appropriate cables When connecting cables to the input and output jacks, use only the cables provided or sold by Nikon for an extended period, the battery may become hot. Particular care should be observed if photographing infants, when the flash should not be taken to avoid injury due...

Product Manual
Page 6
... When cleaning the lens and mirror, remember that produces strong magnetic fields, or in areas subject to extremes of temperature, for the Camera and Battery Do not drop The product may malfunction if immersed in water or exposed to sudden changes in a dry, well-ventilated area. After... cloth and wipe the lens carefully. • See "Technical Notes: Caring for Your Camera" for long periods, remove the battery to the battery-chamber, card-slot, or connector covers. Do not, however, store the camera case in a plastic bag, as radio transmitters could scratch, deform, or tear the ...
... When cleaning the lens and mirror, remember that produces strong magnetic fields, or in areas subject to extremes of temperature, for the Camera and Battery Do not drop The product may malfunction if immersed in water or exposed to sudden changes in a dry, well-ventilated area. After... cloth and wipe the lens carefully. • See "Technical Notes: Caring for Your Camera" for long periods, remove the battery to the battery-chamber, card-slot, or connector covers. Do not, however, store the camera case in a plastic bag, as radio transmitters could scratch, deform, or tear the ...

Product Manual
Page 7
...storage at right. Be sure the battery is fully charged before putting the battery away. Once warmed, a cold battery may be removed with a blower. Memory cards • Turn the power off before use. • After removing the battery from the camera, be sure to the monitor; ...Inserting cards upside down or backwards could cause damage or malfunction. v Replace the terminal cover before taking photographs on important occasions. Turn the camera on , or while images are always...
...storage at right. Be sure the battery is fully charged before putting the battery away. Once warmed, a cold battery may be removed with a blower. Memory cards • Turn the power off before use. • After removing the battery from the camera, be sure to the monitor; ...Inserting cards upside down or backwards could cause damage or malfunction. v Replace the terminal cover before taking photographs on important occasions. Turn the camera on , or while images are always...
Product Manual
Page 10
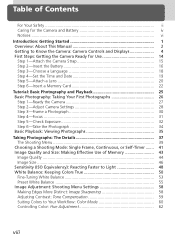
... Notices ...vi Introduction: Getting Started 1 Overview: About This Manual 2 Getting to Know the Camera: Camera Controls and Displays 4 First Steps: Getting the Camera Ready for Use 14 Step 1-Attach the Camera Strap 15 Step 2-Insert the Battery 16 Step 3-Choose a Language 18 Step 4-Set the Time and Date 19 Step 5-Attach a Lens 20 Step 6-Insert...
... Notices ...vi Introduction: Getting Started 1 Overview: About This Manual 2 Getting to Know the Camera: Camera Controls and Displays 4 First Steps: Getting the Camera Ready for Use 14 Step 1-Attach the Camera Strap 15 Step 2-Insert the Battery 16 Step 3-Choose a Language 18 Step 4-Set the Time and Date 19 Step 5-Attach a Lens 20 Step 6-Insert...
Product Manual
Page 13
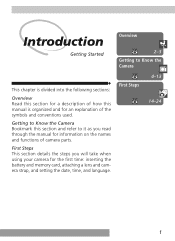
... manual for information on the names and functions of camera parts. Introduction Getting Started Overview 2-3 Getting to it as you will take when using your camera for the first time: inserting the battery and memory card, attaching a lens and camera strap, and setting the date, time, and language.... Getting to Know the Camera Bookmark this manual is divided into the following sections: Overview ...
... manual for information on the names and functions of camera parts. Introduction Getting Started Overview 2-3 Getting to it as you will take when using your camera for the first time: inserting the battery and memory card, attaching a lens and camera strap, and setting the date, time, and language.... Getting to Know the Camera Bookmark this manual is divided into the following sections: Overview ...

Product Manual
Page 14
...achieved at current settings. • Twelve-bit output from the camera's CCD can be saved without modification as high-quality RAW data. • The optional MB-D100 multi function battery pack can follow the step-by-step instructions in the Quick...D100's built-in "Taking Photographs" and "Menu Guide." First-time users who can't wait to experience the simplicity and immediacy of digital photography can expand your pictures once you will never miss the chance for information on what to do with your camera's potential with the advanced Nikon D100 single-lens reflex (SLR) digital camera...
...achieved at current settings. • Twelve-bit output from the camera's CCD can be saved without modification as high-quality RAW data. • The optional MB-D100 multi function battery pack can follow the step-by-step instructions in the Quick...D100's built-in "Taking Photographs" and "Menu Guide." First-time users who can't wait to experience the simplicity and immediacy of digital photography can expand your pictures once you will never miss the chance for information on what to do with your camera's potential with the advanced Nikon D100 single-lens reflex (SLR) digital camera...

Product Manual
Page 19
Introduction-Getting to Know the Camera Camera Controls and Displays 42 43 44 45 40 41 40 Tripod socket 41 Connectors for MB-D100 180 42 Metering selector 75 43 Diopter adjustment control 30 44 Battery-chamber cover latch ......... 16 45 Battery-chamber cover ......... 16, 180 7
Introduction-Getting to Know the Camera Camera Controls and Displays 42 43 44 45 40 41 40 Tripod socket 41 Connectors for MB-D100 180 42 Metering selector 75 43 Diopter adjustment control 30 44 Battery-chamber cover latch ......... 16 45 Battery-chamber cover ......... 16, 180 7

Product Manual
Page 21
Introduction-Getting to Know the Camera Camera Controls and Displays 1 Shutter speed 79-80 Sensitivity 48 Exposure compensation value ....... 86 Flash compensation value 102 Number of shots in bracketing sequence 88 White balance adjustment 90 2 Battery indicator 17 3 Image size 46 4 Image quality 44 5 Flash compensation ... memory buffer fills 41 Remote control mode indicator .. 173 12 White balance mode 50 13 Bracketing indicator 88 14 Clock battery indicator 19 15 "K" (appears when memory remains for over 1,000 exposures 42 16 Bracketing progress indicator ....... 89 17 ...
Introduction-Getting to Know the Camera Camera Controls and Displays 1 Shutter speed 79-80 Sensitivity 48 Exposure compensation value ....... 86 Flash compensation value 102 Number of shots in bracketing sequence 88 White balance adjustment 90 2 Battery indicator 17 3 Image size 46 4 Image quality 44 5 Flash compensation ... memory buffer fills 41 Remote control mode indicator .. 173 12 White balance mode 50 13 Bracketing indicator 88 14 Clock battery indicator 19 15 "K" (appears when memory remains for over 1,000 exposures 42 16 Bracketing progress indicator ....... 89 17 ...

Product Manual
Page 22
...display will return to normal when a fully-charged battery is inserted. All displays will return to normal at room temperature. 10 The other displays in the viewfinder (advanced focusing screen display) tend to brighten at high temperatures and to Know the Camera The Viewfinder Display 1 2 2 3 456 7... 89 10 11 12 13 14 15 16 No Battery When the battery is totally exhausted or no battery is normal and does not indicate a malfunction. This is inserted, the...
...display will return to normal when a fully-charged battery is inserted. All displays will return to normal at room temperature. 10 The other displays in the viewfinder (advanced focusing screen display) tend to brighten at high temperatures and to Know the Camera The Viewfinder Display 1 2 2 3 456 7... 89 10 11 12 13 14 15 16 No Battery When the battery is totally exhausted or no battery is normal and does not indicate a malfunction. This is inserted, the...

Product Manual
Page 23
...active focus area ( 64) is highlighted in black. These phenomena are normal and do not indicate a malfunction. 11 Introduction-Getting to Know the Camera Camera Controls and Displays 1 12-mm (0.47˝) reference circle for center-weighted metering 75 2 Focus brackets (focus areas) ... 64-69 Spot-metering...for Custom Setting 19 (Grid Display; 157), a reference grid is superimposed over 1,000 exposures 42 11 Flash-ready indicator 99 12 Battery indicator 17 13 Shutter speed 80, 82 14 Aperture 81-82 15 Electronic analog exposure display 83 Exposure compensation 86 16 Number of ...
...active focus area ( 64) is highlighted in black. These phenomena are normal and do not indicate a malfunction. 11 Introduction-Getting to Know the Camera Camera Controls and Displays 1 12-mm (0.47˝) reference circle for center-weighted metering 75 2 Focus brackets (focus areas) ... 64-69 Spot-metering...for Custom Setting 19 (Grid Display; 157), a reference grid is superimposed over 1,000 exposures 42 11 Flash-ready indicator 99 12 Battery indicator 17 13 Shutter speed 80, 82 14 Aperture 81-82 15 Electronic analog exposure display 83 Exposure compensation 86 16 Number of ...

Product Manual
Page 26
...2 STEP 3 STEP 4 STEP 5 STEP 6 Attach the Camera Strap 15 Insert the Battery 16-17 To learn more about batteries and alternative power sources, see: • Technical Notes: Optional Accessories 176-183 • Caring for the Camera and Battery iv-v Choose a Language 18 Set the Time and Date ...19 Attach a Lens 20-21 To learn more about the lenses available for the D100, see: • Technical Notes: Optional Accessories 176-183 Insert...
...2 STEP 3 STEP 4 STEP 5 STEP 6 Attach the Camera Strap 15 Insert the Battery 16-17 To learn more about batteries and alternative power sources, see: • Technical Notes: Optional Accessories 176-183 • Caring for the Camera and Battery iv-v Choose a Language 18 Set the Time and Date ...19 Attach a Lens 20-21 To learn more about the lenses available for the D100, see: • Technical Notes: Optional Accessories 176-183 Insert...

Product Manual
Page 28
... about two hours when inserted in the documentation provided with the contacts oriented as shown at shipment. Introduction-First Steps 2First Steps Step 2-Insert the Battery Your camera is powered by a single rechargeable Nikon EN-EL3 lithium-ion battery (provided). 2.1 Charge the battery The EN-EL3 battery supplied with your camera is not fully charged at right.
... about two hours when inserted in the documentation provided with the contacts oriented as shown at shipment. Introduction-First Steps 2First Steps Step 2-Insert the Battery Your camera is powered by a single rechargeable Nikon EN-EL3 lithium-ion battery (provided). 2.1 Charge the battery The EN-EL3 battery supplied with your camera is not fully charged at right.

Product Manual
Page 29
...indicators in the control panel and all indicators in the control panel or viewfinder. No pictures can be taken until battery has been replaced. * No icon displayed when camera powered by an optional EH-5 AC adapter, the control panel will be displayed. 7-Auto Meter Off ( 151)... for Use 2.6 Check the battery level Turn the camera on and check the battery level in viewfinder turn the camera off, open the battery chamber cover as described above, and slide the battery out. Battery partially (auto meter off and the main battery is inserted or the camera is inserted, will show only...
...indicators in the control panel and all indicators in the control panel or viewfinder. No pictures can be taken until battery has been replaced. * No icon displayed when camera powered by an optional EH-5 AC adapter, the control panel will be displayed. 7-Auto Meter Off ( 151)... for Use 2.6 Check the battery level Turn the camera on and check the battery level in viewfinder turn the camera off, open the battery chamber cover as described above, and slide the battery out. Battery partially (auto meter off and the main battery is inserted or the camera is inserted, will show only...

Product Manual
Page 31
... with all pictures. En OFF Save changes to settings and return to the correct date and time as necessary when a charged EN-EL3 battery is installed or the camera is included with the correct time and date, display the setup menu as described opposite, then set Month, Day, Hour, Minute, and ... and Date The time and date of back-up power. O OFF NTSC - - Set the clock to SET UP menu • The camera clock is less accurate than most battery-powered timepieces, and should be regularly checked and reset as described below. 4.1 SET UP Format LCD Brightness Mirror Lock-up Video Output...
... with all pictures. En OFF Save changes to settings and return to the correct date and time as necessary when a charged EN-EL3 battery is installed or the camera is included with the correct time and date, display the setup menu as described opposite, then set Month, Day, Hour, Minute, and ... and Date The time and date of back-up power. O OFF NTSC - - Set the clock to SET UP menu • The camera clock is less accurate than most battery-powered timepieces, and should be regularly checked and reset as described below. 4.1 SET UP Format LCD Brightness Mirror Lock-up Video Output...

Product Manual
Page 35
... unplug the AC adapter (available separately) during formatting. No Memory Card If no memory card is inserted in the camera when a charged EN-EL3 battery is inserted or the camera is on and hold the ( and ) buttons down simultaneously for Use 6.4 Format the memory card Memory cards must be... formatted using the Format option in the setup menu. 23 A blink- When the camera is pow- Note that can also be ...
... unplug the AC adapter (available separately) during formatting. No Memory Card If no memory card is inserted in the camera when a charged EN-EL3 battery is inserted or the camera is on and hold the ( and ) buttons down simultaneously for Use 6.4 Format the memory card Memory cards must be... formatted using the Format option in the setup menu. 23 A blink- When the camera is pow- Note that can also be ...

Product Manual
Page 38
... Basic Photography Taking Your First Photographs There are six basic steps to taking photographs: STEP 1 STEP 2 STEP 3 STEP 4 STEP 5 STEP 6 Ready the Camera 27 To learn more about the battery level display, see: • Introduction: First Steps 16-17 To learn how to restore settings to their default values, see: • Taking...
... Basic Photography Taking Your First Photographs There are six basic steps to taking photographs: STEP 1 STEP 2 STEP 3 STEP 4 STEP 5 STEP 6 Ready the Camera 27 To learn more about the battery level display, see: • Introduction: First Steps 16-17 To learn how to restore settings to their default values, see: • Taking...

Product Manual
Page 39
... zero, the shutter-speed display in the control panel will light. 1 Step 1-Ready the Camera Before taking photographs, ready the camera as described below. 1.1 Turn the camera on The control panel will turn on and the display in the viewfinder will show the number... of exposures remaining The exposure-count displays in the control panel and viewfinder show a blinking , the viewfinder shutter-speed display, . Tutorial-Basic Photography 1.2 Check the battery level If the low-battery...
... zero, the shutter-speed display in the control panel will light. 1 Step 1-Ready the Camera Before taking photographs, ready the camera as described below. 1.1 Turn the camera on The control panel will turn on and the display in the viewfinder will show the number... of exposures remaining The exposure-count displays in the control panel and viewfinder show a blinking , the viewfinder shutter-speed display, . Tutorial-Basic Photography 1.2 Check the battery level If the low-battery...
Product Manual
Page 42
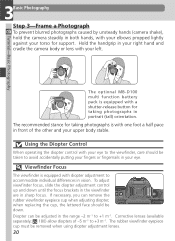
...camera shake), hold the camera steadily in both hands, with your elbows propped lightly against your eye. Diopter can remove the rubber viewfinder eyepiece cup when adjusting diopter; The rubber viewfinder eyepiece cup must be adjusted in your torso for support. The optional MB-D100 multi function battery .... If necessary, you can be removed when using diopter adjustment lenses. 30 Hold the handgrip in your right hand and cradle the camera body or lens with one foot a half pace in portrait (tall) orientation. The recommended stance for taking photographs is with your ...
...camera shake), hold the camera steadily in both hands, with your elbows propped lightly against your eye. Diopter can remove the rubber viewfinder eyepiece cup when adjusting diopter; The rubber viewfinder eyepiece cup must be adjusted in your torso for support. The optional MB-D100 multi function battery .... If necessary, you can be removed when using diopter adjustment lenses. 30 Hold the handgrip in your right hand and cradle the camera body or lens with one foot a half pace in portrait (tall) orientation. The recommended stance for taking photographs is with your ...
Product Manual
Page 45
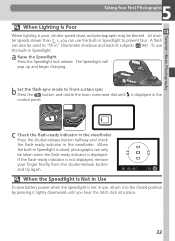
... indicator is not displayed, remove your finger briefly from the shutter-release button and try again. When the Speedlight Is Not in Use To save battery power when the Speedlight is displayed in Speedlight is raised, photographs can also be blurred. When the built-in the control panel.
... indicator is not displayed, remove your finger briefly from the shutter-release button and try again. When the Speedlight Is Not in Use To save battery power when the Speedlight is displayed in Speedlight is raised, photographs can also be blurred. When the built-in the control panel.


