
User Manual
Page 4
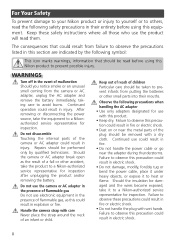
.... Repairs should be performed only by the following symbol: This icon marks warnings, information that could result in injury. Handle the camera strap with care Never place the strap around the neck of children Particular care should be taken to prevent infants from putting the ... become exposed, take it to observe this precaution could result in explosion or fire. After removing or disconnecting the power source, take the product to observe this Nikon product to a Nikonauthorized service representative for inspection. Keep out of reach of an infant or child. ii
.... Repairs should be performed only by the following symbol: This icon marks warnings, information that could result in injury. Handle the camera strap with care Never place the strap around the neck of children Particular care should be taken to prevent infants from putting the ... become exposed, take it to observe this precaution could result in explosion or fire. After removing or disconnecting the power source, take the product to observe this Nikon product to a Nikonauthorized service representative for inspection. Keep out of reach of an infant or child. ii

User Manual
Page 12
...Introduction Memory card slot/ Batterychamber cover ( 7, 10, 11) Sliding lens cover closed Sliding lens cover ( 12) Built-in which the majority of the Camera Speaker Self-timer lamp ( 20) / Power-on lamp ( 12, 14) Microphone ( ( 33, 36, 44) 33, 40, 44) AF-assist illuminator (LED; 16, 80, 83, ... A shooting menu offers control over ( 14, 22, 36) Mode button ( 14, 22, 36) Press to different sub- jects or shooting conditions and let the camera do the rest. Mode indicators Auto ( 14) A simple "point-and-shoot" mode in flash ( 18) Memory card slot ( 10−11) Battery chamber...
...Introduction Memory card slot/ Batterychamber cover ( 7, 10, 11) Sliding lens cover closed Sliding lens cover ( 12) Built-in which the majority of the Camera Speaker Self-timer lamp ( 20) / Power-on lamp ( 12, 14) Microphone ( ( 33, 36, 44) 33, 40, 44) AF-assist illuminator (LED; 16, 80, 83, ... A shooting menu offers control over ( 14, 22, 36) Mode button ( 14, 22, 36) Press to different sub- jects or shooting conditions and let the camera do the rest. Mode indicators Auto ( 14) A simple "point-and-shoot" mode in flash ( 18) Memory card slot ( 10−11) Battery chamber...

User Manual
Page 16
... (connects to DC-IN connector) AC inlet AC plug Power cord (connects to charge the battery or power the camera ( 8). Removing the Camera from the COOLSTATION Remove the camera as shown below and close the multi-connector cover. Audio / video connector (A/V out; 45) Placing the Camera in the COOL-STATION Open the multi connector cover and...
... (connects to DC-IN connector) AC inlet AC plug Power cord (connects to charge the battery or power the camera ( 8). Removing the Camera from the COOLSTATION Remove the camera as shown below and close the multi-connector cover. Audio / video connector (A/V out; 45) Placing the Camera in the COOL-STATION Open the multi connector cover and...

User Manual
Page 18
... on the COOL-STATION. The battery will light (ᕤ). 4 1 3 2 2 Turn the camera off Charging the Battery Check that the camera power-on lamp is on. 3 Place the camera in the COOL-STATION Open the multi connector cover and place the camera in the COOL-STATION with the monitor facing forwards and the connector fully inserted...
... on the COOL-STATION. The battery will light (ᕤ). 4 1 3 2 2 Turn the camera off Charging the Battery Check that the camera power-on lamp is on. 3 Place the camera in the COOL-STATION Open the multi connector cover and place the camera in the COOL-STATION with the monitor facing forwards and the connector fully inserted...

User Manual
Page 19
...63 AC adapter can be sure the DC plug is correctly inserted in damage to the camera. When connecting the adapter, be used to power the camera or to charge a fully depleted battery. 5 Remove the camera from the COOL-STATION, close the multi connector cover, and unplug the AC adapter.... slide the battery latch in the correct orientation. Note that the multi connector cover is tightly closed . 9 Whether connected directly to the camera or to observe this manual. Inserting the plug upside down could result in overheating or in COOL-STATION. On Battery fully charged. Flickers Check...
...63 AC adapter can be sure the DC plug is correctly inserted in damage to the camera. When connecting the adapter, be used to power the camera or to charge a fully depleted battery. 5 Remove the camera from the COOL-STATION, close the multi connector cover, and unplug the AC adapter.... slide the battery latch in the correct orientation. Note that the multi connector cover is tightly closed . 9 Whether connected directly to the camera or to observe this manual. Inserting the plug upside down could result in overheating or in COOL-STATION. On Battery fully charged. Flickers Check...

User Manual
Page 20
...power-on lamp is inserted, pictures are stored in the direction shown (ᕡ) until it opens (ᕢ). ᕡ ᕢ 10 If no memory card is off Inserting Memory Cards Turn the camera off ( 12) before internal memory can be removed from , the camera... card is inserted, the card is used to , and played back and deleted from the camera before inserting or removing memory cards. 2 Open the memory card slot/battery-chamber cover Slide the cover in the...Pictures are recorded to record, delete, or view pictures. For information on removable Secure Digital (SD) memory cards.
...power-on lamp is inserted, pictures are stored in the direction shown (ᕡ) until it opens (ᕢ). ᕡ ᕢ 10 If no memory card is off Inserting Memory Cards Turn the camera off ( 12) before internal memory can be removed from , the camera... card is inserted, the card is used to , and played back and deleted from the camera before inserting or removing memory cards. 2 Open the memory card slot/battery-chamber cover Slide the cover in the...Pictures are recorded to record, delete, or view pictures. For information on removable Secure Digital (SD) memory cards.

User Manual
Page 21
...down or backwards could damage the camera or the card. Open the memory card slot/batterychamber cover and press the card in the direction shown until it latches (ᕢ) ᕡ ᕢ Formatting Memory Cards Before they can be used in the COOLPIX S2, memory cards must be formatted ...using the Format card option in the camera setup menu ( 79). Before inserting the card, make sure that the power-on lamp is off . Lock switch 4 Close the memory card slot cover...
...down or backwards could damage the camera or the card. Open the memory card slot/batterychamber cover and press the card in the direction shown until it latches (ᕢ) ᕡ ᕢ Formatting Memory Cards Before they can be used in the COOLPIX S2, memory cards must be formatted ...using the Format card option in the camera setup menu ( 79). Before inserting the card, make sure that the power-on lamp is off . Lock switch 4 Close the memory card slot cover...
User Manual
Page 22
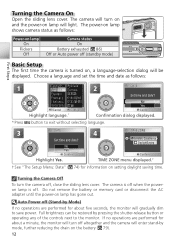
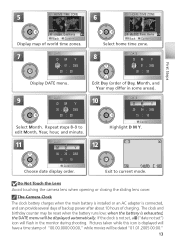
... will turn off , close the sliding lens cover. London, Casablanca DaylightSaving No Yes Confirm Confirm Highlight Yes. Turning the Camera Off To turn on and the power-on lamp will gradually dim to exit without selecting language. 3 DATE 4 TIME ZONE Set time and date? First Steps... Turning the Camera On Open the sliding lens cover. The camera is off . The power-on setting daylight saving time. If no operations are performed for information on lamp shows camera status as follows: 1 * Press 2 DATE Set time and date...
... will turn off , close the sliding lens cover. London, Casablanca DaylightSaving No Yes Confirm Confirm Highlight Yes. Turning the Camera Off To turn on and the power-on lamp will gradually dim to exit without selecting language. 3 DATE 4 TIME ZONE Set time and date? First Steps... Turning the Camera On Open the sliding lens cover. The camera is off . The power-on setting daylight saving time. If no operations are performed for information on lamp shows camera status as follows: 1 * Press 2 DATE Set time and date...
User Manual
Page 23
...00:00," while movies will be displayed automatically. If the clock is exhausted, the DATE menu will be reset when the battery runs low; The Camera Clock The clock battery charges when the main battery is installed or an AC adapter is displayed will have a time stamp of Day, Month, ... clock and birthday counter may differ in the monitor during shooting. Pictures taken while this icon is connected, and can provide several days of backup power after about 10 hours of world time zones. 7 DATE DM Y 01 . 01 . 2005 00 : 00 Madrid, Paris, Berlin Back Confirm Select home time zone. ...
...00:00," while movies will be displayed automatically. If the clock is exhausted, the DATE menu will be reset when the battery runs low; The Camera Clock The clock battery charges when the main battery is installed or an AC adapter is displayed will have a time stamp of Day, Month, ... clock and birthday counter may differ in the monitor during shooting. Pictures taken while this icon is connected, and can provide several days of backup power after about 10 hours of world time zones. 7 DATE DM Y 01 . 01 . 2005 00 : 00 Madrid, Paris, Berlin Back Confirm Select home time zone. ...

User Manual
Page 24
The camera will turn off while flash recharges. Basic Photography The Battery Indicator Display Description NO ICON Battery fully charged. If flash fires, monitor will turn on and the power-on how picture will light. Shooting Options (auto) mode offers flash ... indicator lights. Default is AUTO. Number of exposures remaining: depends on capacity of digital cameras. prepare to lighting and creative intent ( 18). WARNING!! No pictures can be used . Power-on option chosen for first-time users of internal memory or memory card and...
The camera will turn off while flash recharges. Basic Photography The Battery Indicator Display Description NO ICON Battery fully charged. If flash fires, monitor will turn on and the power-on how picture will light. Shooting Options (auto) mode offers flash ... indicator lights. Default is AUTO. Number of exposures remaining: depends on capacity of digital cameras. prepare to lighting and creative intent ( 18). WARNING!! No pictures can be used . Power-on option chosen for first-time users of internal memory or memory card and...

User Manual
Page 26
..., then recompose picture and shoot ( 92). Off Flash is poorly lit ( 80). 16 The camera can continue to focus even when the subject is off , eject the memory card, or remove or disconnect the power source while the internal memory/memory card indicator is blinking or the icon is displayed. Do... not turn the camera off or not required. With the shutter-release button pressed halfway, check the focus and ...
..., then recompose picture and shoot ( 92). Off Flash is poorly lit ( 80). 16 The camera can continue to focus even when the subject is off , eject the memory card, or remove or disconnect the power source while the internal memory/memory card indicator is blinking or the icon is displayed. Do... not turn the camera off or not required. With the shutter-release button pressed halfway, check the focus and ...

User Manual
Page 49
When On is taken, the icon will turn white. 39 Movies 8 Start recording. During Recording To save power, the monitor turns off automatically. Press center of multi selector to meter new values for AE lock, a yellow AE-L icon will be locked with the &#... interval time 5 AE LOCK AE lock Off On Exit Confirm Highlight AE lock. 6 AE LOCK Off On Exit Confirm 7 Exit Confirm Display AE LOCK menu. Camera will be AE-L displayed, indicating that exposure and white balance will take pictures at values for first frame, Off to make selection and exit...
When On is taken, the icon will turn white. 39 Movies 8 Start recording. During Recording To save power, the monitor turns off automatically. Press center of multi selector to meter new values for AE lock, a yellow AE-L icon will be locked with the &#... interval time 5 AE LOCK AE lock Off On Exit Confirm Highlight AE lock. 6 AE LOCK Off On Exit Confirm 7 Exit Confirm Display AE LOCK menu. Camera will be AE-L displayed, indicating that exposure and white balance will take pictures at values for first frame, Off to make selection and exit...

User Manual
Page 72
... that the battery does not run flat values for first frame, Off to meter On new values for each shot. Camera will take pictures at specified interval until shut- The monitor turns on how pictures taken during interval timer shooting. See the ...Appendix for entire series Off at before the camera takes the next shot. The Shooting Menu Interval Timer Photography To save power, the monitor turns off Exit Confirm automatically. 2 Exit to fix exposure and white balance for information...
... that the battery does not run flat values for first frame, Off to meter On new values for each shot. Camera will take pictures at specified interval until shut- The monitor turns on how pictures taken during interval timer shooting. See the ...Appendix for entire series Off at before the camera takes the next shot. The Shooting Menu Interval Timer Photography To save power, the monitor turns off Exit Confirm automatically. 2 Exit to fix exposure and white balance for information...

User Manual
Page 82
...the (T) button ( 22). Highlight SET-UP. 3 Display setup menu. The Setup Menu Menu Options For help on or off to save power. The Setup Menu The setup menu contains the following options: Option Description Shooting menu Scene menu Movie Return to menu for Menus in the ...Date Set clock and choose home and destination time zones. Language Choose language for current mode, press button. Reset all Restore camera settings to menu for camera menus and messages. To return to default values. Monitor settings Adjust monitor brightness and choose display style. Auto off Choose when ...
...the (T) button ( 22). Highlight SET-UP. 3 Display setup menu. The Setup Menu Menu Options For help on or off to save power. The Setup Menu The setup menu contains the following options: Option Description Shooting menu Scene menu Movie Return to menu for Menus in the ...Date Set clock and choose home and destination time zones. Language Choose language for current mode, press button. Reset all Restore camera settings to menu for camera menus and messages. To return to default values. Monitor settings Adjust monitor brightness and choose display style. Auto off Choose when ...

User Manual
Page 89
...playback. Before formatting, be displayed if a memory card is low. A confirmation dialog is powered by opening the lens cover or pressing the button to areas in the camera. The Setup Menu 79 mats internal memory. Auto Off Auto off Choose the time before the monitor turns... deletes all data, including protected pictures and any valued pictures to save power from 30 seconds, 1 minute (the default setting), 5 minutes, or 30 minutes. Regardless of the option chosen, the monitor will turn the camera off, remove the battery or memory card, or unplug the AC adapter...
...playback. Before formatting, be displayed if a memory card is low. A confirmation dialog is powered by opening the lens cover or pressing the button to areas in the camera. The Setup Menu 79 mats internal memory. Auto Off Auto off Choose the time before the monitor turns... deletes all data, including protected pictures and any valued pictures to save power from 30 seconds, 1 minute (the default setting), 5 minutes, or 30 minutes. Regardless of the option chosen, the monitor will turn the camera off, remove the battery or memory card, or unplug the AC adapter...
User Manual
Page 93
...power source Do not unplug the product or remove the battery while the product is not waterproof and must not be immersed in the vicinity of equipment that generates strong electromagnetic radiation or magnetic fields. Do not immerse Although COOLPIX S2... conforms to product memory or internal circuitry. Do not use or store this Nikon product, observe the following IEC standard: CLASS 1 LED PRODUCT IEC60825-1 Edition ... on the memory card, or affect the product's internal circuitry. Immersing the camera or allowing water to come in contact with its internal parts will result in...
...power source Do not unplug the product or remove the battery while the product is not waterproof and must not be immersed in the vicinity of equipment that generates strong electromagnetic radiation or magnetic fields. Do not immerse Although COOLPIX S2... conforms to product memory or internal circuitry. Do not use or store this Nikon product, observe the following IEC standard: CLASS 1 LED PRODUCT IEC60825-1 Edition ... on the memory card, or affect the product's internal circuitry. Immersing the camera or allowing water to come in contact with its internal parts will result in...
User Manual
Page 95
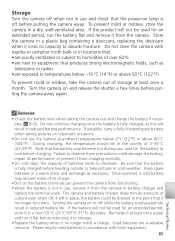
... not in use and check that the power-on and release the shutter a few times before putting the camera away again. If the product will not...the battery could damage the battery, impair its performance, or prevent it no longer functions. Store the camera in a plastic bag containing a desiccant, replacing the desiccant when it in reduced battery life. Once ...50 °C (122 °F) To prevent mold or mildew, take pictures in use, remove it from the camera. Turning the camera on important occasions. • Do not use ; wait for an extended period, store it loses its charge...
... not in use and check that the power-on and release the shutter a few times before putting the camera away again. If the product will not...the battery could damage the battery, impair its performance, or prevent it no longer functions. Store the camera in a plastic bag containing a desiccant, replacing the desiccant when it in reduced battery life. Once ...50 °C (122 °F) To prevent mold or mildew, take pictures in use, remove it from the camera. Turning the camera on important occasions. • Do not use ; wait for an extended period, store it loses its charge...
User Manual
Page 99
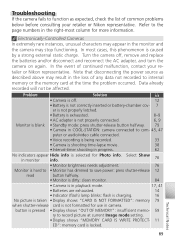
Note that disconnecting the power source as expected, check the list of common problems below before consulting your retailer or Nikon representative. Turn the camera off . 12 • Battery is not correctly inserted or battery-chamber cov- 7 er is not properly latched. • ...Monitor brightness needs adjustment. 76 Monitor is hard to • Monitor has dimmed to save power: press shutter-release 12 read button halfway. • Monitor is dirty: clean monitor. 84 • Camera is in playback mode. 17, 41 • Batteries are exhausted. 14 • Indicator...
Note that disconnecting the power source as expected, check the list of common problems below before consulting your retailer or Nikon representative. Turn the camera off . 12 • Battery is not correctly inserted or battery-chamber cov- 7 er is not properly latched. • ...Monitor brightness needs adjustment. 76 Monitor is hard to • Monitor has dimmed to save power: press shutter-release 12 read button halfway. • Monitor is dirty: clean monitor. 84 • Camera is in playback mode. 17, 41 • Batteries are exhausted. 14 • Indicator...
User Manual
Page 106
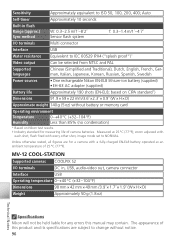
...cameras COOLPIX S2...; D) Approximate weight 140 g (5 oz) without notice. 96 based on Nikon test results. † Industry standard for measuring life of 25 °C ... a camera with every other shot, image mode ...temperature of camera batteries.... m/1´-4´7˝ I /O terminals DC in, USB, audio-video out, camera connector Interface USB Operating temperature 0-+40 °C (+32-104 °F) Dimensions 98...; D) Weight Approximately 50 g (1.8 oz) Technical Notes Specifications Nikon will not be selected from NTSC and PAL Supported languages Chinese (Simplifi...
...cameras COOLPIX S2...; D) Approximate weight 140 g (5 oz) without notice. 96 based on Nikon test results. † Industry standard for measuring life of 25 °C ... a camera with every other shot, image mode ...temperature of camera batteries.... m/1´-4´7˝ I /O terminals DC in, USB, audio-video out, camera connector Interface USB Operating temperature 0-+40 °C (+32-104 °F) Dimensions 98...; D) Weight Approximately 50 g (1.8 oz) Technical Notes Specifications Nikon will not be selected from NTSC and PAL Supported languages Chinese (Simplifi...

User Manual
Page 107
...; 23.5 mm × 79 mm/1.6˝ × 0.9˝ × 3.1˝ (W × H × D) Length of cord Approximately 1700 mm (66.9˝) Weight Approximately 110 g (3.9 oz), excluding power cable EN-EL8 Rechargeable Li-ion Battery Type Rated capacity Rechargeable lithium-ion battery 3.7 V/730 mAh Operating temperature 0-+40 °C (+32-104 °F) Dimensions 35...
...; 23.5 mm × 79 mm/1.6˝ × 0.9˝ × 3.1˝ (W × H × D) Length of cord Approximately 1700 mm (66.9˝) Weight Approximately 110 g (3.9 oz), excluding power cable EN-EL8 Rechargeable Li-ion Battery Type Rated capacity Rechargeable lithium-ion battery 3.7 V/730 mAh Operating temperature 0-+40 °C (+32-104 °F) Dimensions 35...


