L10 / L11 User's Manual
Page 10
...The Shooting Menu 73 Z Image Mode 74 d White Balance 76 q Continuous 78 A Best Shot Selector (BSS 79 d Color Options 79 Restrictions on Camera Settings 80 Playback Options: The Playback Menu 81 z Slide Show 83 A Delete 84 D Protect 84 E Transfer Marking 85 L Copy 86 Basic... Camera Setup: The Setup Menu 87 R Menus 88 H Quick Startup 89 V Welcome Screen 89 W Date 90 Z Monitor Settings 93 f Date Imprint 94 h Sound Settings 96 h Blur Warning 96 i Auto Off 97...
...The Shooting Menu 73 Z Image Mode 74 d White Balance 76 q Continuous 78 A Best Shot Selector (BSS 79 d Color Options 79 Restrictions on Camera Settings 80 Playback Options: The Playback Menu 81 z Slide Show 83 A Delete 84 D Protect 84 E Transfer Marking 85 L Copy 86 Basic... Camera Setup: The Setup Menu 87 R Menus 88 H Quick Startup 89 V Welcome Screen 89 W Date 90 Z Monitor Settings 93 f Date Imprint 94 h Sound Settings 96 h Blur Warning 96 i Auto Off 97...

L10 / L11 User's Manual
Page 11
...are sometimes omitted from actual display. • Illustrations and text displays shown in the camera monitor, and the names of a Nikon COOLPIX L11/COOLPIX L10 digital camera. bols and conventions are for your Nikon digital camera. This icon marks tips, addi- l tional information that may differ from monitor ...This icon marks notes, k information that more clearly shown. Screen Samples In this manual or in this manual thoroughly before using the camera. If a memory card is referred to the camera. The memory card must be removed before the internal memory ...
...are sometimes omitted from actual display. • Illustrations and text displays shown in the camera monitor, and the names of a Nikon COOLPIX L11/COOLPIX L10 digital camera. bols and conventions are for your Nikon digital camera. This icon marks tips, addi- l tional information that may differ from monitor ...This icon marks notes, k information that more clearly shown. Screen Samples In this manual or in this manual thoroughly before using the camera. If a memory card is referred to the camera. The memory card must be removed before the internal memory ...
L10 / L11 User's Manual
Page 13
...prohibited. Be sure to infringe copyright laws. The copying or reproduction of paper money, coins, or securities which are circulated in camera memory does not completely erase the original image data. The copying or reproduction of stamps issued by the government and of certified ... purpose of making illegal copies or to also replace any pictures selected for business use of a scanner, digital camera or other device may be provided for the welcome screen (c 89). Before discarding a data storage device or transferring ownership to property when physically destroying data storage ...
...prohibited. Be sure to infringe copyright laws. The copying or reproduction of paper money, coins, or securities which are circulated in camera memory does not completely erase the original image data. The copying or reproduction of stamps issued by the government and of certified ... purpose of making illegal copies or to also replace any pictures selected for business use of a scanner, digital camera or other device may be provided for the welcome screen (c 89). Before discarding a data storage device or transferring ownership to property when physically destroying data storage ...

L10 / L11 User's Manual
Page 64
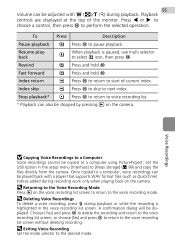
... Exit ? Voice Recordings 3 Press G or H to choose [O Voice recording] in the scene menu and press d. • The voice recording screen is displayed and playback starts. • Index markers show the index position added during recording. Date of recording File number q Select sound file 001...Voice Recordings 1 Press the multi selector G or H to choose the desired voice recording and press d. • The voice recording playback screen is displayed. • For information on using the multi selector, see "Multi Selector" (c 8). 2 Press i. • Currently saved voice recordings are ...
... Exit ? Voice Recordings 3 Press G or H to choose [O Voice recording] in the scene menu and press d. • The voice recording screen is displayed and playback starts. • Index markers show the index position added during recording. Date of recording File number q Select sound file 001...Voice Recordings 1 Press the multi selector G or H to choose the desired voice recording and press d. • The voice recording playback screen is displayed. • For information on using the multi selector, see "Multi Selector" (c 8). 2 Press i. • Currently saved voice recordings are ...
L10 / L11 User's Manual
Page 65
...recordings cannot be copied to a computer, voice recordings can be played back with t (j)/v (k) during recording work only when playing back on the camera. Rewind Q Press and hold d. Once copied to a computer using PictureProject. Choose [Yes] and press d to delete the recording and return ... then press d. Set the USB option in the voice recording list screen. l Returning to the Voice Recording Mode Press i on the voice recording list screen to return to [Mass storage] (c 99) and copy the files directly from the camera. Press I or J to choose a control, then press d to...
...recordings cannot be copied to a computer, voice recordings can be played back with t (j)/v (k) during recording work only when playing back on the camera. Rewind Q Press and hold d. Once copied to a computer using PictureProject. Choose [Yes] and press d to delete the recording and return ... then press d. Set the USB option in the voice recording list screen. l Returning to the Voice Recording Mode Press i on the voice recording list screen to return to [Mass storage] (c 99) and copy the files directly from the camera. Press I or J to choose a control, then press d to...

L10 / L11 User's Manual
Page 66
... G or H to select the file (y). Voice Recordings This option is available only when a memory card is inserted. 1 Press m on the voice recording list screen. (c 54, step3) • When i is pressed to internal memory • For information on the memory card, the message, [No sound file.], is displayed.... Press m to display the copy sound files screen, and copy the sound files stored in the camera's internal memory to the memory card. 2 Press the multi selector G or H to select the copy direction and press ...
... G or H to select the file (y). Voice Recordings This option is available only when a memory card is inserted. 1 Press m on the voice recording list screen. (c 54, step3) • When i is pressed to internal memory • For information on the memory card, the message, [No sound file.], is displayed.... Press m to display the copy sound files screen, and copy the sound files stored in the camera's internal memory to the memory card. 2 Press the multi selector G or H to select the copy direction and press ...

L10 / L11 User's Manual
Page 74
... to Televisions, Computers, and Printers 64 Connecting the Camera and Printer 1 Set the USB option (c 60) to the camera. MENU Exit 3 Turn the printer on. • Check printer settings. 4 Connect the USB cable as shown below. 5 Turn the camera on. • The PictBridge start-up screen (1) will be displayed (2). 1 2 Print selection PictBridge MENU w j Connecting...
... to Televisions, Computers, and Printers 64 Connecting the Camera and Printer 1 Set the USB option (c 60) to the camera. MENU Exit 3 Turn the printer on. • Check printer settings. 4 Connect the USB cable as shown below. 5 Turn the camera on. • The PictBridge start-up screen (1) will be displayed (2). 1 2 Print selection PictBridge MENU w j Connecting...

L10 / L11 User's Manual
Page 76
... d. I Printing 002/005 OK Cancel Current print/ total number of prints Printing Multiple Pictures After connecting the camera to the printer correctly (c 64), print pictures by following the procedure below. 1 When the print selection screen is displayed, press m. • The print menu is complete. Postcard 100 x 150mm MENU Exit 6 Press G or H to...
... d. I Printing 002/005 OK Cancel Current print/ total number of prints Printing Multiple Pictures After connecting the camera to the printer correctly (c 64), print pictures by following the procedure below. 1 When the print selection screen is displayed, press m. • The print menu is complete. Postcard 100 x 150mm MENU Exit 6 Press G or H to...

L10 / L11 User's Manual
Page 78
.../030 OK Cancel k Paper Size The camera supports the following paper sizes: [Default] (the default paper size for DPOF printing are printed accordingly (c 69). View images 30 Print order details will be displayed. • Press m to modify the selection and return to the print selection screen. Only sizes supported by the current...
.../030 OK Cancel k Paper Size The camera supports the following paper sizes: [Default] (the default paper size for DPOF printing are printed accordingly (c 69). View images 30 Print order details will be displayed. • Press m to modify the selection and return to the print selection screen. Only sizes supported by the current...

L10 / L11 User's Manual
Page 84
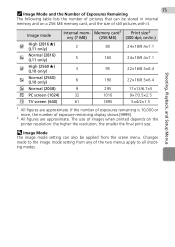
...) e Normal (2048) h PC screen (1024) i TV screen (640) 1 Default setting for L11 2 Default setting for L10 Size (pixels) Description 2,816 × 2,112 Highest quality, suitable for the current setting is displayed in most situations. 2,560 × 1,920 2,048 × 1,536 Smaller size allows more pictures to be recorded with a digital camera are recorded as image...
...) e Normal (2048) h PC screen (1024) i TV screen (640) 1 Default setting for L11 2 Default setting for L10 Size (pixels) Description 2,816 × 2,112 Highest quality, suitable for the current setting is displayed in most situations. 2,560 × 1,920 2,048 × 1,536 Smaller size allows more pictures to be recorded with a digital camera are recorded as image...
L10 / L11 User's Manual
Page 85
...that can also be stored in .) 2 80 24×18/9.4×7.1 c Normal (2816) (L11 only) 5 L High (2560A) (L10 only) 3 d Normal (2560) (L10 only) 6 e Normal (2048) 9 h PC screen (1024) 32 i TV screen (640) 61 160 95 190 295 1010 1895 24×18/9.4×7.1 22×16/8.5×...are approximate. Memory card1 Print size2 ory (7 MB) (256 MB) (300 dpi; Shooting, Playback, and Setup Menus Image mode b High (2816A) (L11 only) Internal mem- cm/in internal memory and on the printer resolution: the higher the resolution, the smaller the final print size. Changes made to...
...that can also be stored in .) 2 80 24×18/9.4×7.1 c Normal (2816) (L11 only) 5 L High (2560A) (L10 only) 3 d Normal (2560) (L10 only) 6 e Normal (2048) 9 h PC screen (1024) 32 i TV screen (640) 61 160 95 190 295 1010 1895 24×18/9.4×7.1 22×16/8.5×...are approximate. Memory card1 Print size2 ory (7 MB) (256 MB) (300 dpi; Shooting, Playback, and Setup Menus Image mode b High (2816A) (L11 only) Internal mem- cm/in internal memory and on the printer resolution: the higher the resolution, the smaller the final print size. Changes made to...

L10 / L11 User's Manual
Page 92
... • When [ON] is selected, a check mark (y) is enabled. Protect • Only one picture can be selected for the welcome screen (c 89), the screen shown MENU Back ON/OFF at right is displayed. nails. Repeat steps 1 and 2 to choose a picture from deletion (c 84), transfer (c... 85), copying between internal memory and the memory card (c 86), or for [Welcome screen]. MENU Back ON/OFF tional pictures. 3 Press d. • The setting is displayed in the top left corner of thumb- Shooting, Playback, and ...
... • When [ON] is selected, a check mark (y) is enabled. Protect • Only one picture can be selected for the welcome screen (c 89), the screen shown MENU Back ON/OFF at right is displayed. nails. Repeat steps 1 and 2 to choose a picture from deletion (c 84), transfer (c... 85), copying between internal memory and the memory card (c 86), or for [Welcome screen]. MENU Back ON/OFF tional pictures. 3 Press d. • The setting is displayed in the top left corner of thumb- Shooting, Playback, and ...

L10 / L11 User's Manual
Page 94
If no memory card is inserted, pictures on using this function. If a memory card is inserted in the camera, pictures in the confirmation dialog to a computer before deletion. • Pictures marked with T or by the Q icon (c 40) in thumbnail playback. Erase...Note, however, that formatting will be deleted with the D icon are recognized by the D icon (c 7) in full-frame playback and the erase selected images screen, and by select- See "Selecting Multiple Pictures" (c 82) for more information on the memory card will delete protected files (c 98). No Yes MENU Exit ...
If no memory card is inserted, pictures on using this function. If a memory card is inserted in the camera, pictures in the confirmation dialog to a computer before deletion. • Pictures marked with T or by the Q icon (c 40) in thumbnail playback. Erase...Note, however, that formatting will be deleted with the D icon are recognized by the D icon (c 7) in full-frame playback and the erase selected images screen, and by select- See "Selecting Multiple Pictures" (c 82) for more information on the memory card will delete protected files (c 98). No Yes MENU Exit ...

L10 / L11 User's Manual
Page 96
... from the largest number existing between the internal memory and a memory card. The newly copied folder is JPEG, MOV, or WAV. • The camera may be displayed. k File Number • When pictures are copied using the [Selected images] option. k Copies Copies have been modified on a... computer. Press m to display the copy option screen, and copy the pictures stored in the internal memory or on using the [Selected images] option, the newly copied pictures are copied with the...
... from the largest number existing between the internal memory and a memory card. The newly copied folder is JPEG, MOV, or WAV. • The camera may be displayed. k File Number • When pictures are copied using the [Selected images] option. k Copies Copies have been modified on a... computer. Press m to display the copy option screen, and copy the pictures stored in the internal memory or on using the [Selected images] option, the newly copied pictures are copied with the...

L10 / L11 User's Manual
Page 97
...96 c 96 c 97 c 98 c 99 c 99 c 100 c 101 c 101 Welcome screen Select screen displayed when camera is turned on pictures. R H V W Z f h h i M/O j k n g B Menus Choose how menus are available in camera. Date Set camera clock and choose home and destination time zones. Battery Type Choose type of batteries inserted in the... monitor brightness and choose display style. 87 Basic Camera Setup: The Setup Menu Shooting, Playback, and Setup Menus The following options are displayed. Quick startup Enable or disable welcome screen and start-up sound. Format memory/Format card...
...96 c 96 c 97 c 98 c 99 c 99 c 100 c 101 c 101 Welcome screen Select screen displayed when camera is turned on pictures. R H V W Z f h h i M/O j k n g B Menus Choose how menus are available in camera. Date Set camera clock and choose home and destination time zones. Battery Type Choose type of batteries inserted in the... monitor brightness and choose display style. 87 Basic Camera Setup: The Setup Menu Shooting, Playback, and Setup Menus The following options are displayed. Quick startup Enable or disable welcome screen and start-up sound. Format memory/Format card...

L10 / L11 User's Manual
Page 98
... Exit ? Date -- Text Menus H Menu names MENU Exit ? 88 Displaying the Setup Menu Choose [Set up Shooting menu Menus Quick startup Welcome screen -- Shooting menu Set up ] and press d. • To choose menus and apply selection, use text or icons. Date -- Display the menu... the multi selector G or H to display the setup menu. Shooting menu Set up Shooting menu Menus Quick startup Welcome screen -- Set up Image mode White balance G Continuous BSS H MENU Exit ? Icon Shooting, Playback, and Setup Menus R Menus Choose whether the menus ...
... Exit ? Date -- Text Menus H Menu names MENU Exit ? 88 Displaying the Setup Menu Choose [Set up Shooting menu Menus Quick startup Welcome screen -- Shooting menu Set up ] and press d. • To choose menus and apply selection, use text or icons. Date -- Display the menu... the multi selector G or H to display the setup menu. Shooting menu Set up Shooting menu Menus Quick startup Welcome screen -- Set up Image mode White balance G Continuous BSS H MENU Exit ? Icon Shooting, Playback, and Setup Menus R Menus Choose whether the menus ...
L10 / L11 User's Manual
Page 99
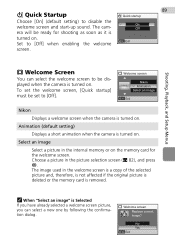
... will be ready for the welcome screen. Welcome screen Nikon Animation Select an image MENU Exit Nikon Displays a welcome screen when the camera is turned on . Select an image Select a picture in the internal memory or on the memory card for shooting as soon as it is turned on . Welcome screen Replace current image? No Yes MENU...
... will be ready for the welcome screen. Welcome screen Nikon Animation Select an image MENU Exit Nikon Displays a welcome screen when the camera is turned on . Select an image Select a picture in the internal memory or on the memory card for shooting as soon as it is turned on . Welcome screen Replace current image? No Yes MENU...

L10 / L11 User's Manual
Page 100
... choose [Daylight saving] and press d then press G. Date 15/05/2007 15:30 Date -- Time zone MENU Exit Shooting, Playback, and Setup Menus Date Set camera clock to choose Y and press d. Useful when travelling. Time zone MENU Exit 2 Press G or H to current date and time (c 12-12). 90 W ...Casablanca yDaylight saving Tokyo, Seoul Daylight saving MENU Exit The time is automatically advanced one hour. 3 Press J. • The [New city time zone] screen is displayed. • For information on the monitor changes according to choose [Time Zone] and press d. • The [Time zone...
... choose [Daylight saving] and press d then press G. Date 15/05/2007 15:30 Date -- Time zone MENU Exit Shooting, Playback, and Setup Menus Date Set camera clock to choose Y and press d. Useful when travelling. Time zone MENU Exit 2 Press G or H to current date and time (c 12-12). 90 W ...Casablanca yDaylight saving Tokyo, Seoul Daylight saving MENU Exit The time is automatically advanced one hour. 3 Press J. • The [New city time zone] screen is displayed. • For information on the monitor changes according to choose [Time Zone] and press d. • The [Time zone...

L10 / L11 User's Manual
Page 104
...the bottom right corner of pictures taken while this option is not available in movie mode, or when [Panorama assist] scene mode. Choose [PC screen (1024)] or larger when using date imprint. • The date is recorded using DPOF-compatible devices, shooting date or photo information will be ... Date Imprint • Imprinted dates form a permanent part of image data and cannot be deleted. • Dates imprinted at an image mode setting of [TV screen (640)] may be printed if [Date] or [Info] is in effect. Shooting, Playback, and Setup Menus 94 f Date Imprint Date and time of recording ...
...the bottom right corner of pictures taken while this option is not available in movie mode, or when [Panorama assist] scene mode. Choose [PC screen (1024)] or larger when using date imprint. • The date is recorded using DPOF-compatible devices, shooting date or photo information will be ... Date Imprint • Imprinted dates form a permanent part of image data and cannot be deleted. • Dates imprinted at an image mode setting of [TV screen (640)] may be printed if [Date] or [Info] is in effect. Shooting, Playback, and Setup Menus 94 f Date Imprint Date and time of recording ...

L10 / L11 User's Manual
Page 110
...) Shooting menu Option Image mode (c 74) White balance (c 76) Continuous (c 78) BSS (c 79) Color Options (c 79) Setup menu Option Menus (c 88) Quick startup (c 89) Welcome screen (c 89) Photo info (c 93) Brightness (c 93) Date imprint (c 94) Button sound (c 96) Shutter sound (c 96) Volume (c 96) Default value z Off Off 0 Default value Small size...
...) Shooting menu Option Image mode (c 74) White balance (c 76) Continuous (c 78) BSS (c 79) Color Options (c 79) Setup menu Option Menus (c 88) Quick startup (c 89) Welcome screen (c 89) Photo info (c 93) Brightness (c 93) Date imprint (c 94) Button sound (c 96) Shutter sound (c 96) Volume (c 96) Default value z Off Off 0 Default value Small size...


