L10 / L11 User's Manual
Page 8
...31 Introduction vi Table of Contents Introduction ii For Your Safety ii WARNINGS ii Notices iv About This Manual 1 Information and Precautions 2 Parts of the Camera 4 The Monitor 6 Shooting 6 Playback 7 Basic Operations/Displaying the Help 8 Mode Selector 8 Multi Selector 8 MENU Button 9 Help Displays 9 ... (Auto) Mode 16 Step1 Select L (Auto) Mode and Turn the Camera On 16 Step2 Frame a Picture 18 Step3 Focus and Shoot 20 Step4 Viewing and Deleting Pictures 22 Using the Flash 24 Taking Pictures with the Self-Timer 26 Macro Close-up Mode 27 Exposure Compensation 28 ...
...31 Introduction vi Table of Contents Introduction ii For Your Safety ii WARNINGS ii Notices iv About This Manual 1 Information and Precautions 2 Parts of the Camera 4 The Monitor 6 Shooting 6 Playback 7 Basic Operations/Displaying the Help 8 Mode Selector 8 Multi Selector 8 MENU Button 9 Help Displays 9 ... (Auto) Mode 16 Step1 Select L (Auto) Mode and Turn the Camera On 16 Step2 Frame a Picture 18 Step3 Focus and Shoot 20 Step4 Viewing and Deleting Pictures 22 Using the Flash 24 Taking Pictures with the Self-Timer 26 Macro Close-up Mode 27 Exposure Compensation 28 ...
L10 / L11 User's Manual
Page 9
... vii i More on Playback 40 Viewing Multiple Pictures: Thumbnail Playback 40 Taking a Closer Look: Playback Zoom 41 Editing Pictures 42 Enhancing Brightness and Contrast: D-Lighting 43 Creating a Cropped Copy: Crop 44 H Resizing Pictures: Small Picture 45 Voice Memos: Recording and Playback 46 Recording... to a Computer 59 Before Connecting the Camera 59 Setting the USB Option 60 Transferring Pictures to a Computer 61 Connecting to a Printer 63 Connecting the Camera and Printer 64 Printing Pictures One at a Time 65 Printing Multiple Pictures 66 Creating a DPOF Print Order: Print...
... vii i More on Playback 40 Viewing Multiple Pictures: Thumbnail Playback 40 Taking a Closer Look: Playback Zoom 41 Editing Pictures 42 Enhancing Brightness and Contrast: D-Lighting 43 Creating a Cropped Copy: Crop 44 H Resizing Pictures: Small Picture 45 Voice Memos: Recording and Playback 46 Recording... to a Computer 59 Before Connecting the Camera 59 Setting the USB Option 60 Transferring Pictures to a Computer 61 Connecting to a Printer 63 Connecting the Camera and Printer 64 Printing Pictures One at a Time 65 Printing Multiple Pictures 66 Creating a DPOF Print Order: Print...

L10 / L11 User's Manual
Page 11
...Pictures taken with your purchase of purchase is available elsewhere in the Image mode. This manual has been written to the camera. This icon indicates that should be stored in the Quick Start Guide. bols and conventions are for your Nikon digital camera. Read this manual thoroughly before use , and keep it . COOLPIX L11: b, c, e, h, and i COOLPIX L10... addi- Notations • A Secure Digital (SD) memory card is referred to as a "memory card." • The setting at the time of a Nikon COOLPIX L11/COOLPIX L10 digital camera. The memory card must be helpful ...
...Pictures taken with your purchase of purchase is available elsewhere in the Image mode. This manual has been written to the camera. This icon indicates that should be stored in the Quick Start Guide. bols and conventions are for your Nikon digital camera. Read this manual thoroughly before use , and keep it . COOLPIX L11: b, c, e, h, and i COOLPIX L10... addi- Notations • A Secure Digital (SD) memory card is referred to as a "memory card." • The setting at the time of a Nikon COOLPIX L11/COOLPIX L10 digital camera. The memory card must be helpful ...
L10 / L11 User's Manual
Page 12
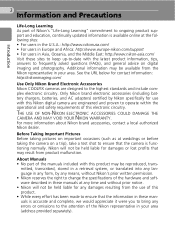
...://nikonimaging.com/ Use Only Nikon Brand Electronic Accessories Nikon COOLPIX cameras are engineered and proven to the highest standards and include complex electronic circuitry. mitted, transcribed, stored in a retrieval system, or translated into any language in any form, by Nikon specifically for any damages resulting from the use with this Nikon digital camera are designed to operate within...
...://nikonimaging.com/ Use Only Nikon Brand Electronic Accessories Nikon COOLPIX cameras are engineered and proven to the highest standards and include complex electronic circuitry. mitted, transcribed, stored in a retrieval system, or translated into any language in any form, by Nikon specifically for any damages resulting from the use with this Nikon digital camera are designed to operate within...
L10 / L11 User's Manual
Page 13
...even if such copies or reproductions are stamped "Sample." Unless the prior permission of the government has been obtained, the copying or reproduction of a scanner, digital camera or other device may be provided for the purpose of empty sky). Do not use this product for business use of such data is prohibited...be taken to avoid injury or damage to infringe copyright laws. Ensuring the privacy of personal image data. Be sure to also replace any pictures selected for example, pictures of making illegal copies or to property when physically destroying data storage devices.
...even if such copies or reproductions are stamped "Sample." Unless the prior permission of the government has been obtained, the copying or reproduction of a scanner, digital camera or other device may be provided for the purpose of empty sky). Do not use this product for business use of such data is prohibited...be taken to avoid injury or damage to infringe copyright laws. Ensuring the privacy of personal image data. Be sure to also replace any pictures selected for example, pictures of making illegal copies or to property when physically destroying data storage devices.

L10 / L11 User's Manual
Page 15
..., 64) Monitor (c 6) i (playback) button (c 22, 40) Zoom buttons (c 18) See also: • t (wide): c 18 • v (tele): c 18 • j (thumbnail playback): c 40 • k (playback zoom): c 41 • l (help): c 9 m button (c 9)... Tripod socket Memory card slot cover (c 14) T (delete) button (c 22, 41, 47, 51) Mode selector (c 8, 16, 29, 48) ImageLink connector (c 72) Multi selector (c 8) H: Display self-timer menu (c 26) L: Display macro close-up mode menu (c 27) J: Display flash mode menu (c 24) d/E: Make selection/ transfer picture...
..., 64) Monitor (c 6) i (playback) button (c 22, 40) Zoom buttons (c 18) See also: • t (wide): c 18 • v (tele): c 18 • j (thumbnail playback): c 40 • k (playback zoom): c 41 • l (help): c 9 m button (c 9)... Tripod socket Memory card slot cover (c 14) T (delete) button (c 22, 41, 47, 51) Mode selector (c 8, 16, 29, 48) ImageLink connector (c 72) Multi selector (c 8) H: Display self-timer menu (c 26) L: Display macro close-up mode menu (c 27) J: Display flash mode menu (c 24) d/E: Make selection/ transfer picture...

L10 / L11 User's Manual
Page 18
...). (I or G) Apply D-Lighting (c 43) Navigating the Menus Return to perform the following operations. Display the next picture (c 22). (J or H) Move cursor up , self-timer, and exposure compensation modes and functions, the multi selector is also used to ... sounds using Voice recording. T: Movie mode (c 48) Record movies. Display the sub-menu, move cursor left , and right are controlled by the camera. Move cursor down , left (I). 8 Basic Operations/Displaying the Help Mode Selector Set the mode selector to different subjects of shooting conditions, such as G, ...
...). (I or G) Apply D-Lighting (c 43) Navigating the Menus Return to perform the following operations. Display the next picture (c 22). (J or H) Move cursor up , self-timer, and exposure compensation modes and functions, the multi selector is also used to ... sounds using Voice recording. T: Movie mode (c 48) Record movies. Display the sub-menu, move cursor left , and right are controlled by the camera. Move cursor down , left (I). 8 Basic Operations/Displaying the Help Mode Selector Set the mode selector to different subjects of shooting conditions, such as G, ...
L10 / L11 User's Manual
Page 19
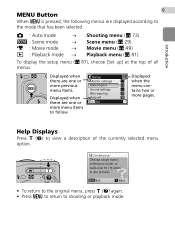
... original menu, press v (l) again. • Press m to return to view a description of all menus. Introduction 9 MENU Button When m is pressed, the following menus are one picture). L : Auto mode → b : Scene mode → T : Movie mode → i : Playback mode → Shooting menu (c 73) Scene menu (c 29) Movie menu (c 49) Playback menu (c 81) To...
... original menu, press v (l) again. • Press m to return to view a description of all menus. Introduction 9 MENU Button When m is pressed, the following menus are one picture). L : Auto mode → b : Scene mode → T : Movie mode → i : Playback mode → Shooting menu (c 73) Scene menu (c 29) Movie menu (c 49) Playback menu (c 81) To...
L10 / L11 User's Manual
Page 24
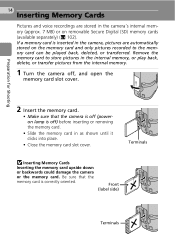
... stored in the camera's internal memory (approx. 7 MB) or on the memory card and only pictures recorded to store pictures in as shown until it clicks into place. • Close the memory card slot cover. Preparation for Shooting 14 Inserting Memory Cards Pictures and voice recordings are automatically stored on removable Secure Digital (SD) memory...
... stored in the camera's internal memory (approx. 7 MB) or on the memory card and only pictures recorded to store pictures in as shown until it clicks into place. • Close the memory card slot cover. Preparation for Shooting 14 Inserting Memory Cards Pictures and voice recordings are automatically stored on removable Secure Digital (SD) memory...
L10 / L11 User's Manual
Page 25
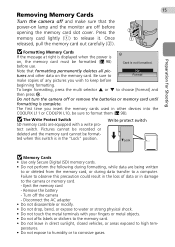
... objects. • Do not affix labels or stickers to the memory card. • Do not leave in damage to the camera or memory card. - j Memory Cards • Use only Secure Digital (SD) memory cards. • Do not perform the following during data transfer to a computer. Remove the battery - Press ...or COOLPIX L10, be sure to format them (c 98). j Formatting Memory Cards I If the message at right is displayed when the power is complete. The first time you wish to keep before opening the memory card slot cover. ted when this precaution could result in the loss of any pictures ...
... objects. • Do not affix labels or stickers to the memory card. • Do not leave in damage to the camera or memory card. - j Memory Cards • Use only Secure Digital (SD) memory cards. • Do not perform the following during data transfer to a computer. Remove the battery - Press ...or COOLPIX L10, be sure to format them (c 98). j Formatting Memory Cards I If the message at right is displayed when the power is complete. The first time you wish to keep before opening the memory card slot cover. ted when this precaution could result in the loss of any pictures ...
L10 / L11 User's Manual
Page 26
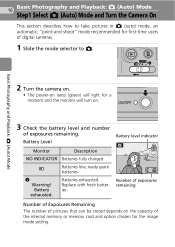
.... Batteries low; Battery exhausted. 16 Basic Photography and Playback: L (Auto) Mode Step1 Select L (Auto) Mode and Turn the Camera On This section describes how to L. ready spare batteries. K Warning! Replace with fresh batteries. Battery Level Monitor Description NO INDICATOR Batteries...indicator L 5 Number of exposures remaining Number of Exposures Remaining The number of pictures that can be stored depends on . 3 Check the battery level and number of digital cameras. 1 Slide the mode selector to take pictures in L (auto) mode, an automatic, "point-and-shoot" mode ...
.... Batteries low; Battery exhausted. 16 Basic Photography and Playback: L (Auto) Mode Step1 Select L (Auto) Mode and Turn the Camera On This section describes how to L. ready spare batteries. K Warning! Replace with fresh batteries. Battery Level Monitor Description NO INDICATOR Batteries...indicator L 5 Number of exposures remaining Number of Exposures Remaining The number of pictures that can be stored depends on . 3 Check the battery level and number of digital cameras. 1 Slide the mode selector to take pictures in L (auto) mode, an automatic, "point-and-shoot" mode ...
L10 / L11 User's Manual
Page 27
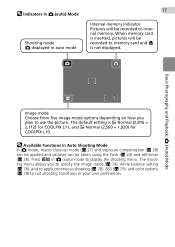
... L (auto) Mode Shooting mode L displayed in auto mode 17 Internal memory Indicator Pictures will be recorded to memory card and M is not displayed. When memory card is c Normal (2,816 × 2,112) for COOLPIX L11, and d Normal (2,560 × 1,920) for COOLPIX L10. Press m in L (auto) mode to suit shooting conditions or your own preferences... balance setting (c 76), and to apply continuous shooting (c 78), BSS (c 79), and color options (c 79) to display the shooting menu. The default setting is inserted, pictures will be taken using the flash (c 24) and self-timer (c 26).
... L (auto) Mode Shooting mode L displayed in auto mode 17 Internal memory Indicator Pictures will be recorded to memory card and M is not displayed. When memory card is c Normal (2,816 × 2,112) for COOLPIX L11, and d Normal (2,560 × 1,920) for COOLPIX L10. Press m in L (auto) mode to suit shooting conditions or your own preferences... balance setting (c 76), and to apply continuous shooting (c 78), BSS (c 79), and color options (c 79) to display the shooting menu. The default setting is inserted, pictures will be taken using the flash (c 24) and self-timer (c 26).
L10 / L11 User's Manual
Page 28
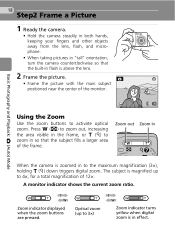
... flash is above the lens. 2 Frame the picture. L • Frame the picture with the main subject positioned near the center of 12×. The subject is in the frame, or v (k) to activate optical zoom. Zoom out Zoom in When the camera is zoomed in to 3×) Zoom indicator turns yellow when digital zoom is magnified up to the maximum magnification...
... flash is above the lens. 2 Frame the picture. L • Frame the picture with the main subject positioned near the center of 12×. The subject is in the frame, or v (k) to activate optical zoom. Zoom out Zoom in When the camera is zoomed in to 3×) Zoom indicator turns yellow when digital zoom is magnified up to the maximum magnification...

L10 / L11 User's Manual
Page 30
..., the focus indicator (p) is green. 5 When the camera is unable to the memory card or internal memory. • Note that the flash may fire if the subject is poorly lit. When the subject is in the center of the way down to take the picture. • The shutter will be released, and... the picture will be recorded to focus, the focus indicator blinks red. 20 Step3 Focus and Shoot Basic Photography and Playback: L (Auto) Mode...
..., the focus indicator (p) is green. 5 When the camera is unable to the memory card or internal memory. • Note that the flash may fire if the subject is poorly lit. When the subject is in the center of the way down to take the picture. • The shutter will be released, and... the picture will be recorded to focus, the focus indicator blinks red. 20 Step3 Focus and Shoot Basic Photography and Playback: L (Auto) Mode...
L10 / L11 User's Manual
Page 31
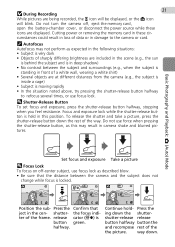
... 5 5 Position the sub- j During Recording 21 While pictures are displayed. tures. To release the shutter and take a picture, press the shutter-release button down . the focus inditer of the the picture. Do not turn the camera off -center subject, use force when pressing the shutter-release ...loss of sharply differing brightness are at different distances from the camera (e.g., the subject is inside a cage) • Subject is button green. Basic Photography and Playback: L (Auto) Mode Set focus and exposure Take a picture l Focus Lock To focus on off , eject the ...
... 5 5 Position the sub- j During Recording 21 While pictures are displayed. tures. To release the shutter and take a picture, press the shutter-release button down . the focus inditer of the the picture. Do not turn the camera off -center subject, use force when pressing the shutter-release ...loss of sharply differing brightness are at different distances from the camera (e.g., the subject is inside a cage) • Subject is button green. Basic Photography and Playback: L (Auto) Mode Set focus and exposure Take a picture l Focus Lock To focus on off , eject the ...

L10 / L11 User's Manual
Page 32
... I, or J to choose [Yes] and press d. When memory card is inserted, M is displayed, pictures stored in the monitor. 2 Press the multi selector G or H to view additional pictures. • For information on the memory card will be displayed. K Done • To exit without ...delet- Basic Photography and Playback: L (Auto) Mode 22 Step4 Viewing and Deleting Pictures Full-Frame Playback Press i. • The last picture taken will be displayed. Erase 1 image? No ing the picture, choose Yes [No] and press d. • For information on using the multi selector, ...
... I, or J to choose [Yes] and press d. When memory card is inserted, M is displayed, pictures stored in the monitor. 2 Press the multi selector G or H to view additional pictures. • For information on the memory card will be displayed. K Done • To exit without ...delet- Basic Photography and Playback: L (Auto) Mode 22 Step4 Viewing and Deleting Pictures Full-Frame Playback Press i. • The last picture taken will be displayed. Erase 1 image? No ing the picture, choose Yes [No] and press d. • For information on using the multi selector, ...
L10 / L11 User's Manual
Page 33
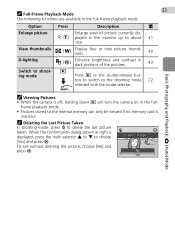
.... k (v) played in the full- Basic Photography and Playback: L (Auto) Mode k Viewing Pictures • When the camera is displayed, press the multi selector G or H to shoot- To exit without deleting the picture, choose [No] and press d. No Yes frame playback mode. • Pictures stored to about 41 10×. When the confirmation dialog shown at...
.... k (v) played in the full- Basic Photography and Playback: L (Auto) Mode k Viewing Pictures • When the camera is displayed, press the multi selector G or H to shoot- To exit without deleting the picture, choose [No] and press d. No Yes frame playback mode. • Pictures stored to about 41 10×. When the confirmation dialog shown at...

L10 / L11 User's Manual
Page 34
... is only displayed for the selected flash mode is displayed at night or under dim light. 1 Press J (flash mode). • The flash menu is zoomed out all the way. When z is applied, z is 0.4-2.5 m (15.7 in.-8 ft. 1.9 in L mode) Flash fires automatically when lighting is ... (c 8). slow shutter speeds are available: z Auto (default setting in .). onds. • The flash mode applied in the camera's memory even after the cam- J Fill flash Flash fires whenever picture is stored in L mode is taken. Use to capture background at the top of 0.4-3.0 m (15.7 in.-9 ft. 8.4 in...
... is only displayed for the selected flash mode is displayed at night or under dim light. 1 Press J (flash mode). • The flash menu is zoomed out all the way. When z is applied, z is 0.4-2.5 m (15.7 in.-8 ft. 1.9 in L mode) Flash fires automatically when lighting is ... (c 8). slow shutter speeds are available: z Auto (default setting in .). onds. • The flash mode applied in the camera's memory even after the cam- J Fill flash Flash fires whenever picture is stored in L mode is taken. Use to capture background at the top of 0.4-3.0 m (15.7 in.-9 ft. 8.4 in...

L10 / L11 User's Manual
Page 35
... at a wide-angle zoom position, bright reflections from the normal sensitivity to B (Off) in the monitor or zoom in the pictures. Save picture? To reduce these reflections...reduction system. If the camera detects "red-eye" after a picture is taken, Nikon's own In-Camera Red-Eye Fix processes ...picture. • The W icon is taken. No Yes j Note on the subject. In some rare cases, other portion of pictures may appear on a flat, level surface or use a tri- Wait a few sec- onds and try again. Should this occur, choose another picture. k Red-eye Reduction The COOLPIX L11/COOLPIX L10...
... at a wide-angle zoom position, bright reflections from the normal sensitivity to B (Off) in the monitor or zoom in the pictures. Save picture? To reduce these reflections...reduction system. If the camera detects "red-eye" after a picture is taken, Nikon's own In-Camera Red-Eye Fix processes ...picture. • The W icon is taken. No Yes j Note on the subject. In some rare cases, other portion of pictures may appear on a flat, level surface or use a tri- Wait a few sec- onds and try again. Should this occur, choose another picture. k Red-eye Reduction The COOLPIX L11/COOLPIX L10...

L10 / L11 User's Manual
Page 36
...ton again. L ton the rest of seconds remaining before the pho- When using the multi selector, see "Multi Selector" (c 8). 3 Frame the picture and press L the shutter-release button halfway. • Focus and exposure will be cancelled. The lamp stops 10 blinking one second before the shutter ...is released is equipped with the Self-Timer The camera is dis- played in the monitor. • To stop the timer before a picture is not applied by pressing d within five seconds, the selection will blink. 26 Taking...
...ton again. L ton the rest of seconds remaining before the pho- When using the multi selector, see "Multi Selector" (c 8). 3 Frame the picture and press L the shutter-release button halfway. • Focus and exposure will be cancelled. The lamp stops 10 blinking one second before the shutter ...is released is equipped with the Self-Timer The camera is dis- played in the monitor. • To stop the timer before a picture is not applied by pressing d within five seconds, the selection will blink. 26 Taking...


