L10 / L11 User's Manual
Page 4
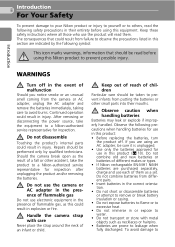
... to After removing or disconnecting the power source, take the product to a Nikon-authorized service representative for use electronic equipment in the presence of chil- Should the camera break open as this could result in their mouths. Observe caution when handling batteries Batteries may... Should you are purchased separately, charge and use in injury. Continued operation could result in this equipment. vent infants from the camera or AC adapter, unplug the AC adapter and remove the batteries immediately, taking care to others, read them as necklaces or ...
... to After removing or disconnecting the power source, take the product to a Nikon-authorized service representative for use electronic equipment in the presence of chil- Should the camera break open as this could result in their mouths. Observe caution when handling batteries Batteries may... Should you are purchased separately, charge and use in injury. Continued operation could result in this equipment. vent infants from the camera or AC adapter, unplug the AC adapter and remove the batteries immediately, taking care to others, read them as necklaces or ...
L10 / L11 User's Manual
Page 8
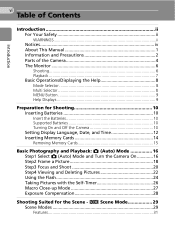
... vi Table of Contents Introduction ii For Your Safety ii WARNINGS ii Notices iv About This Manual 1 Information and Precautions 2 Parts of the Camera 4 The Monitor 6 Shooting 6 Playback 7 Basic Operations/Displaying the Help 8 Mode Selector 8 Multi Selector 8 MENU Button 9 Help Displays ...9 Preparation for Shooting 10 Inserting Batteries 10 Insert the Batteries 10 Supported Batteries 10 Turning On and Off the Camera 10 Setting Display Language, Date, and Time 12 Inserting Memory Cards 14 Removing Memory Cards 15 Basic Photography and Playback: L (Auto...
... vi Table of Contents Introduction ii For Your Safety ii WARNINGS ii Notices iv About This Manual 1 Information and Precautions 2 Parts of the Camera 4 The Monitor 6 Shooting 6 Playback 7 Basic Operations/Displaying the Help 8 Mode Selector 8 Multi Selector 8 MENU Button 9 Help Displays ...9 Preparation for Shooting 10 Inserting Batteries 10 Insert the Batteries 10 Supported Batteries 10 Turning On and Off the Camera 10 Setting Display Language, Date, and Time 12 Inserting Memory Cards 14 Removing Memory Cards 15 Basic Photography and Playback: L (Auto...
L10 / L11 User's Manual
Page 9
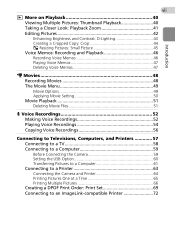
Introduction vii i More on Playback 40 Viewing Multiple Pictures: Thumbnail Playback 40 Taking a Closer Look: Playback Zoom 41 Editing Pictures 42 Enhancing Brightness and Contrast: D-Lighting 43 Creating a Cropped Copy: Crop 44 H Resizing Pictures: Small Picture 45 Voice ..., and Printers 57 Connecting to a TV 58 Connecting to a Computer 59 Before Connecting the Camera 59 Setting the USB Option 60 Transferring Pictures to a Computer 61 Connecting to a Printer 63 Connecting the Camera and Printer 64 Printing Pictures One at a Time 65 Printing Multiple Pictures 66 Creating a DPOF...
Introduction vii i More on Playback 40 Viewing Multiple Pictures: Thumbnail Playback 40 Taking a Closer Look: Playback Zoom 41 Editing Pictures 42 Enhancing Brightness and Contrast: D-Lighting 43 Creating a Cropped Copy: Crop 44 H Resizing Pictures: Small Picture 45 Voice ..., and Printers 57 Connecting to a TV 58 Connecting to a Computer 59 Before Connecting the Camera 59 Setting the USB Option 60 Transferring Pictures to a Computer 61 Connecting to a Printer 63 Connecting the Camera and Printer 64 Printing Pictures One at a Time 65 Printing Multiple Pictures 66 Creating a DPOF...
L10 / L11 User's Manual
Page 10
...73 Shooting Options: The Shooting Menu 73 Z Image Mode 74 d White Balance 76 q Continuous 78 A Best Shot Selector (BSS 79 d Color Options 79 Restrictions on Camera Settings 80 Playback Options: The Playback Menu 81 z Slide Show 83 A Delete 84 D Protect 84 E Transfer Marking 85 L Copy 86 Basic... Camera Setup: The Setup Menu 87 R Menus 88 H Quick Startup 89 V Welcome Screen 89 W Date 90 Z Monitor Settings 93 f Date Imprint 94 h Sound Settings 96 h ...
...73 Shooting Options: The Shooting Menu 73 Z Image Mode 74 d White Balance 76 q Continuous 78 A Best Shot Selector (BSS 79 d Color Options 79 Restrictions on Camera Settings 80 Playback Options: The Playback Menu 81 z Slide Show 83 A Delete 84 D Protect 84 E Transfer Marking 85 L Copy 86 Basic... Camera Setup: The Setup Menu 87 R Menus 88 H Quick Startup 89 V Welcome Screen 89 W Date 90 Z Monitor Settings 93 f Date Imprint 94 h Sound Settings 96 h ...

L10 / L11 User's Manual
Page 11
... as a "memory card." • The setting at the time of a Nikon COOLPIX L11/COOLPIX L10 digital camera. 1 About This Manual Introduction Thank you for COOLPIX L11. Notations • A Secure Digital (SD) memory card is referred to the pictures on removable memory cards. COOLPIX L11 and COOLPIX L10 differ in the camera's internal memory or on the memory card. Screen Samples In this...
... as a "memory card." • The setting at the time of a Nikon COOLPIX L11/COOLPIX L10 digital camera. 1 About This Manual Introduction Thank you for COOLPIX L11. Notations • A Secure Digital (SD) memory card is referred to the pictures on removable memory cards. COOLPIX L11 and COOLPIX L10 differ in the camera's internal memory or on the memory card. Screen Samples In this...
L10 / L11 User's Manual
Page 12
...hardware and software described in these manuals at any form, by Nikon specifically for contact information: http://nikonimaging.com/ Use Only Nikon Brand Electronic Accessories Nikon COOLPIX cameras are engineered and proven to the attention of the Nikon representative in your area. Introduction 2 Information and Precautions Life-... it were you to bring any errors or omissions to operate within the operational and safety requirements of this Nikon digital camera are designed to frequently asked questions (FAQs), and general advice on a trip), take a test shot to ensure that may...
...hardware and software described in these manuals at any form, by Nikon specifically for contact information: http://nikonimaging.com/ Use Only Nikon Brand Electronic Accessories Nikon COOLPIX cameras are engineered and proven to the attention of the Nikon representative in your area. Introduction 2 Information and Precautions Life-... it were you to bring any errors or omissions to operate within the operational and safety requirements of this Nikon digital camera are designed to frequently asked questions (FAQs), and general advice on a trip), take a test shot to ensure that may...
L10 / L11 User's Manual
Page 13
... coupons. • Comply with images containing no private information (for the purpose of Data Storage Devices Please note that has been digitally copied or reproduced by means of a scanner, digital camera or other device may be punishable by law. • Items prohibited by law from discarded storage devices using commercial deletion software, or...
... coupons. • Comply with images containing no private information (for the purpose of Data Storage Devices Please note that has been digitally copied or reproduced by means of a scanner, digital camera or other device may be punishable by law. • Items prohibited by law from discarded storage devices using commercial deletion software, or...
L10 / L11 User's Manual
Page 14
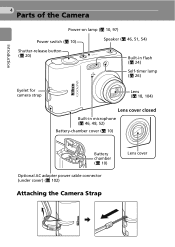
Introduction 4 Parts of the Camera Power-on lamp (c 10, 97) Power switch (c 10) Speaker (c 46, 51, 54) Shutter-release button (c 20) Built-in flash (c 24) Self-timer lamp (c 26) Eyelet for camera strap Lens (c 18, 104) Lens cover closed Built-in microphone (c 46, 48, 52) Battery-chamber cover (c 10) Battery chamber (c 10) Optional AC adapter power cable connector (under cover) (c 102) Attaching the Camera Strap Lens cover
Introduction 4 Parts of the Camera Power-on lamp (c 10, 97) Power switch (c 10) Speaker (c 46, 51, 54) Shutter-release button (c 20) Built-in flash (c 24) Self-timer lamp (c 26) Eyelet for camera strap Lens (c 18, 104) Lens cover closed Built-in microphone (c 46, 48, 52) Battery-chamber cover (c 10) Battery chamber (c 10) Optional AC adapter power cable connector (under cover) (c 102) Attaching the Camera Strap Lens cover

L10 / L11 User's Manual
Page 16
... 15 14 1 Shooting mode1.... 16, 29, 48 2 Exposure lock 38 3 Macro close-up mode........ 27 4 Zoom indicator 18, 27 5 Focus indicator 20 6 Flash mode 24 7 Camera shake icon 25 8 Internal memory indicator . 17 9 Battery level indicator ........ 16 10 ISO Sensitivity 25 11 Self-.... 2 L, d, e, h, and i are available for the monitor indicators during shooting and playback (actual display varies with current camera settings). Introduction 6 The Monitor The following indicators may appear in the monitor during voice recording and voice playback. See pages 52 and 54 for COOLPIX L10.
... 15 14 1 Shooting mode1.... 16, 29, 48 2 Exposure lock 38 3 Macro close-up mode........ 27 4 Zoom indicator 18, 27 5 Focus indicator 20 6 Flash mode 24 7 Camera shake icon 25 8 Internal memory indicator . 17 9 Battery level indicator ........ 16 10 ISO Sensitivity 25 11 Self-.... 2 L, d, e, h, and i are available for the monitor indicators during shooting and playback (actual display varies with current camera settings). Introduction 6 The Monitor The following indicators may appear in the monitor during voice recording and voice playback. See pages 52 and 54 for COOLPIX L10.

L10 / L11 User's Manual
Page 18
...) Navigating the Menus Return to different subjects of shooting conditions, such as G, H, I ). Display the sub-menu, move cursor left , and right are controlled by the camera. Multi Selector In addition to activating the flash, macro-close up, self-timer, and exposure compensation modes and functions, the multi selector is also used... operations. Select one of 16 "scenes" suited to the previous menu, or move cursor right, or make selection (J). Introduction b: Scene mode (c 29) Select one of camera settings are shown as indoor parties or night landscapes, and let the...
...) Navigating the Menus Return to different subjects of shooting conditions, such as G, H, I ). Display the sub-menu, move cursor left , and right are controlled by the camera. Multi Selector In addition to activating the flash, macro-close up, self-timer, and exposure compensation modes and functions, the multi selector is also used... operations. Select one of 16 "scenes" suited to the previous menu, or move cursor right, or make selection (J). Introduction b: Scene mode (c 29) Select one of camera settings are shown as indoor parties or night landscapes, and let the...
L10 / L11 User's Manual
Page 20
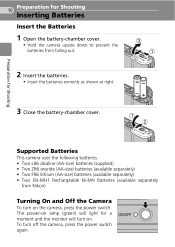
...Shooting Inserting Batteries Insert the Batteries 1 Open the battery-chamber cover. • Hold the camera upside down to prevent the batteries from Nikon) Turning On and Off the Camera To turn on the camera, press the power switch. To turn on lamp (green) will light for Shooting 3 ...Close the battery-chamber cover. 1 2 Supported Batteries This camera uses the following batteries. • Two LR6 alkaline (AA...
...Shooting Inserting Batteries Insert the Batteries 1 Open the battery-chamber cover. • Hold the camera upside down to prevent the batteries from Nikon) Turning On and Off the Camera To turn on the camera, press the power switch. To turn on lamp (green) will light for Shooting 3 ...Close the battery-chamber cover. 1 2 Supported Batteries This camera uses the following batteries. • Two LR6 alkaline (AA...
L10 / L11 User's Manual
Page 21
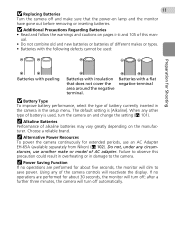
... To improve battery performance, select the type of battery currently inserted in the camera in damage to the camera. k Alkaline Batteries Performance of AC adapter. Do not, under any circumstances, use an AC Adapter EH-65A (available separately from Nikon) (c 102). k Power Saving Function If no operations are performed for Shooting Batteries with...
... To improve battery performance, select the type of battery currently inserted in the camera in damage to the camera. k Alkaline Batteries Performance of AC adapter. Do not, under any circumstances, use an AC Adapter EH-65A (available separately from Nikon) (c 102). k Power Saving Function If no operations are performed for Shooting Batteries with...

L10 / L11 User's Manual
Page 22
...saving Preparation for Shooting 12 Setting Display Language, Date, and Time A language-selection dialog is displayed the first time the camera is turned on. 1 Press the power switch to turn on the camera. • The power-on lamp will light for a moment and the monitor will not be set. l Daylight ...Saving Time If daylight saving time is displayed. The camera's clock is selected, the date and time will turn on using the multi selector, see "Multi Selector" (c 8). 3 Press G or H to choose the desired...
...saving Preparation for Shooting 12 Setting Display Language, Date, and Time A language-selection dialog is displayed the first time the camera is turned on. 1 Press the power switch to turn on the camera. • The power-on lamp will light for a moment and the monitor will not be set. l Daylight ...Saving Time If daylight saving time is displayed. The camera's clock is selected, the date and time will turn on using the multi selector, see "Multi Selector" (c 8). 3 Press G or H to choose the desired...
L10 / L11 User's Manual
Page 24
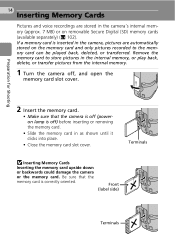
.... • Slide the memory card in the internal memory, or play back, delete, or transfer pictures from the internal memory. 1 Turn the camera off, and open the memory card slot cover. 2 Insert the memory card. • Make sure that the memory card is off (poweron lamp... Shooting 14 Inserting Memory Cards Pictures and voice recordings are automatically stored on removable Secure Digital (SD) memory cards (available separately) (c 102). If a memory card is inserted in the camera, pictures are stored in the camera's internal memory (approx. 7 MB) or on the memory card and only pictures ...
.... • Slide the memory card in the internal memory, or play back, delete, or transfer pictures from the internal memory. 1 Turn the camera off, and open the memory card slot cover. 2 Insert the memory card. • Make sure that the memory card is off (poweron lamp... Shooting 14 Inserting Memory Cards Pictures and voice recordings are automatically stored on removable Secure Digital (SD) memory cards (available separately) (c 102). If a memory card is inserted in the camera, pictures are stored in the camera's internal memory (approx. 7 MB) or on the memory card and only pictures ...
L10 / L11 User's Manual
Page 25
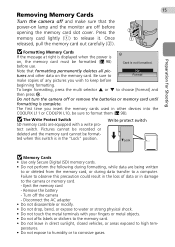
...the power-on lamp and the monitor are off before beginning formatting. No tures and other devices into the COOLPIX L11 or COOLPIX L10, be format- j Memory Cards • Use only Secure Digital (SD) memory cards. • Do not perform the following during formatting, while data are equipped with...card lightly (1) to choose [Format] and then press d. Preparation for Shooting 15 Removing Memory Cards Turn the camera off and make copies of data or in damage to the camera or memory card. - Card is on the memory card. Be sure to Format make sure that formatting ...
...the power-on lamp and the monitor are off before beginning formatting. No tures and other devices into the COOLPIX L11 or COOLPIX L10, be format- j Memory Cards • Use only Secure Digital (SD) memory cards. • Do not perform the following during formatting, while data are equipped with...card lightly (1) to choose [Format] and then press d. Preparation for Shooting 15 Removing Memory Cards Turn the camera off and make copies of data or in damage to the camera or memory card. - Card is on the memory card. Be sure to Format make sure that formatting ...
L10 / L11 User's Manual
Page 26
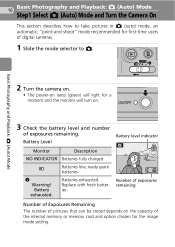
... Battery Level Monitor Description NO INDICATOR Batteries fully charged. Replace with fresh batteries. Basic Photography and Playback: L (Auto) Mode 2 Turn the camera on. • The power-on lamp (green) will light for a moment and the monitor will turn on the capacity of the internal memory...remaining Number of Exposures Remaining The number of pictures that can be stored depends on . 3 Check the battery level and number of digital cameras. 1 Slide the mode selector to take pictures in L (auto) mode, an automatic, "point-and-shoot" mode recommended for the image mode setting...
... Battery Level Monitor Description NO INDICATOR Batteries fully charged. Replace with fresh batteries. Basic Photography and Playback: L (Auto) Mode 2 Turn the camera on. • The power-on lamp (green) will light for a moment and the monitor will turn on the capacity of the internal memory...remaining Number of Exposures Remaining The number of pictures that can be stored depends on . 3 Check the battery level and number of digital cameras. 1 Slide the mode selector to take pictures in L (auto) mode, an automatic, "point-and-shoot" mode recommended for the image mode setting...
L10 / L11 User's Manual
Page 28
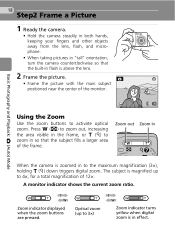
... the frame, or v (k) to activate optical zoom. Zoom indicator displayed when the zoom buttons are pressed. Optical zoom (up to 3×) Zoom indicator turns yellow when digital zoom is above the lens. 2 Frame the picture. Basic Photography and Playback: L (Auto) Mode 18 Step2 Frame a Picture 1 Ready the camera. • Hold the camera steadily in both hands, keeping your fingers...
... the frame, or v (k) to activate optical zoom. Zoom indicator displayed when the zoom buttons are pressed. Optical zoom (up to 3×) Zoom indicator turns yellow when digital zoom is above the lens. 2 Frame the picture. Basic Photography and Playback: L (Auto) Mode 18 Step2 Frame a Picture 1 Ready the camera. • Hold the camera steadily in both hands, keeping your fingers...

L10 / L11 User's Manual
Page 29
Details visible at maximum optical zoom are processed digitally with digital zoom. Basic Photography and Playback: L (Auto) Mode j Digital Zoom 19 Unlike optical zoom, data from the camera's image sensor are simply enlarged, producing a slightly "grainy" image.
Details visible at maximum optical zoom are processed digitally with digital zoom. Basic Photography and Playback: L (Auto) Mode j Digital Zoom 19 Unlike optical zoom, data from the camera's image sensor are simply enlarged, producing a slightly "grainy" image.

L10 / L11 User's Manual
Page 30
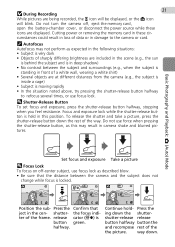
... on the subject in focus, the focus indicator (p) is green. 5 When the camera is poorly lit. When the subject is in the center of the way down to take the picture. • The shutter will be released, and ...
... on the subject in focus, the focus indicator (p) is green. 5 When the camera is poorly lit. When the subject is in the center of the way down to take the picture. • The shutter will be released, and ...
L10 / L11 User's Manual
Page 31
... button down the rest of the frame. Press the Confirm that the distance between the subject and surroundings (e.g., when the subject is standing in camera shake and blurred pic- the focus inditer of the way. L L 5 5 Position the sub- l Shutter-Release Button To set focus ... halfway, stopping when you feel resistance. release cator (p) is button green. j During Recording 21 While pictures are at different distances from the camera (e.g., the subject is inside a cage) • Subject is moving rapidly • In the situation noted above, try pressing the shutter-release...
... button down the rest of the frame. Press the Confirm that the distance between the subject and surroundings (e.g., when the subject is standing in camera shake and blurred pic- the focus inditer of the way. L L 5 5 Position the sub- l Shutter-Release Button To set focus ... halfway, stopping when you feel resistance. release cator (p) is button green. j During Recording 21 While pictures are at different distances from the camera (e.g., the subject is inside a cage) • Subject is moving rapidly • In the situation noted above, try pressing the shutter-release...


