
N-Log Specification Document
Page 2
Introduction 3 2. Curve Characteristics 4 3. Gamut and White Point 5 2/5 September 1st, 2018 Version History Version 1.0.0 Date September 1st, 2018 N-Log Specification Document Contents 1.
Introduction 3 2. Curve Characteristics 4 3. Gamut and White Point 5 2/5 September 1st, 2018 Version History Version 1.0.0 Date September 1st, 2018 N-Log Specification Document Contents 1.

N-Log Specification Document
Page 5
N-Log Specification Document 3. The gamut for N-Log. White point Red primary Green primary Blue primary CIE xy chromaticity x y 0.3127 0.3290 0.708 0.292 0.170 0.797 0.131 0.046 The white point of N-Log is same as the wide color gamut known as "ITU-R BT.2020". 5/5 September 1st, 2018 Gamut and White Point The table below shows the gamut and white point for N-Log is D65.
N-Log Specification Document 3. The gamut for N-Log. White point Red primary Green primary Blue primary CIE xy chromaticity x y 0.3127 0.3290 0.708 0.292 0.170 0.797 0.131 0.046 The white point of N-Log is same as the wide color gamut known as "ITU-R BT.2020". 5/5 September 1st, 2018 Gamut and White Point The table below shows the gamut and white point for N-Log is D65.

Reference Manual
Page 49
.../ self-timer Flash (page 52) Allows you to match the shooting conditions. Flexible button Description Point and shoot Sets the shooting mode to black and white. Camera settings Allows you to change the other colors to [Point and shoot (page 50)].
.../ self-timer Flash (page 52) Allows you to match the shooting conditions. Flexible button Description Point and shoot Sets the shooting mode to black and white. Camera settings Allows you to change the other colors to [Point and shoot (page 50)].

Reference Manual
Page 72
... and change the other functions. More vivid/less vivid Adjust the vividness of the entire image. Colors not selected are changed to black and white. 1 Use flexible button 2, 3, or 4 to select the setting. 2 Use the multi selector to adjust colors and press flexible button... 4 ( ). • Press flexible button 3 ( ) to black and white. Shooting mode flexible button 3 ( ) Change colors Flexible button Description Brighter/darker Adjust the brightness (exposure compensation) of the entire image. Notes about...
... and change the other functions. More vivid/less vivid Adjust the vividness of the entire image. Colors not selected are changed to black and white. 1 Use flexible button 2, 3, or 4 to select the setting. 2 Use the multi selector to adjust colors and press flexible button... 4 ( ). • Press flexible button 3 ( ) to black and white. Shooting mode flexible button 3 ( ) Change colors Flexible button Description Brighter/darker Adjust the brightness (exposure compensation) of the entire image. Notes about...

Reference Manual
Page 78
... detection • The camera's ability to detect faces depends on , and single borders are displayed around the other faces. a portrait subject wearing a white shirt is selected, the focus area changes depending on the shooting conditions that the camera focuses on a variety of similarly shaped windows, etc.) •... no faces are detected when the shutter-release button is pressed halfway: • When [Point and shoot] is standing in front of a white wall) • Point sources of the frame Subjects not suitable for autofocus The camera may not be in the scene (e.g. When faces take ...
... detection • The camera's ability to detect faces depends on , and single borders are displayed around the other faces. a portrait subject wearing a white shirt is selected, the focus area changes depending on the shooting conditions that the camera focuses on a variety of similarly shaped windows, etc.) •... no faces are detected when the shutter-release button is pressed halfway: • When [Point and shoot] is standing in front of a white wall) • Point sources of the frame Subjects not suitable for autofocus The camera may not be in the scene (e.g. When faces take ...

Reference Manual
Page 97
Highlight colors Create a black and white image in cyan-blue monochrome. to select flexible button 4 ( ) Picture 1 Use the multi selector button 4 ( ). Playback mode select an image flexible button 1 ( ) play use to ... the multi selector to select the desired setting and press flexible button 4 ( ). • 1: Use to achieve a vivid, photoprint effect. • 2: Save images in black-and-white. • 3: Save images in sepia tones. • 4: Save images in which only the specified color remains. Change colors Adjust image colors. Playback mode select an...
Highlight colors Create a black and white image in cyan-blue monochrome. to select flexible button 4 ( ) Picture 1 Use the multi selector button 4 ( ). Playback mode select an image flexible button 1 ( ) play use to ... the multi selector to select the desired setting and press flexible button 4 ( ). • 1: Use to achieve a vivid, photoprint effect. • 2: Save images in black-and-white. • 3: Save images in sepia tones. • 4: Save images in which only the specified color remains. Change colors Adjust image colors. Playback mode select an...

Reference Manual
Page 111
.... View by date Allows you to play back images by date 1 Use the multi selector press flexible button 4 ( ). to select the desired date and • A white background of a date indicates that images were recorded on that date. • Images are selected based on that date is displayed. • Images cannot be...
.... View by date Allows you to play back images by date 1 Use the multi selector press flexible button 4 ( ). to select the desired date and • A white background of a date indicates that images were recorded on that date. • Images are selected based on that date is displayed. • Images cannot be...

Reference Manual
Page 114
Choose 2 Use the multi selector to select the desired date and press flexible button 4 ( ). • A white background of a date indicates that date. • Press flexible button 2 ( ) to display the previous month. 3 Press flexible button 2 ( [Start]). • Once the slide show 1 Press ...
Choose 2 Use the multi selector to select the desired date and press flexible button 4 ( ). • A white background of a date indicates that date. • Press flexible button 2 ( ) to display the previous month. 3 Press flexible button 2 ( [Start]). • Once the slide show 1 Press ...

Reference Manual
Page 189
... no more than 0.01% being saved or deleted. Doing so could result in loss of data or in the vicinity of pixels are always lit (white, red, blue, or green) or always off before exposing it to sudden changes in temperature. ● Keep away from strong magnetic fields Do not ... missing or defective. The camera ● Do not apply strong impact to the camera The product may cause the image sensor to deteriorate or produce a white blur effect in photographs. ● Turn the product off (black), this device in damage to the memory card or internal circuitry. ● Notes about ...
... no more than 0.01% being saved or deleted. Doing so could result in loss of data or in the vicinity of pixels are always lit (white, red, blue, or green) or always off before exposing it to sudden changes in temperature. ● Keep away from strong magnetic fields Do not ... missing or defective. The camera ● Do not apply strong impact to the camera The product may cause the image sensor to deteriorate or produce a white blur effect in photographs. ● Turn the product off (black), this device in damage to the memory card or internal circuitry. ● Notes about ...

Quick Start Guide for customers in Asia Oceania the Middle East and Africa
Page 35
... to the memory card or internal circuitry. Forcibly cutting power in loss of equipment that are always lit (white, red, blue, or green) or always off before exposing it to deteriorate or produce a white blur effect in temperature. Hence while these circumstances could result in these displays may cause the image sensor...
... to the memory card or internal circuitry. Forcibly cutting power in loss of equipment that are always lit (white, red, blue, or green) or always off before exposing it to deteriorate or produce a white blur effect in temperature. Hence while these circumstances could result in these displays may cause the image sensor...

Quick Start Guide for customers in the Americas
Page 35
... lens at strong light sources for extended periods Avoid pointing the lens at least 99.99% of data or in damage to deteriorate or produce a white blur effect in the monitor may malfunction if subjected to the lens. Should the monitor break, care should be difficult to see under bright lighting... glass and to prevent the liquid crystal from strong magnetic fields Do not use or store this is on, or while images are always lit (white, red, blue, or green) or always off (black), this device in "For your safety 35 In addition, do not touch or apply force to strong...
... lens at strong light sources for extended periods Avoid pointing the lens at least 99.99% of data or in damage to deteriorate or produce a white blur effect in the monitor may malfunction if subjected to the lens. Should the monitor break, care should be difficult to see under bright lighting... glass and to prevent the liquid crystal from strong magnetic fields Do not use or store this is on, or while images are always lit (white, red, blue, or green) or always off (black), this device in "For your safety 35 In addition, do not touch or apply force to strong...

Quick Start Guide for customers in Europe
Page 34
In addition, do not touch or apply force to deteriorate or produce a white blur effect in a carrying case or a plastic bag before removing or disconnecting the power source or memory card Do not remove the battery while the ... inside the device. Avoid sudden changes in temperature Sudden changes in temperature, such as this could result in loss of equipment that are always lit (white, red, blue, or green) or always off before exposing it to prevent the liquid crystal from strong magnetic fields Do not use or store this...
In addition, do not touch or apply force to deteriorate or produce a white blur effect in a carrying case or a plastic bag before removing or disconnecting the power source or memory card Do not remove the battery while the ... inside the device. Avoid sudden changes in temperature Sudden changes in temperature, such as this could result in loss of equipment that are always lit (white, red, blue, or green) or always off before exposing it to prevent the liquid crystal from strong magnetic fields Do not use or store this...
Reference Manual
Page 2
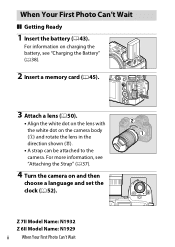
...; A strap can be attached to the camera. For more information, see "Charging the Battery" (0 38). 2 Insert a memory card (045). 3 Attach a lens (050). • Align the white dot on the lens with the white dot on and then choose a language and set the clock (052).
...; A strap can be attached to the camera. For more information, see "Charging the Battery" (0 38). 2 Insert a memory card (045). 3 Attach a lens (050). • Align the white dot on the lens with the white dot on and then choose a language and set the clock (052).

Reference Manual
Page 10
White Balance 94 Adjusting White Balance 94 Silent Photography 100 Rating Pictures 102 Protecting Pictures from Deletion 104 Shooting Controls 106 The Mode Dial 106 Using the Mode Dial 106 P (...
White Balance 94 Adjusting White Balance 94 Silent Photography 100 Rating Pictures 102 Protecting Pictures from Deletion 104 Shooting Controls 106 The Mode Dial 106 Using the Mode Dial 106 P (...

Reference Manual
Page 11
The i Menu 136 The i Menu 136 Still Images 138 Set Picture Control 139 White Balance 145 Image Quality 152 Image Size 154 Flash Mode 156 Metering 157 Wi-Fi Connection 158 View Memory Card Info 159 Release Mode 160 Vibration Reduction 161 AF-Area Mode 163 Focus Mode 164 Movies...165 Set Picture Control 167 White Balance 167 Frame Size and Rate/Image Quality 168 Microphone Sensitivity 174 Choose Image Area 175 Metering 177 Wi-Fi Connection 177 Destination 177 Electronic VR 178 Vibration Reduction 179 AF-Area Mode 179 Focus Mode 179 Table of Contents xi
The i Menu 136 The i Menu 136 Still Images 138 Set Picture Control 139 White Balance 145 Image Quality 152 Image Size 154 Flash Mode 156 Metering 157 Wi-Fi Connection 158 View Memory Card Info 159 Release Mode 160 Vibration Reduction 161 AF-Area Mode 163 Focus Mode 164 Movies...165 Set Picture Control 167 White Balance 167 Frame Size and Rate/Image Quality 168 Microphone Sensitivity 174 Choose Image Area 175 Metering 177 Wi-Fi Connection 177 Destination 177 Electronic VR 178 Vibration Reduction 179 AF-Area Mode 179 Focus Mode 179 Table of Contents xi

Reference Manual
Page 14
... (RAW) Recording 264 NEF (RAW) Compression 264 NEF (RAW) Bit Depth 265 ISO Sensitivity Settings 265 White Balance 267 The White Balance Menu: Fine-Tuning 267 The White Balance Menu: Choosing a Color Temperature 270 Preset Manual: Copying White Balance from a Photograph 272 Set Picture Control 275 Modifying Picture Controls from the Menus..... 275 Manage...
... (RAW) Recording 264 NEF (RAW) Compression 264 NEF (RAW) Bit Depth 265 ISO Sensitivity Settings 265 White Balance 267 The White Balance Menu: Fine-Tuning 267 The White Balance Menu: Choosing a Color Temperature 270 Preset Manual: Copying White Balance from a Photograph 272 Set Picture Control 275 Modifying Picture Controls from the Menus..... 275 Manage...

Reference Manual
Page 15
... 294 Flash Mode 295 Flash Compensation 295 Focus Mode 295 AF-Area Mode 296 Vibration Reduction 296 Auto Bracketing 297 Exposure and Flash Bracketing 298 White Balance Bracketing 303 ADL Bracketing 306 Multiple Exposure 309 Creating a Multiple Exposure 312 HDR (High Dynamic Range 319 Taking HDR Photographs 321 Interval Timer Shooting...
... 294 Flash Mode 295 Flash Compensation 295 Focus Mode 295 AF-Area Mode 296 Vibration Reduction 296 Auto Bracketing 297 Exposure and Flash Bracketing 298 White Balance Bracketing 303 ADL Bracketing 306 Multiple Exposure 309 Creating a Multiple Exposure 312 HDR (High Dynamic Range 319 Taking HDR Photographs 321 Interval Timer Shooting...

Reference Manual
Page 16
... File Naming 364 Destination 364 Choose Image Area 365 Frame Size/Frame Rate 365 Movie Quality 365 Movie File Type 365 ISO Sensitivity Settings 366 White Balance 367 Set Picture Control 367 Manage Picture Control 367 Active D-Lighting 368 High ISO NR 368 Vignette Control 369 Diffraction Compensation 369 Auto Distortion...
... File Naming 364 Destination 364 Choose Image Area 365 Frame Size/Frame Rate 365 Movie Quality 365 Movie File Type 365 ISO Sensitivity Settings 366 White Balance 367 Set Picture Control 367 Manage Picture Control 367 Active D-Lighting 368 High ISO NR 368 Vignette Control 369 Diffraction Compensation 369 Auto Distortion...
Reference Manual
Page 28
... shooting menu Storage folder File naming Primary slot selection Secondary slot function Choose image area Image quality Image size NEF (RAW) recording ISO sensitivity settings White balance Set Picture Control Manage Picture Control Color space Active D-Lighting Long exposure NR High ISO NR Vignette control xxviii Menu List
... shooting menu Storage folder File naming Primary slot selection Secondary slot function Choose image area Image quality Image size NEF (RAW) recording ISO sensitivity settings White balance Set Picture Control Manage Picture Control Color space Active D-Lighting Long exposure NR High ISO NR Vignette control xxviii Menu List

Reference Manual
Page 29
... MOVIE SHOOTING MENU Reset movie shooting menu File naming Destination Choose image area Frame size/frame rate Movie quality Movie file type ISO sensitivity settings White balance Set Picture Control Manage Picture Control Active D-Lighting High ISO NR Vignette control Diffraction compensation Auto distortion control Flicker reduction Menu List xxix
... MOVIE SHOOTING MENU Reset movie shooting menu File naming Destination Choose image area Frame size/frame rate Movie quality Movie file type ISO sensitivity settings White balance Set Picture Control Manage Picture Control Active D-Lighting High ISO NR Vignette control Diffraction compensation Auto distortion control Flicker reduction Menu List xxix


