
Reference Manual
Page 82
..., the date and time cannot be stamped on images. • [Take a series of pictures] • [Shoot a movie miniature] • [Add light trails] Electronic VR When [Choose a style] is set to the following, electronic VR is disabled. • [Shoot night scenes] • [Shoot at intervals] • [Take a series of pictures] • [Photograph fireworks] • [Shoot backlit scenes] • [Add light trails] Digital zoom • When [Smile timer] is selected, digital zoom cannot be used...
..., the date and time cannot be stamped on images. • [Take a series of pictures] • [Shoot a movie miniature] • [Add light trails] Electronic VR When [Choose a style] is set to the following, electronic VR is disabled. • [Shoot night scenes] • [Shoot at intervals] • [Take a series of pictures] • [Photograph fireworks] • [Shoot backlit scenes] • [Add light trails] Digital zoom • When [Smile timer] is selected, digital zoom cannot be used...

Reference Manual
Page 142
...a computer before formatting. Remove image lock. Formatting the internal memory permanently deletes all data. Notes about [Format memory] You cannot format while image lock is established. Data that is displayed. • Do not turn the camera off or open the battery-chamber/memory card slot cover during formatting. • You may not be recovered. Format memory Use this setting while a wireless connection is set. Restricting image deletion (image lock) (page 47) 142 General camera setup Format memory Make sure to save important images to format the internal memory.
...a computer before formatting. Remove image lock. Formatting the internal memory permanently deletes all data. Notes about [Format memory] You cannot format while image lock is established. Data that is displayed. • Do not turn the camera off or open the battery-chamber/memory card slot cover during formatting. • You may not be recovered. Format memory Use this setting while a wireless connection is set. Restricting image deletion (image lock) (page 47) 142 General camera setup Format memory Make sure to save important images to format the internal memory.

Reference Manual
Page 170
... about operation, see the online help for the first time, input the password. Tap [OK] to switch to a smart device. If the [Camera and Wi-Fi connection] screen is displayed in the tab of the SnapBridge app when connected through Bluetooth, the Wi-Fi connection dialog will be displayed after you tap [View options], the iOS settings app launches. Option Description Download pictures Download still images (2 megapixels or original size) and movies...
... about operation, see the online help for the first time, input the password. Tap [OK] to switch to a smart device. If the [Camera and Wi-Fi connection] screen is displayed in the tab of the SnapBridge app when connected through Bluetooth, the Wi-Fi connection dialog will be displayed after you tap [View options], the iOS settings app launches. Option Description Download pictures Download still images (2 megapixels or original size) and movies...

Reference Manual
Page 175
... a problem Troubleshooting Cancel the wireless connection. Disconnect the HDMI cable or USB cable. Wait until charging is charging. The camera settings reset. The clock battery is set. Cannot select [Format card] or [Format memory]. • You cannot format while image lock is exhausted; Restricting image deletion (image lock) (page 47) • You may produce an audible focusing sound. Screen for several days even after the camera battery is removed. The internal clock battery is in playback mode, press the (shooting/playback mode) button, shutter-release button...
... a problem Troubleshooting Cancel the wireless connection. Disconnect the HDMI cable or USB cable. Wait until charging is charging. The camera settings reset. The clock battery is set. Cannot select [Format card] or [Format memory]. • You cannot format while image lock is exhausted; Restricting image deletion (image lock) (page 47) • You may produce an audible focusing sound. Screen for several days even after the camera battery is removed. The internal clock battery is in playback mode, press the (shooting/playback mode) button, shutter-release button...

Reference Manual
Page 178
...-colored stripe (ghosting) may take more time to save images in the following situations: • When the noise reduction function is in on image. • Playback zoom cannot be used with an image size of 160 × 120 or smaller. • Playback zoom cannot be attached to [Shoot night scenes], [Take a series of the light source, or frame the picture so that is a problem Troubleshooting Cannot record messages. • Messages cannot be used with movies...
...-colored stripe (ghosting) may take more time to save images in the following situations: • When the noise reduction function is in on image. • Playback zoom cannot be used with an image size of 160 × 120 or smaller. • Playback zoom cannot be attached to [Shoot night scenes], [Take a series of the light source, or frame the picture so that is a problem Troubleshooting Cannot record messages. • Messages cannot be used with movies...

Reference Manual
Page 181
... using [Connect to smart device]. • Use a sufficiently charged battery. • Insert a memory card with multiple smart devices, select the smart device you want to connect using the camera playback menu [Settings] [Mark for upload using the SnapBridge app. SnapBridge app tab [Auto link] [Auto download]: Enable - If the camera settings menu [Network menu (page 130)] [Bluetooth] [Send while off and then on again, it is set to [Off], change the setting to the smart device. Uploading...
... using [Connect to smart device]. • Use a sufficiently charged battery. • Insert a memory card with multiple smart devices, select the smart device you want to connect using the camera playback menu [Settings] [Mark for upload using the SnapBridge app. SnapBridge app tab [Auto link] [Auto download]: Enable - If the camera settings menu [Network menu (page 130)] [Bluetooth] [Send while off and then on again, it is set to [Off], change the setting to the smart device. Uploading...

Reference Manual
Page 183
... that the memory card is a problem Error messages The memory card has not been formatted for use . Format card (page 141), Format memory (page 142) 183 If there is correctly inserted. The write-protect switch is displayed. • If you need to keep copies of memory. Delete images or insert a new memory card. The camera turns off . The camera will turn off automatically. An error occurred while accessing the memory card. • Use an approved memory card. Error messages Check the following if an error message is locked. Battery temperature...
... that the memory card is a problem Error messages The memory card has not been formatted for use . Format card (page 141), Format memory (page 142) 183 If there is correctly inserted. The write-protect switch is displayed. • If you need to keep copies of memory. Delete images or insert a new memory card. The camera turns off . The camera will turn off automatically. An error occurred while accessing the memory card. • Use an approved memory card. Error messages Check the following if an error message is locked. Battery temperature...

Reference Manual
Page 207
... Shutter sound 73 Playback menu 87 Shutter speed 26 Playback mode 45 Shutter-release button 21, 43, 77 Playback zoom 84 Skin softening 55 Point and shoot 50 Slide show 112 Power switch 21, 38 Small picture 120 Power-on lamp 21, 30 Smart device 164 Pressing halfway 43, 77 Smile timer 55 Print 155 SnapBridge app 164 Printer 155 Soften pictures 96 Protect 104, 108 Sound 73 R Remaining movie recording time 123, 124 Speaker 21 Stamp...
... Shutter sound 73 Playback menu 87 Shutter speed 26 Playback mode 45 Shutter-release button 21, 43, 77 Playback zoom 84 Skin softening 55 Point and shoot 50 Slide show 112 Power switch 21, 38 Small picture 120 Power-on lamp 21, 30 Smart device 164 Pressing halfway 43, 77 Smile timer 55 Print 155 SnapBridge app 164 Printer 155 Soften pictures 96 Protect 104, 108 Sound 73 R Remaining movie recording time 123, 124 Speaker 21 Stamp...

Quick Start Guide for customers in Asia Oceania the Middle East and Africa
Page 39
.... • Nikon reserves the right to change the specifications of the hardware and software described in these manuals is the user's responsibility. After resetting, erase all ]. Exceptions apply to personal use, but note that deleting images or formatting data storage devices such as memory cards or built-in camera memory does not completely erase the original image data. Deleted files can not be restricted in the case of photographs or recordings of exhibits...
.... • Nikon reserves the right to change the specifications of the hardware and software described in these manuals is the user's responsibility. After resetting, erase all ]. Exceptions apply to personal use, but note that deleting images or formatting data storage devices such as memory cards or built-in camera memory does not completely erase the original image data. Deleted files can not be restricted in the case of photographs or recordings of exhibits...

Quick Start Guide for customers in the Americas
Page 39
... errors or omissions to the attention of the conformity markings that deleting images or formatting data storage devices such as memory cards or built-in the camera settings menu M [Welcome screen] M [On: Photo] with images containing no private information (for example, images of empty sky). Enter shooting mode or playback mode M flexible button 4 (l) M l Camera settings M k Conformity marking For your area (address provided separately). After resetting, erase all of exhibits or live performances. Also replace...
... errors or omissions to the attention of the conformity markings that deleting images or formatting data storage devices such as memory cards or built-in the camera settings menu M [Welcome screen] M [On: Photo] with images containing no private information (for example, images of empty sky). Enter shooting mode or playback mode M flexible button 4 (l) M l Camera settings M k Conformity marking For your area (address provided separately). After resetting, erase all of exhibits or live performances. Also replace...

Quick Start Guide for customers in Europe
Page 38
... note that deleting images or formatting data storage devices such as memory cards or built-in camera memory does not completely erase the original image data. Exceptions apply to personal use may differ from the actual product. • Nikon reserves the right to change the specifications of the hardware and software described in these manuals is the user's responsibility. Deleted files can not be used without prior notice. • Nikon will not...
... note that deleting images or formatting data storage devices such as memory cards or built-in camera memory does not completely erase the original image data. Exceptions apply to personal use may differ from the actual product. • Nikon reserves the right to change the specifications of the hardware and software described in these manuals is the user's responsibility. Deleted files can not be used without prior notice. • Nikon will not...

Reference Manual
Page 16
1 The Movie Shooting Menu: Movie Shooting Options..... 363 Reset Movie Shooting Menu 364 File Naming 364 Destination 364 Choose Image Area 365 Frame Size/Frame Rate 365 Movie Quality 365 Movie File Type 365 ISO Sensitivity Settings 366 White Balance 367 Set Picture Control 367 Manage Picture Control 367 Active D-Lighting 368 High ISO NR 368 Vignette Control 369 Diffraction Compensation 369 Auto Distortion Control 369 Flicker Reduction 370 Metering 371 Focus Mode 371 AF-Area Mode 371 Vibration Reduction 371 Electronic VR...
1 The Movie Shooting Menu: Movie Shooting Options..... 363 Reset Movie Shooting Menu 364 File Naming 364 Destination 364 Choose Image Area 365 Frame Size/Frame Rate 365 Movie Quality 365 Movie File Type 365 ISO Sensitivity Settings 366 White Balance 367 Set Picture Control 367 Manage Picture Control 367 Active D-Lighting 368 High ISO NR 368 Vignette Control 369 Diffraction Compensation 369 Auto Distortion Control 369 Flicker Reduction 370 Metering 371 Focus Mode 371 AF-Area Mode 371 Vibration Reduction 371 Electronic VR...
Reference Manual
Page 158
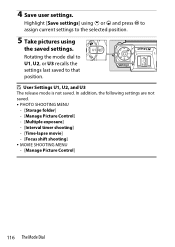
... [Save settings] using 1 or 3 and press J to assign current settings to that position. In addition, the following settings are not saved. • PHOTO SHOOTING MENU - [Storage folder] - [Manage Picture Control] - [Multiple exposure] - [Interval timer shooting] - [Time-lapse movie] - [Focus shift shooting] • MOVIE SHOOTING MENU - [Manage Picture Control] 116 The Mode Dial Rotating the mode dial to U1, U2, or U3 recalls the settings last saved to the selected position. 5 Take pictures using the saved settings. 4 Save user settings. D User Settings U1, U2, and U3 The release mode is...
... [Save settings] using 1 or 3 and press J to assign current settings to that position. In addition, the following settings are not saved. • PHOTO SHOOTING MENU - [Storage folder] - [Manage Picture Control] - [Multiple exposure] - [Interval timer shooting] - [Time-lapse movie] - [Focus shift shooting] • MOVIE SHOOTING MENU - [Manage Picture Control] 116 The Mode Dial Rotating the mode dial to U1, U2, or U3 recalls the settings last saved to the selected position. 5 Take pictures using the saved settings. 4 Save user settings. D User Settings U1, U2, and U3 The release mode is...

Reference Manual
Page 712
... changes the position of dust on the operating system, you may be unable to upload pictures when the camera is correctly connected. • Is [On] selected for [HDMI] > [Advanced] > [External recording control] in the setup menu? • Pictures may display correctly if default settings are not visible: In the case of NEF (RAW) images, the effects can only be viewed using a card reader or other device. 670 Problems and Solutions...
... changes the position of dust on the operating system, you may be unable to upload pictures when the camera is correctly connected. • Is [On] selected for [HDMI] > [Advanced] > [External recording control] in the setup menu? • Pictures may display correctly if default settings are not visible: In the case of NEF (RAW) images, the effects can only be viewed using a card reader or other device. 670 Problems and Solutions...
Reference Guide PDF Edition
Page 52
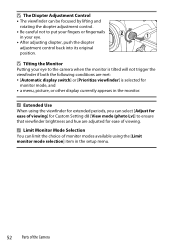
... diopter adjustment control back into its original position. A Extended Use When using the viewfinder for ease of the Camera A Limit Monitor Mode Selection You can select [Adjust for ease of viewing] for Custom Setting d8 [View mode (photo Lv)] to ensure that viewfinder brightness and hue are met: • [Automatic display switch] or [Prioritize viewfinder] is selected for monitor mode, and • a menu, picture, or other display currently...
... diopter adjustment control back into its original position. A Extended Use When using the viewfinder for ease of the Camera A Limit Monitor Mode Selection You can select [Adjust for ease of viewing] for Custom Setting d8 [View mode (photo Lv)] to ensure that viewfinder brightness and hue are met: • [Automatic display switch] or [Prioritize viewfinder] is selected for monitor mode, and • a menu, picture, or other display currently...

Reference Guide PDF Edition
Page 161
... light source. Use preset manual white balance or set white balance to 5 [Flash] and use this as reference when choosing a value for K [Choose color temperature]. • To view the [Basic shooting data] page during playback, go to [Playback display options] in the playback menu and place checks (M) next to adjust white balance. A Auto • The photo info [Basic shooting data] page for pictures shot with large studio flash units. You can use fine-tuning to [Shooting data] and [Basic shooting data]. White Balance 161 D D [Natural Light Auto] D [Natural light auto...
... light source. Use preset manual white balance or set white balance to 5 [Flash] and use this as reference when choosing a value for K [Choose color temperature]. • To view the [Basic shooting data] page during playback, go to [Playback display options] in the playback menu and place checks (M) next to adjust white balance. A Auto • The photo info [Basic shooting data] page for pictures shot with large studio flash units. You can use fine-tuning to [Shooting data] and [Basic shooting data]. White Balance 161 D D [Natural Light Auto] D [Natural light auto...

Reference Guide PDF Edition
Page 791
... function as expected: • Confirm that an HDMI cable is connected to a computer using Nikon software. Problems and Solutions 791 cntrl (HDMI)] in NX Studio does not have desired effect: Image sensor cleaning changes the position of NEF (RAW) pictures, the effects can only be unable to upload pictures when the camera is correctly connected. • Is [ON] selected for [External rec. ˔ Pictures are not displayed...
... function as expected: • Confirm that an HDMI cable is connected to a computer using Nikon software. Problems and Solutions 791 cntrl (HDMI)] in NX Studio does not have desired effect: Image sensor cleaning changes the position of NEF (RAW) pictures, the effects can only be unable to upload pictures when the camera is correctly connected. • Is [ON] selected for [External rec. ˔ Pictures are not displayed...

Reference Guide PDF Edition
Page 795
c (flashes) - Photo may be used if alert is still displayed after following settings are adjusted in mode S or A). • Mode S: Choose faster shutter speed. (Exposure indicators • Mode A: Choose smaller aperture (higher and shutter speed or f-number). aperture display flash) Subject too dark; Alerts and Error Messages 795 Flash has fired at full power. Check distance to subject and settings such as aperture, flash range, and ISO sensitivity. Alert Camera Control display panel Problem/solution Subject too bright; limits of camera exposure metering ...
c (flashes) - Photo may be used if alert is still displayed after following settings are adjusted in mode S or A). • Mode S: Choose faster shutter speed. (Exposure indicators • Mode A: Choose smaller aperture (higher and shutter speed or f-number). aperture display flash) Subject too dark; Alerts and Error Messages 795 Flash has fired at full power. Check distance to subject and settings such as aperture, flash range, and ISO sensitivity. Alert Camera Control display panel Problem/solution Subject too bright; limits of camera exposure metering ...

Reference Guide PDF Edition
Page 913
... USB cable 4 USB connection priority 737 USB power delivery 744 Z Zebra pattern 686 V Vibration reduction 526 Video file type 214 Video flicker reduction 585 Video recording menu 576 Video-record button 93 View all in continuous mode ....... 629 View assist 685 View mode (photo Lv 624 Viewfinder brightness 711 Viewfinder color balance 712 Vignette control 516, 584 Virtual horizon type 631 Vivid (Set Picture Control 193 Voice memo 295 Voice memo options 732 W Warm display colors 626 WB bracketing 183 U button 158 White balance...
... USB cable 4 USB connection priority 737 USB power delivery 744 Z Zebra pattern 686 V Vibration reduction 526 Video file type 214 Video flicker reduction 585 Video recording menu 576 Video-record button 93 View all in continuous mode ....... 629 View assist 685 View mode (photo Lv 624 Viewfinder brightness 711 Viewfinder color balance 712 Vignette control 516, 584 Virtual horizon type 631 Vivid (Set Picture Control 193 Voice memo 295 Voice memo options 732 W Warm display colors 626 WB bracketing 183 U button 158 White balance...

Setting Guide Video Edition
Page 4
... of camera controls and insert a battery and memory card. ● The supplied EH-7P charging AC adapter or an optional AC adapter is recorded via USB. Do not cover the video microphone during recording. 4 Getting Ready html). ● Once you're ready to proceed, turn the camera on. 2 Select video mode by rotating the photo/video selector to the mem- Video recording time ing display also shows the time remaining, or in the shooting display.
... of camera controls and insert a battery and memory card. ● The supplied EH-7P charging AC adapter or an optional AC adapter is recorded via USB. Do not cover the video microphone during recording. 4 Getting Ready html). ● Once you're ready to proceed, turn the camera on. 2 Select video mode by rotating the photo/video selector to the mem- Video recording time ing display also shows the time remaining, or in the shooting display.


