
User Manual
Page 4
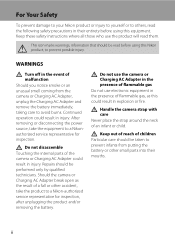
...internal parts of an infant or child. Should the camera or Charging AC Adapter break open as this could result in injury. WARNINGS Turn off in the event of children Particular care should be taken to others, read the following safety precautions in the presence of a ...fall or other small parts into their entirety before using this Nikon product, to a Nikonauthorized service representative for inspection, after unplugging the product and/or removing the battery. Keep out of reach of malfunction ...
...internal parts of an infant or child. Should the camera or Charging AC Adapter break open as this could result in injury. WARNINGS Turn off in the event of children Particular care should be taken to others, read the following safety precautions in the presence of a ...fall or other small parts into their entirety before using this Nikon product, to a Nikonauthorized service representative for inspection, after unplugging the product and/or removing the battery. Keep out of reach of malfunction ...

User Manual
Page 5
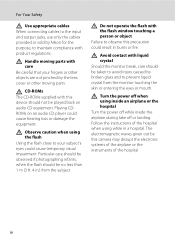
... or break the battery insulation or casing. • Do not expose the battery to flame or to observe this product: • Before replacing the battery, turn the product off. Failure to water. • Replace the terminal cover when transporting the battery. Do not transport or store with plenty of the plug...
... or break the battery insulation or casing. • Do not expose the battery to flame or to observe this product: • Before replacing the battery, turn the product off. Failure to water. • Replace the terminal cover when transporting the battery. Do not transport or store with plenty of the plug...
User Manual
Page 6
...by broken glass and to your fingers or other moving parts with care Be careful that your subject's eyes could cause temporary visual impairment. Turn the power off when using while in .) from the monitor touching the skin or entering the eyes or mouth. iv Follow the instructions of... regulations. For Your Safety Use appropriate cables When connecting cables to the input and output jacks, use only the cables provided or sold by Nikon for the purpose, to observe this precaution could result in burns or fire. Do not operate the flash with the flash window touching a ...
...by broken glass and to your fingers or other moving parts with care Be careful that your subject's eyes could cause temporary visual impairment. Turn the power off when using while in .) from the monitor touching the skin or entering the eyes or mouth. iv Follow the instructions of... regulations. For Your Safety Use appropriate cables When connecting cables to the input and output jacks, use only the cables provided or sold by Nikon for the purpose, to observe this precaution could result in burns or fire. Do not operate the flash with the flash window touching a ...
User Manual
Page 7
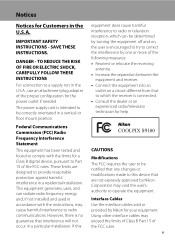
...CAUTIONS Modifications The FCC requires the user to be correctly orientated in the U.S.A. IMPORTANT SAFETY INSTRUCTIONS - These limits are not expressly approved by Nikon Corporation may exceed the limits of Class B Part 15 of the following measures: • Reorient or relocate the receiving antenna. • ...interface cables sold or provided by one or more of the FCC rules. This equipment generates, uses, and can be determined by turning the equipment off and on a circuit different from that any changes or modifications made to this equipment does cause harmful interference to...
...CAUTIONS Modifications The FCC requires the user to be correctly orientated in the U.S.A. IMPORTANT SAFETY INSTRUCTIONS - These limits are not expressly approved by Nikon Corporation may exceed the limits of Class B Part 15 of the following measures: • Reorient or relocate the receiving antenna. • ...interface cables sold or provided by one or more of the FCC rules. This equipment generates, uses, and can be determined by turning the equipment off and on a circuit different from that any changes or modifications made to this equipment does cause harmful interference to...
User Manual
Page 9
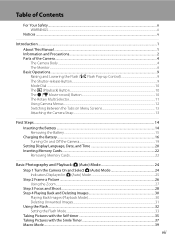
... Screens 13 Attaching the Camera Strap ...13 First Steps ...14 Inserting the Battery ...14 Removing the Battery ...15 Charging the Battery ...16 Turning On and Off the Camera...19 Setting Display Language, Date, and Time 20 Inserting Memory Cards ...22 Removing Memory Cards...22 Basic Photography... and Playback: A (Auto) Mode 24 Step 1 Turn the Camera On and Select A (Auto) Mode 24 Indicators Displayed in A (Auto) Mode 25 Step 2 Frame a Picture ...26 Using the Zoom...27 ...
... Screens 13 Attaching the Camera Strap ...13 First Steps ...14 Inserting the Battery ...14 Removing the Battery ...15 Charging the Battery ...16 Turning On and Off the Camera...19 Setting Display Language, Date, and Time 20 Inserting Memory Cards ...22 Removing Memory Cards...22 Basic Photography... and Playback: A (Auto) Mode 24 Step 1 Turn the Camera On and Select A (Auto) Mode 24 Indicators Displayed in A (Auto) Mode 25 Step 2 Frame a Picture ...26 Using the Zoom...27 ...
User Manual
Page 22
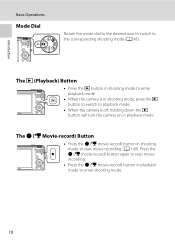
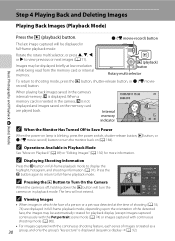
The c (Playback) Button • Press the c button in shooting mode to enter playback mode. • When the camera is off, holding down the c button will turn the camera on in playback mode. The b (e Movie-record) Button • Press the b (e movie-record) button in shooting mode to playback mode. • When the ...
The c (Playback) Button • Press the c button in shooting mode to enter playback mode. • When the camera is off, holding down the c button will turn the camera on in playback mode. The b (e Movie-record) Button • Press the b (e movie-record) button in shooting mode to playback mode. • When the ...
User Manual
Page 27
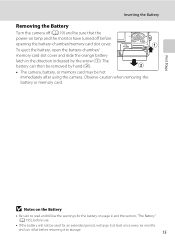
... Battery • Be sure to read and follow the warnings for the battery on lamp and the monitor have turned off before returning it to storage. 15 Inserting the Battery Removing the Battery Turn the camera off (A 19) and be sure that the power-on page iii and the section, "The Battery...
... Battery • Be sure to read and follow the warnings for the battery on lamp and the monitor have turned off before returning it to storage. 15 Inserting the Battery Removing the Battery Turn the camera off (A 19) and be sure that the power-on page iii and the section, "The Battery...

User Manual
Page 28
... Charging AC Adapter EH-69P to insert connectors at an angle, and do not use force when connecting or disconnecting the USB cable. Do not turn the camera on the Charging AC Adapter. Be sure that connectors are connected, attempting to forcibly remove the plug adapter could damage the product. * The...
... Charging AC Adapter EH-69P to insert connectors at an angle, and do not use force when connecting or disconnecting the USB cable. Do not turn the camera on the Charging AC Adapter. Be sure that connectors are connected, attempting to forcibly remove the plug adapter could damage the product. * The...
User Manual
Page 29
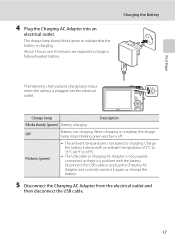
... green to indicate that the battery is not suited to charge a fully exhausted battery. When charging is complete, the charge lamp stops blinking green and turns off.
... green to indicate that the battery is not suited to charge a fully exhausted battery. When charging is complete, the charge lamp stops blinking green and turns off.

User Manual
Page 30
D Charging Using Computer or Battery Charger • Connecting the COOLPIX S9100 to a computer also charges the Rechargeable Li-ion Battery ENEL12 (A 157, 187). • The EN-EL12 can be turned on page iii and the section, "The Battery" (A 195), before use only with compatible devices. First Steps Charging the Battery B Notes on Charging AC...
D Charging Using Computer or Battery Charger • Connecting the COOLPIX S9100 to a computer also charges the Rechargeable Li-ion Battery ENEL12 (A 157, 187). • The EN-EL12 can be turned on page iii and the section, "The Battery" (A 195), before use only with compatible devices. First Steps Charging the Battery B Notes on Charging AC...
User Manual
Page 31
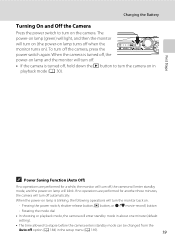
... (the power-on ). The power-on lamp (green) will light, and then the monitor will turn off when the monitor turns on lamp turns off automatically. When the camera is turned off, the power-on . - First Steps C Power Saving Function (Auto Off) If no operations are performed for another ... 19 Rotating the mode dial • In shooting or playback mode, the camera will turn the monitor back on lamp and the monitor will turn off. • If the camera is blinking, the following operations will turn off option (A 184) in about one minute (default setting). • The time ...
... (the power-on ). The power-on lamp (green) will light, and then the monitor will turn off when the monitor turns on lamp turns off automatically. When the camera is turned off, the power-on . - First Steps C Power Saving Function (Auto Off) If no operations are performed for another ... 19 Rotating the mode dial • In shooting or playback mode, the camera will turn the monitor back on lamp and the monitor will turn off. • If the camera is blinking, the following operations will turn off option (A 184) in about one minute (default setting). • The time ...
User Manual
Page 32
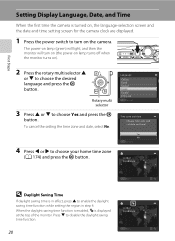
.... Press I to choose the desired language and press the k button. First Steps Setting Display Language, Date, and Time When the first time the camera is turned on, the language-selection screen and the date and time setting screen for the camera clock are displayed. 1 Press the power switch to... turn on (the power-on lamp turns off when the monitor turns on the camera. To cancel the setting the time zone and date, select No. 4 Press J or K to enable the daylight...
.... Press I to choose the desired language and press the k button. First Steps Setting Display Language, Date, and Time When the first time the camera is turned on, the language-selection screen and the date and time setting screen for the camera clock are displayed. 1 Press the power switch to... turn on (the power-on lamp turns off when the monitor turns on the camera. To cancel the setting the time zone and date, select No. 4 Press J or K to enable the daylight...

User Manual
Page 34
... are off before opening the battery-chamber/memory card slot cover. Be sure to check that the power-on lamp and the monitor have turned off and open the batterychamber/memory card slot cover. Slide the memory card in the correct orientation. Observe caution when removing the battery or... memory card. 22 If a memory card is in until it clicks into place. Be sure to turn off and be sure that the power-on lamp and the monitor are automatically saved on removable Secure Digital (SD) memory cards (commercially available;...
... are off before opening the battery-chamber/memory card slot cover. Be sure to check that the power-on lamp and the monitor have turned off and open the batterychamber/memory card slot cover. Slide the memory card in the correct orientation. Observe caution when removing the battery or... memory card. 22 If a memory card is in until it clicks into place. Be sure to turn off and be sure that the power-on lamp and the monitor are automatically saved on removable Secure Digital (SD) memory cards (commercially available;...
User Manual
Page 35
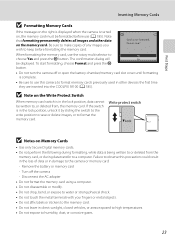
... or memory card - First Steps Inserting Memory Cards B Formatting Memory Cards If the message on the right is displayed when the camera is turned on Memory Cards • Use only Secure Digital memory cards. • Do not perform the following during data transfer to a computer. ... formatting, choose Format and press the k button. • Do not turn the camera off the camera - Note that formatting permanently deletes all images and other devices the first time they are inserted into the COOLPIX S9100 (A 185). When formatting the memory card, use this precaution could result in...
... or memory card - First Steps Inserting Memory Cards B Formatting Memory Cards If the message on the right is displayed when the camera is turned on Memory Cards • Use only Secure Digital memory cards. • Do not perform the following during data transfer to a computer. ... formatting, choose Format and press the k button. • Do not turn the camera off the camera - Note that formatting permanently deletes all images and other devices the first time they are inserted into the COOLPIX S9100 (A 185). When formatting the memory card, use this precaution could result in...
User Manual
Page 36
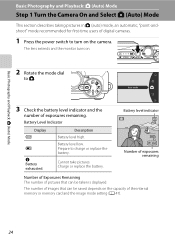
...setting (A 47). 24 Auto mode 3 Check the battery level indicator and the number of digital cameras. 1 Press the power switch to turn on the camera. Prepare to A. The number of images that can be saved depends on . 2 Rotate the mode dial to charge or... Battery Level Indicator Display b Description Battery level high. Basic Photography and Playback: A (Auto) Mode Basic Photography and Playback: A (Auto) Mode Step 1 Turn the Camera On and Select A (Auto) Mode This section describes taking pictures in A (auto) mode, an automatic, "point-andshoot" mode recommended for first...
...setting (A 47). 24 Auto mode 3 Check the battery level indicator and the number of digital cameras. 1 Press the power switch to turn on the camera. Prepare to A. The number of images that can be saved depends on . 2 Rotate the mode dial to charge or... Battery Level Indicator Display b Description Battery level high. Basic Photography and Playback: A (Auto) Mode Basic Photography and Playback: A (Auto) Mode Step 1 Turn the Camera On and Select A (Auto) Mode This section describes taking pictures in A (auto) mode, an automatic, "point-andshoot" mode recommended for first...
User Manual
Page 37
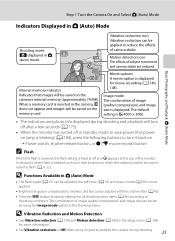
... off and W appears at the top of image quality (compression) and image size is displayed for movie recording (A 140, 148). Step 1 Turn the Camera On and Select A (Auto) Mode Indicators Displayed in A (Auto) Mode Basic Photography and Playback: A (Auto) Mode Shooting mode... A displayed in the setup menu (A 169) for more information. • Set Vibration reduction to turn it back on the camera's internal memory (approximately 74 MB). Movie options A movie option is displayed. D Vibration Reduction and Motion Detection •...
... off and W appears at the top of image quality (compression) and image size is displayed for movie recording (A 140, 148). Step 1 Turn the Camera On and Select A (Auto) Mode Indicators Displayed in A (Auto) Mode Basic Photography and Playback: A (Auto) Mode Shooting mode... A displayed in the setup menu (A 169) for more information. • Set Vibration reduction to turn it back on the camera's internal memory (approximately 74 MB). Movie options A movie option is displayed. D Vibration Reduction and Motion Detection •...

User Manual
Page 38
... when no faces are detected, the focus area is framed by single borders. When using the flash (A 32) while taking pictures in portrait (tall) orientation, turn the camera so that face is not displayed. When the camera detects more than one face, the face closest to 12 faces can be detected...
... when no faces are detected, the focus area is framed by single borders. When using the flash (A 32) while taking pictures in portrait (tall) orientation, turn the camera so that face is not displayed. When the camera detects more than one face, the face closest to 12 faces can be detected...
User Manual
Page 39
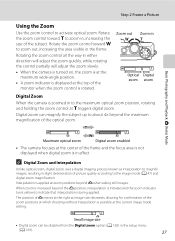
...zoomed in either direction will adjust the zoom quickly, while rotating the control partially will adjust the zoom slowly. • When the camera is turned on, the zoom is at the maximum wide-angle position. • A zoom indicator is rotated. C Digital Zoom and Interpolation Unlike optical ... the Digital zoom option (A 182) in the frame. When zoom is increased beyond the V position, interpolation is initiated and the zoom indicator turns yellow to the image mode (A 47) and digital zoom magnification. Small image size • Digital zoom can magnify the subject up to activate...
...zoomed in either direction will adjust the zoom quickly, while rotating the control partially will adjust the zoom slowly. • When the camera is turned on, the zoom is at the maximum wide-angle position. • A zoom indicator is rotated. C Digital Zoom and Interpolation Unlike optical ... the Digital zoom option (A 182) in the frame. When zoom is increased beyond the V position, interpolation is initiated and the zoom indicator turns yellow to the image mode (A 47) and digital zoom magnification. Small image size • Digital zoom can magnify the subject up to activate...
User Manual
Page 42
... internal memory, C is displayed (sequence display ➝ A 92). When playing back images saved in full-frame playback mode. The lens will turn the monitor back on Playback" (A 89) or "Editing Images" (A 130) for playback display (except images captured continuously with the Pet portrait ...For images captured with the continuous shooting feature, each series of shooting (A 56, 74) are played back. c (playback) button Rotary multi selector To return to Turn On the Camera 1 / 2 5 0 F 3.5 When the camera is off, holding down the c button will not extend. +1.0 ISO 160 4/ 4 C ...
... internal memory, C is displayed (sequence display ➝ A 92). When playing back images saved in full-frame playback mode. The lens will turn the monitor back on Playback" (A 89) or "Editing Images" (A 130) for playback display (except images captured continuously with the Pet portrait ...For images captured with the continuous shooting feature, each series of shooting (A 56, 74) are played back. c (playback) button Rotary multi selector To return to Turn On the Camera 1 / 2 5 0 F 3.5 When the camera is off, holding down the c button will not extend. +1.0 ISO 160 4/ 4 C ...
User Manual
Page 46
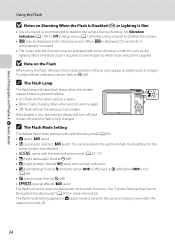
... Flash Is Disabled (W) or Lighting Is Dim • Use of a tripod is taken. Wait a few seconds and try again. • Off: Flash will turn off, and remain off ) • u (special effects): U (auto) The flash cannot be activated with some shooting conditions such as bright spots in setup ...C The Flash Lamp The flash lamp indicates flash status when the shutterrelease button is pressed halfway. • On: Flash will fire when picture is turned off ). The camera selects the optimum flash mode setting for more information. Set Vibration reduction (A 178) to Off in images. To reduce these ...
... Flash Is Disabled (W) or Lighting Is Dim • Use of a tripod is taken. Wait a few seconds and try again. • Off: Flash will turn off, and remain off ) • u (special effects): U (auto) The flash cannot be activated with some shooting conditions such as bright spots in setup ...C The Flash Lamp The flash lamp indicates flash status when the shutterrelease button is pressed halfway. • On: Flash will fire when picture is turned off ). The camera selects the optimum flash mode setting for more information. Set Vibration reduction (A 178) to Off in images. To reduce these ...


