Reference Manual
Page 4
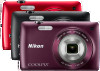
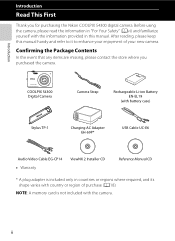
After reading, please keep this manual. ii Before using the camera, please read the information in "For Your Safety" (Avi) and familiarize yourself with the camera. COOLPIX S4300 Digital Camera Camera Strap Rechargeable Li-ion Battery EN-EL19 (with battery case) Stylus TP-1 Charging AC Adapter EH-69P* USB Cable UC-E6 ... your new camera. Confirming the Package Contents In the event that any items are missing, please contact the store where you for purchasing the Nikon COOLPIX S4300 digital camera. Introduction Introduction Read This First Thank you purchased the camera.
After reading, please keep this manual. ii Before using the camera, please read the information in "For Your Safety" (Avi) and familiarize yourself with the camera. COOLPIX S4300 Digital Camera Camera Strap Rechargeable Li-ion Battery EN-EL19 (with battery case) Stylus TP-1 Charging AC Adapter EH-69P* USB Cable UC-E6 ... your new camera. Confirming the Package Contents In the event that any items are missing, please contact the store where you for purchasing the Nikon COOLPIX S4300 digital camera. Introduction Introduction Read This First Thank you purchased the camera.

Reference Manual
Page 5
... camera right away, see "Parts of buttons or messages displayed on a computer monitor appear in this manual, images are used in bold. • In this manual: Symbol Description B This icon marks cautions, information that should be more clearly shown. • Illustrations and ...monitor content shown in this manual may differ from monitor display samples so that should be read before using the camera. To learn about the parts of the camera and basic operations, see "Basic Steps for Shooting and Playback" (A15). A/E/ These ...
... camera right away, see "Parts of buttons or messages displayed on a computer monitor appear in this manual, images are used in bold. • In this manual: Symbol Description B This icon marks cautions, information that should be more clearly shown. • Illustrations and ...monitor content shown in this manual may differ from monitor display samples so that should be read before using the camera. To learn about the parts of the camera and basic operations, see "Basic Steps for Shooting and Playback" (A15). A/E/ These ...
Reference Manual
Page 6
... U.S.A.: http://www.nikonusa.com/ • For users in Europe and Africa: http://www.europe-nikon.com/support/ • For users in your area. Visit the site below for contact information: http://imaging.nikon.com/ Use Only Nikon Brand Electronic Accessories Nikon COOLPIX cameras are engineered and proven to ensure that may be held liable for damages...
... U.S.A.: http://www.nikonusa.com/ • For users in Europe and Africa: http://www.europe-nikon.com/support/ • For users in your area. Visit the site below for contact information: http://imaging.nikon.com/ Use Only Nikon Brand Electronic Accessories Nikon COOLPIX cameras are engineered and proven to ensure that may be held liable for damages...

Reference Manual
Page 7
... private information (for the Select an image option in the documentation at any time and without prior notice. • Nikon will not be provided for business use by a company. Ensuring the privacy of such data is prohibited. Deleted files can sometimes be taken to avoid injury ... written permission. • Nikon reserves the right to change the specifications of the hardware and software described in the Welcome screen setting (A88). v Do not use of this product. • While every effort was obtained, the copying or reproduction of copyrighted creative works such as memory...
... private information (for the Select an image option in the documentation at any time and without prior notice. • Nikon will not be provided for business use by a company. Ensuring the privacy of such data is prohibited. Deleted files can sometimes be taken to avoid injury ... written permission. • Nikon reserves the right to change the specifications of the hardware and software described in the Welcome screen setting (A88). v Do not use of this product. • While every effort was obtained, the copying or reproduction of copyrighted creative works such as memory...
Reference Manual
Page 8
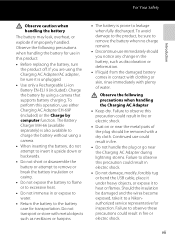
... power source, take the product to prevent possible injury. Parts of an infant or child. For Your Safety To prevent damage to your Nikon product or injury to yourself or to a Nikonauthorized service representative for inspection. Introduction WARNINGS Turn off in the event of flammable gas, as... may result in injury. Do not disassemble Touching the internal parts of a fall or other small parts into their entirety before using this Nikon product, to a Nikon-authorized service representative for extended periods while the devices are indicated by qualified technicians.
... power source, take the product to prevent possible injury. Parts of an infant or child. For Your Safety To prevent damage to your Nikon product or injury to yourself or to a Nikonauthorized service representative for inspection. Introduction WARNINGS Turn off in the event of flammable gas, as... may result in injury. Do not disassemble Touching the internal parts of a fall or other small parts into their entirety before using this Nikon product, to a Nikon-authorized service representative for extended periods while the devices are indicated by qualified technicians.
Reference Manual
Page 9
...objects, or expose it to leakage when fully discharged. The Battery Charger MH-66 (available separately) is also available to charge the battery without using a camera. • When inserting the battery, do not attempt to insert it is prone to a Nikonauthorized service representative for inspection. Do... • Dust on or near the Charging AC Adapter during lightning storms. Failure to observe this precaution could result in this operation, use could result in or expose to water. • Return the battery to heat or flames. For Your Safety Introduction Observe caution when ...
...objects, or expose it to leakage when fully discharged. The Battery Charger MH-66 (available separately) is also available to charge the battery without using a camera. • When inserting the battery, do not attempt to insert it is prone to a Nikonauthorized service representative for inspection. Do... • Dust on or near the Charging AC Adapter during lightning storms. Failure to observe this precaution could result in this operation, use could result in or expose to water. • Return the battery to heat or flames. For Your Safety Introduction Observe caution when ...

Reference Manual
Page 10
... the skin or entering the eyes or mouth. Failure to observe this precaution could result in electric shock. • Do not use only the cables provided or sold by Nikon for the purpose, to your fingers or other objects are not pinched by the lens cover or other moving parts with wet... hands. Turn the power off when using while in burns or fire. Failure to observe this camera may disrupt the electronic systems of...
... the skin or entering the eyes or mouth. Failure to observe this precaution could result in electric shock. • Do not use only the cables provided or sold by Nikon for the purpose, to your fingers or other objects are not pinched by the lens cover or other moving parts with wet... hands. Turn the power off when using while in burns or fire. Failure to observe this camera may disrupt the electronic systems of...

Reference Manual
Page 11
... equipment off and on, the user is no guarantee that to a supply not in accordance with the limits for help. Interface Cables Use the interface cables sold or provided by Nikon Corporation may exceed the limits of Class B Part 15 of the following measures: • Reorient or relocate the receiving antenna. •...
... equipment off and on, the user is no guarantee that to a supply not in accordance with the limits for help. Interface Cables Use the interface cables sold or provided by Nikon Corporation may exceed the limits of Class B Part 15 of the following measures: • Reorient or relocate the receiving antenna. •...

Reference Manual
Page 12
Nikon Inc., 1300 Walt Whitman Road Melville, New York 11747-3064 USA Tel: 631-547-4200 Notice for customers in Europe CAUTIONS RISK OF EXPLOSION IF .... Do not dispose of as household waste. • For more information, contact the retailer or the local authorities in charge of waste management. DISPOSE OF USED BATTERIES ACCORDING TO THE INSTRUCTIONS. Notices Introduction Notice for customers in the State of California WARNING Handling the cord on the battery indicates that this...
Nikon Inc., 1300 Walt Whitman Road Melville, New York 11747-3064 USA Tel: 631-547-4200 Notice for customers in Europe CAUTIONS RISK OF EXPLOSION IF .... Do not dispose of as household waste. • For more information, contact the retailer or the local authorities in charge of waste management. DISPOSE OF USED BATTERIES ACCORDING TO THE INSTRUCTIONS. Notices Introduction Notice for customers in the State of California WARNING Handling the cord on the battery indicates that this...

Reference Manual
Page 13
...Basic Operations 1 Parts of the Camera...2 The Camera Body ...2 Operating the Touch Panel ...4 Tapping...4 Dragging ...4 Dragging and Dropping...4 Using the Stylus ...5 Indicators and Operations of the Monitor/Touch Panel 6 Shooting Mode (Information Indicators 6 Shooting Mode (Operation Controls)...7 ...Playback Mode (Information Display)...8 Playback Mode (Operation Controls) ...9 Switching Between Shooting Mode and Playback Mode 10 Using Menus (d Tab) ...11 Pressing the Shutter-release Button ...13 Attaching the Camera Strap ...13 Basic Steps for Shooting and ...
...Basic Operations 1 Parts of the Camera...2 The Camera Body ...2 Operating the Touch Panel ...4 Tapping...4 Dragging ...4 Dragging and Dropping...4 Using the Stylus ...5 Indicators and Operations of the Monitor/Touch Panel 6 Shooting Mode (Information Indicators 6 Shooting Mode (Operation Controls)...7 ...Playback Mode (Information Display)...8 Playback Mode (Operation Controls) ...9 Switching Between Shooting Mode and Playback Mode 10 Using Menus (d Tab) ...11 Pressing the Shutter-release Button ...13 Attaching the Camera Strap ...13 Basic Steps for Shooting and ...

Reference Manual
Page 14
... and Shoot ...30 Step 5 Play Back Images ...32 Changing How Images Are Displayed 33 Step 6 Delete Unwanted Images 34 Shooting Features ...37 Using A (Auto) Mode...38 Adjusting the A (Auto) Mode Settings 38 Options Available in the Auto Shooting Menu 39 Scene Mode (Shooting Suited ...Settings 53 Smart Portrait Menu Options ...53 Basic Shooting Settings ...54 Functions Available for Each Shooting Mode 54 Using the Flash (Flash Modes)...55 Using the Self-timer ...57 Using Macro Mode ...59 Adjusting Brightness (Exposure Compensation 61 Default Settings ...62 A Changing the Image Size (Image...
... and Shoot ...30 Step 5 Play Back Images ...32 Changing How Images Are Displayed 33 Step 6 Delete Unwanted Images 34 Shooting Features ...37 Using A (Auto) Mode...38 Adjusting the A (Auto) Mode Settings 38 Options Available in the Auto Shooting Menu 39 Scene Mode (Shooting Suited ...Settings 53 Smart Portrait Menu Options ...53 Basic Shooting Settings ...54 Functions Available for Each Shooting Mode 54 Using the Flash (Flash Modes)...55 Using the Self-timer ...57 Using Macro Mode ...59 Adjusting Brightness (Exposure Compensation 61 Default Settings ...62 A Changing the Image Size (Image...
Reference Manual
Page 15
... ...82 Changing Movie Recording Settings (The Movie Menu 85 Movie Playback ...86 General Camera Setup...87 The Setup Menu ...88 Reference Section ...E1 Using the Draw Option ...E2 Using Panorama Assist...E3 Favorite Pictures Mode ...E5 Adding Images to Albums...E5 Viewing Images in an Album ...E6 Removing Images from Albums ...E7...
... ...82 Changing Movie Recording Settings (The Movie Menu 85 Movie Playback ...86 General Camera Setup...87 The Setup Menu ...88 Reference Section ...E1 Using the Draw Option ...E2 Using Panorama Assist...E3 Favorite Pictures Mode ...E5 Adding Images to Albums...E5 Viewing Images in an Album ...E6 Removing Images from Albums ...E7...

Reference Manual
Page 19
... the Camera 2 The Camera Body ...2 Operating the Touch Panel 4 Tapping ...4 Dragging...4 Dragging and Dropping 4 Using the Stylus ...5 Indicators and Operations of the camera and also explains how to start using the camera right away, see "Basic Steps for Shooting and Playback" (A15). 1 Parts of the Camera ... 6 Shooting Mode (Operation Controls 7 Playback Mode (Information Display 8 Playback Mode (Operation Controls 9 Switching Between Shooting Mode and Playback Mode 10 Using Menus (d Tab 11 Pressing the Shutter-release Button 13 Attaching the Camera Strap 13 If you want to...
... the Camera 2 The Camera Body ...2 Operating the Touch Panel 4 Tapping ...4 Dragging...4 Dragging and Dropping 4 Using the Stylus ...5 Indicators and Operations of the camera and also explains how to start using the camera right away, see "Basic Steps for Shooting and Playback" (A15). 1 Parts of the Camera ... 6 Shooting Mode (Operation Controls 7 Playback Mode (Information Display 8 Playback Mode (Operation Controls 9 Switching Between Shooting Mode and Playback Mode 10 Using Menus (d Tab 11 Pressing the Shutter-release Button 13 Attaching the Camera Strap 13 If you want to...
Reference Manual
Page 22
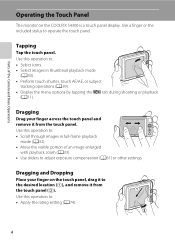
Parts of an image enlarged with playback zoom (A33). • Use sliders to adjust exposure compensation (A61) or other settings. Use this operation to: • Select icons. • Select images in full-frame playback mode (A32). • Move the visible portion...playback (A11). Dragging Drag your finger on the COOLPIX S4300 is a touch panel display. Use this operation to the desired location (1), and remove it from the touch panel (2). Use a finger or the included stylus to : • Apply the rating setting (A74). 4 Use this operation to operate the touch panel. Dragging ...
Parts of an image enlarged with playback zoom (A33). • Use sliders to adjust exposure compensation (A61) or other settings. Use this operation to: • Select icons. • Select images in full-frame playback mode (A32). • Move the visible portion...playback (A11). Dragging Drag your finger on the COOLPIX S4300 is a touch panel display. Use this operation to the desired location (1), and remove it from the touch panel (2). Use a finger or the included stylus to : • Apply the rating setting (A74). 4 Use this operation to operate the touch panel. Dragging ...

Reference Manual
Page 23
... stylus may slip off the display. - Move your finger too quickly. • The camera may not respond if the followings are performed: - Using the Stylus Use the stylus for operations, such as shown. B Notes About the Touch Panel • Keep the stylus out of reach of the Camera and Basic... or the paint option (A75), that require more precision than the included stylus. • Do not apply unnecessary pressure to the strap as when using a finger. Bounce your finger touches it. Operating the Touch Panel Parts of small children. • Do not carry the camera by the stylus. ...
... stylus may slip off the display. - Move your finger too quickly. • The camera may not respond if the followings are performed: - Using the Stylus Use the stylus for operations, such as shown. B Notes About the Touch Panel • Keep the stylus out of reach of the Camera and Basic... or the paint option (A75), that require more precision than the included stylus. • Do not apply unnecessary pressure to the strap as when using a finger. Bounce your finger touches it. Operating the Touch Panel Parts of small children. • Do not carry the camera by the stylus. ...

Reference Manual
Page 28
...one of the available playback modes (A72). • To select a desired shooting or playback mode, tap the icon of that mode. 10 While using playback mode, you can select one of the available shooting modes (A26). • If you press the c (playback) button while the playback... screen is displayed, the playback mode selection menu is displayed, from which is used for viewing images. Shooting mode Playback mode 80 50 4/ 4 0004. Indicators and Operations of the Monitor/Touch Panel Switching Between Shooting Mode and ...
...one of the available playback modes (A72). • To select a desired shooting or playback mode, tap the icon of that mode. 10 While using playback mode, you can select one of the available shooting modes (A26). • If you press the c (playback) button while the playback... screen is displayed, the playback mode selection menu is displayed, from which is used for viewing images. Shooting mode Playback mode 80 50 4/ 4 0004. Indicators and Operations of the Monitor/Touch Panel Switching Between Shooting Mode and ...

Reference Manual
Page 29
Parts of the Camera and Basic Operations Indicators and Operations of the Monitor/Touch Panel Using Menus (d Tab) During Shooting Use the d tab to change the general camera settings using the setting screen, tap H. 11 Tap a menu option • The setting screen of each shooting mode. • Change the settings ...displayed. • If the d tab is displayed. • Tap z to apply the setting of menu options that item. • To finish using the setup menu. Tap the d tab 80 50 • The icons of that can also change the settings of the selected menu option is hidden...
Parts of the Camera and Basic Operations Indicators and Operations of the Monitor/Touch Panel Using Menus (d Tab) During Shooting Use the d tab to change the general camera settings using the setting screen, tap H. 11 Tap a menu option • The setting screen of each shooting mode. • Change the settings ...displayed. • If the d tab is displayed. • Tap z to apply the setting of menu options that item. • To finish using the setup menu. Tap the d tab 80 50 • The icons of that can also change the settings of the selected menu option is hidden...

Reference Manual
Page 30
... menu option is hidden, tap the monitor. 0004. Parts of the Camera and Basic Operations Indicators and Operations of the Monitor/Touch Panel During Playback Use the d tab to display the setup menu. • To hide the menu options, tap the d tab. Retouch Tap a setting option to apply the ... J. 12 You can select images by dragging them while the menu option selection screen is displayed. • You can also change the general camera settings using the setup menu. 4/ 4 Tap the d tab • The icons of menu options that can be changed in the current mode are displayed. •...
... menu option is hidden, tap the monitor. 0004. Parts of the Camera and Basic Operations Indicators and Operations of the Monitor/Touch Panel During Playback Use the d tab to display the setup menu. • To hide the menu options, tap the d tab. Retouch Tap a setting option to apply the ... J. 12 You can select images by dragging them while the menu option selection screen is displayed. • You can also change the general camera settings using the setup menu. 4/ 4 Tap the d tab • The icons of menu options that can be changed in the current mode are displayed. •...

Reference Manual
Page 33
Basic Steps for Shooting and Playback Basic Steps for Shooting and Playback Preparation Preparation 1 Insert the Battery 16 Preparation 2 Charge the Battery 18 Preparation 3 Insert a Memory Card 20 Shooting Step 1 Turn the Camera On 22 Setting the Display Language, Date and Time (First Use After Purchase) ...24 Step 2 Select a Shooting Mode 26 Step 3 Frame a Picture ...28 Step 4 Focus and Shoot...30 Playback Step 5 Play Back Images ...32 Step 6 Delete Unwanted Images 34 15
Basic Steps for Shooting and Playback Basic Steps for Shooting and Playback Preparation Preparation 1 Insert the Battery 16 Preparation 2 Charge the Battery 18 Preparation 3 Insert a Memory Card 20 Shooting Step 1 Turn the Camera On 22 Setting the Display Language, Date and Time (First Use After Purchase) ...24 Step 2 Select a Shooting Mode 26 Step 3 Frame a Picture ...28 Step 4 Focus and Shoot...30 Playback Step 5 Play Back Images ...32 Step 6 Delete Unwanted Images 34 15

Reference Manual
Page 34
... Preparation 1 Insert the Battery 1 Open the battery-chamber/memory card slot cover. 2 Insert the included Rechargeable Li-ion Battery EN-EL19. • Use the edge of the battery to check that the battery is in the correct orientation. 3 Close the battery-chamber/memory card slot cover. • ...Charge the battery before first use or when it is properly inserted, the battery latch will lock it in the direction indicated by the arrow (1) and fully insert the battery (2)....
... Preparation 1 Insert the Battery 1 Open the battery-chamber/memory card slot cover. 2 Insert the included Rechargeable Li-ion Battery EN-EL19. • Use the edge of the battery to check that the battery is in the correct orientation. 3 Close the battery-chamber/memory card slot cover. • ...Charge the battery before first use or when it is properly inserted, the battery latch will lock it in the direction indicated by the arrow (1) and fully insert the battery (2)....


