Reference Manual
Page 4
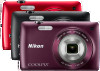
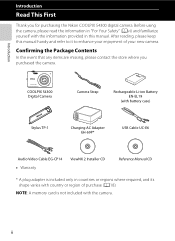
...of purchase (A18). NOTE: A memory card is included only in this manual handy and refer to it to enhance your new camera. Before using the camera, please read the information in "For Your Safety" (Avi) and familiarize yourself with the information provided in countries or regions where required.... Confirming the Package Contents In the event that any items are missing, please contact the store where you for purchasing the Nikon COOLPIX S4300 digital camera. After reading, please keep this manual. ii Introduction Introduction Read This First Thank you purchased the camera.
...of purchase (A18). NOTE: A memory card is included only in this manual handy and refer to it to enhance your new camera. Before using the camera, please read the information in "For Your Safety" (Avi) and familiarize yourself with the information provided in countries or regions where required.... Confirming the Package Contents In the event that any items are missing, please contact the store where you for purchasing the Nikon COOLPIX S4300 digital camera. After reading, please keep this manual. ii Introduction Introduction Read This First Thank you purchased the camera.

Reference Manual
Page 5
...Information • Symbols and Conventions To make it easier to find the information you want to start using the camera. C This icon marks notes, information that should be read before use, to prevent damage to as the "default setting." • The names of menu options displayed ... icons indicate other pages containing relevant information; Read This First About This Manual If you need, the following symbols and conventions are used in this manual may differ from monitor display samples so that monitor indicators can be more clearly shown. • Illustrations and monitor...
...Information • Symbols and Conventions To make it easier to find the information you want to start using the camera. C This icon marks notes, information that should be read before use, to prevent damage to as the "default setting." • The names of menu options displayed ... icons indicate other pages containing relevant information; Read This First About This Manual If you need, the following symbols and conventions are used in this manual may differ from monitor display samples so that monitor indicators can be more clearly shown. • Illustrations and monitor...
Reference Manual
Page 6
... camera are engineered and proven to ensure that may be held liable for contact information: http://imaging.nikon.com/ Use Only Nikon Brand Electronic Accessories Nikon COOLPIX cameras are designed to frequently asked questions (FAQs), and general advice on a trip), take a test shot to operate within the operational and safety requirements of ...
... camera are engineered and proven to ensure that may be held liable for contact information: http://imaging.nikon.com/ Use Only Nikon Brand Electronic Accessories Nikon COOLPIX cameras are designed to frequently asked questions (FAQs), and general advice on a trip), take a test shot to operate within the operational and safety requirements of ...

Reference Manual
Page 7
..., transcribed, stored in a retrieval system, or translated into any language in any form, by any means, without Nikon's prior written permission. • Nikon reserves the right to change the specifications of the hardware and software described in the documentation at any time and without...paper money, coins, securities, government bonds or local government bonds, even if such copies or reproductions are circulated in the malicious use this product. • While every effort was digitally copied or reproduced by national and international copyright laws. The copying or ...
..., transcribed, stored in a retrieval system, or translated into any language in any form, by any means, without Nikon's prior written permission. • Nikon reserves the right to change the specifications of the hardware and software described in the documentation at any time and without...paper money, coins, securities, government bonds or local government bonds, even if such copies or reproductions are circulated in the malicious use this product. • While every effort was digitally copied or reproduced by national and international copyright laws. The copying or ...
Reference Manual
Page 8
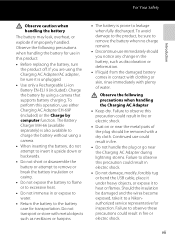
... of flammable gas, as the result of a fall or other small parts into their entirety before using this Nikon product, to prevent possible injury. For Your Safety To prevent damage to your Nikon product or injury to yourself or to others, read them. Keep these safety instructions where all those... who use . Parts of malfunction Should you notice smoke or an unusual smell coming from failure to observe the...
... of flammable gas, as the result of a fall or other small parts into their entirety before using this Nikon product, to prevent possible injury. For Your Safety To prevent damage to your Nikon product or injury to yourself or to others, read them. Keep these safety instructions where all those... who use . Parts of malfunction Should you notice smoke or an unusual smell coming from failure to observe the...
Reference Manual
Page 9
... objects, or expose it to a Nikonauthorized service representative for inspection. The Battery Charger MH-66 (available separately) is unplugged. • Use only a Rechargeable Li-ion Battery EN-EL19 (included). Observe the following precautions when handling the battery for transportation. Failure to observe these precautions...; If liquid from the damaged battery comes in contact with clothing or skin, rinse immediately with plenty of the plug should you are using a camera. • When inserting the battery, do not attempt to insert it upside down or backwards. • Do not short...
... objects, or expose it to a Nikonauthorized service representative for inspection. The Battery Charger MH-66 (available separately) is unplugged. • Use only a Rechargeable Li-ion Battery EN-EL19 (included). Observe the following precautions when handling the battery for transportation. Failure to observe these precautions...; If liquid from the damaged battery comes in contact with clothing or skin, rinse immediately with plenty of the plug should you are using a camera. • When inserting the battery, do not attempt to insert it upside down or backwards. • Do not short...

Reference Manual
Page 10
... a person or object Failure to your fingers or other moving parts. Turn the power off when using the flash Using the flash close to observe this device should not be played back on an audio CD player could...observe this camera may disrupt the electronic systems of the airplane or the instruments of the hospital when using while in .) from the monitor touching the skin or entering the eyes or mouth. For Your Safety..., care should be taken to avoid injury caused by Nikon for the purpose, to prevent liquid crystal from the subject. Follow the instructions of the hospital.
... a person or object Failure to your fingers or other moving parts. Turn the power off when using the flash Using the flash close to observe this device should not be played back on an audio CD player could...observe this camera may disrupt the electronic systems of the airplane or the instruments of the hospital when using while in .) from the monitor touching the skin or entering the eyes or mouth. For Your Safety..., care should be taken to avoid injury caused by Nikon for the purpose, to prevent liquid crystal from the subject. Follow the instructions of the hospital.

Reference Manual
Page 11
... a vertical or floor mount position. If this device that interference will not occur in the U.S.A., use an attachment plug adapter of the FCC rules. Interface Cables Use the interface cables sold or provided by Nikon Corporation may exceed the limits of Class B Part 15 of the proper configuration for the power outlet if...
... a vertical or floor mount position. If this device that interference will not occur in the U.S.A., use an attachment plug adapter of the FCC rules. Interface Cables Use the interface cables sold or provided by Nikon Corporation may exceed the limits of Class B Part 15 of the proper configuration for the power outlet if...

Reference Manual
Page 12
Notices for customers in Europe CAUTIONS RISK OF EXPLOSION IF BATTERY IS REPLACED BY AN INCORRECT TYPE. DISPOSE OF USED BATTERIES ACCORDING TO THE INSTRUCTIONS. The following apply only to users in European countries: • All batteries, whether marked with Canadian ICES-003. ...retailer or the local authorities in charge of waste management. Wash hands after handling. This symbol indicates that the battery is to be collected separately. Nikon Inc., 1300 Walt Whitman Road Melville, New York 11747-3064 USA Tel: 631-547-4200 Notice for customers in Canada CAUTION This Class B digital...
Notices for customers in Europe CAUTIONS RISK OF EXPLOSION IF BATTERY IS REPLACED BY AN INCORRECT TYPE. DISPOSE OF USED BATTERIES ACCORDING TO THE INSTRUCTIONS. The following apply only to users in European countries: • All batteries, whether marked with Canadian ICES-003. ...retailer or the local authorities in charge of waste management. Wash hands after handling. This symbol indicates that the battery is to be collected separately. Nikon Inc., 1300 Walt Whitman Road Melville, New York 11747-3064 USA Tel: 631-547-4200 Notice for customers in Canada CAUTION This Class B digital...

Reference Manual
Page 13
...Basic Operations 1 Parts of the Camera...2 The Camera Body ...2 Operating the Touch Panel ...4 Tapping...4 Dragging ...4 Dragging and Dropping...4 Using the Stylus ...5 Indicators and Operations of the Monitor/Touch Panel 6 Shooting Mode (Information Indicators 6 Shooting Mode (Operation Controls)...7 ...Playback Mode (Information Display)...8 Playback Mode (Operation Controls) ...9 Switching Between Shooting Mode and Playback Mode 10 Using Menus (d Tab) ...11 Pressing the Shutter-release Button ...13 Attaching the Camera Strap ...13 Basic Steps for Shooting and ...
...Basic Operations 1 Parts of the Camera...2 The Camera Body ...2 Operating the Touch Panel ...4 Tapping...4 Dragging ...4 Dragging and Dropping...4 Using the Stylus ...5 Indicators and Operations of the Monitor/Touch Panel 6 Shooting Mode (Information Indicators 6 Shooting Mode (Operation Controls)...7 ...Playback Mode (Information Display)...8 Playback Mode (Operation Controls) ...9 Switching Between Shooting Mode and Playback Mode 10 Using Menus (d Tab) ...11 Pressing the Shutter-release Button ...13 Attaching the Camera Strap ...13 Basic Steps for Shooting and ...

Reference Manual
Page 14
... and Shoot ...30 Step 5 Play Back Images ...32 Changing How Images Are Displayed 33 Step 6 Delete Unwanted Images 34 Shooting Features ...37 Using A (Auto) Mode...38 Adjusting the A (Auto) Mode Settings 38 Options Available in the Auto Shooting Menu 39 Scene Mode (Shooting Suited ...Settings 53 Smart Portrait Menu Options ...53 Basic Shooting Settings ...54 Functions Available for Each Shooting Mode 54 Using the Flash (Flash Modes)...55 Using the Self-timer ...57 Using Macro Mode ...59 Adjusting Brightness (Exposure Compensation 61 Default Settings ...62 A Changing the Image Size (Image...
... and Shoot ...30 Step 5 Play Back Images ...32 Changing How Images Are Displayed 33 Step 6 Delete Unwanted Images 34 Shooting Features ...37 Using A (Auto) Mode...38 Adjusting the A (Auto) Mode Settings 38 Options Available in the Auto Shooting Menu 39 Scene Mode (Shooting Suited ...Settings 53 Smart Portrait Menu Options ...53 Basic Shooting Settings ...54 Functions Available for Each Shooting Mode 54 Using the Flash (Flash Modes)...55 Using the Self-timer ...57 Using Macro Mode ...59 Adjusting Brightness (Exposure Compensation 61 Default Settings ...62 A Changing the Image Size (Image...
Reference Manual
Page 15
... ...82 Changing Movie Recording Settings (The Movie Menu 85 Movie Playback ...86 General Camera Setup...87 The Setup Menu ...88 Reference Section ...E1 Using the Draw Option ...E2 Using Panorama Assist...E3 Favorite Pictures Mode ...E5 Adding Images to Albums...E5 Viewing Images in an Album ...E6 Removing Images from Albums ...E7...
... ...82 Changing Movie Recording Settings (The Movie Menu 85 Movie Playback ...86 General Camera Setup...87 The Setup Menu ...88 Reference Section ...E1 Using the Draw Option ...E2 Using Panorama Assist...E3 Favorite Pictures Mode ...E5 Adding Images to Albums...E5 Viewing Images in an Album ...E6 Removing Images from Albums ...E7...

Reference Manual
Page 19
...Display 8 Playback Mode (Operation Controls 9 Switching Between Shooting Mode and Playback Mode 10 Using Menus (d Tab 11 Pressing the Shutter-release Button 13 Attaching the Camera Strap 13 If you want to use basic camera features. Parts of the Camera 2 The Camera Body ...2 Operating the Touch ...Panel 4 Tapping ...4 Dragging...4 Dragging and Dropping 4 Using the Stylus ...5 Indicators and Operations of the camera and also ...
...Display 8 Playback Mode (Operation Controls 9 Switching Between Shooting Mode and Playback Mode 10 Using Menus (d Tab 11 Pressing the Shutter-release Button 13 Attaching the Camera Strap 13 If you want to use basic camera features. Parts of the Camera 2 The Camera Body ...2 Operating the Touch ...Panel 4 Tapping ...4 Dragging...4 Dragging and Dropping 4 Using the Stylus ...5 Indicators and Operations of the camera and also ...
Reference Manual
Page 22
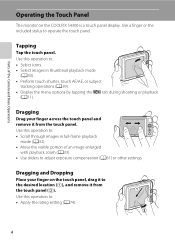
Tapping Tap the touch panel. Dragging Drag your finger on the COOLPIX S4300 is a touch panel display. Use a finger or the included stylus to : • Apply the rating setting (A74). 4 Use this operation to: • Select icons. • Select images in full-frame playback mode (A32). • ...and remove it from the touch panel (2). Dragging and Dropping Place your finger across the touch panel and remove it from the touch panel. Use this operation to: • Scroll through images in thumbnail playback mode (A33). • Perform touch shutter, touch AF/AE, or subject ...
Tapping Tap the touch panel. Dragging Drag your finger on the COOLPIX S4300 is a touch panel display. Use a finger or the included stylus to : • Apply the rating setting (A74). 4 Use this operation to: • Select icons. • Select images in full-frame playback mode (A32). • ...and remove it from the touch panel (2). Dragging and Dropping Place your finger across the touch panel and remove it from the touch panel. Use this operation to: • Scroll through images in thumbnail playback mode (A33). • Perform touch shutter, touch AF/AE, or subject ...

Reference Manual
Page 23
...) or the paint option (A75), that require more precision than the included stylus. • Do not apply unnecessary pressure to the strap as when using a finger. The stylus may slip off the display. - Bounce your finger over too short a distance. - Drag your finger off the strap and... the camera may fall. 5 Attaching the Stylus Attach the stylus to the touch panel. Using the Stylus Use the stylus for operations, such as shown. Operating the Touch Panel Parts of small children. • Do not carry the camera by the ...
...) or the paint option (A75), that require more precision than the included stylus. • Do not apply unnecessary pressure to the strap as when using a finger. The stylus may slip off the display. - Bounce your finger over too short a distance. - Drag your finger off the strap and... the camera may fall. 5 Attaching the Stylus Attach the stylus to the touch panel. Using the Stylus Use the stylus for operations, such as shown. Operating the Touch Panel Parts of small children. • Do not carry the camera by the ...

Reference Manual
Page 28
...mode, press the A (shooting mode) button to switch to shooting mode. • While using shooting mode, press the c (playback) button to switch to shooting mode by pressing the ... The camera has two modes of operation: Shooting mode, which is used for viewing images. JPG 15/05/2012 15:30 Parts of that mode. 10 While using playback mode, you press the c (playback) button while the playback... screen is displayed, the playback mode selection menu is used for taking pictures, and playback mode, which is displayed, from which you can select one of ...
...mode, press the A (shooting mode) button to switch to shooting mode. • While using shooting mode, press the c (playback) button to switch to shooting mode by pressing the ... The camera has two modes of operation: Shooting mode, which is used for viewing images. JPG 15/05/2012 15:30 Parts of that mode. 10 While using playback mode, you press the c (playback) button while the playback... screen is displayed, the playback mode selection menu is used for taking pictures, and playback mode, which is displayed, from which you can select one of ...

Reference Manual
Page 29
...of the selected menu option is hidden, tap A. Parts of the Camera and Basic Operations Indicators and Operations of the Monitor/Touch Panel Using Menus (d Tab) During Shooting Use the d tab to change the settings of each shooting mode. • Change the settings before shooting. • You can be changed... are displayed. • If the d tab is displayed. • Tap z to apply the setting of menu options that item. • To finish using the setup menu. Image mode Tap a setting option to apply the setting • Tap an icon to display the setup menu. • To hide the...
...of the selected menu option is hidden, tap A. Parts of the Camera and Basic Operations Indicators and Operations of the Monitor/Touch Panel Using Menus (d Tab) During Shooting Use the d tab to change the settings of each shooting mode. • Change the settings before shooting. • You can be changed... are displayed. • If the d tab is displayed. • Tap z to apply the setting of menu options that item. • To finish using the setup menu. Image mode Tap a setting option to apply the setting • Tap an icon to display the setup menu. • To hide the...

Reference Manual
Page 30
... d tab. You can select images by dragging them while the menu option selection screen is displayed. • You can also change the general camera settings using the setup menu. 4/ 4 Tap the d tab • The icons of the selected menu option is hidden, tap the monitor. 0004. Retouch Tap a setting option to... edit images. • Select images before making changes. Parts of the Camera and Basic Operations Indicators and Operations of the Monitor/Touch Panel During Playback Use the d tab to the previous screen, tap J. 12
... d tab. You can select images by dragging them while the menu option selection screen is displayed. • You can also change the general camera settings using the setup menu. 4/ 4 Tap the d tab • The icons of the selected menu option is hidden, tap the monitor. 0004. Retouch Tap a setting option to... edit images. • Select images before making changes. Parts of the Camera and Basic Operations Indicators and Operations of the Monitor/Touch Panel During Playback Use the d tab to the previous screen, tap J. 12

Reference Manual
Page 33
Basic Steps for Shooting and Playback Basic Steps for Shooting and Playback Preparation Preparation 1 Insert the Battery 16 Preparation 2 Charge the Battery 18 Preparation 3 Insert a Memory Card 20 Shooting Step 1 Turn the Camera On 22 Setting the Display Language, Date and Time (First Use After Purchase) ...24 Step 2 Select a Shooting Mode 26 Step 3 Frame a Picture ...28 Step 4 Focus and Shoot...30 Playback Step 5 Play Back Images ...32 Step 6 Delete Unwanted Images 34 15
Basic Steps for Shooting and Playback Basic Steps for Shooting and Playback Preparation Preparation 1 Insert the Battery 16 Preparation 2 Charge the Battery 18 Preparation 3 Insert a Memory Card 20 Shooting Step 1 Turn the Camera On 22 Setting the Display Language, Date and Time (First Use After Purchase) ...24 Step 2 Select a Shooting Mode 26 Step 3 Frame a Picture ...28 Step 4 Focus and Shoot...30 Playback Step 5 Play Back Images ...32 Step 6 Delete Unwanted Images 34 15

Reference Manual
Page 34
... inserted, the battery latch will lock it in the correct orientation. 3 Close the battery-chamber/memory card slot cover. • Charge the battery before first use or when it is in place. Basic Steps for Shooting and Playback Basic Steps for more information. 16 See page 18 for Shooting and Playback... Preparation 1 Insert the Battery 1 Open the battery-chamber/memory card slot cover. 2 Insert the included Rechargeable Li-ion Battery EN-EL19. • Use the edge of the battery to check that the battery is running low.
... inserted, the battery latch will lock it in the correct orientation. 3 Close the battery-chamber/memory card slot cover. • Charge the battery before first use or when it is in place. Basic Steps for Shooting and Playback Basic Steps for more information. 16 See page 18 for Shooting and Playback... Preparation 1 Insert the Battery 1 Open the battery-chamber/memory card slot cover. 2 Insert the included Rechargeable Li-ion Battery EN-EL19. • Use the edge of the battery to check that the battery is running low.


