
Product Manual
Page 6
.... Visit the site below for contact information: http://imaging.nikon.com/ Use Only Nikon Brand Electronic Accessories Nikon COOLPIX cameras are engineered and proven to operate within the operational and safety requirements of the camera or result in your area. Only Nikon brand electronic accessories (including battery chargers, batteries, charging AC adapter, AC adapters and cables) certified...
.... Visit the site below for contact information: http://imaging.nikon.com/ Use Only Nikon Brand Electronic Accessories Nikon COOLPIX cameras are engineered and proven to operate within the operational and safety requirements of the camera or result in your area. Only Nikon brand electronic accessories (including battery chargers, batteries, charging AC adapter, AC adapters and cables) certified...

Product Manual
Page 9
... notice smoke or an unusual smell coming from the camera or charging AC adapter, unplug the charging AC adapter and remove the battery immediately, taking care to avoid burns. WARNINGS Turn off in low-temperature burns. After removing or disconnecting the power source, take...: This icon marks warnings, information that could result from putting the battery or other accident, take the equipment to a Nikon-authorized service representative for inspection, after unplugging the product and/or removing the battery. Repairs should be performed only by the following safety precautions in their...
... notice smoke or an unusual smell coming from the camera or charging AC adapter, unplug the charging AC adapter and remove the battery immediately, taking care to avoid burns. WARNINGS Turn off in low-temperature burns. After removing or disconnecting the power source, take...: This icon marks warnings, information that could result from putting the battery or other accident, take the equipment to a Nikon-authorized service representative for inspection, after unplugging the product and/or removing the battery. Repairs should be performed only by the following safety precautions in their...

Product Manual
Page 10
... power supply other than those provided or sold by using a camera that supports battery charging. Failure to observe this product: • Before replacing the battery, turn the product off. The Battery Charger MH-67P (available separately) is also available to insulate the terminal before ...Failure to observe this precaution could cause damage or fire. Observe caution when handling the battery The battery may leak, overheat, or explode if improperly handled. Charge the battery by Nikon could result in damage or malfunction. To avoid damage to leakage when fully discharged.
... power supply other than those provided or sold by using a camera that supports battery charging. Failure to observe this product: • Before replacing the battery, turn the product off. The Battery Charger MH-67P (available separately) is also available to insulate the terminal before ...Failure to observe this precaution could cause damage or fire. Observe caution when handling the battery The battery may leak, overheat, or explode if improperly handled. Charge the battery by Nikon could result in damage or malfunction. To avoid damage to leakage when fully discharged.

Product Manual
Page 13
... • Separate collection and recycling helps conserve natural resources and prevent negative consequences for human health and the environment that the battery is to users in European countries: • This product is designated for separate collection at an appropriate collection point. The ... incorrect disposal. • For more information, contact the retailer or the local authorities in charge of waste management. Wash hands after handling. Nikon Inc., 1300 Walt Whitman Road, Melville, New York 11747-3064 USA Tel: 631-547-4200 Notice for Customers in Canada CAN ICES-3 ...
... • Separate collection and recycling helps conserve natural resources and prevent negative consequences for human health and the environment that the battery is to users in European countries: • This product is designated for separate collection at an appropriate collection point. The ... incorrect disposal. • For more information, contact the retailer or the local authorities in charge of waste management. Wash hands after handling. Nikon Inc., 1300 Walt Whitman Road, Melville, New York 11747-3064 USA Tel: 631-547-4200 Notice for Customers in Canada CAN ICES-3 ...

Product Manual
Page 17
... the Monitor Display (s Button 10 Using Menus (the d Button 12 The Monitor ...14 The Basics of Shooting and Playback 20 Preparation 1 Insert the Battery 20 Preparation 2 Charge the Battery 22 Preparation 3 Insert a Memory Card 24 Internal Memory and Memory Cards 25 Approved Memory Cards...25 Step 1 Turn the Camera On 26 Setting...
... the Monitor Display (s Button 10 Using Menus (the d Button 12 The Monitor ...14 The Basics of Shooting and Playback 20 Preparation 1 Insert the Battery 20 Preparation 2 Charge the Battery 22 Preparation 3 Insert a Memory Card 24 Internal Memory and Memory Cards 25 Approved Memory Cards...25 Step 1 Turn the Camera On 26 Setting...

Product Manual
Page 21
... Version ...E76 Error Messages...E77 File Names ...E81 Optional Accessories ...E82 Technical Notes and Index F1 Caring for the Products...F2 The Camera...F2 The Battery ...F3 Charging AC Adapter ...F4 Memory Cards...F5 Caring for the Camera...F6 Cleaning...F6 Storage ...F7 Troubleshooting ...F8 Specifications ...F16 Index...F23 xix
... Version ...E76 Error Messages...E77 File Names ...E81 Optional Accessories ...E82 Technical Notes and Index F1 Caring for the Products...F2 The Camera...F2 The Battery ...F3 Charging AC Adapter ...F4 Memory Cards...F5 Caring for the Camera...F6 Cleaning...F6 Storage ...F7 Troubleshooting ...F8 Specifications ...F16 Index...F23 xix

Product Manual
Page 24
..., 72, 86, 93, 95 13 l (delete) button 37, 94 14 k (apply selection) button 3, 5, 12 15 Rotary multi selector (multi selector 3, 5, 59 16 Tripod socket 17 Battery-chamber/memory card slot cover 20, 24 * Also referred to as the "multi selector" in this manual. 2
..., 72, 86, 93, 95 13 l (delete) button 37, 94 14 k (apply selection) button 3, 5, 12 15 Rotary multi selector (multi selector 3, 5, 59 16 Tripod socket 17 Battery-chamber/memory card slot cover 20, 24 * Also referred to as the "multi selector" in this manual. 2

Product Manual
Page 37
...remaining 19 (still images 26, E21 20 Internal memory indicator............26 21 Aperture value 52 22 Shutter speed 52 23 ISO sensitivity 73 24 Battery level indicator 26 25 "Date not set" indicator...........28, 95 26 Print date 95 27 Travel destination icon 95 Eye-Fi communication 28 ...indicator 96, E 75 29 White balance 72 30 COOLPIX Picture Control 72 31 Active D-Lighting 73 Continuous shooting 32 mode 48, 73 33 Backlighting (HDR 46 34 Exposure bracketing 73 35 Hand-held...
...remaining 19 (still images 26, E21 20 Internal memory indicator............26 21 Aperture value 52 22 Shutter speed 52 23 ISO sensitivity 73 24 Battery level indicator 26 25 "Date not set" indicator...........28, 95 26 Print date 95 27 Travel destination icon 95 Eye-Fi communication 28 ...indicator 96, E 75 29 White balance 72 30 COOLPIX Picture Control 72 31 Active D-Lighting 73 Continuous shooting 32 mode 48, 73 33 Backlighting (HDR 46 34 Exposure bracketing 73 35 Hand-held...

Product Manual
Page 39
... Easy panorama playback guide 5, 47 ,E4 18 Sequence playback guide 5, E5 Movie playback guide 93 19 Time of recording 28 20 Date of recording 28 (a) Battery level indicator 26 21 (b) Charging AC adapter connection indicator 22 File number and type E81 Eye-Fi communication 23 indicator 96, E75 17
... Easy panorama playback guide 5, 47 ,E4 18 Sequence playback guide 5, E5 Movie playback guide 93 19 Time of recording 28 20 Date of recording 28 (a) Battery level indicator 26 21 (b) Charging AC adapter connection indicator 22 File number and type E81 Eye-Fi communication 23 indicator 96, E75 17

Product Manual
Page 42
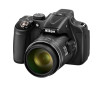
The Basics of Shooting and Playback The Basics of Shooting and Playback Preparation 1 Insert the Battery 1 Open the battery-chamber/ memory card slot cover. 2 Insert the battery. • Push the orange battery latch in Correct Direction Inserting the battery upside down or backwards could damage the camera. 3 Close the battery-chamber/ memory card slot cover. B Be Careful to Insert the Battery in the direction indicated by the arrow (1), and fully insert the battery (2). • The battery locks into place when inserted correctly. Battery latch 20
The Basics of Shooting and Playback The Basics of Shooting and Playback Preparation 1 Insert the Battery 1 Open the battery-chamber/ memory card slot cover. 2 Insert the battery. • Push the orange battery latch in Correct Direction Inserting the battery upside down or backwards could damage the camera. 3 Close the battery-chamber/ memory card slot cover. B Be Careful to Insert the Battery in the direction indicated by the arrow (1), and fully insert the battery (2). • The battery locks into place when inserted correctly. Battery latch 20

Product Manual
Page 43
The Basics of Shooting and Playback Removing the Battery Turn the camera off and make sure that the power-on lamp and the monitor have turned off, and then open the battery-chamber/memory card slot cover. B High Temperature Caution The camera, battery, and memory card may be hot immediately after using the camera. 21 Move the battery latch in the direction indicated by the arrow (1) to eject the battery (2).
The Basics of Shooting and Playback Removing the Battery Turn the camera off and make sure that the power-on lamp and the monitor have turned off, and then open the battery-chamber/memory card slot cover. B High Temperature Caution The camera, battery, and memory card may be hot immediately after using the camera. 21 Move the battery latch in the direction indicated by the arrow (1) to eject the battery (2).

Product Manual
Page 44
... of 1 to 3. • Keep the camera turned off. • Make sure that the plugs are connected, attempting to the charging AC adapter. 2 Make sure the battery is charging. 22 Electrical outlet Charge lamp USB cable (included) • The charge lamp slowly flashes green to indicate that the... two are properly oriented. Using a USB cable other than the UC-E21 could damage the product. * The shape of Shooting and Playback Preparation 2 Charge the Battery 1 Prepare the included charging AC adapter. The Basics of the plug adapter varies according to the plug on the charging AC adapter.
... of 1 to 3. • Keep the camera turned off. • Make sure that the plugs are connected, attempting to the charging AC adapter. 2 Make sure the battery is charging. 22 Electrical outlet Charge lamp USB cable (included) • The charge lamp slowly flashes green to indicate that the... two are properly oriented. Using a USB cable other than the UC-E21 could damage the product. * The shape of Shooting and Playback Preparation 2 Charge the Battery 1 Prepare the included charging AC adapter. The Basics of the plug adapter varies according to the plug on the charging AC adapter.

Product Manual
Page 45
The Basics of AC adapter other than Charging AC Adapter EH-71P, and do not use a commercially available USB-AC adapter or a battery charger for a mobile phone. About 3 hours are required to 95°F). • The USB cable or charging AC adapter is not properly connected..., or there is a problem with the battery. B Notes About Charging Do not, under any circumstances, use the Battery Charger MH-67P (available separately; Shooting is complete, the charge lamp stops flashing Off green and turns off. Charge ...
The Basics of AC adapter other than Charging AC Adapter EH-71P, and do not use a commercially available USB-AC adapter or a battery charger for a mobile phone. About 3 hours are required to 95°F). • The USB cable or charging AC adapter is not properly connected..., or there is a problem with the battery. B Notes About Charging Do not, under any circumstances, use the Battery Charger MH-67P (available separately; Shooting is complete, the charge lamp stops flashing Off green and turns off. Charge ...

Product Manual
Page 46
... the memory card upside down or backwards could damage the camera and the memory card. 3 Close the battery-chamber/ memory card slot cover. Preparation 3 Insert a Memory Card 1 Turn off the camera and open the battery-chamber/memory card slot cover. 2 Insert the memory card. • Slide the memory card in until it...
... the memory card upside down or backwards could damage the camera and the memory card. 3 Close the battery-chamber/ memory card slot cover. Preparation 3 Insert a Memory Card 1 Turn off the camera and open the battery-chamber/memory card slot cover. 2 Insert the memory card. • Slide the memory card in until it...
Product Manual
Page 47
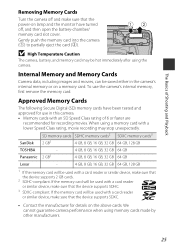
... when using a memory card with an SD Speed Class rating of Shooting and Playback Removing Memory Cards Turn the camera off , and then open the battery-chamber/ memory card slot cover. The Basics of 6 or faster are recommended for recording movies. Gently push the memory card into the camera (1) to partially..., 16 GB, 32 GB 64 GB, 128 GB 1 If the memory card will be hot immediately after using the camera. B High Temperature Caution The camera, battery, and memory card may stop unexpectedly.
... when using a memory card with an SD Speed Class rating of Shooting and Playback Removing Memory Cards Turn the camera off , and then open the battery-chamber/ memory card slot cover. The Basics of 6 or faster are recommended for recording movies. Gently push the memory card into the camera (1) to partially..., 16 GB, 32 GB 64 GB, 128 GB 1 If the memory card will be hot immediately after using the camera. B High Temperature Caution The camera, battery, and memory card may stop unexpectedly.

Product Manual
Page 48
Description The battery level is low. The battery level is high. Recharge the battery. The Basics of Shooting and Playback Battery level indicator 1/250 F5.6 25m 0s 840 Number of images that can be taken is displayed. • C is displayed when no memory... card is inserted in the internal memory. 26 The camera cannot capture images. Number of Exposures Remaining The number of exposures remaining Battery level indicator Display b B N Battery exhausted. Step 1 Turn the Camera On 1 Open the monitor and remove the lens cap. • See "Opening and Adjusting the ...
Description The battery level is low. The battery level is high. Recharge the battery. The Basics of Shooting and Playback Battery level indicator 1/250 F5.6 25m 0s 840 Number of images that can be taken is displayed. • C is displayed when no memory... card is inserted in the internal memory. 26 The camera cannot capture images. Number of Exposures Remaining The number of exposures remaining Battery level indicator Display b B N Battery exhausted. Step 1 Turn the Camera On 1 Open the monitor and remove the lens cap. • See "Opening and Adjusting the ...

Product Manual
Page 51
... m field and press the k button. 6 Select Yes and press the k button. • When settings are captured by Time zone. The backup battery charges when the main battery is inserted into the camera or when the camera is turned on images as they are finished, the lens extends and the camera... it can enable or disable daylight saving time in the z setup menu by selecting Time zone and date followed by setting Print date in backup battery. Set the date and time again. C Imprinting the Shooting Date on Printed Images • You can change these settings using the ViewNX 2 software ...
... m field and press the k button. 6 Select Yes and press the k button. • When settings are captured by Time zone. The backup battery charges when the main battery is inserted into the camera or when the camera is turned on images as they are finished, the lens extends and the camera... it can enable or disable daylight saving time in the z setup menu by selecting Time zone and date followed by setting Print date in backup battery. Set the date and time again. C Imprinting the Shooting Date on Printed Images • You can change these settings using the ViewNX 2 software ...

Product Manual
Page 57
... the way Press the shutter-release button all the way to the camera or the memory card. Do not open the battery-chamber/memory card slot cover or remove the battery or memory card while an indicator is pressed halfway. Press the button gently. The Basics of data, or in damage to...
... the way Press the shutter-release button all the way to the camera or the memory card. Do not open the battery-chamber/memory card slot cover or remove the battery or memory card while an indicator is pressed halfway. Press the button gently. The Basics of data, or in damage to...

Product Manual
Page 80
... mode dial to j. 58 Shooting menu Multiple exposure Save user settings Reset user settings Zoom memory Startup zoom position M exposure preview B The Clock Battery If the internal clock battery (A29) is recommended. The flexible program (when set to j), shutter speed (when set to k or m) or aperture value (when set to j, k, l or m (A52...
... mode dial to j. 58 Shooting menu Multiple exposure Save user settings Reset user settings Zoom memory Startup zoom position M exposure preview B The Clock Battery If the internal clock battery (A29) is recommended. The flexible program (when set to j), shutter speed (when set to k or m) or aperture value (when set to j, k, l or m (A52...

Product Manual
Page 112
... Recording Movies The indicator showing the number of memory card. These phenomena are being saved or while a movie is being recorded. Do not open the battery-chamber/memory card slot cover or remove the battery or memory card while an indicator is panned. -
... Recording Movies The indicator showing the number of memory card. These phenomena are being saved or while a movie is being recorded. Do not open the battery-chamber/memory card slot cover or remove the battery or memory card while an indicator is panned. -


