
Reference Manual
Page 17
... Batteries 10 Preparation 2 Insert a Memory Card.......... 13 Internal Memory and Memory Cards......... 14 Approved Memory Cards 15 Preparation 3 Set the Display Language, Date, and Time 16 Step 1 Turn the Camera On and Select Shooting Mode 20 Turning the Camera On and Off 21 Step 2 Frame a Picture 23 Using the Zoom 24...
... Batteries 10 Preparation 2 Insert a Memory Card.......... 13 Internal Memory and Memory Cards......... 14 Approved Memory Cards 15 Preparation 3 Set the Display Language, Date, and Time 16 Step 1 Turn the Camera On and Select Shooting Mode 20 Turning the Camera On and Off 21 Step 2 Frame a Picture 23 Using the Zoom 24...

Reference Manual
Page 23
1 14 13 16 15 2 3 4 5 6 7 8 9 10 12 11 Parts of the Camera 1 Monitor 6 2 Flash lamp 50 3 b (e movie-record) button 78 4 A (shooting mode) button...34, 35, 43, 47 5 c (playback) button 29 6 Multi selector 7 k (apply selection) button 8 d button 45, 48, 68, 81, 86 9 l (delete) button 31 10 Battery-chamber/ memory card slot cover 10, 13 11 Battery chamber 10 12 Memory card slot 13 13 USB/audio/video output connector.......69 14 Connector cover 69 15 Tripod socket F18 16 Speaker 82 3
1 14 13 16 15 2 3 4 5 6 7 8 9 10 12 11 Parts of the Camera 1 Monitor 6 2 Flash lamp 50 3 b (e movie-record) button 78 4 A (shooting mode) button...34, 35, 43, 47 5 c (playback) button 29 6 Multi selector 7 k (apply selection) button 8 d button 45, 48, 68, 81, 86 9 l (delete) button 31 10 Battery-chamber/ memory card slot cover 10, 13 11 Battery chamber 10 12 Memory card slot 13 13 USB/audio/video output connector.......69 14 Connector cover 69 15 Tripod socket F18 16 Speaker 82 3

Reference Manual
Page 25
1 16 15 2 3 4 5 6 7 8 9 14 13 10 12 11 Parts of the Camera 1 Monitor 6 2 Flash lamp 50 3 b (e movie-record) button 78 4 A (shooting mode) button...34, 35, 43, 47 5 c (playback) button 29 6 Multi selector 7 k (apply selection) button 8 d button 45, 48, 68, 81, 86 9 l (delete) button 31 10 Battery-chamber/ memory card slot cover 10, 13 11 Battery chamber 10 12 Memory card slot 13 13 USB/audio/video output connector.......69 14 Connector cover 69 15 Tripod socket F18 16 Speaker 82 5
1 16 15 2 3 4 5 6 7 8 9 14 13 10 12 11 Parts of the Camera 1 Monitor 6 2 Flash lamp 50 3 b (e movie-record) button 78 4 A (shooting mode) button...34, 35, 43, 47 5 c (playback) button 29 6 Multi selector 7 k (apply selection) button 8 d button 45, 48, 68, 81, 86 9 l (delete) button 31 10 Battery-chamber/ memory card slot cover 10, 13 11 Battery chamber 10 12 Memory card slot 13 13 USB/audio/video output connector.......69 14 Connector cover 69 15 Tripod socket F18 16 Speaker 82 5

Reference Manual
Page 26
Parts of the Camera The Monitor • The information that is turned on the camera's settings and state of use. By default, information is displayed when the camera is displayed in the monitor during shooting and playback changes depending on and when you operate the camera, and turns off after a few seconds (Monitor settings (A 86) > Photo info > Auto info). Shooting Mode 32 31 30 10 29 28 27 26 25 24 23 2 45 13 6 7 8 10 9 10 11 12 13 2 9 m 0 s 15 +1.0 1 / 2 5 0 F 3.2 999 14 16 20 19 18 9 9 9 17 9999 22 21 6
Parts of the Camera The Monitor • The information that is turned on the camera's settings and state of use. By default, information is displayed when the camera is displayed in the monitor during shooting and playback changes depending on and when you operate the camera, and turns off after a few seconds (Monitor settings (A 86) > Photo info > Auto info). Shooting Mode 32 31 30 10 29 28 27 26 25 24 23 2 45 13 6 7 8 10 9 10 11 12 13 2 9 m 0 s 15 +1.0 1 / 2 5 0 F 3.2 999 14 16 20 19 18 9 9 9 17 9999 22 21 6
Reference Manual
Page 27
... Motion detection icon 86 12 "Date not set" indicator...........19, 86, E65 13 Travel destination icon 86 14 Movie options 81 15 Movie length 80 16 Image mode 60 21 Focus area 23, 26 22 Focus area (face detection, pet detection 23, 26 23 ISO sensitivity F12 24 Exposure compensation value...-timer indicator 53 31 Smile timer 45 32 Pet portrait auto release 42 17 Number of exposures remaining (still images 21 * E, q, and O are displayed on L26, K, K, and P are displayed on L25. 7
... Motion detection icon 86 12 "Date not set" indicator...........19, 86, E65 13 Travel destination icon 86 14 Movie options 81 15 Movie length 80 16 Image mode 60 21 Focus area 23, 26 22 Focus area (face detection, pet detection 23, 26 23 ISO sensitivity F12 24 Exposure compensation value...-timer indicator 53 31 Smile timer 45 32 Pet portrait auto release 42 17 Number of exposures remaining (still images 21 * E, q, and O are displayed on L26, K, K, and P are displayed on L25. 7

Reference Manual
Page 28
...15 14 13 12 999/ 999 3 4 5 6 7 8 11 10 9 9 9 / 9 9 9 9999/9999 a 1m 0s 9 1m 0s b 1 Date of recording 16 10 Internal memory indicator 29 2 Time of recording 16 11 Movie playback indicator 82 3 Battery level indicator 21 12 Volume indicator 83 4 Protect icon 68 13 D-Lighting icon 68 5 Eye-Fi indicator 87 14 ...Small picture icon 68 6 Print order icon 68 7 Image mode 60 15 Skin softening icon 68 16 File number and type E63 8 Movie options 81 (a) Current image number/ 9 total number of the Camera Playback Mode 1 2 15/05/2012 12:00...
...15 14 13 12 999/ 999 3 4 5 6 7 8 11 10 9 9 9 / 9 9 9 9999/9999 a 1m 0s 9 1m 0s b 1 Date of recording 16 10 Internal memory indicator 29 2 Time of recording 16 11 Movie playback indicator 82 3 Battery level indicator 21 12 Volume indicator 83 4 Protect icon 68 13 D-Lighting icon 68 5 Eye-Fi indicator 87 14 ...Small picture icon 68 6 Print order icon 68 7 Image mode 60 15 Skin softening icon 68 16 File number and type E63 8 Movie options 81 (a) Current image number/ 9 total number of the Camera Playback Mode 1 2 15/05/2012 12:00...

Reference Manual
Page 29
The Basics of Shooting and Playback The Basics of Shooting and Playback Preparation Preparation 1 Insert the Batteries 10 Preparation 2 Insert a Memory Card 13 Preparation 3 Set the Display Language, Date, and Time 16 Shooting Step 1 Turn the Camera On and Select Shooting Mode 20 Step 2 Frame a Picture ...23 Step 3 Focus and Shoot...26 Playback Step 4 Play Back Images ...29 Step 5 Delete Images...31 9
The Basics of Shooting and Playback The Basics of Shooting and Playback Preparation Preparation 1 Insert the Batteries 10 Preparation 2 Insert a Memory Card 13 Preparation 3 Set the Display Language, Date, and Time 16 Shooting Step 1 Turn the Camera On and Select Shooting Mode 20 Step 2 Frame a Picture ...23 Step 3 Focus and Shoot...26 Playback Step 4 Play Back Images ...29 Step 5 Delete Images...31 9

Reference Manual
Page 35
..., 32 GB SDXC memory card 3 64 GB 64 GB Panasonic 2 GB1 4 GB, 8 GB, 12 GB, 16 GB, 32 GB 48 GB, 64 GB Lexar - 4 GB, 8 GB, 16 GB, 32 GB 64 GB, 128 GB 1 If the memory card will be used with a card reader or similar device, make sure that the device...
..., 32 GB SDXC memory card 3 64 GB 64 GB Panasonic 2 GB1 4 GB, 8 GB, 12 GB, 16 GB, 32 GB 48 GB, 64 GB Lexar - 4 GB, 8 GB, 16 GB, 32 GB 64 GB, 128 GB 1 If the memory card will be used with a card reader or similar device, make sure that the device...

Reference Manual
Page 36
Ye s No Cancel 16 Language 3 Press H or I to select Yes and press the k button. Cancel Time zone and date Choose time zone and set date and time? The Basics ...
Ye s No Cancel 16 Language 3 Press H or I to select Yes and press the k button. Cancel Time zone and date Choose time zone and set date and time? The Basics ...
Reference Manual
Page 39
... screen is displayed when the camera is displayed. Set the date and time again. ➝ Step 3 of "Preparation 3 Set the Display Language, Date, and Time" (A 16) C Imprinting the Shooting Date in the setup menu to be printed without setting the date and time, O will flash when the shooting screen is turned...
... screen is displayed when the camera is displayed. Set the date and time again. ➝ Step 3 of "Preparation 3 Set the Display Language, Date, and Time" (A 16) C Imprinting the Shooting Date in the setup menu to be printed without setting the date and time, O will flash when the shooting screen is turned...

Reference Manual
Page 68
... settings are Auto (default setting), Preset manual, Daylight, Incandescent, Fluorescent, Cloudy, and Flash. The available settings are Single (default setting), Continuous, BSS, and Multi-shot 16. The available settings are Standard color (default setting), Vivid color, Black-and-white, Sepia, and Cyanotype. Allows you to change the color tones of images...
... settings are Auto (default setting), Preset manual, Daylight, Incandescent, Fluorescent, Cloudy, and Flash. The available settings are Single (default setting), Continuous, BSS, and Multi-shot 16. The available settings are Standard color (default setting), Vivid color, Black-and-white, Sepia, and Cyanotype. Allows you to change the color tones of images...

Reference Manual
Page 80
... quality than P. The compression ratio is approximately 1:8. The compression ratio is approximately 1:4. i 3648×2736 is the default setting for L26. The compression ratio is approximately 1:8. Images will be saved. Best choice in which images will be higher quality than i. The compression ratio...mail. The compression ratio is the default setting for L25. Suited to be used when saving images. Example: P 4608×3456 = approx. 16 megapixels, 4608 × 3456 pixels 60 2 P 4608×3456 is approximately 1:8. 1 The total number of pixels captured, and the number ...
... quality than P. The compression ratio is approximately 1:8. The compression ratio is approximately 1:4. i 3648×2736 is the default setting for L26. The compression ratio is approximately 1:8. Images will be saved. Best choice in which images will be higher quality than i. The compression ratio...mail. The compression ratio is the default setting for L25. Suited to be used when saving images. Example: P 4608×3456 = approx. 16 megapixels, 4608 × 3456 pixels 60 2 P 4608×3456 is approximately 1:8. 1 The total number of pixels captured, and the number ...

Reference Manual
Page 82
...sound is disabled. When Smile timer is selected, digital zoom cannot be used . When Multi-shot 16 is used for shooting, the selftimer cannot be used . When using Black-and-white, Sepia,... self-timer, Continuous is fixed at Single. When Continuous, BSS, or Multi-shot 16 is selected, Electronic VR is not heard. When Multi-shot 16 is selected, the Image mode setting is fixed at L (image size: 2560 ×...; 1920 pixels). When Multi-shot 16 is selected, Motion detection is selected, the flash cannot be used. Features That Cannot Be ...
...sound is disabled. When Smile timer is selected, digital zoom cannot be used . When Multi-shot 16 is used for shooting, the selftimer cannot be used . When using Black-and-white, Sepia,... self-timer, Continuous is fixed at Single. When Continuous, BSS, or Multi-shot 16 is selected, Electronic VR is not heard. When Multi-shot 16 is selected, the Image mode setting is fixed at L (image size: 2560 ×...; 1920 pixels). When Multi-shot 16 is selected, Motion detection is selected, the flash cannot be used. Features That Cannot Be ...

Reference Manual
Page 87
... g (i) f (h) 2012 05 Su M Tu W Th F Sa 1234 5 6 7 8 9 10 11 12 13 14 15 16 17 18 19 20 21 22 23 24 25 26 3 g (i) 27 28 29 30 31 Full-frame Display Image Thumbnail Display (4, 9, and... 16 images per screen) Calendar Display • You can view several images on January 1, 2012. 67 ...Display Rotating the zoom control to display the first image captured on that image full-frame. • When 16 thumbnails are treated as images captured on one screen, making it easy to find the image you want....
... g (i) f (h) 2012 05 Su M Tu W Th F Sa 1234 5 6 7 8 9 10 11 12 13 14 15 16 17 18 19 20 21 22 23 24 25 26 3 g (i) 27 28 29 30 31 Full-frame Display Image Thumbnail Display (4, 9, and... 16 images per screen) Calendar Display • You can view several images on January 1, 2012. 67 ...Display Rotating the zoom control to display the first image captured on that image full-frame. • When 16 thumbnails are treated as images captured on one screen, making it easy to find the image you want....
Reference Manual
Page 98
... 720p (1280×720) cannot be selected. 1 Display the shooting screen. • The icon for Movie options, monitor display changes to an aspect ratio of 16:9 with movie recording. • If Photo info in the Monitor settings (A 86) in the setup menu is set to Movie frame+auto info, the area...
... 720p (1280×720) cannot be selected. 1 Display the shooting screen. • The icon for Movie options, monitor display changes to an aspect ratio of 16:9 with movie recording. • If Photo info in the Monitor settings (A 86) in the setup menu is set to Movie frame+auto info, the area...

Reference Manual
Page 117
Create small picture file? g Small Picture: Reducing the Size of an Image Press the c button (playback mode) M d button M g Small picture M k button Create a small copy of 1:16. • The copy is displayed with a compression ratio of the current image. 1 Press the multi selector H or I to select the desired copy size and press ...
Create small picture file? g Small Picture: Reducing the Size of an Image Press the c button (playback mode) M d button M g Small picture M k button Create a small copy of 1:16. • The copy is displayed with a compression ratio of the current image. 1 Press the multi selector H or I to select the desired copy size and press ...
Reference Manual
Page 135
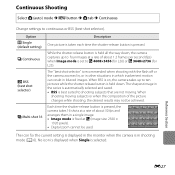
...about 30 fps and arranges them in the series is automatically selected and saved. • BSS is best suited to P 4608×3456 (for L26) or i 3648×2736 (for the current setting is displayed in the monitor when the camera is in blurred images. No icon is displayed ...when Single is pressed. Reference Section E27 Option U Single (default setting) V Continuous D BSS (best shot selector) W Multi-shot 16 Description One picture is taken each time the shutter-release button is selected. The sharpest image in a single image. • Image mode is fixed at...
...about 30 fps and arranges them in the series is automatically selected and saved. • BSS is best suited to P 4608×3456 (for L26) or i 3648×2736 (for the current setting is displayed in the monitor when the camera is in blurred images. No icon is displayed ...when Single is pressed. Reference Section E27 Option U Single (default setting) V Continuous D BSS (best shot selector) W Multi-shot 16 Description One picture is taken each time the shutter-release button is selected. The sharpest image in a single image. • Image mode is fixed at...

Reference Manual
Page 136
... as the sun, reflections of the sun, and electric lights when shooting with Multi-shot 16 enabled is displayed. Save images in monochrome. B Notes About Continuous Shooting • When Continuous, BSS, or Multi-shot 16 is selected, flash cannot be used with other functions (A 62). B Notes About Color... balance are fixed at the values determined with the first image in the monitor when shooting with Multi-shot 16 enabled will be used with images. B Notes About Multi-shot 16 Smear (F3) visible in each series. • The frame rate with continuous shooting may vary depending upon...
... as the sun, reflections of the sun, and electric lights when shooting with Multi-shot 16 enabled is displayed. Save images in monochrome. B Notes About Continuous Shooting • When Continuous, BSS, or Multi-shot 16 is selected, flash cannot be used with other functions (A 62). B Notes About Color... balance are fixed at the values determined with the first image in the monitor when shooting with Multi-shot 16 enabled will be used with images. B Notes About Multi-shot 16 Smear (F3) visible in each series. • The frame rate with continuous shooting may vary depending upon...

Reference Manual
Page 146
... bitrates mean greater image quality and larger movie file sizes. Option Description n HD 720p (1280×720) (default setting)* Movies with an aspect ratio of 16:9 are recorded. • Movie bitrate: Approx. 30 Mbps m VGA (640×480) Movies with an aspect ratio of 4:3 are recorded. • Movie bitrate: Approx. 10...
... bitrates mean greater image quality and larger movie file sizes. Option Description n HD 720p (1280×720) (default setting)* Movies with an aspect ratio of 16:9 are recorded. • Movie bitrate: Approx. 30 Mbps m VGA (640×480) Movies with an aspect ratio of 4:3 are recorded. • Movie bitrate: Approx. 10...

Reference Manual
Page 155
... are imprinted on images. No icon is displayed when Off is saved using the format selected in the setup menu's Time zone and date option (A 16, E41). Select an Image mode setting of O 640×480 may be imprinted in images, even if the Print date function was set to Off...
... are imprinted on images. No icon is displayed when Off is saved using the format selected in the setup menu's Time zone and date option (A 16, E41). Select an Image mode setting of O 640×480 may be imprinted in images, even if the Print date function was set to Off...


