
User Manual
Page 2
.... • HDMI, ( ) logo and High-Definition Multimedia Interface are trademarks or registered trademarks of HDMI Licensing LLC. • All other trade names mentioned in this manual or the other documentation provided with the AVC standard ("AVC video") and/or (ii) decode AVC video that was encoded by a consumer engaged in a personal...-commercial use . AVC Patent Portfolio License This product is granted or shall be obtained from a video provider licensed to (i) encode video in compliance with your Nikon product are trademarks of Apple Inc., registered in the U.S.
.... • HDMI, ( ) logo and High-Definition Multimedia Interface are trademarks or registered trademarks of HDMI Licensing LLC. • All other trade names mentioned in this manual or the other documentation provided with the AVC standard ("AVC video") and/or (ii) decode AVC video that was encoded by a consumer engaged in a personal...-commercial use . AVC Patent Portfolio License This product is granted or shall be obtained from a video provider licensed to (i) encode video in compliance with your Nikon product are trademarks of Apple Inc., registered in the U.S.
User Manual
Page 9
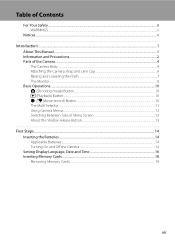
Table of Contents For Your Safety...ii WARNINGS...ii Notices ...v Introduction ...1 About This Manual ...1 Information and Precautions...2 Parts of the Camera...4 The Camera Body ...4 Attaching the Camera Strap and Lens Cap 6 Raising and Lowering the Flash...7 The Monitor...8 Basic ...
Table of Contents For Your Safety...ii WARNINGS...ii Notices ...v Introduction ...1 About This Manual ...1 Information and Precautions...2 Parts of the Camera...4 The Camera Body ...4 Attaching the Camera Strap and Lens Cap 6 Raising and Lowering the Flash...7 The Monitor...8 Basic ...
User Manual
Page 13
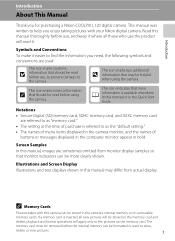
...the Quick Start Guide. C Memory Cards Pictures taken with your Nikon digital camera. This icon marks tips, additional D information that may differ from monitor display samples so that more clearly shown. Read this manual or in the camera's internal memory or on the memory card... and delete, playback and format operations will read before use , and keep it easier to the camera. The memory card must be removed before use , to prevent damage to find the information you for purchasing a Nikon COOLPIX L120...
...the Quick Start Guide. C Memory Cards Pictures taken with your Nikon digital camera. This icon marks tips, additional D information that may differ from monitor display samples so that more clearly shown. Read this manual or in the camera's internal memory or on the memory card... and delete, playback and format operations will read before use , and keep it easier to the camera. The memory card must be removed before use , to prevent damage to find the information you for purchasing a Nikon COOLPIX L120...
User Manual
Page 14
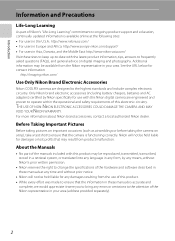
... be held liable for contact information: http://imaging.nikon.com/ Use Only Nikon Brand Electronic Accessories Nikon COOLPIX cameras are engineered and proven to operate within the operational and safety requirements of this product. • While every effort was made to ensure that the information in these manuals is functioning correctly. Introduction Information and Precautions...
... be held liable for contact information: http://imaging.nikon.com/ Use Only Nikon Brand Electronic Accessories Nikon COOLPIX cameras are engineered and proven to operate within the operational and safety requirements of this product. • While every effort was made to ensure that the information in these manuals is functioning correctly. Introduction Information and Precautions...
User Manual
Page 59
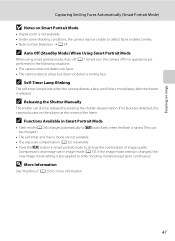
... the d button in smart portrait mode to change the combination of the frame. D More Information See "Autofocus" (A 25) for more information. 47 C Releasing the Shutter Manually The shutter can be changed , the new image mode setting is also applied to other shooting modes (except sport continuous). C Self-Timer Lamp Blinking The...
... the d button in smart portrait mode to change the combination of the frame. D More Information See "Autofocus" (A 25) for more information. 47 C Releasing the Shutter Manually The shutter can be changed , the new image mode setting is also applied to other shooting modes (except sport continuous). C Self-Timer Lamp Blinking The...
User Manual
Page 67
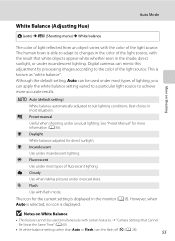
.... e Fluorescent Use under overcast skies. However, when Auto is selected, no icon is known as "white balance". b Preset manual Useful when shooting under incandescent lighting. B Notes on Shooting The color of lighting, you can apply the white balance setting suited ... white whether seen in the monitor (A 8). The human brain is displayed in the shade, direct sunlight, or under most situations. See "Preset Manual" for more accurate results. d Incandescent Use under unusual lighting. The icon for direct sunlight. Auto Mode White Balance (Adjusting Hue) A (auto...
.... e Fluorescent Use under overcast skies. However, when Auto is selected, no icon is known as "white balance". b Preset manual Useful when shooting under incandescent lighting. B Notes on Shooting The color of lighting, you can apply the white balance setting suited ... white whether seen in the monitor (A 8). The human brain is displayed in the shade, direct sunlight, or under most situations. See "Preset Manual" for more accurate results. d Incandescent Use under unusual lighting. The icon for direct sunlight. Auto Mode White Balance (Adjusting Hue) A (auto...
User Manual
Page 68
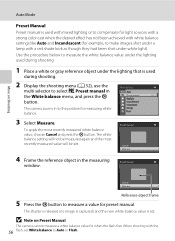
...lighting used during shooting. 2 Display the shooting menu (A 52), use the multi selector to select b Preset manual in to measure a value for preset manual. Preset manual Cancel Measure Reference object frame 5 Press the k button to the position for example, to make images shot under... lighting that is set . Preset manual Cancel Measure 4 Frame the reference object in the measuring window. White balance Auto Preset manual Daylight Incandescent Fluorescent Cloudy Flash 3 Select Measure. B Note on Shooting Auto Mode Preset Manual Preset manual is used with mixed lighting or...
...lighting used during shooting. 2 Display the shooting menu (A 52), use the multi selector to select b Preset manual in to measure a value for preset manual. Preset manual Cancel Measure Reference object frame 5 Press the k button to the position for example, to make images shot under... lighting that is set . Preset manual Cancel Measure 4 Frame the reference object in the measuring window. White balance Auto Preset manual Daylight Incandescent Fluorescent Cloudy Flash 3 Select Measure. B Note on Shooting Auto Mode Preset Manual Preset manual is used with mixed lighting or...
User Manual
Page 106
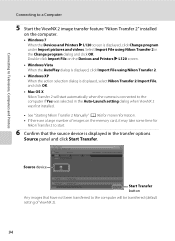
...Launch setting dialog when ViewNX 2 was first installed. • See "Starting Nikon Transfer 2 Manually" (A 96) for more information. • If there are a large number of ViewNX 2). 94 Select Import File using Nikon Transfer 2. • Windows XP When the action selection dialog is displayed, ...select Nikon Transfer 2 Import File, and click OK. • Mac OS X Nikon Transfer 2 will be transferred (default setting of images on the computer. • Windows 7 When the Devices and Printers K L120 screen is displayed in the transfer options Source...
...Launch setting dialog when ViewNX 2 was first installed. • See "Starting Nikon Transfer 2 Manually" (A 96) for more information. • If there are a large number of ViewNX 2). 94 Select Import File using Nikon Transfer 2. • Windows XP When the action selection dialog is displayed, ...select Nikon Transfer 2 Import File, and click OK. • Mac OS X Nikon Transfer 2 will be transferred (default setting of images on the computer. • Windows 7 When the Devices and Printers K L120 screen is displayed in the transfer options Source...

User Manual
Page 108
...8226; Make sure that order, and then double-click the ViewNX 2 icon. D Starting ViewNX 2 Manually Windows Choose Start menu > All Programs > ViewNX 2 > ViewNX 2. D For More Information on Using ViewNX 2 and Nikon Transfer 2 For more information. 96 Connecting to Televisions, Computers and Printers Connecting to create a single panorama...C Transferring Images Using a Computer's Card Slot or a Commercially- Double-clicking the ViewNX 2 shortcut icon on a computer using the camera (A 74). D Starting Nikon Transfer 2 Manually To start Nikon Transfer 2, first start Panorama Maker 5.
...8226; Make sure that order, and then double-click the ViewNX 2 icon. D Starting ViewNX 2 Manually Windows Choose Start menu > All Programs > ViewNX 2 > ViewNX 2. D For More Information on Using ViewNX 2 and Nikon Transfer 2 For more information. 96 Connecting to Televisions, Computers and Printers Connecting to create a single panorama...C Transferring Images Using a Computer's Card Slot or a Commercially- Double-clicking the ViewNX 2 shortcut icon on a computer using the camera (A 74). D Starting Nikon Transfer 2 Manually To start Nikon Transfer 2, first start Panorama Maker 5.

User Manual
Page 121
... Setup 109 For time zones not listed below . UTC +/- Setup Menu D Time Zones The camera supports the time zones listed below , set the camera's clock manually to local time using Date and time in the setup menu. Time zone -11 Midway, Samoa -10 Hawaii, Tahiti -9 Alaska, Anchorage -8 PST (PDT): Los Angeles...
... Setup 109 For time zones not listed below . UTC +/- Setup Menu D Time Zones The camera supports the time zones listed below , set the camera's clock manually to local time using Date and time in the setup menu. Time zone -11 Midway, Samoa -10 Hawaii, Tahiti -9 Alaska, Anchorage -8 PST (PDT): Los Angeles...

User Manual
Page 135
Shooting menu: Preset manual in the White balance menu (A 56) Setup menu: Images registered for Welcome screen (A 105), Time zone and date (A 106), Language (A 118), Video mode (A 119), and ... (A 20), choose the type that matches the batteries currently in the menus will continue from the memory. Alkaline (default setting) COOLPIX (Ni-MH) Lithium LR6/L40 (AA-size) alkaline batteries Nikon EN-MH2 rechargeable Ni-MH (nickel metal hydride) batteries FR6/L91 (AA-size) lithium batteries Basic Camera Setup 123 Numbering will...
Shooting menu: Preset manual in the White balance menu (A 56) Setup menu: Images registered for Welcome screen (A 105), Time zone and date (A 106), Language (A 118), Video mode (A 119), and ... (A 20), choose the type that matches the batteries currently in the menus will continue from the memory. Alkaline (default setting) COOLPIX (Ni-MH) Lithium LR6/L40 (AA-size) alkaline batteries Nikon EN-MH2 rechargeable Ni-MH (nickel metal hydride) batteries FR6/L91 (AA-size) lithium batteries Basic Camera Setup 123 Numbering will...
User Manual
Page 155
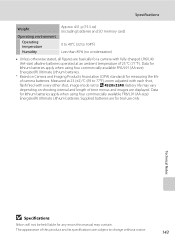
...fully-charged LR6/L40 (AA-size) alkaline batteries operated at 23 (±2) °C (69 to 77°F); Technical Notes B Specifications Nikon will not be held liable for any errors this product and its specifications are subject to R 4320×3240. Measured at an ambient temperature...L91 (AA-size) Energizer(R) Ultimate Lithium batteries. * Based on Camera and Imaging Products Association (CIPA) standards for measuring the life of this manual may vary depending on shooting interval and length of 25 °C (77 °F). Battery life may contain. The appearance of camera batteries....
...fully-charged LR6/L40 (AA-size) alkaline batteries operated at 23 (±2) °C (69 to 77°F); Technical Notes B Specifications Nikon will not be held liable for any errors this product and its specifications are subject to R 4320×3240. Measured at an ambient temperature...L91 (AA-size) Energizer(R) Ultimate Lithium batteries. * Based on Camera and Imaging Products Association (CIPA) standards for measuring the life of this manual may vary depending on shooting interval and length of 25 °C (77 °F). Battery life may contain. The appearance of camera batteries....
User Manual
Page 159
... Playback button 5, 10 Playback menu 66 Playback zoom 64 Portrait b 36 Power 14, 16, 20 Power switch 4, 14, 20 Power-on lamp 4, 14, 20 Preset manual 56 Print 99, 100 Print date 16, 106, 112 Print order 67 Print order (Date) 68 Printer 97 Protect 71 R Recording movies button 5, 10 Red...
... Playback button 5, 10 Playback menu 66 Playback zoom 64 Portrait b 36 Power 14, 16, 20 Power switch 4, 14, 20 Power-on lamp 4, 14, 20 Preset manual 56 Print 99, 100 Print date 16, 106, 112 Print order 67 Print order (Date) 68 Printer 97 Protect 71 R Recording movies button 5, 10 Red...

User Manual
Page 164
No reproduction in any form of this manual, in whole or in part (except for brief quotation in critical articles or reviews), may be made without written authorization from NIKON CORPORATION. CT1B03(11) 6MM02811-03
No reproduction in any form of this manual, in whole or in part (except for brief quotation in critical articles or reviews), may be made without written authorization from NIKON CORPORATION. CT1B03(11) 6MM02811-03


