User Manual
Page 3
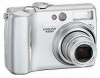
...listed in this section are indicated by a qualified technician. Do not place strap around the neck of an infant or child Placing the camera strap around the neck of an infant or child could result in the event of a fall or other strong light source through the ...viewfinder could cause permanent visual impairment. After removing the battery, take the product to a Nikon-authorized service representative for inspection. Should the product break open as this equipment. WARNINGS Do not look at the sun through the...
...listed in this section are indicated by a qualified technician. Do not place strap around the neck of an infant or child Placing the camera strap around the neck of an infant or child could result in the event of a fall or other strong light source through the ...viewfinder could cause permanent visual impairment. After removing the battery, take the product to a Nikon-authorized service representative for inspection. Should the product break open as this equipment. WARNINGS Do not look at the sun through the...

User Manual
Page 4
...Removing memory cards Memory cards may become hot during use only the cables provided or sold by Nikon for an extended period, the battery may become hot. Before removing the battery, turn the product off and allow the battery to cool. • Discontinue use , or when the product is unplugged. • Use...operating the flash Using the flash close to your subject's eyes could cause hearing loss or damage the equipment. • Before replacing the battery, turn the camera off and make sure the power-on lamp has gone out. If you notice any change in or expose to water. • Do...
...Removing memory cards Memory cards may become hot during use only the cables provided or sold by Nikon for an extended period, the battery may become hot. Before removing the battery, turn the product off and allow the battery to cool. • Discontinue use , or when the product is unplugged. • Use...operating the flash Using the flash close to your subject's eyes could cause hearing loss or damage the equipment. • Before replacing the battery, turn the camera off and make sure the power-on lamp has gone out. If you notice any change in or expose to water. • Do...
User Manual
Page 7
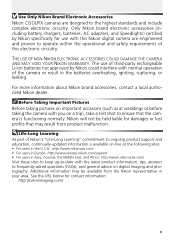
... Nikon Brand Electronic Accessories Nikon COOLPIX cameras are engineered and proven to operate within the operational and safety requirements of this electronic circuitry. Only Nikon brand electronic accessories (including battery chargers, batteries, AC adapters, and Speedlights) certified by Nikon could interfere with you on digital imaging and photography. Before Taking Important Pictures Before taking the camera with normal operation of Nikon...
... Nikon Brand Electronic Accessories Nikon COOLPIX cameras are engineered and proven to operate within the operational and safety requirements of this electronic circuitry. Only Nikon brand electronic accessories (including battery chargers, batteries, AC adapters, and Speedlights) certified by Nikon could interfere with you on digital imaging and photography. Before Taking Important Pictures Before taking the camera with normal operation of Nikon...

User Manual
Page 8
... Safety ...i Notices ...iii Table of Contents ...vi Introduction...1 Before You Begin 2 Parts of the Camera ...2 The Monitor...4 The Mode Dial ...6 Navigating the Menus...7 The Shutter-Release Button 7 First Steps 8 Inserting Batteries ...8 Inserting Memory Cards...10 Checking the Battery Level 12 Basic Setup ...14 Basic Photography 17 Step 1-Select Mode 17 Step 2-Frame the...
... Safety ...i Notices ...iii Table of Contents ...vi Introduction...1 Before You Begin 2 Parts of the Camera ...2 The Monitor...4 The Mode Dial ...6 Navigating the Menus...7 The Shutter-Release Button 7 First Steps 8 Inserting Batteries ...8 Inserting Memory Cards...10 Checking the Battery Level 12 Basic Setup ...14 Basic Photography 17 Step 1-Select Mode 17 Step 2-Frame the...

User Manual
Page 13
Before You Begin Zoom ( / ) buttons ( 19) Green (AF) lamp ( 21) Multi selector 7) Red ( ) lamp ( 21) (center)/ (transfer) button ( 7, 60) Viewfinder ( 19) Speaker Monitor ( 4, 5) Batterychamber cover ( 8) Interface connector cover (delete) button ( 25) (play) button Tripod socket ( 41, 44) MENU button ( 74, 96) USB ( 62)/ Audio/Video (A/V) out ( 59) connector Power connector cover for AC adapter kit ( 124) Battery latch ( 8) Interface connector cover Battery-chamber cover ( 8) 3
Before You Begin Zoom ( / ) buttons ( 19) Green (AF) lamp ( 21) Multi selector 7) Red ( ) lamp ( 21) (center)/ (transfer) button ( 7, 60) Viewfinder ( 19) Speaker Monitor ( 4, 5) Batterychamber cover ( 8) Interface connector cover (delete) button ( 25) (play) button Tripod socket ( 41, 44) MENU button ( 74, 96) USB ( 62)/ Audio/Video (A/V) out ( 59) connector Power connector cover for AC adapter kit ( 124) Battery latch ( 8) Interface connector cover Battery-chamber cover ( 8) 3

User Manual
Page 14
..., 27, 49 2 Zoom indicator1 19 3 Focus indicator2 21 4 Macro close-up mode 46 5 Battery level indicator3) . . . . . 12 6 Internal memory/memory card indicator 17 7 Camera shake icon4) . . 43, 129 8 "Date not set . 4 tures may be blurred. 5) Blinks when the camera clock has not been set. 6) Appears when the new city time zone has been... adjustment 85 26 Image sharpening 86 1) Appears when the zoom buttons are pressed. 2) Appears when the shutter-release button is pressed halfway. 3) Appears when the battery is running low. 4) Appears at slow shutter speeds to warn that pic-
..., 27, 49 2 Zoom indicator1 19 3 Focus indicator2 21 4 Macro close-up mode 46 5 Battery level indicator3) . . . . . 12 6 Internal memory/memory card indicator 17 7 Camera shake icon4) . . 43, 129 8 "Date not set . 4 tures may be blurred. 5) Blinks when the camera clock has not been set. 6) Appears when the new city time zone has been... adjustment 85 26 Image sharpening 86 1) Appears when the zoom buttons are pressed. 2) Appears when the shutter-release button is pressed halfway. 3) Appears when the battery is running low. 4) Appears at slow shutter speeds to warn that pic-

User Manual
Page 15
If the battery level indicator appears, the monitor will turn off the monitor, set Monitor settings to Hide info. To turn off . To...17 16 15 14 13 12 11 9 8 START 10 1 2 3 4 5 6 7 1 Current folder 26 2 File number and type 26 3 Internal memory/memory card indicator 17 4 Battery level indicator* . . . . . 12 5 Volume indicator 118 6 Voice memo recording guide . . 57 7 Voice memo playback guide. . . 57 8 Current frame number/total number ... icon 65 16 Transfer icon 102 17 Time of recording 14 18 Date of recording 14 * Appears when the battery is charging ( 12, 22). 5
If the battery level indicator appears, the monitor will turn off the monitor, set Monitor settings to Hide info. To turn off . To...17 16 15 14 13 12 11 9 8 START 10 1 2 3 4 5 6 7 1 Current folder 26 2 File number and type 26 3 Internal memory/memory card indicator 17 4 Battery level indicator* . . . . . 12 5 Volume indicator 118 6 Voice memo recording guide . . 57 7 Voice memo playback guide. . . 57 8 Current frame number/total number ... icon 65 16 Transfer icon 102 17 Time of recording 14 18 Date of recording 14 * Appears when the battery is charging ( 12, 22). 5
User Manual
Page 18
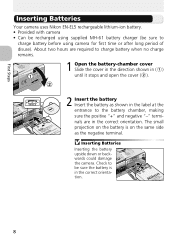
... negative "-" terminals are in the correct orientation. First Steps First Steps Inserting Batteries Your camera uses Nikon EN-EL5 rechargeable lithium-ion battery. • Provided with camera • Can be recharged using supplied MH-61 battery charger (be sure to be sure the battery is on the same side as shown in the label at the entrance...
... negative "-" terminals are in the correct orientation. First Steps First Steps Inserting Batteries Your camera uses Nikon EN-EL5 rechargeable lithium-ion battery. • Provided with camera • Can be recharged using supplied MH-61 battery charger (be sure to be sure the battery is on the same side as shown in the label at the entrance...

User Manual
Page 19
...hot during use. The latch will close when the battery is closed firmly. First Steps Battery latch 3 Close the battery-chamber cover Close the cover ( ) and slide it latches ( ). Slide the battery latch in the direction indicated to the camera. Failure to observe this manual, together with any ...circumstances, use an optional EH-62A AC adapter kit. tion when removing the battery. The orange battery latch is pushed aside as the battery is inserted. Replacing Batteries Turn the camera off and make or model of this precaution could result in overheating or in until it...
...hot during use. The latch will close when the battery is closed firmly. First Steps Battery latch 3 Close the battery-chamber cover Close the cover ( ) and slide it latches ( ). Slide the battery latch in the direction indicated to the camera. Failure to observe this manual, together with any ...circumstances, use an optional EH-62A AC adapter kit. tion when removing the battery. The orange battery latch is pushed aside as the battery is inserted. Replacing Batteries Turn the camera off and make or model of this precaution could result in overheating or in until it...

User Manual
Page 22
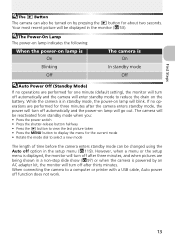
...AC adapter kit (optional) until the power- Charge or replace with a fully charged battery. BATTERY EXHAUSTED" warning is displayed. Turning the Camera Off To turn the camera off while Speedlight recharges. BATTERY EXHAUSTED Battery exhausted. If flash fires, monitor turns off when the power-on lamp has gone out...desired language and press . First Steps Checking the Battery Level 1 Turn the camera on • Press the power switch. • The power-on lamp lights when the camera is on. 2 Check the battery level in the monitor When the camera is turned on for the first time, a ...
...AC adapter kit (optional) until the power- Charge or replace with a fully charged battery. BATTERY EXHAUSTED" warning is displayed. Turning the Camera Off To turn the camera off while Speedlight recharges. BATTERY EXHAUSTED Battery exhausted. If flash fires, monitor turns off when the power-on lamp has gone out...desired language and press . First Steps Checking the Battery Level 1 Turn the camera on • Press the power switch. • The power-on lamp lights when the camera is on. 2 Check the battery level in the monitor When the camera is turned on for the first time, a ...
User Manual
Page 23
...for the current mode • Rotate the mode dial to select a new mode The length of time before the camera enters standby mode can also be turned on the battery. While the camera is powered by pressing the button for one minute (default setting), the monitor will turn off after three minutes, and... when pictures are being shown in a non-stop slide show ( 97) or when the camera is in standby mode, the power-...
...for the current mode • Rotate the mode dial to select a new mode The length of time before the camera enters standby mode can also be turned on the battery. While the camera is powered by pressing the button for one minute (default setting), the monitor will turn off after three minutes, and... when pictures are being shown in a non-stop slide show ( 97) or when the camera is in standby mode, the power-...

User Manual
Page 26
... as the computer. Setting the Clock from Provided Software (Windows XP/Mac OS X Only) If the camera is less accurate than most watches or household clocks. The Clock Battery When the main battery is installed or the camera is in shooting mode and all pictures will charge in about ten hours. When fully charged... you exit without setting time and date, the ("date not set") icon will flash in the monitor when the camera is powered by an EH-62A AC adapter kit (optional), the clock battery will have time stamp of back-up power. See Date ( 112) in the setup menu, provided software can be...
... as the computer. Setting the Clock from Provided Software (Windows XP/Mac OS X Only) If the camera is less accurate than most watches or household clocks. The Clock Battery When the main battery is installed or the camera is in shooting mode and all pictures will charge in about ten hours. When fully charged... you exit without setting time and date, the ("date not set") icon will flash in the monitor when the camera is powered by an EH-62A AC adapter kit (optional), the clock battery will have time stamp of back-up power. See Date ( 112) in the setup menu, provided software can be...
User Manual
Page 32
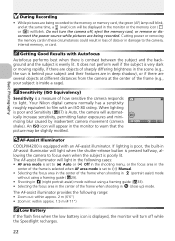
...with Autofocus Autofocus performs best when there is contrast between the subject and the background and the subject is inside a cage). Your Nikon digital camera normally has a sensitivity roughly equivalent to warn that the picture may be slightly mottled. An ISO icon will appear in the ...automatically increase sensitivity, permitting faster exposures and minimizing blur caused by inadvertent camera movement (camera shake). If lighting is poor, the built-in : within approx. 1.5 m (4'11") Low Battery If the flash fires when the low battery icon is set to Auto or Off in the shooting menu, ...
...with Autofocus Autofocus performs best when there is contrast between the subject and the background and the subject is inside a cage). Your Nikon digital camera normally has a sensitivity roughly equivalent to warn that the picture may be slightly mottled. An ISO icon will appear in the ...automatically increase sensitivity, permitting faster exposures and minimizing blur caused by inadvertent camera movement (camera shake). If lighting is poor, the built-in : within approx. 1.5 m (4'11") Low Battery If the flash fires when the low battery icon is set to Auto or Off in the shooting menu, ...

User Manual
Page 42
...) mode, Auto-focus mode is locked to and press the MENU button ( 28). The camera focuses continuously, until AF/AE lock is set by first shot in each series. • When the ( ) battery level indicator is displayed in the monitor, consecutive shooting speed will be slow. Rotate the mode... dial to Continuous AF ( 94) and focus area is locked in the center of the frame. Number of shots that capture moving objects. Camera arranges pictures in four rows ...
...) mode, Auto-focus mode is locked to and press the MENU button ( 28). The camera focuses continuously, until AF/AE lock is set by first shot in each series. • When the ( ) battery level indicator is displayed in the monitor, consecutive shooting speed will be slow. Rotate the mode... dial to Continuous AF ( 94) and focus area is locked in the center of the frame. Number of shots that capture moving objects. Camera arranges pictures in four rows ...

User Manual
Page 78
Rotate the mode dial to a printer that supports PictBridge, pictures can be printed directly from the camera using PictBridge. The setup menu will be sure the battery is fully charged. Highlight PTP and press . See the printer manual for direct printing that the printer supports PictBridge. • Before starting direct printing, check ...
Rotate the mode dial to a printer that supports PictBridge, pictures can be printed directly from the camera using PictBridge. The setup menu will be sure the battery is fully charged. Highlight PTP and press . See the printer manual for direct printing that the printer supports PictBridge. • Before starting direct printing, check ...

User Manual
Page 92
... shot buffer or Multi-shot 16) can be recorded to the memory or memory card. Camera takes 11 pictures when Image quality is NORMAL and Image size is (default setting) pressed. When the ( ) battery level indicator is displayed in the monitor, consecutive shooting speed will be slow. 5 shot buffer...release button is pressed and held , pictures can be recorded at rate of about 3.5 frames per sec- When the ( ) battery level indicator is pressed down, camera takes sixteen consecutive shots at rate of up to about 1.3 frames per second. ond. Only the last five images taken during...
... shot buffer or Multi-shot 16) can be recorded to the memory or memory card. Camera takes 11 pictures when Image quality is NORMAL and Image size is (default setting) pressed. When the ( ) battery level indicator is displayed in the monitor, consecutive shooting speed will be slow. 5 shot buffer...release button is pressed and held , pictures can be recorded at rate of about 3.5 frames per sec- When the ( ) battery level indicator is pressed down, camera takes sixteen consecutive shots at rate of up to about 1.3 frames per second. ond. Only the last five images taken during...

User Manual
Page 128
... the mode dial to to select. Adjust volume of the memory or a memory card status. • An error occurs. Adjust volume of sound played when camera is low. • You can not take pictures because of shutter sound. The Setup Menu 118 tings ( 109), and then press . The options in movie...: • Rotating the mode dial to the other mode. • Pressing to displayed shooting or playback mode. • Pressing to select option or menu. • Battery is turned on.
... the mode dial to to select. Adjust volume of the memory or a memory card status. • An error occurs. Adjust volume of sound played when camera is low. • You can not take pictures because of shutter sound. The Setup Menu 118 tings ( 109), and then press . The options in movie...: • Rotating the mode dial to the other mode. • Pressing to displayed shooting or playback mode. • Pressing to select option or menu. • Battery is turned on.

User Manual
Page 129
... (30m), and press . ory or Format card ( 109), and then press . shown above will be formatted for a preset length of Auto off To save battery power, the camera will be formatted. Auto Off Rotate the mode dial to select Format mem- For more details of time. Format Memory/Card Rotate the mode...
... (30m), and press . ory or Format card ( 109), and then press . shown above will be formatted for a preset length of Auto off To save battery power, the camera will be formatted. Auto Off Rotate the mode dial to select Format mem- For more details of time. Format Memory/Card Rotate the mode...

User Manual
Page 130
... and press . For best performance, format the memory or memory cards regularly. played in Formatting • Format the memory or the memory card using the camera. rean), and then press . 120 The Setup Menu Before formatting, be sure to a computer ( 60). • The memory or memory card performance ... and any valued pictures to transfer any other data that may occur when writing or reading data. • Do not turn the camera off, or remove the battery or memory card, while the "FORMATTING" message is in the memory or on the memory card. If the memory or the memory...
... and press . For best performance, format the memory or memory cards regularly. played in Formatting • Format the memory or the memory card using the camera. rean), and then press . 120 The Setup Menu Before formatting, be sure to a computer ( 60). • The memory or memory card performance ... and any valued pictures to transfer any other data that may occur when writing or reading data. • Do not turn the camera off, or remove the battery or memory card, while the "FORMATTING" message is in the memory or on the memory card. If the memory or the memory...
User Manual
Page 133
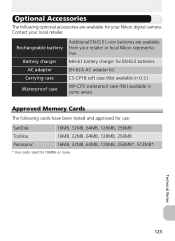
Contact your Nikon digital camera. MH-61 battery charger for EN-EL5 batteries EH-62A AC adapter kit CS-CP18 soft case (Not available in U.S.) WP-CP2 waterproof case (Not available in some areas) Approved Memory Cards The following optional accessories are available from your retailer or local Nikon representative. Technical Notes 123 Technical Notes Optional Accessories...
Contact your Nikon digital camera. MH-61 battery charger for EN-EL5 batteries EH-62A AC adapter kit CS-CP18 soft case (Not available in U.S.) WP-CP2 waterproof case (Not available in some areas) Approved Memory Cards The following optional accessories are available from your retailer or local Nikon representative. Technical Notes 123 Technical Notes Optional Accessories...


