User Manual
Page 3
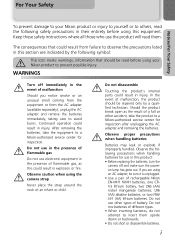
... for inspection. Should the product break open as this section are using the camera strap Never place the strap around the neck of battery. Observe the following precautions when handling batteries for use the product will read before using your Nikon product or injury to yourself or to others, read the following safety precautions...
... for inspection. Should the product break open as this section are using the camera strap Never place the strap around the neck of battery. Observe the following precautions when handling batteries for use the product will read before using your Nikon product or injury to yourself or to others, read the following safety precautions...

User Manual
Page 4
... input and output jacks, use only the cables provided or sold by Nikon for an extended period, the batteries may become hot. Keep out of reach of children Particular care should be taken to prevent liquid crystal from putting the batteries or other small parts into their mouths. Playing CD-ROMs on... are prone to your subject's eyes could cause hearing loss or damage the equipment. To avoid damage to remove the batteries when no less than one meter (39″) from the camera. Removing memory cards Memory cards may become hot during use , or when the product is not in use, at ...
... input and output jacks, use only the cables provided or sold by Nikon for an extended period, the batteries may become hot. Keep out of reach of children Particular care should be taken to prevent liquid crystal from putting the batteries or other small parts into their mouths. Playing CD-ROMs on... are prone to your subject's eyes could cause hearing loss or damage the equipment. To avoid damage to remove the batteries when no less than one meter (39″) from the camera. Removing memory cards Memory cards may become hot during use , or when the product is not in use, at ...

User Manual
Page 5
... to strong shocks or vibration. Notices/For Your Safety Cautions To ensure continued enjoyment of your Nikon product, observe the following precautions when storing or using or storing the camera. Turn the product off before exposing it to high levels of data or in temperature, such... in a carrying case or a plastic bag before removing or disconnecting the power source Do not unplug the product or remove the batteries while the product is connected. Forcibly cutting power in these circumstances could result in loss of moisture. Intense light may malfunction if subjected...
... to strong shocks or vibration. Notices/For Your Safety Cautions To ensure continued enjoyment of your Nikon product, observe the following precautions when storing or using or storing the camera. Turn the product off before exposing it to high levels of data or in temperature, such... in a carrying case or a plastic bag before removing or disconnecting the power source Do not unplug the product or remove the batteries while the product is connected. Forcibly cutting power in these circumstances could result in loss of moisture. Intense light may malfunction if subjected...

User Manual
Page 8
... the camera with your local authorized Nikon dealer. Use Only Nikon Brand Electronic Accessories Your Nikon COOLPIX camera is functioning normally. Only Nikon brand electronic accessories (including battery chargers, batteries, and AC adapters) certified by Nikon specifically for damages or lost profits that the camera is designed... circuitry. vi Nikon will not be held liable for use with you on a trip), take a test shot to ensure that may result from product malfunction. For more information about Nikon brand accessories, contact your Nikon digital camera are engineered and...
... the camera with your local authorized Nikon dealer. Use Only Nikon Brand Electronic Accessories Your Nikon COOLPIX camera is functioning normally. Only Nikon brand electronic accessories (including battery chargers, batteries, and AC adapters) certified by Nikon specifically for damages or lost profits that the camera is designed... circuitry. vi Nikon will not be held liable for use with you on a trip), take a test shot to ensure that may result from product malfunction. For more information about Nikon brand accessories, contact your Nikon digital camera are engineered and...

User Manual
Page 9
...up Mode 27 Assist and Scene Modes 28 Framing Assist 29 e Scene Mode 34 More on Playback 40 Viewing Pictures on the Camera 40 Cropping Pictures 42 Voice Memos: Recording and Playback (E3200 only 43 Viewing Pictures on TV 44 Viewing Pictures on a Computer... For Your Safety i Cautions ...iii Notices ...iv Before You Begin 1 Introduction 1 Parts of the Camera 2 The Monitor 4 The Mode Dial 6 Navigating the Menus 7 The Shutter-Release Button 7 First Steps 8 Inserting Batteries 8 Inserting Memory Cards 10 Checking the Battery Level 12 Basic Setup 14 Basic Photography 16 Step 1 -
...up Mode 27 Assist and Scene Modes 28 Framing Assist 29 e Scene Mode 34 More on Playback 40 Viewing Pictures on the Camera 40 Cropping Pictures 42 Voice Memos: Recording and Playback (E3200 only 43 Viewing Pictures on TV 44 Viewing Pictures on a Computer... For Your Safety i Cautions ...iii Notices ...iv Before You Begin 1 Introduction 1 Parts of the Camera 2 The Monitor 4 The Mode Dial 6 Navigating the Menus 7 The Shutter-Release Button 7 First Steps 8 Inserting Batteries 8 Inserting Memory Cards 10 Checking the Battery Level 12 Basic Setup 14 Basic Photography 16 Step 1 -

User Manual
Page 10
... Imprint 87 Brightness ...89 Sound Settings 90 Blur Warning 91 Auto Off...92 Format memory/card 93 Language ...94 Video Mode 94 Reset All ...94 Battery Type 96 Firmware Version 96 Technical Notes 97 Optional Accessories 97 Caring for Your Camera 98 Error Messages 100 Troubleshooting 103 Specifications 106 Index ...108 viii
... Imprint 87 Brightness ...89 Sound Settings 90 Blur Warning 91 Auto Off...92 Format memory/card 93 Language ...94 Video Mode 94 Reset All ...94 Battery Type 96 Firmware Version 96 Technical Notes 97 Optional Accessories 97 Caring for Your Camera 98 Error Messages 100 Troubleshooting 103 Specifications 106 Index ...108 viii

User Manual
Page 13
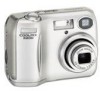
Before You Begin Parts of the Camera Red (!) lamp (Q 20) Green (AF) lamp (Q 20) Viewfinder (Q 18) Mode dial (Q 6) Zoom (l/O ) buttons (Q 18) MENU button (Q 61) Multi selector (!/Y/&/V) (Q 7) u(delete) button (Q 22, 23) x(play) button (Q 22, 23) Monitor (Q 5, 18) Interface connector cover (Q 44, 46) Tripod socket (Q 25, 26) Battery-chamber cover (Q 8) Battery-chamber cover latch (Q 8) Interface connector cover USB connector (Q 46) Audio/video (AV) out connector (E3200 only) (Q 44)/ Video output connector (E2200 only) (Q 44) 3
Before You Begin Parts of the Camera Red (!) lamp (Q 20) Green (AF) lamp (Q 20) Viewfinder (Q 18) Mode dial (Q 6) Zoom (l/O ) buttons (Q 18) MENU button (Q 61) Multi selector (!/Y/&/V) (Q 7) u(delete) button (Q 22, 23) x(play) button (Q 22, 23) Monitor (Q 5, 18) Interface connector cover (Q 44, 46) Tripod socket (Q 25, 26) Battery-chamber cover (Q 8) Battery-chamber cover latch (Q 8) Interface connector cover USB connector (Q 46) Audio/video (AV) out connector (E3200 only) (Q 44)/ Video output connector (E2200 only) (Q 44) 3

User Manual
Page 14
...(BSS 69 20 White balance 65 21 Color options 70 22 Macro close-up mode 27 5 Appears when camera clock has not been set " icon5 14 10 Self-timer indicator 26 11 Date imprint indicator 87 1... Appears when taking pictures with Panorama Assist 2 Displayed when zoom buttons are pressed. 3 Appears when batteries are running low. Before You Begin The Monitor Shooting 2 AE-L 1 34 56 22 19 21 ... 38 3 Focus indicator 20 4 Zoom indicator2 18 5 Battery level indicator3 12 6 Internal memory/memory card indicator 16 7 Camera shake icon4 25 8 Time zone 84 9 "Date not set . 6 Indicates that...
...(BSS 69 20 White balance 65 21 Color options 70 22 Macro close-up mode 27 5 Appears when camera clock has not been set " icon5 14 10 Self-timer indicator 26 11 Date imprint indicator 87 1... Appears when taking pictures with Panorama Assist 2 Displayed when zoom buttons are pressed. 3 Appears when batteries are running low. Before You Begin The Monitor Shooting 2 AE-L 1 34 56 22 19 21 ... 38 3 Focus indicator 20 4 Zoom indicator2 18 5 Battery level indicator3 12 6 Internal memory/memory card indicator 16 7 Camera shake icon4 25 8 Time zone 84 9 "Date not set . 6 Indicates that...

User Manual
Page 15
....05 1 16 12:00 2 3 15 12 14 13 11 10 4 5 6 7 8 10 8 9 1 Current folder 23 2 File number and type 23 3 Internal memory/memory card indicator 16 4 Battery level indicator1 12 5 Volume indicator2 60 6 Voice memo recording guide2 . . 43 7 Voice memo playback guide2 . . . 43 8 Current frame number/total number of frames/length of... icon 75 14 Print-order icon 48 15 Transfer icon 76 16 Time of recording 14-15 17 Date of movie . . 23, 60 1 Appears when batteries are running low. 2 E3200 only.
....05 1 16 12:00 2 3 15 12 14 13 11 10 4 5 6 7 8 10 8 9 1 Current folder 23 2 File number and type 23 3 Internal memory/memory card indicator 16 4 Battery level indicator1 12 5 Volume indicator2 60 6 Voice memo recording guide2 . . 43 7 Voice memo playback guide2 . . . 43 8 Current frame number/total number of frames/length of... icon 75 14 Print-order icon 48 15 Transfer icon 76 16 Time of recording 14-15 17 Date of movie . . 23, 60 1 Appears when batteries are running low. 2 E3200 only.

User Manual
Page 18
... Inserting Batteries Your camera uses: • LR6 (AA) alkaline batteries (×2), or • Nikon EN-MH1 rechargeable nickel-metal hydride (NiMH) batteries (×2), or • ZR6 (AA) nickel manganese batteries (×2), or • FR6/L91 (AA) lithium batteries (×2), or • CR-V3 lithium batteries (×1) 1 2 1 Open the battery-chamber cover • Pressing the battery-chamber latch (g;c), slide the battery-chamber...
... Inserting Batteries Your camera uses: • LR6 (AA) alkaline batteries (×2), or • Nikon EN-MH1 rechargeable nickel-metal hydride (NiMH) batteries (×2), or • ZR6 (AA) nickel manganese batteries (×2), or • FR6/L91 (AA) lithium batteries (×2), or • CR-V3 lithium batteries (×1) 1 2 1 Open the battery-chamber cover • Pressing the battery-chamber latch (g;c), slide the battery-chamber...

User Manual
Page 19
... a back-up power source. 9 First Steps For more information on the manufacturer. Alternative Power Sources • To power the camera continuously for longer periods after the batteries have faulty insulation. • Batteries with a flat negative terminal. Do not, under any circumstances, use an EH-62B AC adapter (Q 97). Charge each pair of AC...
... a back-up power source. 9 First Steps For more information on the manufacturer. Alternative Power Sources • To power the camera continuously for longer periods after the batteries have faulty insulation. • Batteries with a flat negative terminal. Do not, under any circumstances, use an EH-62B AC adapter (Q 97). Charge each pair of AC...

User Manual
Page 22
...menu (Q 96). Rotate the mode dial to a setting other than f. First Steps The x Button The camera can also be displayed. Your most recent picture will blink when the "BATTERY EXHAUSTED" warning is turned on for about a second. See "First Steps: Basic Setup" (Q 14). ...• Before checking the battery level, select the appropriate Battery type option in the monitor (Q 22). 12 X Low battery. Checking the Battery Level 1 Turn the camera on by pressing the x button for the first time, a language selection dialog will ...
...menu (Q 96). Rotate the mode dial to a setting other than f. First Steps The x Button The camera can also be displayed. Your most recent picture will blink when the "BATTERY EXHAUSTED" warning is turned on for about a second. See "First Steps: Basic Setup" (Q 14). ...• Before checking the battery level, select the appropriate Battery type option in the monitor (Q 22). 12 X Low battery. Checking the Battery Level 1 Turn the camera on by pressing the x button for the first time, a language selection dialog will ...

User Manual
Page 23
... the Auto off option in a non-stop slide show (Q 72) or when the camera is lit. Do not remove the batteries or disconnect the EH-62B AC adapter until the power-on lamp has gone out. While the camera is no operations are being shown in the setup menu (Q 92). However, when a menu... dial to enter standby mode when there is in the AUTO OFF menu has elapsed (Q 92). First Steps 13 Checking the Battery Level Turning the Camera Off To turn the camera off, press the power switch when the power-on lamp is powered by an AC adapter, the monitor will turn off after...
... the Auto off option in a non-stop slide show (Q 72) or when the camera is lit. Do not remove the batteries or disconnect the EH-62B AC adapter until the power-on lamp has gone out. While the camera is no operations are being shown in the setup menu (Q 92). However, when a menu... dial to enter standby mode when there is in the AUTO OFF menu has elapsed (Q 92). First Steps 13 Checking the Battery Level Turning the Camera Off To turn the camera off, press the power switch when the power-on lamp is powered by an AC adapter, the monitor will turn off after...

User Manual
Page 24
... to highlight current time zone. No No Yes Yes Confirmation dialog displayed. The Clock Battery When the main batteries are installed or the camera is checked, time will automatically be displayed in the monitor. When fully charged, the clock battery can provide several days of back-up to Step 4, press multi selector up power...
... to highlight current time zone. No No Yes Yes Confirmation dialog displayed. The Clock Battery When the main batteries are installed or the camera is checked, time will automatically be displayed in the monitor. When fully charged, the clock battery can provide several days of back-up to Step 4, press multi selector up power...
User Manual
Page 65
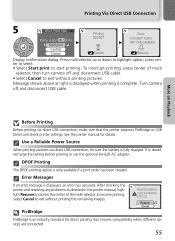
...printer manual, highlight Resume and press the center of multi selector, then turn camera off and disconnect USB cable. After checking the printer and resolving any problems as directed in doubt, recharge the battery before printing or use the optional EH-62B AC adapter. Printing Via Direct ...USB Connection 5 DPOF PRINTING Printing Done Printer ready? 007 prints + Start print 002/007 YOU MAY TURN + OFF THE CAMERA Confirm Cancel Cancel Resume Display confirmation...
...printer manual, highlight Resume and press the center of multi selector, then turn camera off and disconnect USB cable. After checking the printer and resolving any problems as directed in doubt, recharge the battery before printing or use the optional EH-62B AC adapter. Printing Via Direct ...USB Connection 5 DPOF PRINTING Printing Done Printer ready? 007 prints + Start print 002/007 YOU MAY TURN + OFF THE CAMERA Confirm Cancel Cancel Resume Display confirmation...
User Manual
Page 92
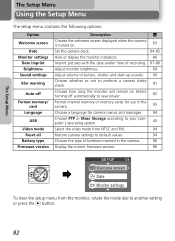
...settings Blur warning Auto off Format memory/ card Language USB Video mode Reset all Battery type Firmware version Description Q Choose the welcome screen displayed when the camera is turned on. 83 Set the camera clock. 84-85 Hide or display the monitor indicators. 86 Imprint pictures with ... to your computer's operating system. 45 Select the video mode from NTSC and PAL. 94 Restore camera settings to default values. 94 Choose the type of batteries inserted in the camera. 96 Display the current firmware version. 96 SET-UP 1/5 Welcome screen Date Monitor settings To clear...
...settings Blur warning Auto off Format memory/ card Language USB Video mode Reset all Battery type Firmware version Description Q Choose the welcome screen displayed when the camera is turned on. 83 Set the camera clock. 84-85 Hide or display the monitor indicators. 86 Imprint pictures with ... to your computer's operating system. 45 Select the video mode from NTSC and PAL. 94 Restore camera settings to default values. 94 Choose the type of batteries inserted in the camera. 96 Display the current firmware version. 96 SET-UP 1/5 Welcome screen Date Monitor settings To clear...

User Manual
Page 102
... thirty seconds of non-operation when Auto off automatically. The Setup Menu Auto Off To save battery power, the camera will enter standby mode if no change in AUTO OFF menu has elapsed. If On is selected, camera will enter sleep mode after one minute (1m) default setting, five minutes (5m) and... thirty minutes (30m). The camera will enter standby mode when there is set to five minutes (5m) or thirty minutes (...
... thirty seconds of non-operation when Auto off automatically. The Setup Menu Auto Off To save battery power, the camera will enter standby mode if no change in AUTO OFF menu has elapsed. If On is selected, camera will enter sleep mode after one minute (1m) default setting, five minutes (5m) and... thirty minutes (30m). The camera will enter standby mode when there is set to five minutes (5m) or thirty minutes (...

User Manual
Page 106
... option when you have inserted alkaline (AA) batteries. Backup Battery If the backup battery (Q 14) is used to choose the type of batteries inserted in the camera. Select this option when you have inserted rechargeable EN-MH1 (AA) nickel-metal hydride batteries, or nickel-manganese batteries. The Setup Menu Battery Type Battery type This option is not charged sufficiently...
... option when you have inserted alkaline (AA) batteries. Backup Battery If the backup battery (Q 14) is used to choose the type of batteries inserted in the camera. Select this option when you have inserted rechargeable EN-MH1 (AA) nickel-metal hydride batteries, or nickel-manganese batteries. The Setup Menu Battery Type Battery type This option is not charged sufficiently...

User Manual
Page 107
... AC adapter Carrying case Water-proof Case Additional EN-MH1 NiMH batteries are available from your Nikon digital camera: San Disk Toshiba Panasonic 16 MB, 32 MB, 64 MB, 128 MB, 256 MB 16 MB, 32 MB, 64 MB, 128 MB, 256 MB 16 ... Cards The following optional accessories were available for your local retailer or Nikon representative for details. Technical Notes Optional Accessories At the time of 10 MB/s or over Technical Notes 97 Contact your Nikon digital camera. MH-70 battery charger for EN-MH1 batteries EH-62B AC adapter CS-CP18 soft case*1 WP-CP1*2 *1 Not available...
... AC adapter Carrying case Water-proof Case Additional EN-MH1 NiMH batteries are available from your Nikon digital camera: San Disk Toshiba Panasonic 16 MB, 32 MB, 64 MB, 128 MB, 256 MB 16 MB, 32 MB, 64 MB, 128 MB, 256 MB 16 ... Cards The following optional accessories were available for your local retailer or Nikon representative for details. Technical Notes Optional Accessories At the time of 10 MB/s or over Technical Notes 97 Contact your Nikon digital camera. MH-70 battery charger for EN-MH1 batteries EH-62B AC adapter CS-CP18 soft case*1 WP-CP1*2 *1 Not available...
User Manual
Page 109
...• are fully charged before heading outside to take the camera out of storage at regular intervals. Turn the camera on and release the shutter a few times before putting the camera away. Be sure that the batteries are subject to deteriorate. We recommend that you will return ...off with local regulations. 99 Technical Notes If you charge NiMH batteries immediately before they are dirty, wipe them off before putting the camera away again. Keep spare batteries in a dry, well-ventilated area. The batteries will not be replaced at least once a month. To prevent ...
...• are fully charged before heading outside to take the camera out of storage at regular intervals. Turn the camera on and release the shutter a few times before putting the camera away. Be sure that the batteries are subject to deteriorate. We recommend that you will return ...off with local regulations. 99 Technical Notes If you charge NiMH batteries immediately before they are dirty, wipe them off before putting the camera away again. Keep spare batteries in a dry, well-ventilated area. The batteries will not be replaced at least once a month. To prevent ...


