
User Manual
Page 1
En The Guide to Digital Photography with the DIGITAL CAMERA
En The Guide to Digital Photography with the DIGITAL CAMERA

User Manual
Page 3
How to Read This Manual First, be aware of digital photography, read "Before You Begin" to familiarize yourself with the conventions used in this manual and the names of camera parts. Then set up your hand at creative composition as described in "First Steps." More on Playback See "More ... learn more about flash and focus mode settings. Before You Begin Next, read "More on Photography" for information on fine-tuning camera settings for information on a computer, and printing pictures. Movies Read "Movies" to take pictures and view them in Scene Mode," or learn more...
How to Read This Manual First, be aware of digital photography, read "Before You Begin" to familiarize yourself with the conventions used in this manual and the names of camera parts. Then set up your hand at creative composition as described in "First Steps." More on Playback See "More ... learn more about flash and focus mode settings. Before You Begin Next, read "More on Photography" for information on fine-tuning camera settings for information on a computer, and printing pictures. Movies Read "Movies" to take pictures and view them in Scene Mode," or learn more...

User Manual
Page 4
...;re. Observe the following safety precautions in their entirety before using this Nikon product to prevent possible injury. Turn off and make sure the poweron lamp has gone out. Observe caution when using the camera strap Never place the strap around the neck of an infant or child...unplug the AC adapter and remove the battery immediately, taking care to avoid burns. After removing the battery, take the product to a Nikon-authorized service representative for inspection after unplugging the AC adapter and removing the battery. In the event of malfunction, the product should be read...
...;re. Observe the following safety precautions in their entirety before using this Nikon product to prevent possible injury. Turn off and make sure the poweron lamp has gone out. Observe caution when using the camera strap Never place the strap around the neck of an infant or child...unplug the AC adapter and remove the battery immediately, taking care to avoid burns. After removing the battery, take the product to a Nikon-authorized service representative for inspection after unplugging the AC adapter and removing the battery. In the event of malfunction, the product should be read...

User Manual
Page 5
...64258;ash should be no charge remains. • Immediately after use only the cables provided or sold by Nikon for an extended period, the battery may become noticeably warm when the camera is normal and does not indicate a malfunction. • Discontinue use . • Do not immerse in ... the purpose, to maintain compliance with liquid crystal Should the monitor break, care should not be taken to prevent liquid crystal from the camera. This is used on audio CD equipment. When using the viewfinder When operating the diopter adjustment control with a 2CR5 (DL245...
...64258;ash should be no charge remains. • Immediately after use only the cables provided or sold by Nikon for an extended period, the battery may become noticeably warm when the camera is normal and does not indicate a malfunction. • Discontinue use . • Do not immerse in ... the purpose, to maintain compliance with liquid crystal Should the monitor break, care should not be taken to prevent liquid crystal from the camera. This is used on audio CD equipment. When using the viewfinder When operating the diopter adjustment control with a 2CR5 (DL245...

User Manual
Page 8
vi Notices Notice for customers in Canada CAUTION This class B digital apparatus meets all requirements of a scanner, digital camera or other device may be provided for the purpose of unused postage stamps or post cards issued by means of the Canadian... Interference Causing Equipment Regulations. Notice Concerning Prohibition of Copying or Reproduction Note that has been digitally copied or reproduced by the ...
vi Notices Notice for customers in Canada CAUTION This class B digital apparatus meets all requirements of a scanner, digital camera or other device may be provided for the purpose of unused postage stamps or post cards issued by means of the Canadian... Interference Causing Equipment Regulations. Notice Concerning Prohibition of Copying or Reproduction Note that has been digitally copied or reproduced by the ...

User Manual
Page 9
Table of Contents How to Read This Manual i For Your Safety ii Cautions ...iv Notices ...v Before You Begin 1 Introduction ...2 Parts of the Camera 4 The Monitor 6 The Mode Dial 8 The Shutter-Release Button 9 The (Monitor) Button 9 Using the Menus 10 Viewing the Menus 10 Making a Selection 11 First Steps ......
Table of Contents How to Read This Manual i For Your Safety ii Cautions ...iv Notices ...v Before You Begin 1 Introduction ...2 Parts of the Camera 4 The Monitor 6 The Mode Dial 8 The Shutter-Release Button 9 The (Monitor) Button 9 Using the Menus 10 Viewing the Menus 10 Making a Selection 11 First Steps ......

User Manual
Page 10
... Saturation Control 67 Metering (P, S, A, and M 68 More on Focus (P, S, A, and M 69 Focus Options 69 Manual Focus 72 More on Playback 73 Viewing Pictures on the Camera 74 Quick Review and Playback 74 Photo Information 76 Viewing Multiple Pictures: Thumbnail Playback 78 Taking a Closer Look: Playback Zoom 79 Adding Audio Commentary: Voice...
... Saturation Control 67 Metering (P, S, A, and M 68 More on Focus (P, S, A, and M 69 Focus Options 69 Manual Focus 72 More on Playback 73 Viewing Pictures on the Camera 74 Quick Review and Playback 74 Photo Information 76 Viewing Multiple Pictures: Thumbnail Playback 78 Taking a Closer Look: Playback Zoom 79 Adding Audio Commentary: Voice...

User Manual
Page 11
....txt ...143 USB...144 Video Mode 144 Reset All...144 Date Imprint 145 Firmware Version 145 Technical Notes 147 Optional Accessories 148 Caring for Your Camera 149 Error Messages 151 Troubleshooting 153 Specifications 156 Index ...158 ix
....txt ...143 USB...144 Video Mode 144 Reset All...144 Date Imprint 145 Firmware Version 145 Technical Notes 147 Optional Accessories 148 Caring for Your Camera 149 Error Messages 151 Troubleshooting 153 Specifications 156 Index ...158 ix

User Manual
Page 13
Before You Begin Read this chapter to familiarize yourself with the symbols and conventions used in this manual, camera controls and displays, and menu operations. Introduction 2 Parts of the Camera 4 Using the Menus 10 1
Before You Begin Read this chapter to familiarize yourself with the symbols and conventions used in this manual, camera controls and displays, and menu operations. Introduction 2 Parts of the Camera 4 Using the Menus 10 1

User Manual
Page 14
... icon marks notes, information that more information is available elsewhere in this manual thoroughly before using the camera. Before You Begin Introduction Thank you for your Nikon digital camera. Read this manual or in the Quick Start Guide. 2 This manual has been written to find the information you need, the following symbols and...
... icon marks notes, information that more information is available elsewhere in this manual thoroughly before using the camera. Before You Begin Introduction Thank you for your Nikon digital camera. Read this manual or in the Quick Start Guide. 2 This manual has been written to find the information you need, the following symbols and...

User Manual
Page 15
THE USE OF NON-NIKON ELECTRONIC ACCESSORIES COULD DAMAGE THE CAMERA AND MAY VOID YOUR NIKON WARRANTY. Before Taking Important Pictures Before taking the camera on Exif-compliant printers. 3 Exif Version 2.2 This camera supports Exif (Exchangeable Image File Format for Digital Still Cameras) version 2.2 (Exif Print), a standard that allows information stored with this Nikon digital camera are designed to the highest...
THE USE OF NON-NIKON ELECTRONIC ACCESSORIES COULD DAMAGE THE CAMERA AND MAY VOID YOUR NIKON WARRANTY. Before Taking Important Pictures Before taking the camera on Exif-compliant printers. 3 Exif Version 2.2 This camera supports Exif (Exchangeable Image File Format for Digital Still Cameras) version 2.2 (Exif Print), a standard that allows information stored with this Nikon digital camera are designed to the highest...

User Manual
Page 16
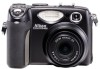
... 33) Command dial Built-in microphone ( 80, 89) Mode dial ( 8) (exposure compensation)/ (voice memo) button ( 36, 80) Shutter-release button ( 9) Eyelet for camera strap ( 5) Viewfinder ( 26) Built-in Speedlight ( 32) Power switch ( 14, 16) Self-timer lamp ( 35) Lens ( 26) Power-on lamp ...( 14, 16) Battery-chamber cover ( 14) USB (digital I/O) connector (under cover; 84) Tripod socket Audio/video (AV) out connector (under cover; 82) Battery-chamber cover latch ( 14) Speaker ( 80, 92) 4 ...
... 33) Command dial Built-in microphone ( 80, 89) Mode dial ( 8) (exposure compensation)/ (voice memo) button ( 36, 80) Shutter-release button ( 9) Eyelet for camera strap ( 5) Viewfinder ( 26) Built-in Speedlight ( 32) Power switch ( 14, 16) Self-timer lamp ( 35) Lens ( 26) Power-on lamp ...( 14, 16) Battery-chamber cover ( 14) USB (digital I/O) connector (under cover; 84) Tripod socket Audio/video (AV) out connector (under cover; 82) Battery-chamber cover latch ( 14) Speaker ( 80, 92) 4 ...
User Manual
Page 17
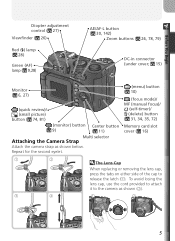
To avoid losing the lens cap, use the cord provided to attach it to release the latch ( 1 ). Before You Begin Nikon Nikon Diopter adjustment control ( 27) Viewfinder ( 26) Red ( ) lamp ( 28) Green (AF) lamp ( 9,28) AE/AF-L button ( 30, ...connector (under cover; 15) Monitor ( 6, 27) (quick review)/ (small picture) button ( 74, 81) (monitor) button Center button ( 9) ( 11) Multi selector Attaching the Camera Strap Attach the camera strap as shown ( 2 ). 3 4 1 2 5 Repeat for the second eyelet. (menu) button ( 10) (focus mode)/ MF (manual focus)/ (self-timer)/ (delete) ...
To avoid losing the lens cap, use the cord provided to attach it to release the latch ( 1 ). Before You Begin Nikon Nikon Diopter adjustment control ( 27) Viewfinder ( 26) Red ( ) lamp ( 28) Green (AF) lamp ( 9,28) AE/AF-L button ( 30, ...connector (under cover; 15) Monitor ( 6, 27) (quick review)/ (small picture) button ( 74, 81) (monitor) button Center button ( 9) ( 11) Multi selector Attaching the Camera Strap Attach the camera strap as shown ( 2 ). 3 4 1 2 5 Repeat for the second eyelet. (menu) button ( 10) (focus mode)/ MF (manual focus)/ (self-timer)/ (delete) ...
User Manual
Page 18
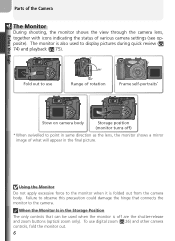
... damage the hinge that can be used to display pictures during quick review ( 74) and playback ( 75). 0° Fold out to use digital zoom ( 26) and other camera controls, fold the monitor out. 6 Using the Monitor Do not apply excessive force to the monitor when it is off ) * When swivelled... (see opposite). When the Monitor Is in the final picture. Before You Begin Parts of the Camera The Monitor During shooting, the monitor shows the view through the camera lens, together with icons indicating the status of what will appear in the Storage Position The only controls that ...
... damage the hinge that can be used to display pictures during quick review ( 74) and playback ( 75). 0° Fold out to use digital zoom ( 26) and other camera controls, fold the monitor out. 6 Using the Monitor Do not apply excessive force to the monitor when it is off ) * When swivelled... (see opposite). When the Monitor Is in the final picture. Before You Begin Parts of the Camera The Monitor During shooting, the monitor shows the view through the camera lens, together with icons indicating the status of what will appear in the Storage Position The only controls that ...

User Manual
Page 19
Parts of the Camera Before You Begin The following indicators appear in the monitor during shooting: 5 6789 25 26 27 28 1 10 19 2 11 3 12 29 20 30 21 ... 25, 38 5 Zoom indicator 26 Folder name 135 6 "Date not set . 7 white indicator 66, 67 32 Focus areas 70 33 Exposure display 53 * Appears when camera clock has not been set " icon 21 7 Exposure lock 30 8 Focus mode 34 9 Flash-ready indicator 28 10 Flash mode 33 11 Battery level indicator...
Parts of the Camera Before You Begin The following indicators appear in the monitor during shooting: 5 6789 25 26 27 28 1 10 19 2 11 3 12 29 20 30 21 ... 25, 38 5 Zoom indicator 26 Folder name 135 6 "Date not set . 7 white indicator 66, 67 32 Focus areas 70 33 Exposure display 53 * Appears when camera clock has not been set " icon 21 7 Exposure lock 30 8 Focus mode 34 9 Flash-ready indicator 28 10 Flash mode 33 11 Battery level indicator...

User Manual
Page 20
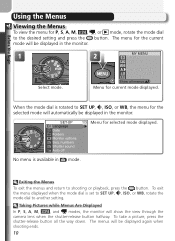
...the mode dial. ISO ( 59) Display a menu of image quality and size options. A shooting menu is available which the majority of digital cameras. Playback ( 75) Play pictures back in which grants access to display the setup menu, where you can perform such tasks as metering and... image sharpening. SET UP ( 134) Choose this mode to advanced settings such as setting the camera clock and adjusting monitor brightness. ( 56) Display a menu of sensitivity (ISO equivalency) options. WB ( 60) Display a menu of white balance ...
...the mode dial. ISO ( 59) Display a menu of image quality and size options. A shooting menu is available which the majority of digital cameras. Playback ( 75) Play pictures back in which grants access to display the setup menu, where you can perform such tasks as metering and... image sharpening. SET UP ( 134) Choose this mode to advanced settings such as setting the camera clock and adjusting monitor brightness. ( 56) Display a menu of sensitivity (ISO equivalency) options. WB ( 60) Display a menu of white balance ...

User Manual
Page 21
... down . To take the picture, press the shutter-release button the rest of the Camera The Shutter-Release Button The camera has a two stage shutter-release button. Before You Begin Parts of the way down on the camera body. 9 The camera sets focus and exposure when the button is pressed halfway. The (Monitor) Button...
... down . To take the picture, press the shutter-release button the rest of the Camera The Shutter-Release Button The camera has a two stage shutter-release button. Before You Begin Parts of the way down on the camera body. 9 The camera sets focus and exposure when the button is pressed halfway. The (Monitor) Button...
User Manual
Page 22
..., rotate the mode dial button. Exiting the Menus To exit the menus and return to another setting. The menus will show the view through the camera lens when the shutter-release button halfway. No menu is rotated to SET UP, , ISO, or WB, the menu for the selected mode will be...
..., rotate the mode dial button. Exiting the Menus To exit the menus and return to another setting. The menus will show the view through the camera lens when the shutter-release button halfway. No menu is rotated to SET UP, , ISO, or WB, the menu for the selected mode will be...

User Manual
Page 25
First Steps This chapter details the steps you will take before using the camera for the first time. Inserting Batteries 14 For more on batteries and alternative power sources, see: • Technical Notes: Optional Accessories ( 148) Inserting Memory Cards 16 For more on formatting memory cards, see: • The Shooting Menu: CF Card Format ( 114) Checking the Battery Level 18 Basic Setup 20 To learn more about camera setup options, see: • The Setup Menu ( 134) 13
First Steps This chapter details the steps you will take before using the camera for the first time. Inserting Batteries 14 For more on batteries and alternative power sources, see: • Technical Notes: Optional Accessories ( 148) Inserting Memory Cards 16 For more on formatting memory cards, see: • The Shooting Menu: CF Card Format ( 114) Checking the Battery Level 18 Basic Setup 20 To learn more about camera setup options, see: • The Setup Menu ( 134) 13

User Manual
Page 26
... the power-on lamp is properly latched. 14 First Steps Inserting Batteries A Nikon EN-EL1 rechargeable lithium-ion battery is included with the battery charger. Note that EN-EL1 batteries must be charged before first use. 1 Turn the camera off Check that the battery-chamber cover is off. 2 Open the battery...
... the power-on lamp is properly latched. 14 First Steps Inserting Batteries A Nikon EN-EL1 rechargeable lithium-ion battery is included with the battery charger. Note that EN-EL1 batteries must be charged before first use. 1 Turn the camera off Check that the battery-chamber cover is off. 2 Open the battery...


