User Manual
Page 8
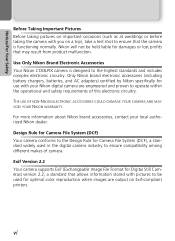
Only Nikon brand electronic accessories (including battery chargers, batteries, and AC adapters) certified by Nikon specifically for use with your local authorized Nikon dealer. Exif Version 2.2 Your camera supports Exif (Exchangeable Image File Format for damages or lost profits that may result from product malfunction. Use Only Nikon Brand Electronic Accessories Your Nikon COOLPIX camera is functioning normally. Design Rule for Camera File System (DCF) Your camera conforms to the Design Rule for Camera File System...
Only Nikon brand electronic accessories (including battery chargers, batteries, and AC adapters) certified by Nikon specifically for use with your local authorized Nikon dealer. Exif Version 2.2 Your camera supports Exif (Exchangeable Image File Format for damages or lost profits that may result from product malfunction. Use Only Nikon Brand Electronic Accessories Your Nikon COOLPIX camera is functioning normally. Design Rule for Camera File System (DCF) Your camera conforms to the Design Rule for Camera File System...
User Manual
Page 9
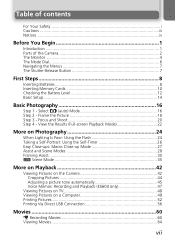
... Shutter-Release Button 7 First Steps 8 Inserting Batteries 8 Inserting Memory Cards 10 Checking the Battery Level 12 Basic Setup 14 Basic Photography 16 Step 1 - Focus and Shoot 20 Step 4 - View the Results (Full-screen Playback Mode 22 More on Photography 24 When Lighting Is Poor: Using the Flash 24 Taking a Self-Portrait: Using the Self-Timer 26 Easy Close-ups: Macro Close-up Mode 27 Assist and Scene Modes 28 Framing Assist 30 e Scene Mode 35 More on Playback 42 Viewing Pictures...
... Shutter-Release Button 7 First Steps 8 Inserting Batteries 8 Inserting Memory Cards 10 Checking the Battery Level 12 Basic Setup 14 Basic Photography 16 Step 1 - Focus and Shoot 20 Step 4 - View the Results (Full-screen Playback Mode 22 More on Photography 24 When Lighting Is Poor: Using the Flash 24 Taking a Self-Portrait: Using the Self-Timer 26 Easy Close-ups: Macro Close-up Mode 27 Assist and Scene Modes 28 Framing Assist 30 e Scene Mode 35 More on Playback 42 Viewing Pictures...
User Manual
Page 10
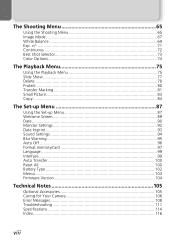
... Image Mode 67 White Balance 69 Exp. +/- ...71 Continuous 72 Best Shot Selector 73 Color Options 74 The Playback Menu 75 Using the Playback Menu 75 Slide Show 77 Delete ...78 Protect ...80 Transfer Marking 81 Small Picture 83 Copy ...84 The Set-up Menu 87 Using the Set-up Menu 87 Welcome Screen 89 Date ...90 Monitor Settings 92 Date Imprint 93 Sound Settings 94 Blur Warning 95 Auto Off...96 Format memory/card 97 Language ...99 Interface...99 Auto Transfer 100 Reset All ...100 Battery...
... Image Mode 67 White Balance 69 Exp. +/- ...71 Continuous 72 Best Shot Selector 73 Color Options 74 The Playback Menu 75 Using the Playback Menu 75 Slide Show 77 Delete ...78 Protect ...80 Transfer Marking 81 Small Picture 83 Copy ...84 The Set-up Menu 87 Using the Set-up Menu 87 Welcome Screen 89 Date ...90 Monitor Settings 92 Date Imprint 93 Sound Settings 94 Blur Warning 95 Auto Off...96 Format memory/card 97 Language ...99 Interface...99 Auto Transfer 100 Reset All ...100 Battery...
User Manual
Page 11
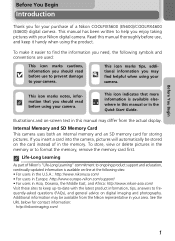
... manual or in the memory or to help you should read before using your camera. This icon indicates that you insert a card into the camera, pictures will automatically be available from the actual display. Internal Memory and SD Memory Card This camera uses both an internal memory and an SD memory card for contact information: http://nikonimaging.com/ 1 This manual has been written to format the memory, remove the memory card first. To store, view or delete pictures in the Quick Start Guide...
... manual or in the memory or to help you should read before using your camera. This icon indicates that you insert a card into the camera, pictures will automatically be available from the actual display. Internal Memory and SD Memory Card This camera uses both an internal memory and an SD memory card for contact information: http://nikonimaging.com/ 1 This manual has been written to format the memory, remove the memory card first. To store, view or delete pictures in the Quick Start Guide...
User Manual
Page 14
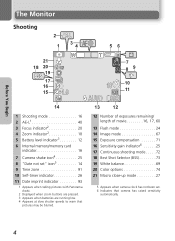
... 4 Zoom indicator2 18 5 Battery level indicator3 12 6 Internal memory/memory card indicator 16 7 Camera shake icon4 25 8 "Date not set" icon5 14 9 Time zone 91 10 Self-timer indicator 26 11 Date imprint indicator 93 1 Appears when taking pictures with Panorama Assist. 2 Displayed when zoom buttons are pressed. 3 Appears when batteries are running low. 4 Appears at slow shutter speeds to warn that pictures may be blurred. 12 Number of exposures remaining/ length of movie 16, 17, 60 13 Flash mode 24 14 Image mode...
... 4 Zoom indicator2 18 5 Battery level indicator3 12 6 Internal memory/memory card indicator 16 7 Camera shake icon4 25 8 "Date not set" icon5 14 9 Time zone 91 10 Self-timer indicator 26 11 Date imprint indicator 93 1 Appears when taking pictures with Panorama Assist. 2 Displayed when zoom buttons are pressed. 3 Appears when batteries are running low. 4 Appears at slow shutter speeds to warn that pictures may be blurred. 12 Number of exposures remaining/ length of movie 16, 17, 60 13 Flash mode 24 14 Image mode...
User Manual
Page 15
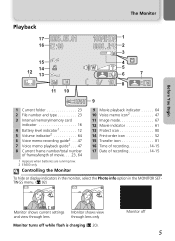
... Image mode 67 12 Movie indicator 61 13 Protect icon 80 14 Print-order icon 52 15 Transfer icon 81 16 Time of recording 14-15 17 Date of movie. . . .23, 64 1 Appears when batteries are running low. 2 E5600 only. Before You Begin The Monitor Playback 17 2005.05.01 16 12:00 100NIKON 1 0008.JPG 2 3 15 12 14 13 5M 11 10 4 5 6 7 8 10 8 START 9 1 Current folder 23 2 File number...
... Image mode 67 12 Movie indicator 61 13 Protect icon 80 14 Print-order icon 52 15 Transfer icon 81 16 Time of recording 14-15 17 Date of movie. . . .23, 64 1 Appears when batteries are running low. 2 E5600 only. Before You Begin The Monitor Playback 17 2005.05.01 16 12:00 100NIKON 1 0008.JPG 2 3 15 12 14 13 5M 11 10 4 5 6 7 8 10 8 START 9 1 Current folder 23 2 File number...
User Manual
Page 55
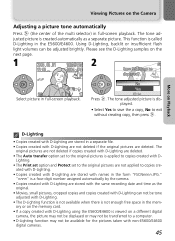
... set to the original pictures are not applied to copies created with D- ory or on the memory card. • If a copy created with D-Lighting are stored with the same recording date and time as the original. • Movies, small pictures, cropped copies and copies created with D-Lighting can be adjusted brightly. Please see the D-Lighting samples on Playback D-Lighting • Copies created with D-Lighting are deleted. Viewing Pictures on a different digital camera, the picture may not be displayed...
... set to the original pictures are not applied to copies created with D- ory or on the memory card. • If a copy created with D-Lighting are stored with the same recording date and time as the original. • Movies, small pictures, cropped copies and copies created with D-Lighting can be adjusted brightly. Please see the D-Lighting samples on Playback D-Lighting • Copies created with D-Lighting are deleted. Viewing Pictures on a different digital camera, the picture may not be displayed...
User Manual
Page 57
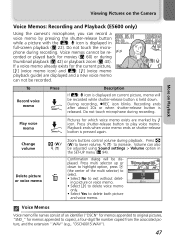
... l (W)/ O (T) u Zoom buttons control volume during recording. phone during playback. Voice memos cannot be displayed. JPG 11 To Record voice memo Press Description If O: @ icon is displayed in the SET-UP menu (Q 94). Confirmation dialog will be recorded while shutter-release button is held down to highlight option, press I (the center of an identifier ("DSCN" for memos appended to original pictures, "SND_" for memos appended to copies), a four-digit file number copied...
... l (W)/ O (T) u Zoom buttons control volume during recording. phone during playback. Voice memos cannot be displayed. JPG 11 To Record voice memo Press Description If O: @ icon is displayed in the SET-UP menu (Q 94). Confirmation dialog will be recorded while shutter-release button is held down to highlight option, press I (the center of an identifier ("DSCN" for memos appended to original pictures, "SND_" for memos appended to copies), a four-digit file number copied...
User Manual
Page 59
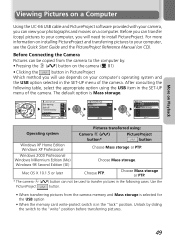
... Format memory Language Interface :Set :Help INTERFACE USB Video mode :Set USB PTP Mass storage :Set Pictures transferred using the USB item in PictureProject Which method you can transfer (copy) pictures to your computer, you will use depends on your computer's operating system and the USB option selected in the "lock" position. Mac OS X 10.1.5 or later Choose PTP. More on Playback Viewing Pictures on a Computer Using the UC-E6 USB cable and PictureProject software provided with your camera, you will need...
... Format memory Language Interface :Set :Help INTERFACE USB Video mode :Set USB PTP Mass storage :Set Pictures transferred using the USB item in PictureProject Which method you can transfer (copy) pictures to your computer, you will use depends on your computer's operating system and the USB option selected in the "lock" position. Mac OS X 10.1.5 or later Choose PTP. More on Playback Viewing Pictures on a Computer Using the UC-E6 USB cable and PictureProject software provided with your camera, you will need...
User Manual
Page 63
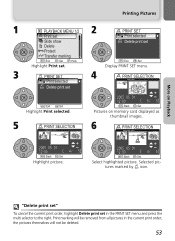
... print set :Exit :Set Highlight Print selected. 5 PRINT SELECTION 2005 . 05 . 01 12 : 00 45 :Back :Set Highlight picture. Printing Pictures 2 PRINT SET Print selected Delete print set :Exit :Set Display PRINT SET menu. 4 PRINT SELECTION 2005 . 05 . 01 12 : 00 55 :Back :Set Pictures on Playback 1 PLAYBACK MENU 1/2 Print set Slide show Delete Protect Transfer marking :Exit :Set :Help Highlight Print set. 3 PRINT SET Print selected Delete print set in the current print order; Selected pic- More on memory card displayed as thumbnail images. 6 PRINT...
... print set :Exit :Set Highlight Print selected. 5 PRINT SELECTION 2005 . 05 . 01 12 : 00 45 :Back :Set Highlight picture. Printing Pictures 2 PRINT SET Print selected Delete print set :Exit :Set Display PRINT SET menu. 4 PRINT SELECTION 2005 . 05 . 01 12 : 00 55 :Back :Set Pictures on Playback 1 PLAYBACK MENU 1/2 Print set Slide show Delete Protect Transfer marking :Exit :Set :Help Highlight Print set. 3 PRINT SET Print selected Delete print set in the current print order; Selected pic- More on memory card displayed as thumbnail images. 6 PRINT...

User Manual
Page 75
... Continuous Take pictures one at a time or in a sequence. 72 BSS Turn the Best Shot Selector (BSS) on or off. 73 Color Options Choose a standard color, vivid color, black-and-white, sepia, or cyanotype effect for your light source. 69 Exp. +/- Continuous BSS :Exit :Set :Help The Shooting Menu Icon Type Display Using the Menus option of the SET-UP menu switches the menu display between Text and Icons (Q 103). The Shooting Menu Using the Shooting Menu In P (auto) mode, the following settings can...
... Continuous Take pictures one at a time or in a sequence. 72 BSS Turn the Best Shot Selector (BSS) on or off. 73 Color Options Choose a standard color, vivid color, black-and-white, sepia, or cyanotype effect for your light source. 69 Exp. +/- Continuous BSS :Exit :Set :Help The Shooting Menu Icon Type Display Using the Menus option of the SET-UP menu switches the menu display between Text and Icons (Q 103). The Shooting Menu Using the Shooting Menu In P (auto) mode, the following settings can...
User Manual
Page 79
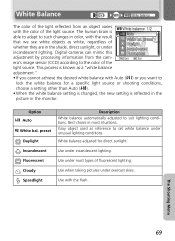
... Use when taking pictures under incandescent lighting. The Shooting Menu 69 This process is known as a "white balance adjustment." • If you cannot achieve the desired white balance with Auto (M) or you want to lock the white balance for direct sunlight. Incandescent Use under overcast skies. Speedlight Use with the color of the light source. preset Daylight Incandescent Fluorescent :Exit :Set light source. Best choice in the shade, direct sunlight, or under incandescent lighting. Digital cameras...
... Use when taking pictures under incandescent lighting. The Shooting Menu 69 This process is known as a "white balance adjustment." • If you cannot achieve the desired white balance with Auto (M) or you want to lock the white balance for direct sunlight. Incandescent Use under overcast skies. Speedlight Use with the color of the light source. preset Daylight Incandescent Fluorescent :Exit :Set light source. Best choice in the shade, direct sunlight, or under incandescent lighting. Digital cameras...

User Manual
Page 82
... at a rate of pictures. Continuous Use the options in this menu to capture a fleeting expression on Camera Settings At settings other than Single, the flash (Q 24) turns off automatically and focus (Q 20), exposure (Q 71), and auto white balance (Q 69) for all the way, camera takes sixteen consecutive images at a setting of Single. When shutter-release button is held down. Continuous Multi-shot 16 Camera takes pictures continuously while shutter-release button is pressed all photos are recorded at H Normal (2592...
... at a rate of pictures. Continuous Use the options in this menu to capture a fleeting expression on Camera Settings At settings other than Single, the flash (Q 24) turns off automatically and focus (Q 20), exposure (Q 71), and auto white balance (Q 69) for all the way, camera takes sixteen consecutive images at a setting of Single. When shutter-release button is held down. Continuous Multi-shot 16 Camera takes pictures continuously while shutter-release button is pressed all photos are recorded at H Normal (2592...

User Manual
Page 91
... Pictures Some Nikon digital cameras allow you connect the camera to a computer via the UC-E6 USB cable and press I (the center of the multi selector) to hide pictures during playback. JPG 5M 11 Full-screen playback Thumbnail playback When you to transfer pictures, only pictures marked with a V icon will be marked for transfer. Remove transfer marking from all pictures in memory or on memory card are marked for transfer to a computer and to turn automatic transfer...
... Pictures Some Nikon digital cameras allow you connect the camera to a computer via the UC-E6 USB cable and press I (the center of the multi selector) to hide pictures during playback. JPG 5M 11 Full-screen playback Thumbnail playback When you to transfer pictures, only pictures marked with a V icon will be marked for transfer. Remove transfer marking from all pictures in memory or on memory card are marked for transfer to a computer and to turn automatic transfer...
User Manual
Page 103
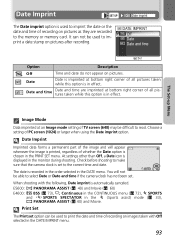
... used to print the date and time of recording on images taken with the following, Date imprint is displayed in the j (Sports assist) mode (Q 33), K PANORAMA ASSIST (Q 40) and Movie. Check before shooting to make sure that the camera clock is set . The Set-up Menu Image Mode Data imprinted at bottom right corner of all pictures taken while this option is in the DATE IMPRINT menu. 93 E5600: K PANORAMA ASSIST (Q 40) and Movie (Q 60) E4600: D BSS (Q 73), C Continuous...
... used to print the date and time of recording on images taken with the following, Date imprint is displayed in the j (Sports assist) mode (Q 33), K PANORAMA ASSIST (Q 40) and Movie. Check before shooting to make sure that the camera clock is set . The Set-up Menu Image Mode Data imprinted at bottom right corner of all pictures taken while this option is in the DATE IMPRINT menu. 93 E5600: K PANORAMA ASSIST (Q 40) and Movie (Q 60) E4600: D BSS (Q 73), C Continuous...
User Manual
Page 109
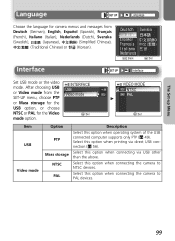
... devices. Interface :Back :Set Interface Set USB mode or the video mode. Select this option when connecting the camera to PAL devices. 99 Select this option when operating system of the USB connected computer supports only PTP (Q 49). The Set-up Menu Language Language Choose the language for the Video mode option. INTERFACE USB Video mode :Set VIDEO MODE NTSC PAL + :Set Item USB Video mode Option PTP Mass storage NTSC PAL Description Select this option when connecting via direct USB connection (Q 56).
... devices. Interface :Back :Set Interface Set USB mode or the video mode. Select this option when connecting the camera to PAL devices. 99 Select this option when operating system of the USB connected computer supports only PTP (Q 49). The Set-up Menu Language Language Choose the language for the Video mode option. INTERFACE USB Video mode :Set VIDEO MODE NTSC PAL + :Set Item USB Video mode Option PTP Mass storage NTSC PAL Description Select this option when connecting via direct USB connection (Q 56).

User Manual
Page 119
...Camera connected to record information need for transfer. copies. • Image can not be adjusted • Images can not be adjusted using D-Lighting one time. using D-Lighting. delete pictures or movies. • Takes long time to record pictures at current settings. • Choose lower image quality/ size. • Delete pictures. NOT BE READ / OUT OF MEMORY / Camera in shooting mode: Insufficient memory to save • Insert memory card with movie on memory card or in memory. formatted for use in camera. • Error occurred while saving movie. • Camera...
...Camera connected to record information need for transfer. copies. • Image can not be adjusted • Images can not be adjusted using D-Lighting one time. using D-Lighting. delete pictures or movies. • Takes long time to record pictures at current settings. • Choose lower image quality/ size. • Delete pictures. NOT BE READ / OUT OF MEMORY / Camera in shooting mode: Insufficient memory to save • Insert memory card with movie on memory card or in memory. formatted for use in camera. • Error occurred while saving movie. • Camera...

User Manual
Page 121
... and reconnect the adapter, and turn the camera on again, or, if you are hidden. Problem Possible cause Q • Camera is off . 5 • USB cable is connected. - • AV/Video cable is dirty: clean monitor. 106 Technical Notes 111 Troubleshooting If your camera fails to function as described above may stop functioning. Refer to the page numbers listed in the Monitor settings menu. • Ambient lighting is too...
... and reconnect the adapter, and turn the camera on again, or, if you are hidden. Problem Possible cause Q • Camera is off . 5 • USB cable is connected. - • AV/Video cable is dirty: clean monitor. 106 Technical Notes 111 Troubleshooting If your camera fails to function as described above may stop functioning. Refer to the page numbers listed in the Monitor settings menu. • Ambient lighting is too...
User Manual
Page 122
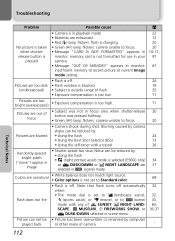
release button is pressed • Camera is in playback mode. • Batteries are exhausted. • Red (!) lamp flickers: flash is charging. • Green (AF) lamp flickers: camera unable to focus. • Message "CARD IS NOT FORMATTED" appears in monitor: memory card is not formatted for use in your camera. • Message "OUT OF MEMORY" appears in monitor: insufficient memory to record picture at current Image mode setting. 22 12 20 20 10-11, 97 67 • Flash is off...
release button is pressed • Camera is in playback mode. • Batteries are exhausted. • Red (!) lamp flickers: flash is charging. • Green (AF) lamp flickers: camera unable to focus. • Message "CARD IS NOT FORMATTED" appears in monitor: memory card is not formatted for use in your camera. • Message "OUT OF MEMORY" appears in monitor: insufficient memory to record picture at current Image mode setting. 22 12 20 20 10-11, 97 67 • Flash is off...
User Manual
Page 127
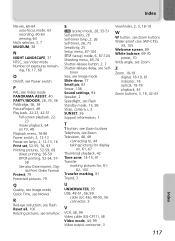
... full-screen playback, 2223 movie playback, 64 on TV, 48 Playback menu, 76-86 Power switch, 2, 12-13 Power-on , 61, 67 Thumbnail playback, 42 Time zone, 14-15, 91 Transfer marking pictures for display on lamp, 2, 12-13, 16 Print set, 52-55, 76, 93 Printing pictures, 52-59, 68 direct printing, 56-59 DPOF printing, 52-54, 57- 58 See also Date imprint, Dig- timer Size, see Image mode Slide show, 77 Small pic, 83...
... full-screen playback, 2223 movie playback, 64 on TV, 48 Playback menu, 76-86 Power switch, 2, 12-13 Power-on , 61, 67 Thumbnail playback, 42 Time zone, 14-15, 91 Transfer marking pictures for display on lamp, 2, 12-13, 16 Print set, 52-55, 76, 93 Printing pictures, 52-59, 68 direct printing, 56-59 DPOF printing, 52-54, 57- 58 See also Date imprint, Dig- timer Size, see Image mode Slide show, 77 Small pic, 83...


