
User Manual
Page 9
...screen Playback Mode 22 More on Photography 24 When Lighting Is Poor: Using the Flash 24 Taking a Self-Portrait: Using the Self-Timer 26 Easy Close-ups: Macro Close-up Mode 27 Assist and Scene Modes 28 Framing Assist 29 e Scene Mode 34 More on Playback 40 Viewing Pictures on the Camera... 56 Viewing Movies 60 vii Table of contents For Your Safety i Cautions ...iii Notices ...iv Before You Begin 1 Introduction 1 Parts of the Camera 2 The Monitor 4 The Mode Dial 6 Navigating the Menus 7 The Shutter-Release Button 7 First Steps 8 Inserting Batteries 8 Inserting Memory Cards ...
...screen Playback Mode 22 More on Photography 24 When Lighting Is Poor: Using the Flash 24 Taking a Self-Portrait: Using the Self-Timer 26 Easy Close-ups: Macro Close-up Mode 27 Assist and Scene Modes 28 Framing Assist 29 e Scene Mode 34 More on Playback 40 Viewing Pictures on the Camera... 56 Viewing Movies 60 vii Table of contents For Your Safety i Cautions ...iii Notices ...iv Before You Begin 1 Introduction 1 Parts of the Camera 2 The Monitor 4 The Mode Dial 6 Navigating the Menus 7 The Shutter-Release Button 7 First Steps 8 Inserting Batteries 8 Inserting Memory Cards ...

User Manual
Page 10
... Slide Show 72 Delete ...73 Protect ...75 Auto Transfer 76 Small Picture 78 Copy ...79 The Setup Menu 82 Using the Setup Menu 82 Welcome Screen 83 Date ...84 Monitor Settings 86 Date Imprint 87 Brightness ...89 Sound Settings 90 Blur Warning 91 Auto Off...92 Format memory/card 93 Language... ...94 Video Mode 94 Reset All ...94 Battery Type 96 Firmware Version 96 Technical Notes 97 Optional Accessories 97 Caring for Your Camera 98 Error Messages 100 Troubleshooting 103 Specifications 106 Index ...108 viii
... Slide Show 72 Delete ...73 Protect ...75 Auto Transfer 76 Small Picture 78 Copy ...79 The Setup Menu 82 Using the Setup Menu 82 Welcome Screen 83 Date ...84 Monitor Settings 86 Date Imprint 87 Brightness ...89 Sound Settings 90 Blur Warning 91 Auto Off...92 Format memory/card 93 Language... ...94 Video Mode 94 Reset All ...94 Battery Type 96 Firmware Version 96 Technical Notes 97 Optional Accessories 97 Caring for Your Camera 98 Error Messages 100 Troubleshooting 103 Specifications 106 Index ...108 viii
User Manual
Page 26
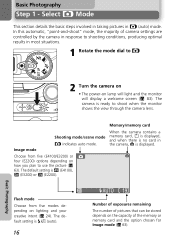
...to use the picture (Q 63). Basic Photography Choose from five modes depending on how you plan to shooting conditions, producing optimal results in the camera, } is !# (auto). 16 AUTO 19 Number of exposures remaining The number of pictures that can be stored depends on lamp will light and... the monitor will display a welcome screen (Q 83). Select P Mode This section details the basic steps involved in taking pictures in P (auto) mode. Flash mode Choose from five (...
...to use the picture (Q 63). Basic Photography Choose from five modes depending on how you plan to shooting conditions, producing optimal results in the camera, } is !# (auto). 16 AUTO 19 Number of exposures remaining The number of pictures that can be stored depends on lamp will light and... the monitor will display a welcome screen (Q 83). Select P Mode This section details the basic steps involved in taking pictures in P (auto) mode. Flash mode Choose from five (...

User Manual
Page 32
...displayed in the order recorded, up or down to highlight Yes and then press the center of the multi selector. Step 4 - To cancel full-screen playback and return to a particular frame number without deleting the picture, highlight No and press the center of the multi selector. Press the multi ...selector up or left to view pictures in the monitor, press the u button. Done Basic Photography 22 View the Results (Full-screen Playback Mode) 1 Press the x button 2004.08.05 13:00 100NIKON 0001.JPG 11 2 View pictures in the monitor To view additional pictures, ...
...displayed in the order recorded, up or down to highlight Yes and then press the center of the multi selector. Step 4 - To cancel full-screen playback and return to a particular frame number without deleting the picture, highlight No and press the center of the multi selector. Press the multi ...selector up or left to view pictures in the monitor, press the u button. Done Basic Photography 22 View the Results (Full-screen Playback Mode) 1 Press the x button 2004.08.05 13:00 100NIKON 0001.JPG 11 2 View pictures in the monitor To view additional pictures, ...
User Manual
Page 33
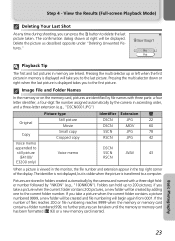
... pictures are stored in folders created automatically by the camera and named with three parts: a four letter identifier, a four-digit file number assigned automatically by "NIKON" (e.g., "100NIKON"). Erase 1 image ? If the ...number of the display. If you take you take a picture when the current folder contains 200 pictures, a new folder will be created and file numbering will be created by adding one to the first picture. Step 4 - View the Results (Full-screen...
... pictures are stored in folders created automatically by the camera and named with three parts: a four letter identifier, a four-digit file number assigned automatically by "NIKON" (e.g., "100NIKON"). Erase 1 image ? If the ...number of the display. If you take you take a picture when the current folder contains 200 pictures, a new folder will be created and file numbering will be created by adding one to the first picture. Step 4 - View the Results (Full-screen...

User Manual
Page 41
... assist menu helps you frame vivid landscape shots that enhance outlines, colors, and contrast. More on distant objects through foreground objects such as windows or a screen of frame. N Landscape No guides are displayed in background at right of branches.
... assist menu helps you frame vivid landscape shots that enhance outlines, colors, and contrast. More on distant objects through foreground objects such as windows or a screen of frame. N Landscape No guides are displayed in background at right of branches.

User Manual
Page 50
...displayed, press l (W) button once to view nine thumbnails. Confirmation dialog will be performed while thumbnails are displayed, to return to full-screen playback. The following operations can be dis- Change number of four thumbnail images. u played. More on Playback More on Playback Viewing Pictures ...on the Camera Viewing Multiple Pictures: Thumbnail Playback Pressing the l (W) button in full-screen playback displays the pictures in the memory or on the memory card in " from nine thumbnails to...
...displayed, press l (W) button once to view nine thumbnails. Confirmation dialog will be performed while thumbnails are displayed, to return to full-screen playback. The following operations can be dis- Change number of four thumbnail images. u played. More on Playback More on Playback Viewing Pictures ...on the Camera Viewing Multiple Pictures: Thumbnail Playback Pressing the l (W) button in full-screen playback displays the pictures in the memory or on the memory card in " from nine thumbnails to...

User Manual
Page 51
...entire picture is pressed. ture that contains only the portion of the multi selector to select. Cancel zoom Cancel zoom and return to full-screen playback. Press multi selector up or down to highlight option, press the center of the image visi- Use multi selector to scroll to... l (W) button is displayed. To use multi selector to view other areas of 10×. Erase 1 image ? More on Playback Viewing Pictures on the Camera Taking a Closer Look: Playback Zoom Use the O (T) button to zoom in on still images displayed in the monitor. Crop picture Delete picture Only portion...
...entire picture is pressed. ture that contains only the portion of the multi selector to select. Cancel zoom Cancel zoom and return to full-screen playback. Press multi selector up or down to highlight option, press the center of the image visi- Use multi selector to scroll to... l (W) button is displayed. To use multi selector to view other areas of 10×. Erase 1 image ? More on Playback Viewing Pictures on the Camera Taking a Closer Look: Playback Zoom Use the O (T) button to zoom in on still images displayed in the monitor. Crop picture Delete picture Only portion...

User Manual
Page 55
... Second Edition (SE) Choose Mass Storage. Use the PictureProject button. • When transferring pictures from the camera to the computer by sliding the switch to your photographs and movies on a computer. SET-UP 1/5 Welcome screen Date Monitor settings SET-UP 4/5 Language USB Video mode USB PTP Mass Storage Pictures transferred using the...
... Second Edition (SE) Choose Mass Storage. Use the PictureProject button. • When transferring pictures from the camera to the computer by sliding the switch to your photographs and movies on a computer. SET-UP 1/5 Welcome screen Date Monitor settings SET-UP 4/5 Language USB Video mode USB PTP Mass Storage Pictures transferred using the...

User Manual
Page 60
... date of recording on all pictures in print order, highlight Info and press the center of the multi selector. Done is displayed and the screen returns to full-screen playback. Check will appear in box next to item. • To print shutter speed and aperture on all pictures in box next to...
... date of recording on all pictures in print order, highlight Info and press the center of the multi selector. Done is displayed and the screen returns to full-screen playback. Check will appear in box next to item. • To print shutter speed and aperture on all pictures in box next to...

User Manual
Page 70
... an option, then press the center of multi selector. Use multi selector to select = icon, then press center of multi selector to full-screen playback. press the multi selector to left or right to highlight a control, then press the center of multi selector to return to perform the... zoom buttons to select * icon, then press and hold center of movie will be displayed. A confirmation dialog will be displayed; Viewing Movies In full-screen playback mode (Q 22), movies can be viewed by a W icon and can be played with sound (E4100/E3200 only). Playback ends at the top...
... an option, then press the center of multi selector. Use multi selector to select = icon, then press center of multi selector to full-screen playback. press the multi selector to left or right to highlight a control, then press the center of multi selector to return to perform the... zoom buttons to select * icon, then press and hold center of movie will be displayed. A confirmation dialog will be displayed; Viewing Movies In full-screen playback mode (Q 22), movies can be viewed by a W icon and can be played with sound (E4100/E3200 only). Playback ends at the top...

User Manual
Page 73
...) Normal (1600) Option E (2288*) (E4100 only) L (2048*) (E3200 only) w (1600*) (E2200 only) F (2288) (E4100 only) b (2048) (E3200 only) c (1600) S PC screen (1024) R TV screen (640) Size (pixels) 2,288 × 1,712 2,048 × 1,536 1,600 × 1,200 2,288 × 1,712 2,048 × 1,536 1,600 × 1,200 1,024 × 768...of memory each setting. † All figures are saved to the memory or memory card. The size of the files, and with a digital camera are recorded as they are approximate. Pictures can be recorded in the memory or on the memory card, depends on a television or 13"...
...) Normal (1600) Option E (2288*) (E4100 only) L (2048*) (E3200 only) w (1600*) (E2200 only) F (2288) (E4100 only) b (2048) (E3200 only) c (1600) S PC screen (1024) R TV screen (640) Size (pixels) 2,288 × 1,712 2,048 × 1,536 1,600 × 1,200 2,288 × 1,712 2,048 × 1,536 1,600 × 1,200 1,024 × 768...of memory each setting. † All figures are saved to the memory or memory card. The size of the files, and with a digital camera are recorded as they are approximate. Pictures can be recorded in the memory or on the memory card, depends on a television or 13"...

User Manual
Page 74
... Approx. 255 Normal (2048) (E3200 only) Approx. 18 Approx. 153 Approx. 308 Normal (1600) Approx. 29 Approx. 239 Approx. 482 PC screen (1024) Approx. 61 Approx. 511 Approx. 1028 TV screen (640) Approx. 132 Approx. 1096 Approx. 2203 * All figures are approximate. The file size of compressed images varies with the scene...
... Approx. 255 Normal (2048) (E3200 only) Approx. 18 Approx. 153 Approx. 308 Normal (1600) Approx. 29 Approx. 239 Approx. 482 PC screen (1024) Approx. 61 Approx. 511 Approx. 1028 TV screen (640) Approx. 132 Approx. 1096 Approx. 2203 * All figures are approximate. The file size of compressed images varies with the scene...

User Manual
Page 82
Slide Show Slide show This option is used to play pictures back in the starting screen, the slide show . PAUSE End Restart Skip to next frame Press multi selector to right or down to fast forward through show and return to ... slide shows. Hold multi selector down to skip to rewind through show . "Loop" If Loop is selected. Auto Off SLIDE SHOW Pause Start Loop The camera will repeat automatically. End slide show ^ End slide show . Hold multi selector down to next slide. Highlight End and press the center of the multi...
Slide Show Slide show This option is used to play pictures back in the starting screen, the slide show . PAUSE End Restart Skip to next frame Press multi selector to right or down to fast forward through show and return to ... slide shows. Hold multi selector down to skip to rewind through show . "Loop" If Loop is selected. Auto Off SLIDE SHOW Pause Start Loop The camera will repeat automatically. End slide show ^ End slide show . Hold multi selector down to next slide. Highlight End and press the center of the multi...

User Manual
Page 86
...screen playback 3 4 Thumbnail playback When you to hide pictures during playback. Mark selected pictures for transfer. Pictures taken while this option is in effect will be selected for transfer. Transferring More than 999 Pictures No more than 999 pictures can not be transferred (Q 45). 76 Hidden Pictures Some Nikon digital cameras... allow you connect the camera to a computer via the UC-E6 USB cable and press the center of the multi selector...
...screen playback 3 4 Thumbnail playback When you to hide pictures during playback. Mark selected pictures for transfer. Pictures taken while this option is in effect will be selected for transfer. Transferring More than 999 Pictures No more than 999 pictures can not be transferred (Q 45). 76 Hidden Pictures Some Nikon digital cameras... allow you connect the camera to a computer via the UC-E6 USB cable and press the center of the multi selector...

User Manual
Page 88
...files with no drop in web browser. 160 × 120 Copy can be displayed full-screen on television or 13" monitor with names of the form "SSCNnnnn.JPG," where "nnnn" ... web pages. To view the new, resized copy, press the multi selector down until the copy is a four-digit number assigned automatically by a gray border). Option q 640 × 480 r 320 × 240 s 160 ..., select Small pic. Copies are stored in thumbnail playback, small pictures are indicated by the camera. The copy will be viewed in the thumbnail display. Confirmation dialog displayed. To create a ...
...files with no drop in web browser. 160 × 120 Copy can be displayed full-screen on television or 13" monitor with names of the form "SSCNnnnn.JPG," where "nnnn" ... web pages. To view the new, resized copy, press the multi selector down until the copy is a four-digit number assigned automatically by a gray border). Option q 640 × 480 r 320 × 240 s 160 ..., select Small pic. Copies are stored in thumbnail playback, small pictures are indicated by the camera. The copy will be viewed in the thumbnail display. Confirmation dialog displayed. To create a ...

User Manual
Page 92
...Auto off Format memory/ card Language USB Video mode Reset all Battery type Firmware version Description Q Choose the welcome screen displayed when the camera is turned on. 83 Set the camera clock. 84-85 Hide or display the monitor indicators. 86 Imprint pictures with the date and/or time of.... 45 Select the video mode from NTSC and PAL. 94 Restore camera settings to default values. 94 Choose the type of batteries inserted in the camera. 96 Display the current firmware version. 96 SET-UP 1/5 Welcome screen Date Monitor settings To clear the setup menu from the monitor, rotate...
...Auto off Format memory/ card Language USB Video mode Reset all Battery type Firmware version Description Q Choose the welcome screen displayed when the camera is turned on. 83 Set the camera clock. 84-85 Hide or display the monitor indicators. 86 Imprint pictures with the date and/or time of.... 45 Select the video mode from NTSC and PAL. 94 Restore camera settings to default values. 94 Choose the type of batteries inserted in the camera. 96 Display the current firmware version. 96 SET-UP 1/5 Welcome screen Date Monitor settings To clear the setup menu from the monitor, rotate...

User Manual
Page 93
... will be selected for the welcome screen, No to exit leaving the welcome screen unchanged. Welcome Screen Welcome screen This option is used to choose the welcome screen displayed when the camera is turned on . WELCOME IMAGE SELECT 1/2 Disable welcome Nikon Animation Option Description Disable welcome No welcome screen is displayed when camera is turned on . High- If you...
... will be selected for the welcome screen, No to exit leaving the welcome screen unchanged. Welcome Screen Welcome screen This option is used to choose the welcome screen displayed when the camera is turned on . WELCOME IMAGE SELECT 1/2 Disable welcome Nikon Animation Option Description Disable welcome No welcome screen is displayed when camera is turned on . High- If you...

User Manual
Page 94
..., Casablanca MENU Back Set daylight saving time automatically advances the time one hour. Check the clock regularly against more information on setting the camera clock, see "First Steps: Basic Setup" (Q 14). This option is automatically calculated and the date and time in the selected region...2 Press multi selector right to display the time zone screen. 3 Press multi selector left or right to highlight DaylightSaving and press center of multi selector. Press multi selector down to set the camera clock when using your camera for the first time. The normal time zone setting ...
..., Casablanca MENU Back Set daylight saving time automatically advances the time one hour. Check the clock regularly against more information on setting the camera clock, see "First Steps: Basic Setup" (Q 14). This option is automatically calculated and the date and time in the selected region...2 Press multi selector right to display the time zone screen. 3 Press multi selector left or right to highlight DaylightSaving and press center of multi selector. Press multi selector down to set the camera clock when using your camera for the first time. The normal time zone setting ...

User Manual
Page 97
...in effect. Date Imprint Imprinted data forms a permanent part of the image and will not be used to print the date and time of PC screen (1024) or larger when using the date imprint option. With E4100, the continuous shooting function does not work when the date imprint option is chosen... has not been set option can not be difficult to make sure that the camera clock is automatically canceled. Check before shooting to read. You will appear whenever the image is printed, regardless of TV screen (640) may be used to imprint a date stamp on pictures. Print Set The Print set . ...
...in effect. Date Imprint Imprinted data forms a permanent part of the image and will not be used to print the date and time of PC screen (1024) or larger when using the date imprint option. With E4100, the continuous shooting function does not work when the date imprint option is chosen... has not been set option can not be difficult to make sure that the camera clock is automatically canceled. Check before shooting to read. You will appear whenever the image is printed, regardless of TV screen (640) may be used to imprint a date stamp on pictures. Print Set The Print set . ...


