

User Manual
Page 5
...broken glass and to the input and output jacks, use only the cables provided or sold by Nikon for an extended period, the battery may become hot. Keep out of reach of small children.... or entering the eyes or mouth. Avoid contact with product regulations. Observe due caution when removing memory cards from the subject. The lens section • Do not insert your subject's eyes could cause...to remove the battery when no less than one meter (39˝) from the camera. Removing memory cards Memory cards may become hot during use , attach the terminal cover and store in the gap ...
...broken glass and to the input and output jacks, use only the cables provided or sold by Nikon for an extended period, the battery may become hot. Keep out of reach of small children.... or entering the eyes or mouth. Avoid contact with product regulations. Observe due caution when removing memory cards from the subject. The lens section • Do not insert your subject's eyes could cause...to remove the battery when no less than one meter (39˝) from the camera. Removing memory cards Memory cards may become hot during use , attach the terminal cover and store in the gap ...

User Manual
Page 6
... the product off any sand or salt with a lightly dampened cloth and then dry your Nikon service representative. • Do not apply pressure to all moving parts with your camera at the beach or seaside, wipe off before exposing it to strong shocks or vibration. Keep ... generates strong electromagnetic radiation or magnetic fields. These parts are always lit or that are especially susceptible to see in damage to product memory or internal circuitry. Notes on a cold day, can cause irreparable damage. Keep free of the internal mechanism can cause condensation inside the...
... the product off any sand or salt with a lightly dampened cloth and then dry your Nikon service representative. • Do not apply pressure to all moving parts with your camera at the beach or seaside, wipe off before exposing it to strong shocks or vibration. Keep ... generates strong electromagnetic radiation or magnetic fields. These parts are always lit or that are especially susceptible to see in damage to product memory or internal circuitry. Notes on a cold day, can cause irreparable damage. Keep free of the internal mechanism can cause condensation inside the...

User Manual
Page 7
..., for long periods, remove the battery to prevent leakage and store the camera in a plastic bag containing a desiccant. Batteries • When you may appear in the monitor. Memory cards • Turn the power off with a clean, dry cloth before putting the camera away again. • Store the battery in a cool, dry place. This...
..., for long periods, remove the battery to prevent leakage and store the camera in a plastic bag containing a desiccant. Batteries • When you may appear in the monitor. Memory cards • Turn the power off with a clean, dry cloth before putting the camera away again. • Store the battery in a cool, dry place. This...

User Manual
Page 8
...omissions to the memory card will not be held liable for customers in Canada CAUTION This class B digital apparatus meets all requirements of the Canadian Interference Causing Equipment Regulations. Turn the camera off, remove and replace the battery, and turn the camera on again. In...the camera may stop functioning. Data already recorded to the attention of the Nikon representative in your retailer or Nikon representative. Note that the information in these manuals is caused by any means, without Nikon's prior written permission. • Nikon reserves the right to the memory card...
...omissions to the memory card will not be held liable for customers in Canada CAUTION This class B digital apparatus meets all requirements of the Canadian Interference Causing Equipment Regulations. Turn the camera off, remove and replace the battery, and turn the camera on again. In...the camera may stop functioning. Data already recorded to the attention of the Nikon representative in your retailer or Nikon representative. Note that the information in these manuals is caused by any means, without Nikon's prior written permission. • Nikon reserves the right to the memory card...
User Manual
Page 11
...Find It-Parts of the COOLPIX 2500 4 How to Use It-Camera Controls and Displays 6 Menu Guide: Index to Menu Options 9 Tutorial: Getting Started 15 First Steps: Getting Ready to Use Your Camera 16 Step 1-Attach the Camera Strap 16 Step 2-Insert the Battery and Memory Card 16 Step 3-Check... Shoot 28 Step 6-Put the Camera Away 30 Review and Deletion: Quick Review 31 Quick Review 32 Full-Screen Review 32 Thumbnail Review 34 Getting Creative: Scene Selection 36 Connections: Your Camera and Your Computer 41 Before You Begin: Installing Nikon View 5 42 Making the Connection...
...Find It-Parts of the COOLPIX 2500 4 How to Use It-Camera Controls and Displays 6 Menu Guide: Index to Menu Options 9 Tutorial: Getting Started 15 First Steps: Getting Ready to Use Your Camera 16 Step 1-Attach the Camera Strap 16 Step 2-Insert the Battery and Memory Card 16 Step 3-Check... Shoot 28 Step 6-Put the Camera Away 30 Review and Deletion: Quick Review 31 Quick Review 32 Full-Screen Review 32 Thumbnail Review 34 Getting Creative: Scene Selection 36 Connections: Your Camera and Your Computer 41 Before You Begin: Installing Nikon View 5 42 Making the Connection...
User Manual
Page 12
... Delaying Shutter Release: Choosing a Self-Timer Mode 55 Framing Pictures: Optical and Digital Zoom 57 Keep or Delete: Picture Review 58 Fine-Tuning Camera Settings: The -Mode Menu 59 Making Effective Use of Memory: Image Quality and Size 60 Adjusting Exposure: Exp 63 Keeping Colors True: White... 66 Getting Sharper Pictures: BSS (Best Shot Selector 67 Making Edges More Distinct: Image Sharpening 68 Camera Setup: The SET-UP Menu 69 Adjusting Monitor Brightness: Brightness 72 Formatting Memory Cards: CF Card Format 72 Setting the Time and Date: Date 73 Conserving Battery Power: Auto ...
... Delaying Shutter Release: Choosing a Self-Timer Mode 55 Framing Pictures: Optical and Digital Zoom 57 Keep or Delete: Picture Review 58 Fine-Tuning Camera Settings: The -Mode Menu 59 Making Effective Use of Memory: Image Quality and Size 60 Adjusting Exposure: Exp 63 Keeping Colors True: White... 66 Getting Sharper Pictures: BSS (Best Shot Selector 67 Making Edges More Distinct: Image Sharpening 68 Camera Setup: The SET-UP Menu 69 Adjusting Monitor Brightness: Brightness 72 Formatting Memory Cards: CF Card Format 72 Setting the Time and Date: Date 73 Conserving Battery Power: Auto ...
User Manual
Page 16
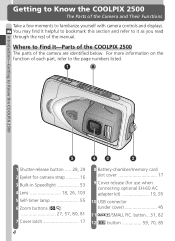
... refer to familiarize yourself with camera controls and displays. button ... 31, 82 12 button 59, 70, 85 4 Introduction-Getting to Know the COOLPIX 2500 Getting to Know the COOLPIX 2500 The Parts of the Camera and Their Functions Take a ...few moments to the page numbers listed. 1 A 5 4 3 2 1 Shutter-release button ..... 28, 29 2 Eyelet for camera strap .......... 16 3 Built-in Speedlight 53 4 Lens 18, 26, 103 5 Self-timer lamp 55 6 Zoom buttons ( / ) 27, 57, 80, 81 7 Cover latch 17 8 Battery-chamber/memory...
... refer to familiarize yourself with camera controls and displays. button ... 31, 82 12 button 59, 70, 85 4 Introduction-Getting to Know the COOLPIX 2500 Getting to Know the COOLPIX 2500 The Parts of the Camera and Their Functions Take a ...few moments to the page numbers listed. 1 A 5 4 3 2 1 Shutter-release button ..... 28, 29 2 Eyelet for camera strap .......... 16 3 Built-in Speedlight 53 4 Lens 18, 26, 103 5 Self-timer lamp 55 6 Zoom buttons ( / ) 27, 57, 80, 81 7 Cover latch 17 8 Battery-chamber/memory...

User Manual
Page 21
...high-contrast subjects. 10, 59- 63 SHOOTING (manual) mode gives you full control over camera settings. mode SHOOTING menu contains four advanced 68 shooting options. to the settings avail- 11...The options available depend on the operating mode and, in the camera monitor. Mode Menu Description In (auto) and scene modes, the SHOOT- ING ...menu is accessed from the SHOOTING menu, contains options for basic camera setup (e.g., setting the time and date, choosing a language). 12, 69- ...to some camera settings are made with the help of menus that appear in mode, on ...
...high-contrast subjects. 10, 59- 63 SHOOTING (manual) mode gives you full control over camera settings. mode SHOOTING menu contains four advanced 68 shooting options. to the settings avail- 11...The options available depend on the operating mode and, in the camera monitor. Mode Menu Description In (auto) and scene modes, the SHOOT- ING ...menu is accessed from the SHOOTING menu, contains options for basic camera setup (e.g., setting the time and date, choosing a language). 12, 69- ...to some camera settings are made with the help of menus that appear in mode, on ...

User Manual
Page 24
...ALL Reset all settings to default values No Reset MENU OFF SELECT 12 Reset All ( mode only) Reset camera settings to a USB Mass Storage computer. Reset SET 76 No Format Format memory cards for year, month, and day AUTO OFF Brightness CF Card Format Date Auto Off Language USB Reset... All MENU OFF SELECT Auto Off 30 s Specify how long the monitor will be accessed from the SHOOTING menu, contains options for camera setup. Introduction-Menu ...
...ALL Reset all settings to default values No Reset MENU OFF SELECT 12 Reset All ( mode only) Reset camera settings to a USB Mass Storage computer. Reset SET 76 No Format Format memory cards for year, month, and day AUTO OFF Brightness CF Card Format Date Auto Off Language USB Reset... All MENU OFF SELECT Auto Off 30 s Specify how long the monitor will be accessed from the SHOOTING menu, contains options for camera setup. Introduction-Menu ...

User Manual
Page 25
... managing the pictures on a DPOFcompatible device. Print set Delete print set Print Set Select pictures for use in your camera. No Format This option is set to format memory cards for printing on the memory SET card. SELECT SET QUICK DONE 90 Select pictures for transfer to a com- All OFF puter, or remove...
... managing the pictures on a DPOFcompatible device. Print set Delete print set Print Set Select pictures for use in your camera. No Format This option is set to format memory cards for printing on the memory SET card. SELECT SET QUICK DONE 90 Select pictures for transfer to a com- All OFF puter, or remove...
User Manual
Page 28
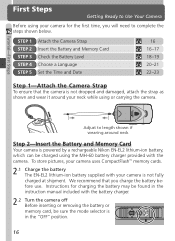
... 16 To store pictures, your camera is powered by a rechargeable Nikon EN-EL2 lithium-ion battery, which can be sure the mode selector is not dropped and damaged, attach the strap as shown and wear it around neck Step 2-Insert the Battery and Memory Card Your camera is not fully charged at shipment.... We recommend that the camera is in ...
... 16 To store pictures, your camera is powered by a rechargeable Nikon EN-EL2 lithium-ion battery, which can be sure the mode selector is not dropped and damaged, attach the strap as shown and wear it around neck Step 2-Insert the Battery and Memory Card Your camera is not fully charged at shipment.... We recommend that the camera is in ...

User Manual
Page 29
... dislodged during operation, be formatted before first use. Insert the memory card as shown in the label on formatting memory cards, see "Camera Setup: CF Card Format" ( 72). 17 For information on the underside of the batterychamber/memory card slot cover (A). A B C EN-EL2 EN-EL2...(A2), indicating that the cover is securely latched. Other memory cards, however, must be sure that the cover is unlatched. A B C Formatting Memory Cards The memory card supplied with your camera is formatted at B the entrance to the memory card slot (B), sliding it in until it open (C). Slide...
... dislodged during operation, be formatted before first use. Insert the memory card as shown in the label on formatting memory cards, see "Camera Setup: CF Card Format" ( 72). 17 For information on the underside of the batterychamber/memory card slot cover (A). A B C EN-EL2 EN-EL2...(A2), indicating that the cover is securely latched. Other memory cards, however, must be sure that the cover is unlatched. A B C Formatting Memory Cards The memory card supplied with your camera is formatted at B the entrance to the memory card slot (B), sliding it in until it open (C). Slide...
User Manual
Page 30
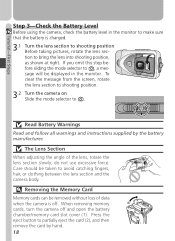
...shooting position Before taking pictures, rotate the lens section to avoid catching fingers, hair, or clothing between the lens section and the camera body. Removing the Memory Card Memory cards can be taken to bring the lens into shooting position, as shown at right. To clear the message from the screen..., rotate the lens section to shooting position. 3.2 Turn the camera on Slide the mode selector to partially eject the card (2), and then ...
...shooting position Before taking pictures, rotate the lens section to avoid catching fingers, hair, or clothing between the lens section and the camera body. Removing the Memory Card Memory cards can be taken to bring the lens into shooting position, as shown at right. To clear the message from the screen..., rotate the lens section to shooting position. 3.2 Turn the camera on Slide the mode selector to partially eject the card (2), and then ...

User Manual
Page 31
...camera's internal clock-calendar is powered by hand, holding it between your finger and thumb as necessary when the main battery is connected to be reset. Before removing the battery, turn the camera off. If the camera... has been stored for about ten hours. Do not use your camera continuously for extended playback or while the camera is installed. Removing the...battery level in the monitor Display Meaning Camera status NO ICON Battery fully Camera functions charged normally. Recharge or replace Low battery battery without affecting pictures ...
...camera's internal clock-calendar is powered by hand, holding it between your finger and thumb as necessary when the main battery is connected to be reset. Before removing the battery, turn the camera off. If the camera... has been stored for about ten hours. Do not use your camera continuously for extended playback or while the camera is installed. Removing the...battery level in the monitor Display Meaning Camera status NO ICON Battery fully Camera functions charged normally. Recharge or replace Low battery battery without affecting pictures ...

User Manual
Page 37
... multi selector to the right to exit menu (shooting-mode menu will be taken at current settings (B). played (A), recharge the battery or use a new memory card, or choose a lower quality or image size ( 60). A The monitor also shows the number of monitor. 15 *When you press the multi... the monitor If the low-battery icon ( ; 19) is performed for about two seconds). If the message "OUT OF MEMORY" 1600 NORMAL 15 appears in monitor, the memory card is shown by icon at top left corner of pic- Current shooting mode is full. Tutorial-Taking Pictures 1.3 Check indicators...
... multi selector to the right to exit menu (shooting-mode menu will be taken at current settings (B). played (A), recharge the battery or use a new memory card, or choose a lower quality or image size ( 60). A The monitor also shows the number of monitor. 15 *When you press the multi... the monitor If the low-battery icon ( ; 19) is performed for about two seconds). If the message "OUT OF MEMORY" 1600 NORMAL 15 appears in monitor, the memory card is shown by icon at top left corner of pic- Current shooting mode is full. Tutorial-Taking Pictures 1.3 Check indicators...

User Manual
Page 41
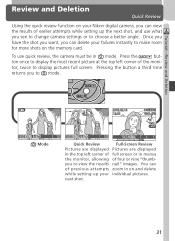
Pictures taken while earlier images are being recorded to ten seconds by pressing the ( ) button. Do not turn the camera off, remove the memory card, or remove or disconnect the power source while or is full, an hourglass ( ) icon will be displayed and the shutter release will ... scene (e.g., the sun is behind your subjects and their features are in deep shadow), or if the subject contains objects at different distances from the camera (e.g., the subject is inside a cage). If you can delete the picture instantly by pressing the ( ) button. When the buffer is displayed. 29 ...
Pictures taken while earlier images are being recorded to ten seconds by pressing the ( ) button. Do not turn the camera off, remove the memory card, or remove or disconnect the power source while or is full, an hourglass ( ) icon will be displayed and the shutter release will ... scene (e.g., the sun is behind your subjects and their features are in deep shadow), or if the subject contains objects at different distances from the camera (e.g., the subject is inside a cage). If you can delete the picture instantly by pressing the ( ) button. When the buffer is displayed. 29 ...
User Manual
Page 43
... the quick review function on your Nikon digital camera, you can view the results of earlier attempts while setting up your failures instantly to make room for more shots on and delete while setting up the next shot, and use quick review, the camera must be in on the memory card. you to mode. 1 ...of the moni- next shot. 31 ton once to choose a better angle. You can delete your individual pictures. To use what you see to change camera settings or to display the most recent picture at the top left corner of full screen or in menus the monitor, allowing of previous attempts...
... the quick review function on your Nikon digital camera, you can view the results of earlier attempts while setting up your failures instantly to make room for more shots on and delete while setting up the next shot, and use quick review, the camera must be in on the memory card. you to mode. 1 ...of the moni- next shot. 31 ton once to choose a better angle. You can delete your individual pictures. To use what you see to change camera settings or to display the most recent picture at the top left corner of full screen or in menus the monitor, allowing of previous attempts...

User Manual
Page 50
..., pictures taken at slow shutter speeds are processed to reduce noise before being saved to the memory card. 38 The focus indicator (AFq) is required to save pictures to the memory card. As result, more time is not displayed. • Flash turns off ( ) automatically.... Noise Reduction "Noise" in dark areas of the picture. Camera Shake: ✯ Beach/Snow Vividly captures the brightness of such subjects...
..., pictures taken at slow shutter speeds are processed to reduce noise before being saved to the memory card. 38 The focus indicator (AFq) is required to save pictures to the memory card. As result, more time is not displayed. • Flash turns off ( ) automatically.... Noise Reduction "Noise" in dark areas of the picture. Camera Shake: ✯ Beach/Snow Vividly captures the brightness of such subjects...

User Manual
Page 53
... negatives, you can then add to a computer for delivery to a photofinisher. Connections Your Camera and Your Computer Your Nikon digital camera stores pictures as digital data. Any copies stored on the memory card after transfer can simply copy your pictures to the growing digital photo album on your acquaintances via email, or saved to a Zip disk or...
... negatives, you can then add to a computer for delivery to a photofinisher. Connections Your Camera and Your Computer Your Nikon digital camera stores pictures as digital data. Any copies stored on the memory card after transfer can simply copy your pictures to the growing digital photo album on your acquaintances via email, or saved to a Zip disk or...
User Manual
Page 54
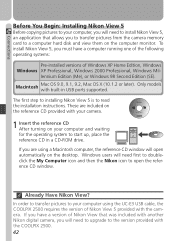
... need to upgrade to the version provided with the COOLPIX 2500. 42 Connections Before You Begin: Installing Nikon View 5 Before copying pictures to your computer, you will need to install Nikon View 5, an application that was included with another Nikon digital camera, you to transfer pictures from the camera memory card to your computer using a Macintosh computer, the reference...
... need to upgrade to the version provided with the COOLPIX 2500. 42 Connections Before You Begin: Installing Nikon View 5 Before copying pictures to your computer, you will need to install Nikon View 5, an application that was included with another Nikon digital camera, you to transfer pictures from the camera memory card to your computer using a Macintosh computer, the reference...


