
Instruction Manual
Page 3
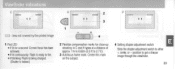
... throw used batteries into the fire. If someone accidentally swallows abattery, call adoctor immediately. Nikon cannot be held responsible for safe handling of the camera Camera body • Do not disassemble or modify the camera, as it houses high-voltage circui try wh ich can cause electric shocks. •... Do not touch inside metal portions of children's reach . WARNING: for malfunctions caused by using the Nuvis 11 Oi in ways not specified in injury. • Keep battery out of the flash if...
... throw used batteries into the fire. If someone accidentally swallows abattery, call adoctor immediately. Nikon cannot be held responsible for safe handling of the camera Camera body • Do not disassemble or modify the camera, as it houses high-voltage circui try wh ich can cause electric shocks. •... Do not touch inside metal portions of children's reach . WARNING: for malfunctions caused by using the Nuvis 11 Oi in ways not specified in injury. • Keep battery out of the flash if...

Instruction Manual
Page 4
... mode .. .... 32 Title recording funct ion 15 Anytime flash mode 33 Loading the film... .. ... 16 Slow sync flash mode 34 Basic operation 19 Remote control photography (optional 34 Holding the camera properly .. ..19 For safehandling of the camera 36 Shutter release operation 20 Camera care tips .... ... 36 Selecting aprint type 21 Notes on batteries ... 37...
... mode .. .... 32 Title recording funct ion 15 Anytime flash mode 33 Loading the film... .. ... 16 Slow sync flash mode 34 Basic operation 19 Remote control photography (optional 34 Holding the camera properly .. ..19 For safehandling of the camera 36 Shutter release operation 20 Camera care tips .... ... 36 Selecting aprint type 21 Notes on batteries ... 37...

Instruction Manual
Page 5
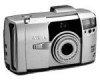
Camera parts 1 2 3 4 5 1 Remote control reception sensor (1& P. 35) 2 Flash (1& P. 31) 6 3 Viewfinder window 7 4 Shutter release button (1& P. 20) 8 5 Red-eye reduction/self-timer indicator lamp (1& p. 28, 29, 30, 35) 6 Auto exposure metering window 7 Power switch/Lens cover (1& P 9) 8 Autofocus windows (1& P 19) 9 9 Strap slot (1& P. 8) 5
Camera parts 1 2 3 4 5 1 Remote control reception sensor (1& P. 35) 2 Flash (1& P. 31) 6 3 Viewfinder window 7 4 Shutter release button (1& P. 20) 8 5 Red-eye reduction/self-timer indicator lamp (1& p. 28, 29, 30, 35) 6 Auto exposure metering window 7 Power switch/Lens cover (1& P 9) 8 Autofocus windows (1& P 19) 9 9 Strap slot (1& P. 8) 5
Instruction Manual
Page 6
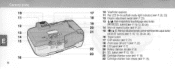
parts 10 11 12 15 16 6 17 10 Viewfinder eyepiece 11 Red LED (In-focus/flash ready-light indicator) (lIE P 20, 23) 18 12 Diopter adjustment switch (lIE P 23) 13 '1 /.... Flash mode/infinity focus/language select button (MO DE/SEL button)(1IE P 10-13, 30-34) 14 Mid-roll rewind button (lIE P 27...
parts 10 11 12 15 16 6 17 10 Viewfinder eyepiece 11 Red LED (In-focus/flash ready-light indicator) (lIE P 20, 23) 18 12 Diopter adjustment switch (lIE P 23) 13 '1 /.... Flash mode/infinity focus/language select button (MO DE/SEL button)(1IE P 10-13, 30-34) 14 Mid-roll rewind button (lIE P 27...
Instruction Manual
Page 7
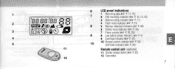
LCD panel indications 1 Recordi~g data (1& P 11 , 15) 2 Title recording indicator (1& P. 12, 13, 15) 3 Data recording indicator (1& P 11) 4 Flash mode indicator (1& P 31) 5 Red-eye reduction indicator (1& P 28) 6 Infinity focus indicator (1& P 30) 7 Frame counter (1& P 18, 26) 8 Low battery power indicator (1& P 9) 9 Cartridge indicator (1& P. 18) 10 Remote control indicator (1& P 34) Self-time r indicator (1& P 29) Remote control unit (optional) 11 Shutter release button (1& P 35) 12 Transmitter 7
LCD panel indications 1 Recordi~g data (1& P 11 , 15) 2 Title recording indicator (1& P. 12, 13, 15) 3 Data recording indicator (1& P 11) 4 Flash mode indicator (1& P 31) 5 Red-eye reduction indicator (1& P 28) 6 Infinity focus indicator (1& P 30) 7 Frame counter (1& P 18, 26) 8 Low battery power indicator (1& P 9) 9 Cartridge indicator (1& P. 18) 10 Remote control indicator (1& P 34) Self-time r indicator (1& P 29) Remote control unit (optional) 11 Shutter release button (1& P 35) 12 Transmitter 7
Instruction Manual
Page 19
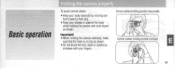
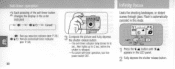
Correct camera holding position (horizontal) Correct camera holding the camera vertical ly, make sure that theflash is on top as shown. • Do not block the lens, flash or autofocus windows with both hands as shown. Basic operation Holding the camera properly To avoid camera shake: • Keep your body balanced by movi ng one foot forward a half step • Keep you r elbows inagainst the body while holding the camera with your fingers. Important! • When holding position (vertical) '0::: ,,\, 19
Correct camera holding position (horizontal) Correct camera holding the camera vertical ly, make sure that theflash is on top as shown. • Do not block the lens, flash or autofocus windows with both hands as shown. Basic operation Holding the camera properly To avoid camera shake: • Keep your body balanced by movi ng one foot forward a half step • Keep you r elbows inagainst the body while holding the camera with your fingers. Important! • When holding position (vertical) '0::: ,,\, 19
Instruction Manual
Page 23
... not covered by the printed image 1 Red LED • If lit for asecond Correct focus has been achieved. • If lit continuously: Flash is ready to fire. • If blinking: Flash is being charged. (Shutter is locked.) +t - [ !~11111 '*' 4 2 Parallax compensation marks for close-u p shooting in Cand Htypes at a distance of approx 1mto...
... not covered by the printed image 1 Red LED • If lit for asecond Correct focus has been achieved. • If lit continuously: Flash is ready to fire. • If blinking: Flash is being charged. (Shutter is locked.) +t - [ !~11111 '*' 4 2 Parallax compensation marks for close-u p shooting in Cand Htypes at a distance of approx 1mto...
Instruction Manual
Page 28
To reduce the "red-eye" effect, use this mode. Important! Advanced operation 28 Red-eye redyction mode .. .',. - ~ ~~ < ~, • ~- Red-eye reduction does not work with flash cancel and infinity focus modes. 1 Turn the cameraONand press the @ / Ii ~ button until @ appears in the LCDpane l. 2 Lightly press the shutter release button and confirm that the red LED lights up cont inuously, then fully depress the shutter release button to take the pictu re. Inflash photography,the subject's eyes may sometimes appear bright red.
To reduce the "red-eye" effect, use this mode. Important! Advanced operation 28 Red-eye redyction mode .. .',. - ~ ~~ < ~, • ~- Red-eye reduction does not work with flash cancel and infinity focus modes. 1 Turn the cameraONand press the @ / Ii ~ button until @ appears in the LCDpane l. 2 Lightly press the shutter release button and confirm that the red LED lights up cont inuously, then fully depress the shutter release button to take the pictu re. Inflash photography,the subject's eyes may sometimes appear bright red.
Instruction Manual
Page 30
... shutter is released. -To cancel self-timer operation, turn the power switch OFF. 30 1 Press the '1 /iii button until @ iIi appears in the order indicated. Flash isautomatical ly canceled in this mode. @ .
... shutter is released. -To cancel self-timer operation, turn the power switch OFF. 30 1 Press the '1 /iii button until @ iIi appears in the order indicated. Flash isautomatical ly canceled in this mode. @ .

Instruction Manual
Page 31
Flash photography With the camera turned ON, press the '1/j,l button to 9.5 It) Each pressing of the '1/j,l button changes the flash mode inthe order indicated. 'I AUTO : Auto flash (lIE P32) @ ~ : Infinity focus (lIE P 30) ® : Flash cancel (lIE P 32) ~ : Anytime flash (lIE P 33) ~~J~ ~ : Auto flash with flash, make sure the subject is withi n flash shooting distance range. Before shooting with slow...
Flash photography With the camera turned ON, press the '1/j,l button to 9.5 It) Each pressing of the '1/j,l button changes the flash mode inthe order indicated. 'I AUTO : Auto flash (lIE P32) @ ~ : Infinity focus (lIE P 30) ® : Flash cancel (lIE P 32) ~ : Anytime flash (lIE P 33) ~~J~ ~ : Auto flash with flash, make sure the subject is withi n flash shooting distance range. Before shooting with slow...

Instruction Manual
Page 32
Make sure that AUTO ~ is automatically activated whenever you turn the camera ON. Auto flash mode is displayed in the LCD panel To select Auto mode when in another flash mode, simply press the '1/'" button until AUTO 'I appears in the LCD panel Use the flash cancel mode to achieve anatural lighting effect in portraits and night scenes. 1 Press the '1/'" button until @ appears in the LC 0 panel 32 The default flash mode, auto flash mode is ideal for general photography: The camera senses when theavailablelight is low and automaticallyfires the flash.
Make sure that AUTO ~ is automatically activated whenever you turn the camera ON. Auto flash mode is displayed in the LCD panel To select Auto mode when in another flash mode, simply press the '1/'" button until AUTO 'I appears in the LCD panel Use the flash cancel mode to achieve anatural lighting effect in portraits and night scenes. 1 Press the '1/'" button until @ appears in the LC 0 panel 32 The default flash mode, auto flash mode is ideal for general photography: The camera senses when theavailablelight is low and automaticallyfires the flash.

Instruction Manual
Page 33
..., use a tripod to prevent camera shake. 2 Lightly press the shutter release button and confirm that the red LED lights up for asecond, then fully depress the shutter release button to take the picture. 1 Press the '1/;;' button until 'I appears in this mode, the flash fires every time, enabling you ...to achieve afill-flash effect when shooting asubject against abright background or in shadow. 2 Lightly press the shutter release button and confirm that the red LED is on, then fully depress the shutter release button to take the picture. Important! Since the camera tends to select slow ...
..., use a tripod to prevent camera shake. 2 Lightly press the shutter release button and confirm that the red LED lights up for asecond, then fully depress the shutter release button to take the picture. 1 Press the '1/;;' button until 'I appears in this mode, the flash fires every time, enabling you ...to achieve afill-flash effect when shooting asubject against abright background or in shadow. 2 Lightly press the shutter release button and confirm that the red LED is on, then fully depress the shutter release button to take the picture. Important! Since the camera tends to select slow ...

Instruction Manual
Page 34
Remote control photography Inself-timer mode, this mode. - Tocancel, press the @ /il ~ button again or tu rn the camera OFF. Slow sync flash mode Use this mode to 34 avoid camera shake. 1 Press the '1/Ai button until ~~J~ 'I appears in the LCDpanel. 2 Lightly press the shutter release button and confirmthat thered ... il~ appears in theLCD panel. -You can take as many pictu res as you wish in night and low light scenes. Since the camera selects slow shutter speeds in th is mode, use atripod to correctly expose both main subject and background in this opti onal device gives youcontrol...
Remote control photography Inself-timer mode, this mode. - Tocancel, press the @ /il ~ button again or tu rn the camera OFF. Slow sync flash mode Use this mode to 34 avoid camera shake. 1 Press the '1/Ai button until ~~J~ 'I appears in the LCDpanel. 2 Lightly press the shutter release button and confirmthat thered ... il~ appears in theLCD panel. -You can take as many pictu res as you wish in night and low light scenes. Since the camera selects slow shutter speeds in th is mode, use atripod to correctly expose both main subject and background in this opti onal device gives youcontrol...

Instruction Manual
Page 36
...near a heater. • Al low the camera to cool off after continuous flash firing Overuse generates heat in battery and camera. • The camera may damage the precision mechanism. • Prevent foreign matter from the lens. Camera care tips • Turn the camera OFF when not in use, to avoid accidental ... not used for a long time, take it out regularly, release the shutter and fire the flash a few times. 36 Immediately wipe salt, sand and dust from the camera with lens cleaner. Clean the autofocus windows with a soft cloth. • Never use a cloth moistened with a soft, dry ...
...near a heater. • Al low the camera to cool off after continuous flash firing Overuse generates heat in battery and camera. • The camera may damage the precision mechanism. • Prevent foreign matter from the lens. Camera care tips • Turn the camera OFF when not in use, to avoid accidental ... not used for a long time, take it out regularly, release the shutter and fire the flash a few times. 36 Immediately wipe salt, sand and dust from the camera with lens cleaner. Clean the autofocus windows with a soft cloth. • Never use a cloth moistened with a soft, dry ...
Instruction Manual
Page 38
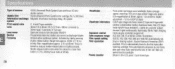
... release button locks when the subject is automatically thrust to turn the power ON/OFF Shutter Programmed electronic shutter; Lights continuously: flash ready; IX) system system Print aspect ratio C, Hand P-type available lens 30mm F/3.8-85mm F/9.5 (375mm-1 06mm converted to 35mm...85mm; approx. 0.5x magnification at 30mm, approx. 1.2x at 85mm; Auto rewind at the end of camera IX240 (Advanced Photo System) type autofocus AE lens- shutter camera Usable film IX240 (Advanced Photo System) film cartridge (167 x 30.2mm) Information exchange Magnetic Information Exchange...
... release button locks when the subject is automatically thrust to turn the power ON/OFF Shutter Programmed electronic shutter; Lights continuously: flash ready; IX) system system Print aspect ratio C, Hand P-type available lens 30mm F/3.8-85mm F/9.5 (375mm-1 06mm converted to 35mm...85mm; approx. 0.5x magnification at 30mm, approx. 1.2x at 85mm; Auto rewind at the end of camera IX240 (Advanced Photo System) type autofocus AE lens- shutter camera Usable film IX240 (Advanced Photo System) film cartridge (167 x 30.2mm) Information exchange Magnetic Information Exchange...
Instruction Manual
Page 39
...not used at 8Smm (ISO 200); Battery is the same as the camera body; Weight (with no AM/PM; before flash fires Battery life Approx. 17 rolls of 2S-exposure film with flash for half of the camera; Dateprinting: Y/M/D, Y/M/D/H/m, M/D/Y, M/DIY/H/m, D/M/Y, D/MIY/H/m, or No printing... (Y: year, M month, 0: day, H hour, m: minute); 24-hour cycle with battery): approx. 13g (0.5 oz) Four flash modes available: Auto flash , Flash cancel, Anytime flash and Slow sync flash ;...
...not used at 8Smm (ISO 200); Battery is the same as the camera body; Weight (with no AM/PM; before flash fires Battery life Approx. 17 rolls of 2S-exposure film with flash for half of the camera; Dateprinting: Y/M/D, Y/M/D/H/m, M/D/Y, M/DIY/H/m, D/M/Y, D/MIY/H/m, or No printing... (Y: year, M month, 0: day, H hour, m: minute); 24-hour cycle with battery): approx. 13g (0.5 oz) Four flash modes available: Auto flash , Flash cancel, Anytime flash and Slow sync flash ;...