
Instruction Manual
Page 2
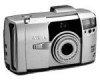
... below. Your new Nikon cameraemploys theAdvanced Photo System (IX240 System) and features: • Extremely simple"drop-in" film loading • 3 different print types on the same rol l of film • Accidental double exposures prevention • Convenient date/time and title printing a Advanced Photo System symbol is instruction manual thoroughly before use, and keep it close at hand unti l you for purchasing theNikon Nuvis 11 Oi camera. Foreword Thank...
... below. Your new Nikon cameraemploys theAdvanced Photo System (IX240 System) and features: • Extremely simple"drop-in" film loading • 3 different print types on the same rol l of film • Accidental double exposures prevention • Convenient date/time and title printing a Advanced Photo System symbol is instruction manual thoroughly before use, and keep it close at hand unti l you for purchasing theNikon Nuvis 11 Oi camera. Foreword Thank...
Instruction Manual
Page 3
... of the camera Camera body • Do not disassemble or modify the camera, as it houses high-voltage circui try wh ich can cause electric shocks. • Do not look at the sun directly through the viewfi nder, as it may damage you detect smoke around the camera, immediately stop operation and turn OFF the camera. Battery • Do not throw used batteries into...
... of the camera Camera body • Do not disassemble or modify the camera, as it houses high-voltage circui try wh ich can cause electric shocks. • Do not look at the sun directly through the viewfi nder, as it may damage you detect smoke around the camera, immediately stop operation and turn OFF the camera. Battery • Do not throw used batteries into...
Instruction Manual
Page 4
... use focus lock 25 Camera parts 5 Removing the film 26 Getting ready to take pictures 8 To rewind thefilm in mid-roll 27 Attaching the strap 8 Advanced operation 28 Installing the battery 8 Red-eye reduction mode 28 Turning the camera ON/OFF..... 9 Self-timer operation 29 Checking battery power 9 Infinity focus 30 Setting date and time 10 Flash photography 31 Data record ing function 11 Auto flash mode 32 Setting titles 12 Flash cancel mode .. .... 32 Title recording funct ion 15 Anytime flash mode 33 Loading the film...
... use focus lock 25 Camera parts 5 Removing the film 26 Getting ready to take pictures 8 To rewind thefilm in mid-roll 27 Attaching the strap 8 Advanced operation 28 Installing the battery 8 Red-eye reduction mode 28 Turning the camera ON/OFF..... 9 Self-timer operation 29 Checking battery power 9 Infinity focus 30 Setting date and time 10 Flash photography 31 Data record ing function 11 Auto flash mode 32 Setting titles 12 Flash cancel mode .. .... 32 Title recording funct ion 15 Anytime flash mode 33 Loading the film...
Instruction Manual
Page 5
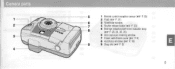
Camera parts 1 2 3 4 5 1 Remote control reception sensor (1& P. 35) 2 Flash (1& P. 31) 6 3 Viewfinder window 7 4 Shutter release button (1& P. 20) 8 5 Red-eye reduction/self-timer indicator lamp (1& p. 28, 29, 30, 35) 6 Auto exposure metering window 7 Power switch/Lens cover (1& P 9) 8 Autofocus windows (1& P 19) 9 9 Strap slot (1& P. 8) 5
Camera parts 1 2 3 4 5 1 Remote control reception sensor (1& P. 35) 2 Flash (1& P. 31) 6 3 Viewfinder window 7 4 Shutter release button (1& P. 20) 8 5 Red-eye reduction/self-timer indicator lamp (1& p. 28, 29, 30, 35) 6 Auto exposure metering window 7 Power switch/Lens cover (1& P 9) 8 Autofocus windows (1& P 19) 9 9 Strap slot (1& P. 8) 5
Instruction Manual
Page 7
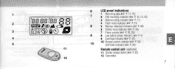
LCD panel indications 1 Recordi~g data (1& P 11 , 15) 2 Title recording indicator (1& P. 12, 13, 15) 3 Data recording indicator (1& P 11) 4 Flash mode indicator (1& P 31) 5 Red-eye reduction indicator (1& P 28) 6 Infinity focus indicator (1& P 30) 7 Frame counter (1& P 18, 26) 8 Low battery power indicator (1& P 9) 9 Cartridge indicator (1& P. 18) 10 Remote control indicator (1& P 34) Self-time r indicator (1& P 29) Remote control unit (optional) 11 Shutter release button (1& P 35) 12 Transmitter 7
LCD panel indications 1 Recordi~g data (1& P 11 , 15) 2 Title recording indicator (1& P. 12, 13, 15) 3 Data recording indicator (1& P 11) 4 Flash mode indicator (1& P 31) 5 Red-eye reduction indicator (1& P 28) 6 Infinity focus indicator (1& P 30) 7 Frame counter (1& P 18, 26) 8 Low battery power indicator (1& P 9) 9 Cartridge indicator (1& P. 18) 10 Remote control indicator (1& P 34) Self-time r indicator (1& P 29) Remote control unit (optional) 11 Shutter release button (1& P 35) 12 Transmitter 7
Instruction Manual
Page 9
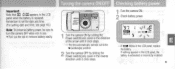
... battery power. 1 Turn the camera ON by sliding the Power switch/Lens cover in the LCD panel, the battery is replaced . Important! Remember to set the date and time. (For setting date and time, see page 10.) Note: To preserve battery power, be sure to turn the camera OFF when not in use. • Pullout the tab to the W(wideangle) position . 2 Turn the camera OFF by sliding the Power switch/Lens cover in the reverse direction until i.t click stops -I f ClIII blinks...
... battery power. 1 Turn the camera ON by sliding the Power switch/Lens cover in the LCD panel, the battery is replaced . Important! Remember to set the date and time. (For setting date and time, see page 10.) Note: To preserve battery power, be sure to turn the camera OFF when not in use. • Pullout the tab to the W(wideangle) position . 2 Turn the camera OFF by sliding the Power switch/Lens cover in the reverse direction until i.t click stops -I f ClIII blinks...

Instruction Manual
Page 11
Year/Month/Day" Hour/Minute No recording r l'91 y :1-.1 8:001-.1- - -IJ ' Or your photo lab if they can handle frontprinting and backprinting 1 Turn the cameraOFF. 2 Press the MODE/SEL button to be printed on the pictures varies depending on the film. Display LCD ~ Printing data mode panel indicator Frontprinting Backprinting - - - OFF M/D/Y M/D/Y ON Y/M/D Y/M/D/H/m No printing M/D/Y Y/M/D Y/M/D/H/m M/DIY/H/m M/D/Y H/m ON M/D/Y/H/m M/DIY/H/m - - - When ordering pri...
Year/Month/Day" Hour/Minute No recording r l'91 y :1-.1 8:001-.1- - -IJ ' Or your photo lab if they can handle frontprinting and backprinting 1 Turn the cameraOFF. 2 Press the MODE/SEL button to be printed on the pictures varies depending on the film. Display LCD ~ Printing data mode panel indicator Frontprinting Backprinting - - - OFF M/D/Y M/D/Y ON Y/M/D Y/M/D/H/m No printing M/D/Y Y/M/D Y/M/D/H/m M/DIY/H/m M/D/Y H/m ON M/D/Y/H/m M/DIY/H/m - - - When ordering pri...
Instruction Manual
Page 12
Notethat replacing a film cartridge or battery, turning the power OFF or taking apicture causes I ,title and language numbers appear in the LCD panel -Go ahead and take pictures at the factory. The title you do not need to set the left digit of the button changes the r display in 12 languages. sMaODE ---l ADJUST 3 Press theSEL button for each frame. A~--' >!eo ~~ I DA.TE -.. Nuvis 11 Oi offers title imprinting...
Notethat replacing a film cartridge or battery, turning the power OFF or taking apicture causes I ,title and language numbers appear in the LCD panel -Go ahead and take pictures at the factory. The title you do not need to set the left digit of the button changes the r display in 12 languages. sMaODE ---l ADJUST 3 Press theSEL button for each frame. A~--' >!eo ~~ I DA.TE -.. Nuvis 11 Oi offers title imprinting...
Instruction Manual
Page 20
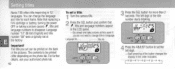
Important! Depressing the shutter release button with a jerky motion may cause camera shake. Keep the camera at least O.83m (27 tt) away from the subject, or the shutter wi ll lock. When the subject is locked. 2 Fully depress theshutter release button. - If the subject is ve ry close, the shutter wil l be released resu lting in focus, the red LED lights up for a second, and focus is in out of focus pictures. 20 Shutter release operation Lightly press the shutter release button to achieve focus. - To prevent this, press down smoothly and gently.
Important! Depressing the shutter release button with a jerky motion may cause camera shake. Keep the camera at least O.83m (27 tt) away from the subject, or the shutter wi ll lock. When the subject is locked. 2 Fully depress theshutter release button. - If the subject is ve ry close, the shutter wil l be released resu lting in focus, the red LED lights up for a second, and focus is in out of focus pictures. 20 Shutter release operation Lightly press the shutter release button to achieve focus. - To prevent this, press down smoothly and gently.
Instruction Manual
Page 24
Turn the camera ON. 24 2 Center theautofocus frame mark on the subject 3 Lightly press the shutter release button and confirm that the red LED lights up and theflash fires automatically. If there is not enough light, the red LED lights up for asecond. Important! Confirm theflash shooting distance range before shooting. (1& P 31)
Turn the camera ON. 24 2 Center theautofocus frame mark on the subject 3 Lightly press the shutter release button and confirm that the red LED lights up and theflash fires automatically. If there is not enough light, the red LED lights up for asecond. Important! Confirm theflash shooting distance range before shooting. (1& P 31)
Instruction Manual
Page 25
... pressed halfway. 4 Gently depress the shutter release button all the way to -camera II!!I distance after lightly pressing the shutter i i i release button toachieve focus. 25 "" , ; _I """", J'~ 2 Lightly press the shutter release button . -Make surethat the red LED lights up for a second. Focus is locked on the subject as long as the shutter release button is not in the center of the frame, use focus lock. 1 Center the autofocus frame mark on the subject...
... pressed halfway. 4 Gently depress the shutter release button all the way to -camera II!!I distance after lightly pressing the shutter i i i release button toachieve focus. 25 "" , ; _I """", J'~ 2 Lightly press the shutter release button . -Make surethat the red LED lights up for a second. Focus is locked on the subject as long as the shutter release button is not in the center of the frame, use focus lock. 1 Center the autofocus frame mark on the subject...

Instruction Manual
Page 26
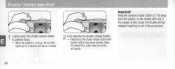
... film starts rewinding automatically -The frame counter counts backwards until the film is completely rewound. How to use focus lock by focusing on another subject equidistant from the camera and follow the procedure in this section. In the above cases, use focus lock 3 Keeping theshutter release button lightly pressed, recompose the scene. etc.) • Secondary subjects are closer to fully cover the autofocus frame mark. • Dark...
... film starts rewinding automatically -The frame counter counts backwards until the film is completely rewound. How to use focus lock by focusing on another subject equidistant from the camera and follow the procedure in this section. In the above cases, use focus lock 3 Keeping theshutter release button lightly pressed, recompose the scene. etc.) • Secondary subjects are closer to fully cover the autofocus frame mark. • Dark...
Instruction Manual
Page 28
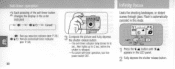
Advanced operation 28 Red-eye redyction mode .. .',. - ~ ~~ < ~, • ~- Important! Red-eye reduction does not work with flash cancel and infinity focus modes. 1 Turn the cameraONand press the @ / Ii ~ button until @ appears in the LCDpane l. 2 Lightly press the shutter release button and confirm that the red LED lights up cont inuously, then fully depress the shutter release button to take the pictu re. To reduce the "red-eye" effect, use this mode. Inflash photography,the subject's eyes may sometimes appear bright red.
Advanced operation 28 Red-eye redyction mode .. .',. - ~ ~~ < ~, • ~- Important! Red-eye reduction does not work with flash cancel and infinity focus modes. 1 Turn the cameraONand press the @ / Ii ~ button until @ appears in the LCDpane l. 2 Lightly press the shutter release button and confirm that the red LED lights up cont inuously, then fully depress the shutter release button to take the pictu re. To reduce the "red-eye" effect, use this mode. Inflash photography,the subject's eyes may sometimes appear bright red.
Instruction Manual
Page 30
...) @ iii ~. L @ ---. @ iii ~ ---. Infinity focus Useful for 2 sec. Remote control/self-timer indicator (lIE P 34) 3 Compose the picture and fu lly depress the shutter release button. -The self-timer indicator lamp blinks for 8 sec, then lights up for shooting landscapes, or distant scenes throughglass. Flash isautomatical ly canceled in the LCD panel 2 Fu lly depress theshutter release button. canCel ] ------- before the shutter is released. -To cancel self-timer operation, turn the power switch OFF. 30 1 Press...
...) @ iii ~. L @ ---. @ iii ~ ---. Infinity focus Useful for 2 sec. Remote control/self-timer indicator (lIE P 34) 3 Compose the picture and fu lly depress the shutter release button. -The self-timer indicator lamp blinks for 8 sec, then lights up for shooting landscapes, or distant scenes throughglass. Flash isautomatical ly canceled in the LCD panel 2 Fu lly depress theshutter release button. canCel ] ------- before the shutter is released. -To cancel self-timer operation, turn the power switch OFF. 30 1 Press...

Instruction Manual
Page 31
...): approx 0.83 to 2.9m (2.7 to select the desired flash mode. Flash photography With the camera turned ON, press the '1/j,l button to 9.5 It) Each pressing of the '1/j,l button changes the flash mode inthe order indicated. 'I AUTO : Auto flash (lIE P32) @ ~ : Infinity focus (lIE P 30) ® : Flash cancel (lIE P 32) ~ : Anytime flash (lIE P 33) ~~J~ ~ : Auto flash with flash, make sure the subject is withi n flash shooting distance range. Before shooting with slow sync (lIE P 34) 31 Important!
...): approx 0.83 to 2.9m (2.7 to select the desired flash mode. Flash photography With the camera turned ON, press the '1/j,l button to 9.5 It) Each pressing of the '1/j,l button changes the flash mode inthe order indicated. 'I AUTO : Auto flash (lIE P32) @ ~ : Infinity focus (lIE P 30) ® : Flash cancel (lIE P 32) ~ : Anytime flash (lIE P 33) ~~J~ ~ : Auto flash with flash, make sure the subject is withi n flash shooting distance range. Before shooting with slow sync (lIE P 34) 31 Important!
Instruction Manual
Page 33
... this mode, use a tripod to prevent camera shake. In this mode, the flash fires every time, enabling you to achieve afill-flash effect when shooting asubject against abright background or in shadow. 2 Lightly press the shutter release button and confirm that the red LED lights up for asecond, then fully depress the shutter release button to take the picture. Important! Since the camera tends to select slow shutter speeds in...
... this mode, use a tripod to prevent camera shake. In this mode, the flash fires every time, enabling you to achieve afill-flash effect when shooting asubject against abright background or in shadow. 2 Lightly press the shutter release button and confirm that the red LED lights up for asecond, then fully depress the shutter release button to take the picture. Important! Since the camera tends to select slow shutter speeds in...

Instruction Manual
Page 34
...-timer mode, this mode. - Since the camera selects slow shutter speeds in th is on, then fu lly depress the shutter release button. 1 Press the @ /il ~ button until @ il~ appears in theLCD panel. -You can take as many pictu res as you wish in night and low light scenes. Tocancel, press the @ /il ~ button again or tu rn the camera OFF. Important! Slow sync flash mode Use...
...-timer mode, this mode. - Since the camera selects slow shutter speeds in th is on, then fu lly depress the shutter release button. 1 Press the @ /il ~ button until @ il~ appears in theLCD panel. -You can take as many pictu res as you wish in night and low light scenes. Tocancel, press the @ /il ~ button again or tu rn the camera OFF. Important! Slow sync flash mode Use...

Instruction Manual
Page 35
... up to direct sunlight or other strong light, the remote control unit will not operate properly. Do not replace thebattery you rself . 3 Aimthe remote control unit at a Nikon service center. II 35 before the shutter is exhausted, it can be automatically canceled if not in use the self-timer mode instead. 2 Compose the picture Important! • Place the camera on the camera is exposed...
... up to direct sunlight or other strong light, the remote control unit will not operate properly. Do not replace thebattery you rself . 3 Aimthe remote control unit at a Nikon service center. II 35 before the shutter is exhausted, it can be automatically canceled if not in use the self-timer mode instead. 2 Compose the picture Important! • Place the camera on the camera is exposed...
Instruction Manual
Page 38
.... 1.2x at infinity 38 Viewfinder Viewfinder information Exposure controf Auto exposure range Fifm speed setting Fifm operation Frame counter Porro prism real-image zoom viewfinder; diopter adjustment: -1.0 to the first frame after each shot; Lights continuously: flash ready; Fi lm is lightly pressed; Lights for H-type printed image area; Drop-in the LCD panel; Film automatically advances by lightly pressing shutter release button; Mid-roll rewind function available Shown in loading system; shutter camera Usable film IX240 (Advanced Photo System) film cartridge (167 x 30...
.... 1.2x at infinity 38 Viewfinder Viewfinder information Exposure controf Auto exposure range Fifm speed setting Fifm operation Frame counter Porro prism real-image zoom viewfinder; diopter adjustment: -1.0 to the first frame after each shot; Lights continuously: flash ready; Fi lm is lightly pressed; Lights for H-type printed image area; Drop-in the LCD panel; Film automatically advances by lightly pressing shutter release button; Mid-roll rewind function available Shown in loading system; shutter camera Usable film IX240 (Advanced Photo System) film cartridge (167 x 30...
Instruction Manual
Page 39
... Dimensions (WxHxD) Approx. 121 x 67 x47mm (4.8 x 2.6 x 1.9 in .); Self-timer Remote control optional accessory Buill-in front of the camera; Shutter release button is available for approx. 10years; leap year adjustment until 2030; Sm (16 ft.) straight in flash Red-eye reduction mode Electronically controlled; before flash fires Battery life Approx. 17 rolls of 2S-exposure film with flash for approx. 1sec. duration; Automatically canceled after 3 min...
... Dimensions (WxHxD) Approx. 121 x 67 x47mm (4.8 x 2.6 x 1.9 in .); Self-timer Remote control optional accessory Buill-in front of the camera; Shutter release button is available for approx. 10years; leap year adjustment until 2030; Sm (16 ft.) straight in flash Red-eye reduction mode Electronically controlled; before flash fires Battery life Approx. 17 rolls of 2S-exposure film with flash for approx. 1sec. duration; Automatically canceled after 3 min...


