User Guide
Page 1
... servicing instructions are qualified to rain or moisture. 1 The lightning flash with arrowhead symbol, within an equilateral triangle, is intended to alert the user to service manual for use by qualified service personnel only. POWER SUPPLY: Connect the supplied adapter to persons. NOTE: Before plugging the power cord into an AC outlet, make sure that contained in the USB port. REFER SERVICING TO...
... servicing instructions are qualified to rain or moisture. 1 The lightning flash with arrowhead symbol, within an equilateral triangle, is intended to alert the user to service manual for use by qualified service personnel only. POWER SUPPLY: Connect the supplied adapter to persons. NOTE: Before plugging the power cord into an AC outlet, make sure that contained in the USB port. REFER SERVICING TO...
User Guide
Page 3
... the GPS hardware and GPS operating software. This product should not be exposed to excessive heat such as a navigational aid. This device complies with the same or equivalent type. Important Safety Instructions Warning Failure to avoid the following two conditions: (1) This device may not cause harmful interference, and (2) This device must accept any purpose requiring precise measurement of direction, distance, location, or...
... the GPS hardware and GPS operating software. This product should not be exposed to excessive heat such as a navigational aid. This device complies with the same or equivalent type. Important Safety Instructions Warning Failure to avoid the following two conditions: (1) This device may not cause harmful interference, and (2) This device must accept any purpose requiring precise measurement of direction, distance, location, or...
User Guide
Page 4
... reasonable protection against harmful interference in accordance with limits for Class B digital device, pursuant to part 15 of the following measures: 1. Connect the equipment into an outlet on , the user is connected. 3. Reorient or relocate the receiving antenna. 2. These limits are only for help. Important Safety Instructions Note: This equipment has been tested and found to comply with the...
... reasonable protection against harmful interference in accordance with limits for Class B digital device, pursuant to part 15 of the following measures: 1. Connect the equipment into an outlet on , the user is connected. 3. Reorient or relocate the receiving antenna. 2. These limits are only for help. Important Safety Instructions Note: This equipment has been tested and found to comply with the...
User Guide
Page 6
Contents Important Safety Instructions Accessories View of Main Unit System Connections Power Supply Preparation General Setup Playback Functions Voice Recorder File Manager Calculator and Alarm Use of the Mount Accessories Troubleshooting Specifications 1 5 7 8 10 12 16 20 21 22 23 24 26 6
Contents Important Safety Instructions Accessories View of Main Unit System Connections Power Supply Preparation General Setup Playback Functions Voice Recorder File Manager Calculator and Alarm Use of the Mount Accessories Troubleshooting Specifications 1 5 7 8 10 12 16 20 21 22 23 24 26 6

User Guide
Page 7
... card into the slot. 4. Used to connect to charge the unit. USB Charging Port Connect to the supplied adapter to the USB device. 6. LCD Screen 8. When the earphones are connected to enter or exit the standby mode. 3. Charge Indicator When charging the battery, it is fully charged, it turns green. 7. Standby Button Press for private listening. View of Main Unit 1. Earphone Jack Used to switch power on or off automatically. 5. When the battery is red. ON/OFF Switch Used...
... card into the slot. 4. Used to connect to charge the unit. USB Charging Port Connect to the supplied adapter to the USB device. 6. LCD Screen 8. When the earphones are connected to enter or exit the standby mode. 3. Charge Indicator When charging the battery, it is fully charged, it turns green. 7. Standby Button Press for private listening. View of Main Unit 1. Earphone Jack Used to switch power on or off automatically. 5. When the battery is red. ON/OFF Switch Used...
User Guide
Page 14
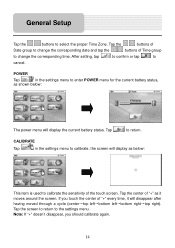
... below : This item is used to change the corresponding date and tap the buttons of "+" every time, it moves around the screen. After setting, tap to confirm or tap to return. Tap the center of the touch screen. If you should calibrate again. 14 CALIBRATE Tap in the settings menu to enter POWER menu for the current battery status, as below : The power menu will display the current battery status. Note: If...
... below : This item is used to change the corresponding date and tap the buttons of "+" every time, it moves around the screen. After setting, tap to confirm or tap to return. Tap the center of the touch screen. If you should calibrate again. 14 CALIBRATE Tap in the settings menu to enter POWER menu for the current battery status, as below : The power menu will display the current battery status. Note: If...
User Guide
Page 15
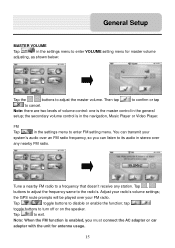
... buttons to enter FM setting menu. You can listen to turn off or on the speaker. Tap to adjust the master volume. General Setup MASTER VOLUME Tap in the settings menu to enter VOLUME setting menu for antenna usage. 15 Adjust your FM radio. tap / toggle buttons to its audio in stereo over an FM radio frequency, so you must connect the AC adapter or car adapter with the unit for master volume adjusting...
... buttons to enter FM setting menu. You can listen to turn off or on the speaker. Tap to adjust the master volume. General Setup MASTER VOLUME Tap in the settings menu to enter VOLUME setting menu for antenna usage. 15 Adjust your FM radio. tap / toggle buttons to its audio in stereo over an FM radio frequency, so you must connect the AC adapter or car adapter with the unit for master volume adjusting...
User Guide
Page 16
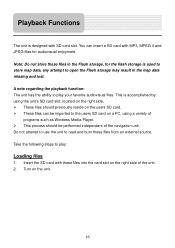
... : Loading files 1. Take the following steps to open the Flash storage may result in the Flash storage, for audiovisual enjoyment. This is designed with SD card slot. Insert the SD card with MP3, MPEG-4 and JPEG files for the flash storage is used to store map data, any attempt to play your favorite audiovisual files. Turn on the right side of the navigation unit. Playback Functions The unit...
... : Loading files 1. Take the following steps to open the Flash storage may result in the Flash storage, for audiovisual enjoyment. This is designed with SD card slot. Insert the SD card with MP3, MPEG-4 and JPEG files for the flash storage is used to store map data, any attempt to play your favorite audiovisual files. Turn on the right side of the navigation unit. Playback Functions The unit...
User Guide
Page 18
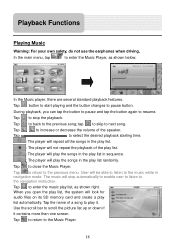
...Use the scroll bar to the navigation instruction. User will play list. : The player will not repeat the playback of the speaker. to select the desired playback starting time. : The player will repeat all the songs in the play the songs in navigation mode. Tap to increase or decrease the volume of the play list...menu. When you can tap the button to pause and tap the button again to pause button. The music will look for audio files on its SD memory card and create a play list, the system will stop the playback. Tap button to start playing and the button changes ...
...Use the scroll bar to the navigation instruction. User will play list. : The player will not repeat the playback of the speaker. to select the desired playback starting time. : The player will repeat all the songs in the play the songs in navigation mode. Tap to increase or decrease the volume of the play list...menu. When you can tap the button to pause and tap the button again to pause button. The music will look for audio files on its SD memory card and create a play list, the system will stop the playback. Tap button to start playing and the button changes ...
User Guide
Page 22
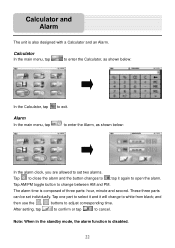
... The unit is disabled. 22 Tap AM/PM toggle button to white from black; Tap one part to select it and it again to adjust corresponding time. Note: When in the standby mode, the alarm function is also designed with a Calculator and an Alarm. tap it will change to change between AM and PM. Calculator In the main menu, tap to enter...
... The unit is disabled. 22 Tap AM/PM toggle button to white from black; Tap one part to select it and it again to adjust corresponding time. Note: When in the standby mode, the alarm function is also designed with a Calculator and an Alarm. tap it will change to change between AM and PM. Calculator In the main menu, tap to enter...
User Guide
Page 23
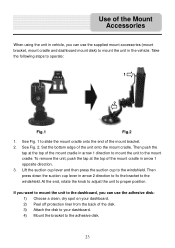
... Lift the suction cup lever and then press the suction cup to operate: 1 2 Fig.1 Fig.2 1. Use of the Mount Accessories When using the unit in vehicle, you can use the adhesive disk: 1) Choose a clean, dry spot on your ...mount the unit to the dashboard, you can use the supplied mount accessories (mount bracket, mount cradle and dashboard mount disk) to mount the unit in arrow 2 direction to fix the bracket to the mount cradle. Set the bottom edge of the mount bracket. 2. To remove the unit, push the tap at the top of the mount cradle in arrow 1 direction to mount the unit...
... Lift the suction cup lever and then press the suction cup to operate: 1 2 Fig.1 Fig.2 1. Use of the Mount Accessories When using the unit in vehicle, you can use the adhesive disk: 1) Choose a clean, dry spot on your ...mount the unit to the dashboard, you can use the supplied mount accessories (mount bracket, mount cradle and dashboard mount disk) to mount the unit in arrow 2 direction to fix the bracket to the mount cradle. Set the bottom edge of the mount bracket. 2. To remove the unit, push the tap at the top of the mount cradle in arrow 1 direction to mount the unit...
User Guide
Page 24
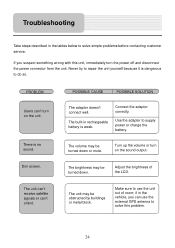
... power connector from the unit. The brightness may be turned down or mute. Make sure to supply power or charge the battery. if in the vehicle, you suspect something wrong with this problem. 24 PROBLEM Users can use the unit out of the LCD. There is weak. POSSIBLE CAUSE POSSIBLE SOLUTION The adaptor doesn't connect well. Turn up the volume or turn on the sound output. Never try to repair the unit...
... power connector from the unit. The brightness may be turned down or mute. Make sure to supply power or charge the battery. if in the vehicle, you suspect something wrong with this problem. 24 PROBLEM Users can use the unit out of the LCD. There is weak. POSSIBLE CAUSE POSSIBLE SOLUTION The adaptor doesn't connect well. Turn up the volume or turn on the sound output. Never try to repair the unit...
Software Manual
Page 2
... streets necessary for a prolonged time, always park the car in a safe manner and in roads, traffic controls and driving conditions. Do not select or input destinations, change settings or otherwise manually operate this situation will incorrectly display the vehicle's position on the road instead of road closures, construction, weather, new roads and other means to -date. The database utilized by the software. Because of looking at all traffic regulations. Usually this software...
... streets necessary for a prolonged time, always park the car in a safe manner and in roads, traffic controls and driving conditions. Do not select or input destinations, change settings or otherwise manually operate this situation will incorrectly display the vehicle's position on the road instead of road closures, construction, weather, new roads and other means to -date. The database utilized by the software. Because of looking at all traffic regulations. Usually this software...
Software Manual
Page 3
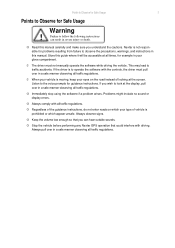
... injury or death. If the driver is prohibited or which your type of looking at the display, pull over in a safe manner observing all times, for Safe Usage Warning ! Read this guide where it will be accessible at all traffic regulations. Regardless of the guidance instructions, do not enter roads on the road instead of vehicle is to traffic accidents. Problems might include no sound or display errors.
... injury or death. If the driver is prohibited or which your type of looking at the display, pull over in a safe manner observing all times, for Safe Usage Warning ! Read this guide where it will be accessible at all traffic regulations. Regardless of the guidance instructions, do not enter roads on the road instead of vehicle is to traffic accidents. Problems might include no sound or display errors.
Software Manual
Page 4
...5 - Icons and Controls 18 Compass and GPS ...18 User Interface Controls and Icons ...18 Turn-By-Turn Icons ...20 Set Destinations 9 To Set a Destination Using an Address 9 To Set a Destination Using a Point Of Interest 10 To Set a Destination Using Cross Roads 11 To Set a Destination Using an Item in Favorites 12 To Cancel a Route ...12 To Save a Destination as a Favorite or Home Location 13 4 - 4 Contents Nextar Software Manual 1 - Nextar Basics 5 Main Map Display ...5 Map Displays Modes...5 Turn-By-Turn Views ...6 Browsing the Map Display ...7 Zooming In and Out ...7 Data Entry...
...5 - Icons and Controls 18 Compass and GPS ...18 User Interface Controls and Icons ...18 Turn-By-Turn Icons ...20 Set Destinations 9 To Set a Destination Using an Address 9 To Set a Destination Using a Point Of Interest 10 To Set a Destination Using Cross Roads 11 To Set a Destination Using an Item in Favorites 12 To Cancel a Route ...12 To Save a Destination as a Favorite or Home Location 13 4 - 4 Contents Nextar Software Manual 1 - Nextar Basics 5 Main Map Display ...5 Map Displays Modes...5 Turn-By-Turn Views ...6 Browsing the Map Display ...7 Zooming In and Out ...7 Data Entry...
Software Manual
Page 5
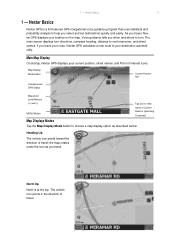
...-featured GPS navigational voice guidance program that uses statistical and probability analysis to view name of Interest icons. Nextar Basics Nextar GPS is at the top. Map Display Mode button Current Position Icon Compass and GPS Status Map Zoom Level Buttons (+) and (-) MENU Button Tap icon to help you travel , Nextar GPS displays your destination automatically. If you travel . As you leave your route, Nextar GPS calculates a new route to choose a map display option as you select and set destinations quickly and easily. 1 - Main Map Display On startup, Nextar...
...-featured GPS navigational voice guidance program that uses statistical and probability analysis to view name of Interest icons. Nextar Basics Nextar GPS is at the top. Map Display Mode button Current Position Icon Compass and GPS Status Map Zoom Level Buttons (+) and (-) MENU Button Tap icon to help you travel , Nextar GPS displays your destination automatically. If you travel . As you leave your route, Nextar GPS calculates a new route to choose a map display option as you select and set destinations quickly and easily. 1 - Main Map Display On startup, Nextar...
Software Manual
Page 13
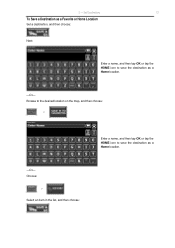
Set Destinations 13 To Save a Destination as a Favorite or Home Location Set a destination, and then choose: Next: Enter a name, and then tap OK or tap the HOME icon to save the destination as a Home location. -Or- 2 - Choose: > Select an item in the list, and then choose: Browse to the desired location on the map, and then choose: > Enter a name, and then tap OK or tap the HOME icon to save the destination as a Home location. -Or-
Set Destinations 13 To Save a Destination as a Favorite or Home Location Set a destination, and then choose: Next: Enter a name, and then tap OK or tap the HOME icon to save the destination as a Home location. -Or- 2 - Choose: > Select an item in the list, and then choose: Browse to the desired location on the map, and then choose: > Enter a name, and then tap OK or tap the HOME icon to save the destination as a Home location. -Or-
Software Manual
Page 18
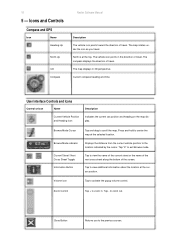
... current car position and heading on the map display. Zoom Control Tap + to activate the popup volume control. The vehicle icon points in 3D perspective. Current Street / Next Cross Street Toggle Information Button Tap to the previous screen. Close Button Returns you travel . to scroll the map. Icons and Controls Compass and GPS Icon Name Heading-Up North-Up 3-D Compass Nextar Software Manual Description The vehicle icon points toward the direction of the screen. Current compass heading and time. Browse Mode...
... current car position and heading on the map display. Zoom Control Tap + to activate the popup volume control. The vehicle icon points in 3D perspective. Current Street / Next Cross Street Toggle Information Button Tap to the previous screen. Close Button Returns you travel . to scroll the map. Icons and Controls Compass and GPS Icon Name Heading-Up North-Up 3-D Compass Nextar Software Manual Description The vehicle icon points toward the direction of the screen. Current compass heading and time. Browse Mode...

Software Manual
Page 19
... selected location in the Favorites list, and then start voice guidance and Turn-By-Turn views to the selected location. Map Button Tap to return to the data entry screen. VIEW Options Button GO / SAVE & GO Cycles the main display through the route calculation criteria options. Scroll Buttons When available, allows you to the next action. Highlighted keyboard letters Displays all possible selections based on the characters entered thus far. Keys When available, returns you to delete...
... selected location in the Favorites list, and then start voice guidance and Turn-By-Turn views to the selected location. Map Button Tap to return to the data entry screen. VIEW Options Button GO / SAVE & GO Cycles the main display through the route calculation criteria options. Scroll Buttons When available, allows you to the next action. Highlighted keyboard letters Displays all possible selections based on the characters entered thus far. Keys When available, returns you to delete...
Software Manual
Page 20
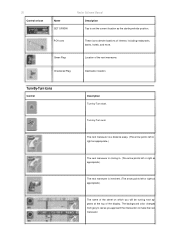
POI Icons These icons denote locations of the next maneuver. Checkered Flag Destination location. The background color changes from grey to red as you approach the intersection to set the current location as appropriate.) The name of the street on which you will be turning next appears at the top of the display. Turn-By-Turn Icons Control Description Turn-by -Turn end. 20 Control or Icon Name SET ORIGIN Nextar Software Manual Description...
POI Icons These icons denote locations of the next maneuver. Checkered Flag Destination location. The background color changes from grey to red as you approach the intersection to set the current location as appropriate.) The name of the street on which you will be turning next appears at the top of the display. Turn-By-Turn Icons Control Description Turn-by -Turn end. 20 Control or Icon Name SET ORIGIN Nextar Software Manual Description...


