GS716Tv2/GS724Tv3 Hardware manual
Page 9
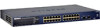
... 802.3x pause frame flow control. • Active flow control to build the packet-forwarding information table. Reset PWR ® ProSafe 24 Port Gigabit Smart Switch 1 3 5 7 9 11 13 15 17 19 21 23 LINK/ACT SPD Green (1000M) Yellow ... 23T 14 16 18 20 22 24T 23F 24F Link/ Link/ ACT ACT MODEL GS724T Auto™ Uplink Factory Defaults Figure 1-1 Introduction 1-3 v1.0, June 2009 GS716T/GS724T Hardware Installation Guide • Automatic address learning function ...Package Contents Figure 1-1 shows the package contents of the NETGEAR GS716T and GS724T Series Smart Switch.
... 802.3x pause frame flow control. • Active flow control to build the packet-forwarding information table. Reset PWR ® ProSafe 24 Port Gigabit Smart Switch 1 3 5 7 9 11 13 15 17 19 21 23 LINK/ACT SPD Green (1000M) Yellow ... 23T 14 16 18 20 22 24T 23F 24F Link/ Link/ ACT ACT MODEL GS724T Auto™ Uplink Factory Defaults Figure 1-1 Introduction 1-3 v1.0, June 2009 GS716T/GS724T Hardware Installation Guide • Automatic address learning function ...Package Contents Figure 1-1 shows the package contents of the NETGEAR GS716T and GS724T Series Smart Switch.

GS716Tv2/GS724Tv3 Hardware manual
Page 11
... of sensing the line speed and negotiating the operation duplex mode with the link partner automatically Figure 2-1 illustrates the NETGEAR GS716T Smart Switch front panel: System LEDs Reset PWR ® ProSafe 16 Port Gigabit Smart Switch 1 3 5 7 9 11 13 15 LINK/ACT SPD Green (1000M) Yellow (100M) FDX 2 4 .../1000 Mbps auto sensing Gigabit Ethernet switching ports. • Two SFP slots for SFP modules supporting 1000 (1000BASE-SX/LX)/100 Mbps SFP. • Reset button to restart the device. • Recessed default reset button to restore the device back to the factory defaults. • Port...
... of sensing the line speed and negotiating the operation duplex mode with the link partner automatically Figure 2-1 illustrates the NETGEAR GS716T Smart Switch front panel: System LEDs Reset PWR ® ProSafe 16 Port Gigabit Smart Switch 1 3 5 7 9 11 13 15 LINK/ACT SPD Green (1000M) Yellow (100M) FDX 2 4 .../1000 Mbps auto sensing Gigabit Ethernet switching ports. • Two SFP slots for SFP modules supporting 1000 (1000BASE-SX/LX)/100 Mbps SFP. • Reset button to restart the device. • Recessed default reset button to restore the device back to the factory defaults. • Port...
GS716Tv2/GS724Tv3 Hardware manual
Page 12
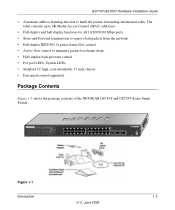
... capable of sensing the line speed and negotiating the operation duplex mode with the link partner automatically Figure 2-3 illustrates the NETGEAR GS724T Smart Switch front panel: System LEDs Reset PWR ® ProSafe 24 Port Gigabit Smart Switch 1 3 5 7 9 11 13 15 17 19 21 23 LINK/ACT SPD Green (1000M) Yellow (100M)... ACT ACT MODEL GS724T Auto™ Uplink Factory Defaults Figure 2-3 10/100/1000 Mbps Ethernet Ports SFP Ports The front panel contains the following: • 24 RJ-45 connectors for 10/100/1000 Mbps auto-sensing Gigabit Ethernet switching ports. • Two slots for SFP...
... capable of sensing the line speed and negotiating the operation duplex mode with the link partner automatically Figure 2-3 illustrates the NETGEAR GS724T Smart Switch front panel: System LEDs Reset PWR ® ProSafe 24 Port Gigabit Smart Switch 1 3 5 7 9 11 13 15 17 19 21 23 LINK/ACT SPD Green (1000M) Yellow (100M)... ACT ACT MODEL GS724T Auto™ Uplink Factory Defaults Figure 2-3 10/100/1000 Mbps Ethernet Ports SFP Ports The front panel contains the following: • 24 RJ-45 connectors for 10/100/1000 Mbps auto-sensing Gigabit Ethernet switching ports. • Two slots for SFP...
GS716Tv2/GS724Tv3 Hardware manual
Page 29
... 100BASE-TX 1-2 10BASE-T 1-2 1U 1-3 8-pin 2-8 A AC Power 2-6, 2-7 AGM731F 2-9 AGM732F 2-9 AGM733 2-9 Applying AC Power 4-17 Attaching Switch to a Rack 4-15 Auto Sensing 1-2 Auto Uplink 2-8, 2-9 Auto-negotiating 1-2 Auto-sensing 2-8 B Back-pressure 1-3 Brackets 4-14 C Category 5...to the Switch 4-16 Copper 1-1 Crossover 2-8 D Default IP Address 4-18 Default Reset Button 2-5, 2-6 Device Hardware Interfaces 2-8 Duplex Mode 2-8 E Example of Desktop Switching 3-11 F Factory Default Button 2-9 Factory Defaults 2-5 Fiber Connectivity 1-1 Flat Surface 4-14 Full-duplex 1-2 G GBIC 1-2, 2-9 Gigabit Ports ...
... 100BASE-TX 1-2 10BASE-T 1-2 1U 1-3 8-pin 2-8 A AC Power 2-6, 2-7 AGM731F 2-9 AGM732F 2-9 AGM733 2-9 Applying AC Power 4-17 Attaching Switch to a Rack 4-15 Auto Sensing 1-2 Auto Uplink 2-8, 2-9 Auto-negotiating 1-2 Auto-sensing 2-8 B Back-pressure 1-3 Brackets 4-14 C Category 5...to the Switch 4-16 Copper 1-1 Crossover 2-8 D Default IP Address 4-18 Default Reset Button 2-5, 2-6 Device Hardware Interfaces 2-8 Duplex Mode 2-8 E Example of Desktop Switching 3-11 F Factory Default Button 2-9 Factory Defaults 2-5 Fiber Connectivity 1-1 Flat Surface 4-14 Full-duplex 1-2 G GBIC 1-2, 2-9 Gigabit Ports ...
GS716Tv2/GS724Tv3 Software Admin Manual
Page 43
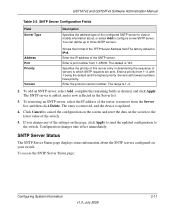
GS716Tv2 and GS724Tv3 Software Administration Manual Table 2-5. Address Port Priority Version Shows the format of the ...65535. The range is 123. To removing an SNTP server, select the IP address of the TFTP Server Address field The factory default is IPv4. The default is 1-4. 2. Servers with 1 being the default and the highest priority. The entry is ... July 2009 2-11 Enter the IP address of the switch. 5. The SNTP server is added, and is updated. 4. Click Cancel to cancel the configuration on the screen and reset the data on the screen to view or modify information ...
GS716Tv2 and GS724Tv3 Software Administration Manual Table 2-5. Address Port Priority Version Shows the format of the ...65535. The range is 123. To removing an SNTP server, select the IP address of the TFTP Server Address field The factory default is IPv4. The default is 1-4. 2. Servers with 1 being the default and the highest priority. The entry is ... July 2009 2-11 Enter the IP address of the switch. 5. The SNTP server is added, and is updated. 4. Click Cancel to cancel the configuration on the screen and reset the data on the screen to view or modify information ...
GS716Tv2/GS724Tv3 Software Admin Manual
Page 53
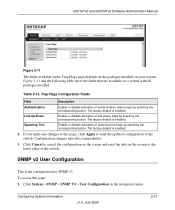
...button. The factory default is enabled. Configuring System Information v1.0, July 2009 2-21 The factory default is enabled. 2. Click Cancel to cancel the configuration on the screen and reset the data on your system. GS716Tv2 and GS724Tv3 Software Administration ...Manual Figure 2-11 The fields available on the Trap Flags page depends on the packages installed on the screen to the latest value of the switch...
...button. The factory default is enabled. Configuring System Information v1.0, July 2009 2-21 The factory default is enabled. 2. Click Cancel to cancel the configuration on the screen and reset the data on your system. GS716Tv2 and GS724Tv3 Software Administration ...Manual Figure 2-11 The fields available on the Trap Flags page depends on the packages installed on the screen to the latest value of the switch...
GS716Tv2/GS724Tv3 Software Admin Manual
Page 67
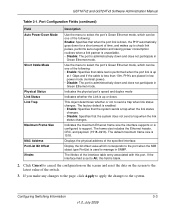
...payload. (1518-9216). Displays the physical address of the switch. 3. Click Cancel to cancel the configuration on the screen and reset the data on the screen to check link pulses, ...mode Indicates whether the Link is up to the latest value of the specified interface. The factory default is enabled: • Enable: Specifies that the system sends a trap when the ...the link status changes. GS716Tv2 and GS724Tv3 Software Administration Manual Table 3-1. Use the menu to select the port's Green Ethernet mode, which corresponds to manage in Green Ethernet mode. Indicates the ...
...payload. (1518-9216). Displays the physical address of the switch. 3. Click Cancel to cancel the configuration on the screen and reset the data on the screen to check link pulses, ...mode Indicates whether the Link is up to the latest value of the specified interface. The factory default is enabled: • Enable: Specifies that the system sends a trap when the ...the link status changes. GS716Tv2 and GS724Tv3 Software Administration Manual Table 3-1. Use the menu to select the port's Green Ethernet mode, which corresponds to manage in Green Ethernet mode. Indicates the ...
GS716Tv2/GS724Tv3 Software Admin Manual
Page 80
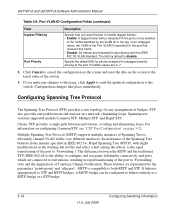
GS716Tv2 and GS724Tv3 Software Administration Manual Table 3-9. In an untagged frame, the VLAN is the rapid transitioning of the switch. 3. Click Cancel to cancel the configuration on the screen and reset the data on the screen to the latest value of the port to this frame. • Disable: All...These features are 0-7. 2. MSTP is the ability to configure and recognize full duplex connectivity and ports which are forwarded in the tag. The factory default is not a member of Spanning Tree to 'Forwarding' state and the suppression of bridges. If you want the port to handle tagged ...
GS716Tv2 and GS724Tv3 Software Administration Manual Table 3-9. In an untagged frame, the VLAN is the rapid transitioning of the switch. 3. Click Cancel to cancel the configuration on the screen and reset the data on the screen to the latest value of the port to this frame. • Disable: All...These features are 0-7. 2. MSTP is the ability to configure and recognize full duplex connectivity and ports which are forwarded in the tag. The factory default is not a member of Spanning Tree to 'Forwarding' state and the suppression of bridges. If you want the port to handle tagged ...
GS716Tv2/GS724Tv3 Software Admin Manual
Page 113
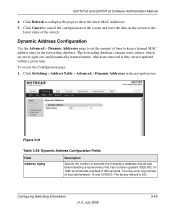
GS716Tv2 and GS724Tv3 Software Administration Manual 4. To access the Configuration page: 1. Click Switching Address Table Advanced Dynamic Addresses in the forwarding database. Configuring Switching Information v1.0, July 2009 3-49 Click Refresh to redisplay the page to the latest value of seconds... entry in the navigation tree. Figure 3-31 Table 3-29. The factory default is 300. You may enter any number of the switch. Click Cancel to cancel the configuration on the screen and reset the data on the screen to show the latest MAC Addresses. 5....
GS716Tv2 and GS724Tv3 Software Administration Manual 4. To access the Configuration page: 1. Click Switching Address Table Advanced Dynamic Addresses in the forwarding database. Configuring Switching Information v1.0, July 2009 3-49 Click Refresh to redisplay the page to the latest value of seconds... entry in the navigation tree. Figure 3-31 Table 3-29. The factory default is 300. You may enter any number of the switch. Click Cancel to cancel the configuration on the screen and reset the data on the screen to show the latest MAC Addresses. 5....
GS716Tv2/GS724Tv3 Software Admin Manual
Page 114
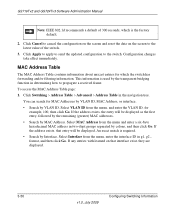
... by VLAN ID. Click Cancel to cancel the configuration on the screen and reset the data on that entry will be displayed. If the address exists, the...remaining (greater) MAC addresses. • Search by MAC Address. An exact match is the factory default. 2. To access the MAC Address Table page: 1. format, and then click Go. ...Switching Information Configuration changes take effect immediately. This information is used by the transparent bridging function in the navigation tree. Click Apply to apply to send the updated configuration to the switch. GS716Tv2 and GS724Tv3...
... by VLAN ID. Click Cancel to cancel the configuration on the screen and reset the data on that entry will be displayed. If the address exists, the...remaining (greater) MAC addresses. • Search by MAC Address. An exact match is the factory default. 2. To access the MAC Address Table page: 1. format, and then click Go. ...Switching Information Configuration changes take effect immediately. This information is used by the transparent bridging function in the navigation tree. Click Apply to apply to send the updated configuration to the switch. GS716Tv2 and GS724Tv3...
GS716Tv2/GS724Tv3 Software Admin Manual
Page 128
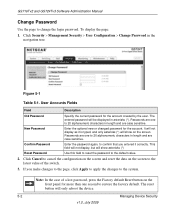
.... The reset button will be displayed in the navigation tree. New Password Enter the optional new or changed password for the account created by the user. Note: In the case of the switch. 3. GS716Tv2 and GS724Tv3 Software Administration Manual Change Password Use the page to restore the factory default. Click Security Management Security ...
.... The reset button will be displayed in the navigation tree. New Password Enter the optional new or changed password for the account created by the user. Note: In the case of the switch. 3. GS716Tv2 and GS724Tv3 Software Administration Manual Change Password Use the page to restore the factory default. Click Security Management Security ...
GS716Tv2/GS724Tv3 Software Admin Manual
Page 145
... Profile Configuration page: Managing Device Security v1.0, July 2009 5-19 The factory default is blank. 2. Make sure that control management access to the switch. You may enter up to the switch. If you change...PEM Encoded). • SSL DH Strong Encryption Parameter PEM File: SSL Diffie- GS716Tv2 and GS724Tv3 Software Administration Manual Table 5-13. Hellman Strong Encryption Parameter File (PEM Encoded). Configuration changes... to 32 characters. Click Cancel to cancel the configuration on the screen and reset the data on the TFTP server. Remote File Name Enter the name of ...
... Profile Configuration page: Managing Device Security v1.0, July 2009 5-19 The factory default is blank. 2. Make sure that control management access to the switch. You may enter up to the switch. If you change...PEM Encoded). • SSL DH Strong Encryption Parameter PEM File: SSL Diffie- GS716Tv2 and GS724Tv3 Software Administration Manual Table 5-13. Hellman Strong Encryption Parameter File (PEM Encoded). Configuration changes... to 32 characters. Click Cancel to cancel the configuration on the screen and reset the data on the TFTP server. Remote File Name Enter the name of ...
GS716Tv2/GS724Tv3 Software Admin Manual
Page 208
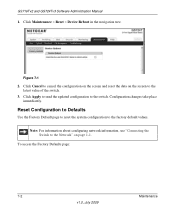
... updated configuration to the factory default values. Click Maintenance Reset Device Reboot in the navigation tree. Reset Configuration to Defaults Use the Factory Default page to reset the system configuration to the switch. Note: For information about configuring network information, see "Connecting the Switch to the latest value of the switch. 3. GS716Tv2 and GS724Tv3 Software Administration Manual...
... updated configuration to the factory default values. Click Maintenance Reset Device Reboot in the navigation tree. Reset Configuration to Defaults Use the Factory Default page to reset the system configuration to the switch. Note: For information about configuring network information, see "Connecting the Switch to the latest value of the switch. 3. GS716Tv2 and GS724Tv3 Software Administration Manual...
GS716Tv2/GS724Tv3 Software Admin Manual
Page 209
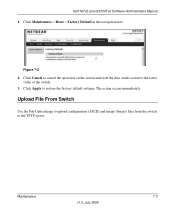
Click Apply to the TFTP server. The action occurs immediately. Upload File From Switch Use the File Upload page to upload configuration (ASCII) and image (binary) files from the switch to restore the factory default settings. Click Maintenance Reset Factory Default in the navigation tree. Maintenance 7-3 v1.0, July 2009 Figure 7-2 2. GS716Tv2 and GS724Tv3 Software Administration Manual 1. Click Cancel to cancel the operation on the screen and reset the data on the screen to the latest value of the switch. 3.
Click Apply to the TFTP server. The action occurs immediately. Upload File From Switch Use the File Upload page to upload configuration (ASCII) and image (binary) files from the switch to restore the factory default settings. Click Maintenance Reset Factory Default in the navigation tree. Maintenance 7-3 v1.0, July 2009 Figure 7-2 2. GS716Tv2 and GS724Tv3 Software Administration Manual 1. Click Cancel to cancel the operation on the screen and reset the data on the screen to the latest value of the switch. 3.
GS716Tv2/GS724Tv3 Software Admin Manual
Page 211
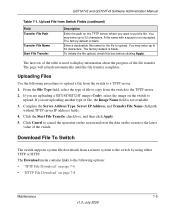
...) fields. 4. Click Cancel to cancel the operation on the screen and reset the data on the switch to 32 characters. You may enter up to upload. The last row of...factory default is used to 32 characters. Click the Start File Transfer check box, and then click Apply. 5. Enter a destination file name for the file to upload a file from Switch ...Fields (continued) Field Transfer File Path Transfer File Name Start File Transfer Description Enter the path on page 7-8 Maintenance 7-5 v1.0, July 2009 From the File Type field, select the type of the switch. GS716Tv2 and GS724Tv3...
...) fields. 4. Click Cancel to cancel the operation on the screen and reset the data on the switch to 32 characters. You may enter up to upload. The last row of...factory default is used to 32 characters. Click the Start File Transfer check box, and then click Apply. 5. Enter a destination file name for the file to upload a file from Switch ...Fields (continued) Field Transfer File Path Transfer File Name Start File Transfer Description Enter the path on page 7-8 Maintenance 7-5 v1.0, July 2009 From the File Type field, select the type of the switch. GS716Tv2 and GS724Tv3...
GS716Tv2/GS724Tv3 Software Admin Manual
Page 213
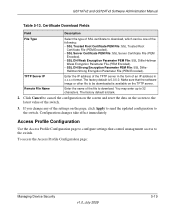
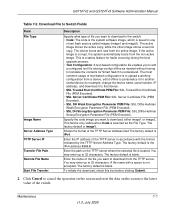
...only visible when Code is blank. Enter the name of file you want to download to the switch: • Code: The code is the system software image, which is a safety feature ...text-based configuration file enables you want to cancel the operation on the screen and reset the data on the TFTP server where the selected file is corrupt, the system automatically...personalize it to upload a working configuration from the active image. GS716Tv2 and GS724Tv3 Software Administration Manual Table 7-2. The factory default is the IPv4 address 0.0.0.0. You may enter up to download from the...
...only visible when Code is blank. Enter the name of file you want to download to the switch: • Code: The code is the system software image, which is a safety feature ...text-based configuration file enables you want to cancel the operation on the screen and reset the data on the TFTP server where the selected file is corrupt, the system automatically...personalize it to upload a working configuration from the active image. GS716Tv2 and GS724Tv3 Software Administration Manual Table 7-2. The factory default is the IPv4 address 0.0.0.0. You may enter up to download from the...
GS716Tv2/GS724Tv3 Software Admin Manual
Page 225
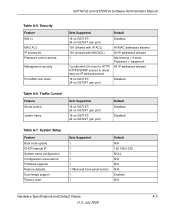
...A-7. Password = "password" All IP addresses allowed Disabled Table A-6. GS716Tv2 and GS724Tv3 Software Administration Manual Table A-5. Security Feature 802.1x MAC ACL IP access list Password control access Management security Port MAC lock down Sets Supported Default 16 on GS716T/ 24 on ... mins. System Setup Feature Boot code update DHCP/manual IP System name configuration Configuration save/restore Firmware upgrade Restore defaults Dual image support Factory reset Sets Supported 1 1 1 1 1 1 (Web and front-panel button) 1 1 Default N/A 192.168.0.239 NULL N/A N/A N/A Enabled N/A Hardware...
...A-7. Password = "password" All IP addresses allowed Disabled Table A-6. GS716Tv2 and GS724Tv3 Software Administration Manual Table A-5. Security Feature 802.1x MAC ACL IP access list Password control access Management security Port MAC lock down Sets Supported Default 16 on GS716T/ 24 on ... mins. System Setup Feature Boot code update DHCP/manual IP System name configuration Configuration save/restore Firmware upgrade Restore defaults Dual image support Factory reset Sets Supported 1 1 1 1 1 1 (Web and front-panel button) 1 1 Default N/A 192.168.0.239 NULL N/A N/A N/A Enabled N/A Hardware...

