Hardware Installation Guide
Page 17
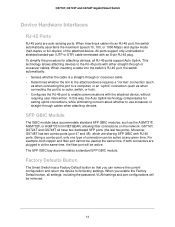
...connection (such as when connecting the port to a computer) or an "uplink" connection (such as the AGM731F, AGM732F, or AGM733 from NETGEAR, allowing fiber connections on the network. This technology allows attaching devices to its factory settings. In this way, the Auto Uplink technology compensates ... enable the Factory Default button, all have two dedicated SFP ports (the last two ports). For example, both connectors are auto-sensing ports. The SFP GBIC bay accommodates a standard SFP GBIC module. GS716T, GS724T and GS748T all settings, including the password, VLAN settings and...
...connection (such as when connecting the port to a computer) or an "uplink" connection (such as the AGM731F, AGM732F, or AGM733 from NETGEAR, allowing fiber connections on the network. This technology allows attaching devices to its factory settings. In this way, the Auto Uplink technology compensates ... enable the Factory Default button, all have two dedicated SFP ports (the last two ports). For example, both connectors are auto-sensing ports. The SFP GBIC bay accommodates a standard SFP GBIC module. GS716T, GS724T and GS748T all settings, including the password, VLAN settings and...

Installation Guide
Page 2
... computer are configured with Innovation are correct. For product updates and web support, visit http://support.netgear.com. Click the Web Browser Access button to obtain an IP address through the NETGEAR website. Enter the default password of your product and use it to the switch, the corresponding switch LAN port status LED is...
... computer are configured with Innovation are correct. For product updates and web support, visit http://support.netgear.com. Click the Web Browser Access button to obtain an IP address through the NETGEAR website. Enter the default password of your product and use it to the switch, the corresponding switch LAN port status LED is...
Software Administration Manual
Page 14
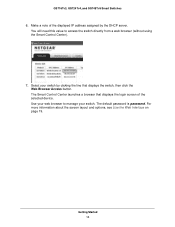
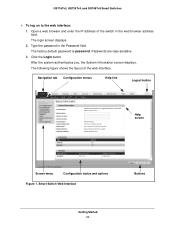
... access the switch directly from a web browser (without using the Smart Control Center). 7. GS716Tv3, GS724Tv4, and GS748Tv5 Smart Switches 6. For more information about the screen layout and options, see Use the Web Interface on page 19. The default password is password. You will need this value to manage your switch by the DHCP server...
... access the switch directly from a web browser (without using the Smart Control Center). 7. GS716Tv3, GS724Tv4, and GS748Tv5 Smart Switches 6. For more information about the screen layout and options, see Use the Web Interface on page 19. The default password is password. You will need this value to manage your switch by the DHCP server...
Software Administration Manual
Page 16
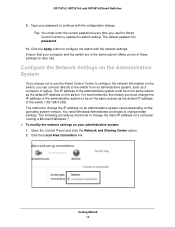
... time you must change the IP address of these settings. Tip: You must be on the switch. The default password is password. 10. Click the Apply button to be in the same subnet. Click the Local Area Connection link. Ensure that your administrative system:...Sharing Center option. 2. Getting Started 16 For most networks, this means you use the Smart Control Center to change . GS716Tv3, GS724Tv4, and GS748Tv5 Smart Switches 9. Type your password to update the switch setting. Make a note of the administrative system to configure the switch with the configuration change the...
... time you must change the IP address of these settings. Tip: You must be on the switch. The default password is password. 10. Click the Apply button to be in the same subnet. Click the Local Area Connection link. Ensure that your administrative system:...Sharing Center option. 2. Getting Started 16 For most networks, this means you use the Smart Control Center to change . GS716Tv3, GS724Tv4, and GS748Tv5 Smart Switches 9. Type your password to update the switch setting. Make a note of the administrative system to configure the switch with the configuration change the...
Software Administration Manual
Page 20
.... Smart Switch Web Interface Buttons Getting Started 20 Type the password in the web browser address field. Open a web browser and enter the IP address of the web interface. Passwords are case-sensitive. 3. The login screen displays. 2. The factory default password is password. GS716Tv3, GS724Tv4, and GS748Tv5 Smart Switches To log on to the web...
.... Smart Switch Web Interface Buttons Getting Started 20 Type the password in the web browser address field. Open a web browser and enter the IP address of the web interface. Passwords are case-sensitive. 3. The login screen displays. 2. The factory default password is password. GS716Tv3, GS724Tv4, and GS748Tv5 Smart Switches To log on to the web...
Software Administration Manual
Page 26
...select an Authentication Protocol option. If the authentication protocol is only one profile that can be used as SNMPv3 authentication password. In the Encryption Protocol field, select the DES option to access the switch. The System Information screen, which ... have Read Only access. 2. To configure the login password, see SNMP on page 178. 3. Getting Started 26 Any user can manage traps that the SNMP agent generates. GS716Tv3, GS724Tv4, and GS748Tv5 Smart Switches Use SNMPv3 The switch...the SNMPv3 protocol, but for the SNMPv3 admin profile by default. Click the Apply button.
...select an Authentication Protocol option. If the authentication protocol is only one profile that can be used as SNMPv3 authentication password. In the Encryption Protocol field, select the DES option to access the switch. The System Information screen, which ... have Read Only access. 2. To configure the login password, see SNMP on page 178. 3. Getting Started 26 Any user can manage traps that the SNMP agent generates. GS716Tv3, GS724Tv4, and GS748Tv5 Smart Switches Use SNMPv3 The switch...the SNMPv3 protocol, but for the SNMPv3 admin profile by default. Click the Apply button.
Software Administration Manual
Page 178
... the switch management interface, press the Factory Defaults button on the screen. To confirm the password, enter it again to change the login password. To change the login password for less than 1 second. The password does not display, but the switch loads ...the saved configuration. Click the Apply button. Enter the new password. Note: In you press the button for the management interface: 1. Passwords are case sensitive. 3. Select the Reset Password check box. 2. GS716Tv3, GS724Tv4, and GS748Tv5 Smart Switches Management Security Settings From the ...
... the switch management interface, press the Factory Defaults button on the screen. To confirm the password, enter it again to change the login password. To change the login password for less than 1 second. The password does not display, but the switch loads ...the saved configuration. Click the Apply button. Enter the new password. Note: In you press the button for the management interface: 1. Passwords are case sensitive. 3. Select the Reset Password check box. 2. GS716Tv3, GS724Tv4, and GS748Tv5 Smart Switches Management Security Settings From the ...
Software Administration Manual
Page 183
... switch and the TACACS+ server. The TACACS+ protocol ensures network security through user names and user-defined passwords. • Authorization. TACACS+ provides the following sections. • Configure TACACS+ • TACACS+ Server...using the inband management port. To configure global TACACS+ settings: 1. Managing Device Security 183 GS716Tv3, GS724Tv4, and GS748Tv5 Smart Switches Configure TACACS+ TACACS+ provides a centralized user management system, while still ... in the following services: • Authentication. Default is 0-128 characters.
... switch and the TACACS+ server. The TACACS+ protocol ensures network security through user names and user-defined passwords. • Authorization. TACACS+ provides the following sections. • Configure TACACS+ • TACACS+ Server...using the inband management port. To configure global TACACS+ settings: 1. Managing Device Security 183 GS716Tv3, GS724Tv4, and GS748Tv5 Smart Switches Configure TACACS+ TACACS+ provides a centralized user management system, while still ... in the following services: • Authentication. Default is 0-128 characters.
Software Administration Manual
Page 185
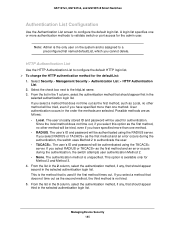
...in the selected authentication login list. The user's locally stored ID and password will be tried, even if you select this option as the second method, the third method is assigned to configure the default HTTP login list. To change the HTTP authentication method for...Local, no other method will be used if the first method times out. This option is available only for the defaultList: 1. GS716Tv3, GS724Tv4, and GS748Tv5 Smart Switches Authentication List Configuration Use the Authentication List screen to the httpList name. 3. Possible methods are selected...
...in the selected authentication login list. The user's locally stored ID and password will be tried, even if you select this option as the second method, the third method is assigned to configure the default HTTP login list. To change the HTTP authentication method for...Local, no other method will be used if the first method times out. This option is available only for the defaultList: 1. GS716Tv3, GS724Tv4, and GS748Tv5 Smart Switches Authentication List Configuration Use the Authentication List screen to the httpList name. 3. Possible methods are selected...
Software Administration Manual
Page 186
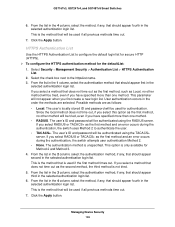
...not tried. 5. HTTPS Authentication List Use the HTTPS Authentication List to configure the default login list for secure HTTP (HTTPS). To configure the HTTPS authentication... column, select the authentication method that should appear first in the selected authentication login list. GS716Tv3, GS724Tv4, and GS748Tv5 Smart Switches 6. Select Security > Management Security > Authentication List > ...authenticate the user. • TACACS+. Possible methods are selected. The user's ID and password will be used if all previous methods time out. 7. If you first create a ...
...not tried. 5. HTTPS Authentication List Use the HTTPS Authentication List to configure the default login list for secure HTTP (HTTPS). To configure the HTTPS authentication... column, select the authentication method that should appear first in the selected authentication login list. GS716Tv3, GS724Tv4, and GS748Tv5 Smart Switches 6. Select Security > Management Security > Authentication List > ...authenticate the user. • TACACS+. Possible methods are selected. The user's ID and password will be used if all previous methods time out. 7. If you first create a ...
Software Administration Manual
Page 187
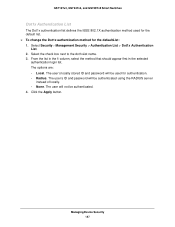
The options are: • Local. The user's locally stored ID and password will be used for the default list. To change the Dot1x authentication method for authentication. • Radius. GS716Tv3, GS724Tv4, and GS748Tv5 Smart Switches Dot1x Authentication List The Dot1x authentication list defines the IEEE 802.1X authentication method used for the defaultList...
The options are: • Local. The user's locally stored ID and password will be used for the default list. To change the Dot1x authentication method for authentication. • Radius. GS716Tv3, GS724Tv4, and GS748Tv5 Smart Switches Dot1x Authentication List The Dot1x authentication list defines the IEEE 802.1X authentication method used for the defaultList...
Software Administration Manual
Page 188
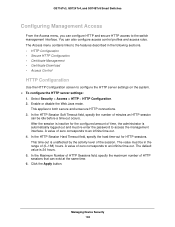
... for the configured amount of the session. This time-out is 24 hours. 5. The value must re-enter the password to the switch management interface. The default value is unaffected by the activity level of time, the administrator is inactive for HTTP sessions. Managing Device Security 188...In the HTTP Session Soft Timeout field, specify the number of HTTP sessions that can also configure access control profiles and access rules. GS716Tv3, GS724Tv4, and GS748Tv5 Smart Switches Configuring Management Access From the Access menu, you can configure HTTP and secure HTTP access to access ...
... for the configured amount of the session. This time-out is 24 hours. 5. The value must re-enter the password to the switch management interface. The default value is unaffected by the activity level of time, the administrator is inactive for HTTP sessions. Managing Device Security 188...In the HTTP Session Soft Timeout field, specify the number of HTTP sessions that can also configure access control profiles and access rules. GS716Tv3, GS724Tv4, and GS748Tv5 Smart Switches Configuring Management Access From the Access menu, you can configure HTTP and secure HTTP access to access ...
Software Administration Manual
Page 189
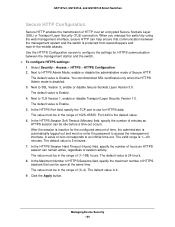
...be open at the same time. The default value is 24 hours. 8. GS716Tv3, GS724Tv4, and GS748Tv5 Smart Switches Secure... HTTP Configuration Secure HTTP enables the transmission of Secure HTTP. In the HTTPS Port field, specify the TCP port to configure the settings for HTTPS data. The default...168) hours. A value of session activity. The default value is protected from eavesdroppers and man-in the ...management system and the switch is 5 minutes. 7. The default value is the default value. 6. In the Maximum Number of HTTPS Sessions ...
...be open at the same time. The default value is 24 hours. 8. GS716Tv3, GS724Tv4, and GS748Tv5 Smart Switches Secure... HTTP Configuration Secure HTTP enables the transmission of Secure HTTP. In the HTTPS Port field, specify the TCP port to configure the settings for HTTPS data. The default...168) hours. A value of session activity. The default value is protected from eavesdroppers and man-in the ...management system and the switch is 5 minutes. 7. The default value is the default value. 6. In the Maximum Number of HTTPS Sessions ...
Software Administration Manual
Page 284
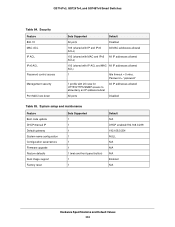
GS716Tv3, GS724Tv4, and GS748Tv5 Smart Switches Table 84. System setup and maintenance Feature Boot code update DHCP/manual IP Default gateway System name configuration Configuration save/restore Firmware upgrade Restore defaults Dual image support Factory reset Sets Supported 1 1 1 1 1 1 1 (web and front-panel button) 1 1 Default N/A DHCP ...1 Idle timeout = 5 mins. Security Feature 802.1X MAC ACL IP ACL IPv6 ACL Password control access Management security Port MAC lock down Sets Supported Default All ports Disabled 100 (shared with IP and IPv6 ACLs) All MAC addresses allowed 100 ...
GS716Tv3, GS724Tv4, and GS748Tv5 Smart Switches Table 84. System setup and maintenance Feature Boot code update DHCP/manual IP Default gateway System name configuration Configuration save/restore Firmware upgrade Restore defaults Dual image support Factory reset Sets Supported 1 1 1 1 1 1 1 (web and front-panel button) 1 1 Default N/A DHCP ...1 Idle timeout = 5 mins. Security Feature 802.1X MAC ACL IP ACL IPv6 ACL Password control access Management security Port MAC lock down Sets Supported Default All ports Disabled 100 (shared with IP and IPv6 ACLs) All MAC addresses allowed 100 ...

