
Product Data Sheet
Page 7
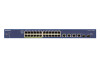
ProSAFE® Fast Ethernet Smart Switches Technical Specifications Data Sheet FS526T, FS726T, FS728TLP, FS728TP and FS750T2 Model FS526Tv2 FS726T FS728TLP FS728TP FS750T2 Strick, or WRED (Weighted Deficit Round Robin) Both WRR Auto-VoIP Yes, based on protocols (SIP, H323 and SCCP) or...1X Radius network access control IEEE 802.1Q VLAN Tagging IEEE 802.3 af (PoE) IEEE 802.3x full-duplex flow control Yes MANAGEMENT Password management Yes Configurable Management VLAN Yes No Admin access control via Radius and TACACS+ No No No Yes No Web-based graphical user interface...
ProSAFE® Fast Ethernet Smart Switches Technical Specifications Data Sheet FS526T, FS726T, FS728TLP, FS728TP and FS750T2 Model FS526Tv2 FS726T FS728TLP FS728TP FS750T2 Strick, or WRED (Weighted Deficit Round Robin) Both WRR Auto-VoIP Yes, based on protocols (SIP, H323 and SCCP) or...1X Radius network access control IEEE 802.1Q VLAN Tagging IEEE 802.3 af (PoE) IEEE 802.3x full-duplex flow control Yes MANAGEMENT Password management Yes Configurable Management VLAN Yes No Admin access control via Radius and TACACS+ No No No Yes No Web-based graphical user interface...
Installation Guide
Page 2
...in lowercase letters and click Login. June 2013 NETGEAR, Inc. 350 East Plumeria Drive San Jose, CA 95134 USA 5. Enter the default password of 255.255.255.0. 3. To access the switch with this, see the online FS526Tv2 and FS728TLP Smart Switch™ Software Administration Manual. For ...each page of NETGEAR, Inc. If your device, locate the serial number on ...
...in lowercase letters and click Login. June 2013 NETGEAR, Inc. 350 East Plumeria Drive San Jose, CA 95134 USA 5. Enter the default password of 255.255.255.0. 3. To access the switch with this, see the online FS526Tv2 and FS728TLP Smart Switch™ Software Administration Manual. For ...each page of NETGEAR, Inc. If your device, locate the serial number on ...

Web Management User Guide
Page 4
ProSAFE FS526Tv2, FS726Tv2, and FS728TLP Smart Switches Chapter 4 Manage Access to the Switch Manage the Password for the Smart Switch 53 Change the Password 53 Reset the Password 54 Configure Secure Access to the Smart Switch 54 Configure the Global Settings for HTTP Sessions 54 Manage the Access Profile and ...for the Physical Ports and LAGs 61 Enable Flow Control 64 Configure the Auto-VoIP Mode 65 Chapter 6 Configure Power over Ethernet (Model FS728TLP Only) View the Global PoE Information and Enable PoE SNMP Traps 68 View the Global PoE Power Information 68 Enable PoE SNMP Traps 69...
ProSAFE FS526Tv2, FS726Tv2, and FS728TLP Smart Switches Chapter 4 Manage Access to the Switch Manage the Password for the Smart Switch 53 Change the Password 53 Reset the Password 54 Configure Secure Access to the Smart Switch 54 Configure the Global Settings for HTTP Sessions 54 Manage the Access Profile and ...for the Physical Ports and LAGs 61 Enable Flow Control 64 Configure the Auto-VoIP Mode 65 Chapter 6 Configure Power over Ethernet (Model FS728TLP Only) View the Global PoE Information and Enable PoE SNMP Traps 68 View the Global PoE Power Information 68 Enable PoE SNMP Traps 69...
Web Management User Guide
Page 8
... the Smart Switch 296 Overview of the Network Utilities 296 Configure the IP Address Settings of the Smart Switch 297 Change the Password for Accessing the Smart Switch 298 Save and Restore the Configuration File 299 Upgrade the Firmware 303 View and Manage Tasks 305...C Factory Default Software Settings Default Login Settings 319 IPv4, DHCP, VLAN, and Clock Settings 319 Port Characteristics 319 PoE Settings (Model FS728TLP Only 321 Quality of Service and Traffic Control Settings 321 Security Settings 322 Multicast and Forwarding Database Settings 323 Management Settings 324 Image,...
... the Smart Switch 296 Overview of the Network Utilities 296 Configure the IP Address Settings of the Smart Switch 297 Change the Password for Accessing the Smart Switch 298 Save and Restore the Configuration File 299 Upgrade the Firmware 303 View and Manage Tasks 305...C Factory Default Software Settings Default Login Settings 319 IPv4, DHCP, VLAN, and Clock Settings 319 Port Characteristics 319 PoE Settings (Model FS728TLP Only 321 Quality of Service and Traffic Control Settings 321 Security Settings 322 Multicast and Forwarding Database Settings 323 Management Settings 324 Image,...

Web Management User Guide
Page 11
..., enter 192.168.0.239 into the address field. To log on page 29 or Use Automatic Switch Discovery for NETGEAR switches, such as password management, firmware upgrade, and configuration file backup. For more information, see Appendix A, Smart Control Center Utilities. If you to... mask, either with a DHCP Server on to the web management interface: 1. ProSAFE FS526Tv2, FS726Tv2, and FS728TLP Smart Switches In addition to discovering the smart switch and other NETGEAR switches, the Smart Control Center provides several utilities for a Network without a DHCP server, use that IP...
..., enter 192.168.0.239 into the address field. To log on page 29 or Use Automatic Switch Discovery for NETGEAR switches, such as password management, firmware upgrade, and configuration file backup. For more information, see Appendix A, Smart Control Center Utilities. If you to... mask, either with a DHCP Server on to the web management interface: 1. ProSAFE FS526Tv2, FS726Tv2, and FS728TLP Smart Switches In addition to discovering the smart switch and other NETGEAR switches, the Smart Control Center provides several utilities for a Network without a DHCP server, use that IP...

Web Management User Guide
Page 12
ProSAFE FS526Tv2, FS726Tv2, and FS728TLP Smart Switches 2. The default password is password. Click the Login button. Type the password in the Password field. Introduction 12 After the system authenticates you, the System Information screen displays. In the browser address field, type the IP address of the smart switch. 3. Passwords are case-sensitive. 4.
ProSAFE FS526Tv2, FS726Tv2, and FS728TLP Smart Switches 2. The default password is password. Click the Login button. Type the password in the Password field. Introduction 12 After the system authenticates you, the System Information screen displays. In the browser address field, type the IP address of the smart switch. 3. Passwords are case-sensitive. 4.

Web Management User Guide
Page 31
.... Click the Login button. Connect the Smart Switch to Your Network 31 Passwords are case-sensitive. 11. You can now configure the smart switch over the web management interface. Click the Web Browser Access button. After the system ... by clicking the table row that displays the smart switch. 9. The Smart Control Center displays the login screen of the smart switch. 10. The default password is password. ProSAFE FS526Tv2, FS726Tv2, and FS728TLP Smart Switches 8.
.... Click the Login button. Connect the Smart Switch to Your Network 31 Passwords are case-sensitive. 11. You can now configure the smart switch over the web management interface. Click the Web Browser Access button. After the system ... by clicking the table row that displays the smart switch. 9. The Smart Control Center displays the login screen of the smart switch. 10. The default password is password. ProSAFE FS526Tv2, FS726Tv2, and FS728TLP Smart Switches 8.

Web Management User Guide
Page 33
...switch. In the Current Password field, type your smart switch by clicking the table row that displays the smart switch. 8. Note: You need to discover the smart switch. Click the Apply button. Note: You might have to update the switch setting. ProSAFE FS526Tv2, FS726Tv2, and FS728TLP Smart Switches 7. Make .... Click the Configure Device button. The new network settings are in the same subnet. 11. Make a note of the screen. 9. The default password is installed and the smart switch are applied to Your Network 33 The DHCP client becomes disabled on which the Smart Control Center is...
...switch. In the Current Password field, type your smart switch by clicking the table row that displays the smart switch. 8. Note: You need to discover the smart switch. Click the Apply button. Note: You might have to update the switch setting. ProSAFE FS526Tv2, FS726Tv2, and FS728TLP Smart Switches 7. Make .... Click the Configure Device button. The new network settings are in the same subnet. 11. Make a note of the screen. 9. The default password is installed and the smart switch are applied to Your Network 33 The DHCP client becomes disabled on which the Smart Control Center is...

Web Management User Guide
Page 34
..., you change the TCP/IP properties. Click the Web Browser Access button. The default password is running a Microsoft Windows operating system: 1. Write down the current network address settings of the smart switch. ProSAFE FS526Tv2, FS726Tv2, and FS728TLP Smart Switches The Smart Control Center rediscovers the smart switch with the new network settings...
..., you change the TCP/IP properties. Click the Web Browser Access button. The default password is running a Microsoft Windows operating system: 1. Write down the current network address settings of the smart switch. ProSAFE FS526Tv2, FS726Tv2, and FS728TLP Smart Switches The Smart Control Center rediscovers the smart switch with the new network settings...

Web Management User Guide
Page 36
...FS526Tv2, FS726Tv2, and FS728TLP Smart Switches 4. Type the password in the fields. The IP configuration screen displays. 7. Even though it seems that the fields under the Static IP Address radio button are case-sensitive. 5. Select the Static IP Address radio button. Passwords are masked out, you... , the System Information screen displays. 6. The IP configuration is password. Click the Login button. After the system authenticates you can enter information in ...
...FS526Tv2, FS726Tv2, and FS728TLP Smart Switches 4. Type the password in the fields. The IP configuration screen displays. 7. Even though it seems that the fields under the Static IP Address radio button are case-sensitive. 5. Select the Static IP Address radio button. Passwords are masked out, you... , the System Information screen displays. 6. The IP configuration is password. Click the Login button. After the system authenticates you can enter information in ...

Web Management User Guide
Page 37
... of the smart switch: a. The IP address of the computer must be different from the IP address of the smart switch. c. The default password is running a Microsoft Windows operating system): a. b. d. Click the Login button. Write down the current network address settings of the computer to change... before you , the System Information screen displays. Reconnect your computer, open the Internet Protocol (TCP/IP) properties screen. Passwords are saved. ProSAFE FS526Tv2, FS726Tv2, and FS728TLP Smart Switches 8. Connect the Smart Switch to the smart switch. 9.
... of the smart switch: a. The IP address of the computer must be different from the IP address of the smart switch. c. The default password is running a Microsoft Windows operating system): a. b. d. Click the Login button. Write down the current network address settings of the computer to change... before you , the System Information screen displays. Reconnect your computer, open the Internet Protocol (TCP/IP) properties screen. Passwords are saved. ProSAFE FS526Tv2, FS726Tv2, and FS728TLP Smart Switches 8. Connect the Smart Switch to the smart switch. 9.

Web Management User Guide
Page 44
...4. (Optional) Change the network settings on page 29. Write down the current network address settings of your computer (if the computer is password. d. Reconnect your computer, open the Internet Protocol (TCP/IP) properties screen. b. d. Configure Basic System Settings 44 Set the IP ...the OK button. 5. ProSAFE FS526Tv2, FS726Tv2, and FS728TLP Smart Switches If you configured a dynamic IP address through DHCP or BOOTP, use the Smart Control Center to an address in the Password field. b. c. Open a web browser. Passwords are case-sensitive. Click the Login button. After ...
...4. (Optional) Change the network settings on page 29. Write down the current network address settings of your computer (if the computer is password. d. Reconnect your computer, open the Internet Protocol (TCP/IP) properties screen. b. d. Configure Basic System Settings 44 Set the IP ...the OK button. 5. ProSAFE FS526Tv2, FS726Tv2, and FS728TLP Smart Switches If you configured a dynamic IP address through DHCP or BOOTP, use the Smart Control Center to an address in the Password field. b. c. Open a web browser. Passwords are case-sensitive. Click the Login button. After ...

Web Management User Guide
Page 52
The chapter includes the following sections: • Manage the Password for the Smart Switch • Configure Secure Access to the smart switch. Manage Access to the Switch 4 This chapter describes how to configure secure access to the Smart Switch 52 4.
The chapter includes the following sections: • Manage the Password for the Smart Switch • Configure Secure Access to the smart switch. Manage Access to the Switch 4 This chapter describes how to configure secure access to the Smart Switch 52 4.

Web Management User Guide
Page 53
... the smart switch to press the Factory Defaults button on the front panel of the password. The length can be between 1 and Length 20 characters. ProSAFE FS526Tv2, FS726Tv2, and FS728TLP Smart Switches Manage the Password for the Smart Switch NETGEAR recommends that you enter is displayed in the following table. The default minimum length...
... the smart switch to press the Factory Defaults button on the front panel of the password. The length can be between 1 and Length 20 characters. ProSAFE FS526Tv2, FS726Tv2, and FS728TLP Smart Switches Manage the Password for the Smart Switch NETGEAR recommends that you enter is displayed in the following table. The default minimum length...

Web Management User Guide
Page 54
...HTTP Sessions Global settings for HTTP sessions to the smart switch over HTTP or SNMP. Select Security > Management Security > User Configuration > Change Password. Select the Reset Password check box. 3. The settings are saved. Manage Access to the web management interface include time-out settings and the maximum number of simultaneous... sessions. To configure the global settings for the web management interface to the default value: 1. ProSAFE FS526Tv2, FS726Tv2, and FS728TLP Smart Switches 3. Reset the Password To reset the login...
...HTTP Sessions Global settings for HTTP sessions to the smart switch over HTTP or SNMP. Select Security > Management Security > User Configuration > Change Password. Select the Reset Password check box. 3. The settings are saved. Manage Access to the web management interface include time-out settings and the maximum number of simultaneous... sessions. To configure the global settings for the web management interface to the default value: 1. ProSAFE FS526Tv2, FS726Tv2, and FS728TLP Smart Switches 3. Reset the Password To reset the login...

Web Management User Guide
Page 150
... The Global Configuration screen displays. A RADIUS server maintains a user database, which can authenticate a user name and password before authorizing use of retransmit requests. On the smart switch, RADIUS servers provide a centralized authentication method for an ...for each individual RADIUS server. Select Security > Management Security > RADIUS > Global Configuration. ProSAFE FS526Tv2, FS726Tv2, and FS728TLP Smart Switches Configure RADIUS Authentication RADIUS servers provide additional security for all configured RADIUS servers, take the following information into...
... The Global Configuration screen displays. A RADIUS server maintains a user database, which can authenticate a user name and password before authorizing use of retransmit requests. On the smart switch, RADIUS servers provide a centralized authentication method for an ...for each individual RADIUS server. Select Security > Management Security > RADIUS > Global Configuration. ProSAFE FS526Tv2, FS726Tv2, and FS728TLP Smart Switches Configure RADIUS Authentication RADIUS servers provide additional security for all configured RADIUS servers, take the following information into...

Web Management User Guide
Page 275
... the latest features of the screen, verify the firmware version. One image is the active image, and the second image is loaded. Passwords are case-sensitive. 10. Note: After you , the System Information screen displays. In the Versions section of the web management interface... storage. As a safety feature in the unlikely event that the active image is password. The default password is corrupt, the smart switch automatically starts from the nonactive image. ProSAFE FS526Tv2, FS726Tv2, and FS728TLP Smart Switches WARNING: During a firmware upgrade, do not try to go online, ...
... the latest features of the screen, verify the firmware version. One image is the active image, and the second image is loaded. Passwords are case-sensitive. 10. Note: After you , the System Information screen displays. In the Versions section of the web management interface... storage. As a safety feature in the unlikely event that the active image is password. The default password is corrupt, the smart switch automatically starts from the nonactive image. ProSAFE FS526Tv2, FS726Tv2, and FS728TLP Smart Switches WARNING: During a firmware upgrade, do not try to go online, ...

Web Management User Guide
Page 277
... display the latest features of the screen, verify the firmware version. Switch Management Tools 277 The reboots. Type the password in the Password field. Passwords are case-sensitive. 10. ProSAFE FS526Tv2, FS726Tv2, and FS728TLP Smart Switches 7. Select the Check this box and click APPLY below to the smart switch until the smart switch finishes...
... display the latest features of the screen, verify the firmware version. Switch Management Tools 277 The reboots. Type the password in the Password field. Passwords are case-sensitive. 10. ProSAFE FS526Tv2, FS726Tv2, and FS728TLP Smart Switches 7. Select the Check this box and click APPLY below to the smart switch until the smart switch finishes...
Web Management User Guide
Page 285
... ... Please wait 2 minutes. If you lose network connectivity after the reset. Select the check box. 3. After you have lost the password that provides access to the web management interface, you have reset the smart switch to factory default settings, the firmware that was the active... 2. Click the Apply button. Select Maintenance > Reset > Factory Default. The firmware is enabled. Switch Management Tools 285 ProSAFE FS526Tv2, FS726Tv2, and FS728TLP Smart Switches WARNING: During a system reboot, do not try to go online, turn off the smart switch, shut down the computer, or do ...
... ... Please wait 2 minutes. If you lose network connectivity after the reset. Select the check box. 3. After you have lost the password that provides access to the web management interface, you have reset the smart switch to factory default settings, the firmware that was the active... 2. Click the Apply button. Select Maintenance > Reset > Factory Default. The firmware is enabled. Switch Management Tools 285 ProSAFE FS526Tv2, FS726Tv2, and FS728TLP Smart Switches WARNING: During a system reboot, do not try to go online, turn off the smart switch, shut down the computer, or do ...

Web Management User Guide
Page 289
...and the client IP mask is 255.255.255.0, any IP address can access the smart switch. Configure the settings as a password. Access Mode Status From the menu, select the access mode: • ReadOnly. Configure SNMP 289 The default mask is enabled ...SNMP management station. The community configuration is 0.0.0.0, which SNMP clients can both read information. • ReadWrite. ProSAFE FS526Tv2, FS726Tv2, and FS728TLP Smart Switches The Community Configuration screen displays. The station can access the smart switch. • Disable. The following table. The client ...
...and the client IP mask is 255.255.255.0, any IP address can access the smart switch. Configure the settings as a password. Access Mode Status From the menu, select the access mode: • ReadOnly. Configure SNMP 289 The default mask is enabled ...SNMP management station. The community configuration is 0.0.0.0, which SNMP clients can both read information. • ReadWrite. ProSAFE FS526Tv2, FS726Tv2, and FS728TLP Smart Switches The Community Configuration screen displays. The station can access the smart switch. • Disable. The following table. The client ...


