DG series - Configuration with ProSafe Client
Page 1
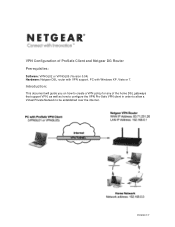
Introduction: This document will guide you on how to create a VPN policy for any of ProSafe Client and Netgear DG Router Prerequisites: Software: VPNGL02 or VPNGL05 (Version 5.04) Hardware: Netgear DSL router with VPN support, PC with Windows XP, Vista or 7. VPN Configuration of the home DSL gateways that support VPN, as well as how to configure the VPN Pro-Safe VPN client in order to allow a Virtual Private Network to be established over the internet. Version 1.1
Introduction: This document will guide you on how to create a VPN policy for any of ProSafe Client and Netgear DG Router Prerequisites: Software: VPNGL02 or VPNGL05 (Version 5.04) Hardware: Netgear DSL router with VPN support, PC with Windows XP, Vista or 7. VPN Configuration of the home DSL gateways that support VPN, as well as how to configure the VPN Pro-Safe VPN client in order to allow a Virtual Private Network to be established over the internet. Version 1.1
DG series - Configuration with ProSafe Client
Page 2
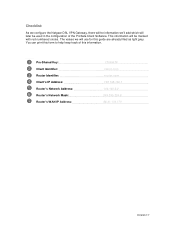
You can print this form to help keep track of the ProSafe Client Software. Checklist: As we configure the Netgear DSL VPN Gateway, there will be information we will use for this information. ➊ Pre-Shared Key 12345678 _ ➋ Client Identifier _____client.com _ ➌ Router Identifier _____router....
You can print this form to help keep track of the ProSafe Client Software. Checklist: As we configure the Netgear DSL VPN Gateway, there will be information we will use for this information. ➊ Pre-Shared Key 12345678 _ ➋ Client Identifier _____client.com _ ➌ Router Identifier _____router....
DG series - Configuration with ProSafe Client
Page 3
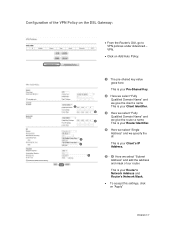
Configuration of our router. VPN. Click on "Apply" Version 1.1 This is your Client's IP Address. ➎ - ➏ Here we specify the IP. This is your Router's Network Address and ... a name This is your Router Identifier. ➍ Here we select "Single Address" and we select "Subnet Address" and add the address and mask of the VPN Policy on the DSL Gateway: From the Router's GUI, go to...
Configuration of our router. VPN. Click on "Apply" Version 1.1 This is your Client's IP Address. ➎ - ➏ Here we specify the IP. This is your Router's Network Address and ... a name This is your Router Identifier. ➍ Here we select "Single Address" and we select "Subnet Address" and add the address and mask of the VPN Policy on the DSL Gateway: From the Router's GUI, go to...

DG series - Configuration with ProSafe Client
Page 4
It will be added with the name Gateway. Version 1.1 Configuration of the VPN Policy on the ProSafe Client: Before you start configuring the VPN Client, go through the Checklist at the start and make sure you have all the information listed there. After installing the VPN Client Software, click on the plus sign to open the configuration panel. Right click on "VPN Configuration" and add a new Phase 1.
It will be added with the name Gateway. Version 1.1 Configuration of the VPN Policy on the ProSafe Client: Before you start configuring the VPN Client, go through the Checklist at the start and make sure you have all the information listed there. After installing the VPN Client Software, click on the plus sign to open the configuration panel. Right click on "VPN Configuration" and add a new Phase 1.

DG series - Configuration with ProSafe Client
Page 5
Click on gateway. ❼ The Remote Gateway field will be ❼ the value of your Router's WAN IP Address. ➊ ➊ Input the Pre-Shared Key that you have used when creating the VPN Policy on the Router and click on the OK Button. Next, tick the checkbox next to Use: Secure Gateway Tunnel. ➋ The Local ID Type is DNS, and the Value for the ID is your Client Identifier. ➌ The ID Type field will be the value of your Router Identifier. ➋ ➌ Version 1.1
Click on gateway. ❼ The Remote Gateway field will be ❼ the value of your Router's WAN IP Address. ➊ ➊ Input the Pre-Shared Key that you have used when creating the VPN Policy on the Router and click on the OK Button. Next, tick the checkbox next to Use: Secure Gateway Tunnel. ➋ The Local ID Type is DNS, and the Value for the ID is your Client Identifier. ➌ The ID Type field will be the value of your Router Identifier. ➋ ➌ Version 1.1
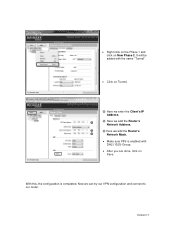
DG series - Configuration with ProSafe Client
Page 6
It will be added with DH2 (1020) Group. After you are done, click on Save. Now we add the Router's ➏ Network Mask. Make sure PFS is completed. Version 1.1 Right click on the Phase 1 and click on Tunnel. ➍ Here we enter the Client's IP Address. ➍ ➎ Here we add the Router's Network Address. ➎ ➏ Here we can try our VPN configuration and connect to our router. With this, the configuration is enabled with the name "Tunnel". Click on New Phase 2.
It will be added with DH2 (1020) Group. After you are done, click on Save. Now we add the Router's ➏ Network Mask. Make sure PFS is completed. Version 1.1 Right click on the Phase 1 and click on Tunnel. ➍ Here we enter the Client's IP Address. ➍ ➎ Here we add the Router's Network Address. ➎ ➏ Here we can try our VPN configuration and connect to our router. With this, the configuration is enabled with the name "Tunnel". Click on New Phase 2.

DG series - Configuration with ProSafe Client
Page 7
Now we should be able to Tools and click on Connection Panel. Double click on the tunnel we created. The tray notice box should tell us we are connected. The Connection Panel should show a green button indicating we configured, do the following: Go to access the resources at the DSL Gateway's network from our Client PC. Version 1.1 Connecting: To connect the VPN Tunnel we are connected.
Now we should be able to Tools and click on Connection Panel. Double click on the tunnel we created. The tray notice box should tell us we are connected. The Connection Panel should show a green button indicating we configured, do the following: Go to access the resources at the DSL Gateway's network from our Client PC. Version 1.1 Connecting: To connect the VPN Tunnel we are connected.

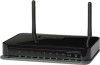
DGN2200 Setup Manual
Page 11
... ready! configure your network. This is available on the Internet quickly, the Resource CD contains a Smart Wizard™. Corporate network settings or Virtual Private Network (VPN) client software may conflict with your company's network support staff. When you have finished, you need to a Mac, are technically knowledgeable, select this option. •...
... ready! configure your network. This is available on the Internet quickly, the Resource CD contains a Smart Wizard™. Corporate network settings or Virtual Private Network (VPN) client software may conflict with your company's network support staff. When you have finished, you need to a Mac, are technically knowledgeable, select this option. •...

DGN2200 Setup Manual
Page 42
... Your Network Virtual Private Networking Basics Glossary Link http://documentation.netgear.com/reference/enu/tcpip/index.htm http://documentation.netgear.com/reference/enu/wireless/index.htm http://documentation.netgear.com/reference/enu/wsdhcp/index.htm http://documentation.netgear.com/reference/enu/vpn/index.htm http://documentation.netgear.com/reference/enu/glossary/index.htm Related Documents 38
... Your Network Virtual Private Networking Basics Glossary Link http://documentation.netgear.com/reference/enu/tcpip/index.htm http://documentation.netgear.com/reference/enu/wireless/index.htm http://documentation.netgear.com/reference/enu/wsdhcp/index.htm http://documentation.netgear.com/reference/enu/vpn/index.htm http://documentation.netgear.com/reference/enu/glossary/index.htm Related Documents 38

DGN2200 User Manual
Page 6
... 98 Step 1: Configure the Client-to-Gateway VPN Tunnel 98 Step 2: Configure the NETGEAR ProSafe VPN Client 101 Set Up a Gateway-to-Gateway VPN Configuration 108 VPN Tunnel Control 112 Activate a VPN Tunnel 112 Verify the Status of a VPN Tunnel 115 Deactivate a VPN Tunnel 116 Delete a VPN Tunnel 118 Set Up VPN Tunnels in Special Circumstances 118 Use Auto Policy...
... 98 Step 1: Configure the Client-to-Gateway VPN Tunnel 98 Step 2: Configure the NETGEAR ProSafe VPN Client 101 Set Up a Gateway-to-Gateway VPN Configuration 108 VPN Tunnel Control 112 Activate a VPN Tunnel 112 Verify the Status of a VPN Tunnel 115 Deactivate a VPN Tunnel 116 Delete a VPN Tunnel 118 Set Up VPN Tunnels in Special Circumstances 118 Use Auto Policy...

DGN2200 User Manual
Page 7
N300 Wireless ADSL2+ Modem Router DGN2200 Configuration Profile 146 Step-by-Step Configuration 147 Configuration Summary (Telecommuter Example 149 Setting Up Client-to-Gateway VPN Configuration (Telecommuter Example)150 Step 1: Configure Gateway A (the NETGEAR VPN Router at the Main Office)151 Step 2: Configure Gateway B (the Modem Router at the Regional Office)152 Monitoring the VPN Tunnel (Telecommuter Example 157 Viewing the VPN Router's VPN Status and Log Information 158 Appendix C Notification of Compliance Index Contents | 7
N300 Wireless ADSL2+ Modem Router DGN2200 Configuration Profile 146 Step-by-Step Configuration 147 Configuration Summary (Telecommuter Example 149 Setting Up Client-to-Gateway VPN Configuration (Telecommuter Example)150 Step 1: Configure Gateway A (the NETGEAR VPN Router at the Main Office)151 Step 2: Configure Gateway B (the Modem Router at the Regional Office)152 Monitoring the VPN Tunnel (Telecommuter Example 157 Viewing the VPN Router's VPN Status and Log Information 158 Appendix C Notification of Compliance Index Contents | 7

DGN2200 User Manual
Page 19
...has the following ways: • Log in Table 2, Basic Settings Screen Description on page 24. • Network settings. Before running NETGEAR Genie on your network. The CD starts and detects the language you can click the shortcut that was placed on a corporate PC, ... Internet LED blinks. This file has setup and system information, the NETGEAR Technical Support phone number, links to complete the setup. Modem Router Setup | 19 Corporate network settings or virtual private network (VPN) client software might conflict with your modem router settings. Contact your ...
...has the following ways: • Log in Table 2, Basic Settings Screen Description on page 24. • Network settings. Before running NETGEAR Genie on your network. The CD starts and detects the language you can click the shortcut that was placed on a corporate PC, ... Internet LED blinks. This file has setup and system information, the NETGEAR Technical Support phone number, links to complete the setup. Modem Router Setup | 19 Corporate network settings or virtual private network (VPN) client software might conflict with your modem router settings. Contact your ...

DGN2200 User Manual
Page 22
... this menu requires a solid understanding of the modem router menu, select Setup Wizard to set the country, language, and Internet connection. VPN tunnels provide secure, encrypted communications between your modem router. See Manual Setup (Basic Settings) on page 23 and ADSL Settings on page...8226; Maintenance menu. See Chapter 7, Virtual Private Networking. • Web Support. Setup Wizard If you do not use the NETGEAR Genie, you performed the NETGEAR Genie setup, the country, language, Internet, and wireless network settings are called tunnels. Specify the language and location, and ...
... this menu requires a solid understanding of the modem router menu, select Setup Wizard to set the country, language, and Internet connection. VPN tunnels provide secure, encrypted communications between your modem router. See Manual Setup (Basic Settings) on page 23 and ADSL Settings on page...8226; Maintenance menu. See Chapter 7, Virtual Private Networking. • Web Support. Setup Wizard If you do not use the NETGEAR Genie, you performed the NETGEAR Genie setup, the country, language, Internet, and wireless network settings are called tunnels. Specify the language and location, and ...

DGN2200 User Manual
Page 94
...; Set Up a Client-to-Gateway VPN Configuration on page 98 • Set Up a Gateway-to-Gateway VPN Configuration on page 108 • VPN Tunnel Control on page 112 • Set Up VPN Tunnels in Special Circumstances on page 159 to Virtual Private Networking (VPN) on page 118 Chapter 8. See Appendix B, NETGEAR VPN Configuration, and click the link...
...; Set Up a Client-to-Gateway VPN Configuration on page 98 • Set Up a Gateway-to-Gateway VPN Configuration on page 108 • VPN Tunnel Control on page 112 • Set Up VPN Tunnels in Special Circumstances on page 159 to Virtual Private Networking (VPN) on page 118 Chapter 8. See Appendix B, NETGEAR VPN Configuration, and click the link...

DGN2200 User Manual
Page 95
... PC and a network gateway; The DGN2200 supports both types. Client-to-Gateway VPN Tunnels Client-to-gateway VPN tunnels provide secure access from any location on your network is one tunnel endpoint, running NETGEAR ProSafe VPN Client Figure 17. The remote PC is the other tunnel endpoint. (See Set... Up a Client-to-Gateway VPN Configuration on page 98.) Gateway-to-Gateway VPN Tunnels Gateway-to your network from a remote PC, such...
... PC and a network gateway; The DGN2200 supports both types. Client-to-Gateway VPN Tunnels Client-to-gateway VPN tunnels provide secure access from any location on your network is one tunnel endpoint, running NETGEAR ProSafe VPN Client Figure 17. The remote PC is the other tunnel endpoint. (See Set... Up a Client-to-Gateway VPN Configuration on page 98.) Gateway-to-Gateway VPN Tunnels Gateway-to your network from a remote PC, such...

DGN2200 User Manual
Page 96
..., use fully qualified domain names (FQDNs)? In this configuration. See Set Up a Gateway-to-Gateway VPN Configuration on a worksheet: Table 3. VPN Tunnel Configuration Worksheet Parameter Connection Name Pre-Shared Key Secure Association Perfect Forward secrecy Encryption Protocol Authentication Protocol ...range of configuration information defines a security association (SA) between two or more NETGEAR VPN-enabled routers is helpful to form the VPN tunnel end points. Plan a VPN When you set up a VPN, it is a good way to configure each end of the remote network ...
..., use fully qualified domain names (FQDNs)? In this configuration. See Set Up a Gateway-to-Gateway VPN Configuration on a worksheet: Table 3. VPN Tunnel Configuration Worksheet Parameter Connection Name Pre-Shared Key Secure Association Perfect Forward secrecy Encryption Protocol Authentication Protocol ...range of configuration information defines a security association (SA) between two or more NETGEAR VPN-enabled routers is helpful to form the VPN tunnel end points. Plan a VPN When you set up a VPN, it is a good way to configure each end of the remote network ...

DGN2200 User Manual
Page 97
... wide, encrypting these values using VPNC defaults (see Table 4, Parameters Recommended by the BPNC and Used in which you use to -Gateway VPN Configuration on page 97). - Parameters Recommended by encrypting the data three times using a dynamic IP address has to always be the initiator....- DES. Virtual Private Networking | 97 Triple DES achieves a higher level of security by the BPNC and Used in the VPN Wizard Parameter Secure Association Authentication Method Encryption Method Authentication Protocol Diffie-Hellman (DH) Group Key Life IKE Life Time Factory Default Setting...
... wide, encrypting these values using VPNC defaults (see Table 4, Parameters Recommended by the BPNC and Used in which you use to -Gateway VPN Configuration on page 97). - Parameters Recommended by encrypting the data three times using a dynamic IP address has to always be the initiator....- DES. Virtual Private Networking | 97 Triple DES achieves a higher level of security by the BPNC and Used in the VPN Wizard Parameter Secure Association Authentication Method Encryption Method Authentication Protocol Diffie-Hellman (DH) Group Key Life IKE Life Time Factory Default Setting...

DGN2200 User Manual
Page 98
... gateway involves these two steps: • Step 1: Configure the Client-to-Gateway VPN Tunnel on page 98 describes how to use the VPN Wizard to configure the NETGEAR ProSafe VPN Client endpoint. Client-to-gateway VPN tunnel Step 1: Configure the Client-to-Gateway VPN Tunnel This section describes using the VPNC default parameters listed in Special...
... gateway involves these two steps: • Step 1: Configure the Client-to-Gateway VPN Tunnel on page 98 describes how to use the VPN Wizard to configure the NETGEAR ProSafe VPN Client endpoint. Client-to-gateway VPN tunnel Step 1: Configure the Client-to-Gateway VPN Tunnel This section describes using the VPNC default parameters listed in Special...

DGN2200 User Manual
Page 99
...IP Address) Dynamic 22.23.24.25 To configure a client-to-gateway VPN tunnel using the VPN Wizard: 1. The following worksheet identifies the parameters used in this procedure, which are highlighted in blue. VPN > VPN Wizard. The connection name is for convenience and does not affect how ...the VPN tunnel functions. N300 Wireless ADSL2+ Modem Router DGN2200 The following screen displays. Click Next. 2. VPN Tunnel Configuration Worksheet Parameter Connection Name ...
...IP Address) Dynamic 22.23.24.25 To configure a client-to-gateway VPN tunnel using the VPN Wizard: 1. The following worksheet identifies the parameters used in this procedure, which are highlighted in blue. VPN > VPN Wizard. The connection name is for convenience and does not affect how ...the VPN tunnel functions. N300 Wireless ADSL2+ Modem Router DGN2200 The following screen displays. Click Next. 2. VPN Tunnel Configuration Worksheet Parameter Connection Name ...

DGN2200 User Manual
Page 100
The Summary screen displays: Note: To view the VPNC-recommended authentication and encryption settings used by the VPN Wizard, click the here link. 5. The VPN Policies screen displays, showing that the new tunnel is enabled: 100 | Chapter 8. Enter the remote IP address and subnet mask, and click Next. Virtual Private Networking Click Done. N300 Wireless ADSL2+ Modem Router DGN2200 3. Select the radio button for the type of target end point, and click Next. 4.
The Summary screen displays: Note: To view the VPNC-recommended authentication and encryption settings used by the VPN Wizard, click the here link. 5. The VPN Policies screen displays, showing that the new tunnel is enabled: 100 | Chapter 8. Enter the remote IP address and subnet mask, and click Next. Virtual Private Networking Click Done. N300 Wireless ADSL2+ Modem Router DGN2200 3. Select the radio button for the type of target end point, and click Next. 4.


