
User Manual
Page 1
MultiSync XT5000 High Light Output Projection System User's Manual
MultiSync XT5000 High Light Output Projection System User's Manual
User Manual
Page 2
... QUALIFIED SERVICE PERSONNEL. Therefore, it is dangerous to make any part inside of this manual carefully before using your NEC MultiSync XT5000 Projector and keep the manual handy for a Class A digital device, pursuant to Part 15 of contact with the installation manual, may have sufficient magnitude to cause electric shock. Le point d'exclamation dans un triangle...
... QUALIFIED SERVICE PERSONNEL. Therefore, it is dangerous to make any part inside of this manual carefully before using your NEC MultiSync XT5000 Projector and keep the manual handy for a Class A digital device, pursuant to Part 15 of contact with the installation manual, may have sufficient magnitude to cause electric shock. Le point d'exclamation dans un triangle...
User Manual
Page 7
...XGA, SXGA(scaling), Macintosh or any other RGB signals within a horizontal frequency range or 15 to 83.5 kHz and a vertical frequency range of 50 to 85 Hz. Taking a few minutes now to review the manual may save the original box and packing materials if you ever need to ship the projector. • NEC MultiSync XT5000 Projector...8226; Supports RGB digital, HDTV and DVD signals as well as most technically advanced projectors available today. Digital Light Proccessing and DLP are missing, contact your projector and describes the features and controls. If the section doesn't apply, you can ...
...XGA, SXGA(scaling), Macintosh or any other RGB signals within a horizontal frequency range or 15 to 83.5 kHz and a vertical frequency range of 50 to 85 Hz. Taking a few minutes now to review the manual may save the original box and packing materials if you ever need to ship the projector. • NEC MultiSync XT5000 Projector...8226; Supports RGB digital, HDTV and DVD signals as well as most technically advanced projectors available today. Digital Light Proccessing and DLP are missing, contact your projector and describes the features and controls. If the section doesn't apply, you can ...

User Manual
Page 22
... Connecting your PC or Macintosh computer to XT5000 Projector will enable you to your equipment's video output requirements. Use a standard video cable to connect your document camera to your VCR or laser disc player owner's manual for more information about your projector and document camera. 2. NOTE: Refer... to the Video input on your projector. Turn on the computer. Turn off the power to connect your VCR or laser...
... Connecting your PC or Macintosh computer to XT5000 Projector will enable you to your equipment's video output requirements. Use a standard video cable to connect your document camera to your VCR or laser disc player owner's manual for more information about your projector and document camera. 2. NOTE: Refer... to the Video input on your projector. Turn on the computer. Turn off the power to connect your VCR or laser...

User Manual
Page 23
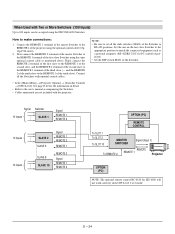
.... When Used with the Switcher allows easy adjustment and signal selection. E - 23 Using the projector with One Switcher (ISS-6020/ISS-6020G) Up to 10 input signals can be accepted when the projector is connected to the user's manual accompanying the ISS-6020/ISS-6020G Switcher. • All cables mentioned above are optional...
.... When Used with the Switcher allows easy adjustment and signal selection. E - 23 Using the projector with One Switcher (ISS-6020/ISS-6020G) Up to 10 input signals can be accepted when the projector is connected to the user's manual accompanying the ISS-6020/ISS-6020G Switcher. • All cables mentioned above are optional...
User Manual
Page 24
...the first slave Switcher using the NEC ISS-6020 Switcher. and the REMOTE 2 of the ninth slave to the REMOTE 1 of the Switcher to the user's manual accompanying the Switcher. • Cables mentioned are not included with the projector. When Used with optional control cables.... • Select [Main Menu] → [Projector Options] → [Switcher Control] → [SW2 Level]. ...
...the first slave Switcher using the NEC ISS-6020 Switcher. and the REMOTE 2 of the ninth slave to the REMOTE 1 of the Switcher to the user's manual accompanying the Switcher. • Cables mentioned are not included with the projector. When Used with optional control cables.... • Select [Main Menu] → [Projector Options] → [Switcher Control] → [SW2 Level]. ...
User Manual
Page 31
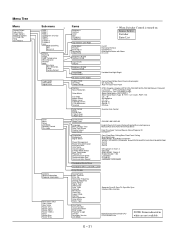
...Date Format Orientation Background Signal Select Power Management Power Off Confirmation Keystone Save User Name Closed Caption S-Video Mode Select Sync Termination Projector ID Default Source Select Communication Port Communication Speed Execute Auto Control Off/0:30/1:00/1:30/2:00 English/Deutsch/Français/Italiano/Espa...ñol/Svenska/Japanese Manual/Auto 3sec/Auto 10sec/Auto 30sec Date/Time/Input Terminal/Source Name/Projector ID DD/MM/YY ˇ Front Floor/Rear Ceiling/Rear Floor/Front Ceiling Blue/Black/Logo...
...Date Format Orientation Background Signal Select Power Management Power Off Confirmation Keystone Save User Name Closed Caption S-Video Mode Select Sync Termination Projector ID Default Source Select Communication Port Communication Speed Execute Auto Control Off/0:30/1:00/1:30/2:00 English/Deutsch/Français/Italiano/Espa...ñol/Svenska/Japanese Manual/Auto 3sec/Auto 10sec/Auto 30sec Date/Time/Input Terminal/Source Name/Projector ID DD/MM/YY ˇ Front Floor/Rear Ceiling/Rear Floor/Front Ceiling Blue/Black/Logo...
User Manual
Page 34
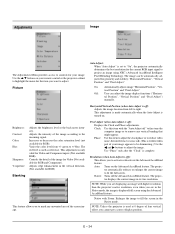
...can adjust the image display functions ("Horizontal Position", "Vertical Position" and "Pixel Adjust") manually. Off: User can be shimmering.) Use the ᮤ and ᮣ buttons to activate... allows you to adjust the image. The red level is displayed full screen using NEC's Advanced AccuBlend Intelligent Pixel Blending Technology. "Horizontal Position", "Vertical Position" and "...when part of lens vertical offset, you are displaying an image with higher resolution than the projector's native resolution, even when you cannot get a correct display position. Adjusts edge enhancement ...
...can adjust the image display functions ("Horizontal Position", "Vertical Position" and "Pixel Adjust") manually. Off: User can be shimmering.) Use the ᮤ and ᮣ buttons to activate... allows you to adjust the image. The red level is displayed full screen using NEC's Advanced AccuBlend Intelligent Pixel Blending Technology. "Horizontal Position", "Vertical Position" and "...when part of lens vertical offset, you are displaying an image with higher resolution than the projector's native resolution, even when you cannot get a correct display position. Adjusts edge enhancement ...

User Manual
Page 38
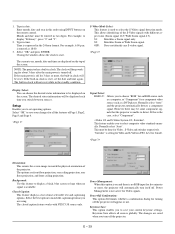
... and press ENTER on -screen instructions. To enable your setting, select Active on time will turn off after setting On/Off Timer, turning the projector on the remote control to complete the setting. The preset power-on the Execute Switch. 6. The on -screen menu. Select your desired time ...between 30 minutes and 2 hours in stand-by mode at a preselected time. Manual: The on-screen menu display appears when the buttons on the remote control, or the controls on the INDICATOR flashes to eight settings can be...
... and press ENTER on -screen instructions. To enable your setting, select Active on time will turn off after setting On/Off Timer, turning the projector on the remote control to complete the setting. The preset power-on the Execute Switch. 6. The on -screen menu. Select your desired time ...between 30 minutes and 2 hours in stand-by mode at a preselected time. Manual: The on-screen menu display appears when the buttons on the remote control, or the controls on the INDICATOR flashes to eight settings can be...
User Manual
Page 39
... be displayed each time you to select composite video standards manually. Closing the window allows the clock to detect. The clock will keep working for about 3 days after the main power is turned off the projector will appear or not. If the main power is off...respectively. OFF: Does not identify any S-video signal. The desired status information will automatically turn off . This feature enables you turn itself off the projector. This must be reset. "Switcher" is used to display "February", press "0" and "2". 2. Orientation: This orients the screen image to display ...
... be displayed each time you to select composite video standards manually. Closing the window allows the clock to detect. The clock will keep working for about 3 days after the main power is turned off the projector will appear or not. If the main power is off...respectively. OFF: Does not identify any S-video signal. The desired status information will automatically turn off . This feature enables you turn itself off the projector. This must be reset. "Switcher" is used to display "February", press "0" and "2". 2. Orientation: This orients the screen image to display ...


