
P401 : RS232 codes for X461UN, X461HB, X431BT, P401, P461, P521, P551, P701, S401, S461 and S521
Page 1
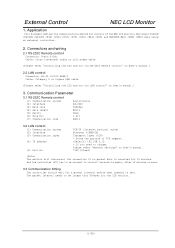
... address (5) Port No. The packet interval needs to change, Please refer "Network settings" on User's manual.) 3. External Control NEC LCD Monitor 1. TCP/IP (Internet protocol suite) Ethernet (CSMA/CD) Transport layer (TCP) * Using the payload of the NEC LCD monitor, MultiSync X461UN /X461HB /X431BT /P401 /P461 /P521 /P701 /S401 /S461 /S521 and MULTEOS M401 /M461 /M521 when using an external controller. 2. Connectors and wiring 2.1 RS-232C Remote control Connector: 9-pin D-Sub Cable: Cross (reversed) cable or...
... address (5) Port No. The packet interval needs to change, Please refer "Network settings" on User's manual.) 3. External Control NEC LCD Monitor 1. TCP/IP (Internet protocol suite) Ethernet (CSMA/CD) Transport layer (TCP) * Using the payload of the NEC LCD monitor, MultiSync X461UN /X461HB /X431BT /P401 /P461 /P521 /P701 /S401 /S461 /S521 and MULTEOS M401 /M461 /M521 when using an external controller. 2. Connectors and wiring 2.1 RS-232C Remote control Connector: 9-pin D-Sub Cable: Cross (reversed) cable or...
P401 : RS232 codes for X461UN, X461HB, X431BT, P401, P461, P521, P551, P701, S401, S461 and S521
Page 5
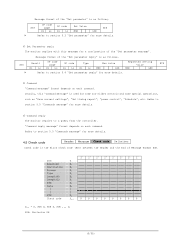
... non-slider controls and some special operations, such as "Save current settings", "Get timing report", "power control", "Schedule", etc. Message format of the "Set parameter" is as follows, STX OP code OP code page Set Value ETX Hi Lo Hi Lo MSB LSB Refer to section 5.3 "Set parameter" for more details. 4 Set Parameter reply The monitor replies with this "command message" is used for...
... non-slider controls and some special operations, such as "Save current settings", "Get timing report", "power control", "Schedule", etc. Message format of the "Set parameter" is as follows, STX OP code OP code page Set Value ETX Hi Lo Hi Lo MSB LSB Refer to section 5.3 "Set parameter" for more details. 4 Set Parameter reply The monitor replies with this "command message" is used for...
P401 : RS232 codes for X461UN, X461HB, X431BT, P401, P461, P521, P551, P701, S401, S461 and S521
Page 49
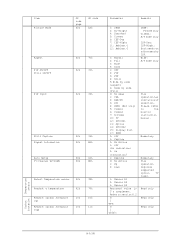
...operation requires supported option TV tuner. Item Picture Mode OP code page 02h OP code 1Ah Aspect PIP ON/OFF Still ON/OFF PIP Input 02h 70h 02h 72h 02h 73h Still Capture Signal Information Auto Setup TV-Channel UP/DOWN 02h 76h 02h EAh 00h 1Eh 00h 8Bh Select Temperature sensor...: 0: | 65535: sRGB: PC mode only Cinema: A/V mode only ISF-Day: ISF-Night: Each needs an adjustment by side (Full) 0: No mean 1: VGA 2: RGB/HV 3: DVI 4: HDMI (Set only) 5: Video1 6: Video2 7: S-Video 10: TV 12: DVD/HD1 13: Option 14: DVD/HD2 15: Display Port 17: HDMI 0: Off 1: Capture 0: No Action...
...operation requires supported option TV tuner. Item Picture Mode OP code page 02h OP code 1Ah Aspect PIP ON/OFF Still ON/OFF PIP Input 02h 70h 02h 72h 02h 73h Still Capture Signal Information Auto Setup TV-Channel UP/DOWN 02h 76h 02h EAh 00h 1Eh 00h 8Bh Select Temperature sensor...: 0: | 65535: sRGB: PC mode only Cinema: A/V mode only ISF-Day: ISF-Night: Each needs an adjustment by side (Full) 0: No mean 1: VGA 2: RGB/HV 3: DVI 4: HDMI (Set only) 5: Video1 6: Video2 7: S-Video 10: TV 12: DVD/HD1 13: Option 14: DVD/HD2 15: Display Port 17: HDMI 0: Off 1: Capture 0: No Action...
Specification Brochure
Page 2
Specifications for 24/7 operation, expansion slot, programable lookup tables, Plug and Play (DDC/CI, DDC2B), PIP (remote), POP, 6-axis color adjustment, multi-level programmable zoom, TileMatrix (up to 10x10), TileComp, video ready, scheduler (w/ RTC), sharpness/softness, off-timer (countdown), screen saver, vacation switch, 10-bit gamma, AutoBright (signal input), Windows Vista Premium-certified, portrait-capable; closed captioning, serial number display, POWER Power Requirements Power Consumption (typical) Power Consumption - Video1, Component Loop-out Stereo RCA RS-232 out...
Specifications for 24/7 operation, expansion slot, programable lookup tables, Plug and Play (DDC/CI, DDC2B), PIP (remote), POP, 6-axis color adjustment, multi-level programmable zoom, TileMatrix (up to 10x10), TileComp, video ready, scheduler (w/ RTC), sharpness/softness, off-timer (countdown), screen saver, vacation switch, 10-bit gamma, AutoBright (signal input), Windows Vista Premium-certified, portrait-capable; closed captioning, serial number display, POWER Power Requirements Power Consumption (typical) Power Consumption - Video1, Component Loop-out Stereo RCA RS-232 out...

Press Release
Page 2
...; color calibration kit (NEC SVII-PRO-KIT), tiled X461UN displays will have identical color settings, ensuring color uniformity and fidelity across individual and multiple screens, creating a perfectly matched image in the MultiSync X461UN are alerted to source and manage display content. Included in tiled environments The MultiSync X461UN can be fully integrated into the X461UN expansion slot eliminates the need for external distribution equipment and power supply, thus providing for digital...
...; color calibration kit (NEC SVII-PRO-KIT), tiled X461UN displays will have identical color settings, ensuring color uniformity and fidelity across individual and multiple screens, creating a perfectly matched image in the MultiSync X461UN are alerted to source and manage display content. Included in tiled environments The MultiSync X461UN can be fully integrated into the X461UN expansion slot eliminates the need for external distribution equipment and power supply, thus providing for digital...

Users Manual
Page 2
... Use English-3 Contents ...English-4 Installation ...English-5 Parts Name and Functions ...English-7 Control Panel ...English-7 Terminal Panel ...English-8 Wireless Remote Control (Optional English-10 Operating Range for the Option Remote Control English-11 Handling the remote control ...English-11 Setup ...English-12 Connections ...English-14 Wiring Diagram ...English-14 Connecting a Personal Computer ...English-15 Connecting a DVD Player with HDMI out English-15 Basic Operation ...English-16 Power ON and OFF Modes ...English-16 Power Indicator ...English-17 Using Power...
... Use English-3 Contents ...English-4 Installation ...English-5 Parts Name and Functions ...English-7 Control Panel ...English-7 Terminal Panel ...English-8 Wireless Remote Control (Optional English-10 Operating Range for the Option Remote Control English-11 Handling the remote control ...English-11 Setup ...English-12 Connections ...English-14 Wiring Diagram ...English-14 Connecting a Personal Computer ...English-15 Connecting a DVD Player with HDMI out English-15 Basic Operation ...English-16 Power ON and OFF Modes ...English-16 Power Indicator ...English-17 Using Power...

Users Manual
Page 5
... anything on the LCD surface. English-3 Damage to the cord may expose you use OA cleaner it is easily accessible. • Handle with this monitor. • Do not place any cleaning solution or glass cleaner! • Adjust the monitor's brightness, contrast and sharpness controls to enhance readability. • Avoid displaying fixed patterns on the power cord. Refer all servicing to the LCD surface. • Please...
... anything on the LCD surface. English-3 Damage to the cord may expose you use OA cleaner it is easily accessible. • Handle with this monitor. • Do not place any cleaning solution or glass cleaner! • Adjust the monitor's brightness, contrast and sharpness controls to enhance readability. • Avoid displaying fixed patterns on the power cord. Refer all servicing to the LCD surface. • Please...

Users Manual
Page 9
... menu. Control Key Lock Mode This control completely locks out access to decrease the adjustment with the "SCHEDULE SETTINGS" function enabled. English Parts Name and Functions Control Panel POWER button Switches the power on/off . Decreases the audio output level when the OSD menu is turned-off . Glows red when the LCD is in POWER OFF (ECO standby) mode. Green and Amber blink alternately while in POWER OFF (standby) mode. INPUT button Acts as their factory preset name. MINUS button Acts as (+) button to previous menu...
... menu. Control Key Lock Mode This control completely locks out access to decrease the adjustment with the "SCHEDULE SETTINGS" function enabled. English Parts Name and Functions Control Panel POWER button Switches the power on/off . Decreases the audio output level when the OSD menu is turned-off . Glows red when the LCD is in POWER OFF (ECO standby) mode. Green and Amber blink alternately while in POWER OFF (standby) mode. INPUT button Acts as their factory preset name. MINUS button Acts as (+) button to previous menu...

Users Manual
Page 10
... such as a DVD player, HDTV device, or Set-Top-Box. This is on -Green signal can be used with the supplied power cord. A Sync-on screen to your monitor. BNC and RCA connectors are not on a separate device. LAN port (RJ-45) LAN connection. REMOTE IN/OUT Use the optional wired remote control by connecting it to an input on screen, outputs the signal from the VIDEO IN connector. HDMI connector To input digital HDMI signals. Please select signal type in order...
... such as a DVD player, HDTV device, or Set-Top-Box. This is on -Green signal can be used with the supplied power cord. A Sync-on screen to your monitor. BNC and RCA connectors are not on a separate device. LAN port (RJ-45) LAN connection. REMOTE IN/OUT Use the optional wired remote control by connecting it to an input on screen, outputs the signal from the VIDEO IN connector. HDMI connector To input digital HDMI signals. Please select signal type in order...

Users Manual
Page 12
.... CHANGE button: Replaces to set and change passwords, change channel and set REMOTE ID. Main picture Sub picture DVI VGA RGB/HV HDMI DVD/HD1 DVD/HD2 SCART VIDEO1 VIDEO2 S-VIDEO DVI - - VIDEO2 - - - - - - - See page 17. SCART - - - - - English-10 See page 18. SOUND button (not available) SET button Makes selection. PIP (Picture In Picture) button ON/OFF button: Toggle switches between PIP, POP, sideby-side (aspect) and side-by-side (full). RGB/HV - - - - AUTO SETUP button Enters auto setup menu. Small screen which adjusted "PIP" mode moves...
.... CHANGE button: Replaces to set and change passwords, change channel and set REMOTE ID. Main picture Sub picture DVI VGA RGB/HV HDMI DVD/HD1 DVD/HD2 SCART VIDEO1 VIDEO2 S-VIDEO DVI - - VIDEO2 - - - - - - - See page 17. SCART - - - - - English-10 See page 18. SOUND button (not available) SET button Makes selection. PIP (Picture In Picture) button ON/OFF button: Toggle switches between PIP, POP, sideby-side (aspect) and side-by-side (full). RGB/HV - - - - AUTO SETUP button Enters auto setup menu. Small screen which adjusted "PIP" mode moves...
Users Manual
Page 14
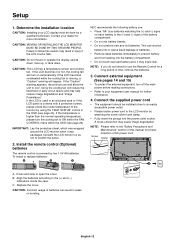
... or cause liquid leakage of time, remove the batteries. 3. Connect the supplied power cord • The equipment should be done by using the "HEAT STATUS" control in injury if the LCD monitor falls. Contact your equipment user manual for a long period of batteries. • Remove dead batteries immediately to the (+) and (-) signs of AC power cord. CAUTION: Do not mount or operate the display upside down, face up...
... or cause liquid leakage of time, remove the batteries. 3. Connect the supplied power cord • The equipment should be done by using the "HEAT STATUS" control in injury if the LCD monitor falls. Contact your equipment user manual for a long period of batteries. • Remove dead batteries immediately to the (+) and (-) signs of AC power cord. CAUTION: Do not mount or operate the display upside down, face up...

Users Manual
Page 19
...*4 Input Name Audio input mode Picture aspect Input Signal Information Sub picture information *3: "IR CONTROL" should be set "Primary" or "Secondary". *4: "IR CONTROL" should be expanded beyond the active display area. Use the COLOR SYSTEM menu to set to expansion. WIDE: Expands a 16:9 letter box signal to your new display has been set [AUTO], [NTSC], [PAL], [SECAM], [PAL60], [4.43NTSC], according to fill entire screen. English Power Indicator Mode Status Indicator Light Power ON Green*2 Power OFF (Eco Standby)*1 Red Power consumption...
...*4 Input Name Audio input mode Picture aspect Input Signal Information Sub picture information *3: "IR CONTROL" should be set "Primary" or "Secondary". *4: "IR CONTROL" should be expanded beyond the active display area. Use the COLOR SYSTEM menu to set to expansion. WIDE: Expands a 16:9 letter box signal to your new display has been set [AUTO], [NTSC], [PAL], [SECAM], [PAL60], [4.43NTSC], according to fill entire screen. English Power Indicator Mode Status Indicator Light Power ON Green*2 Power OFF (Eco Standby)*1 Red Power consumption...

Users Manual
Page 23
... "AUTO SETUP" if required. Can be "AUTO". MAIN AUDIO LINE OUT Selecting "VARIABLE" will be adjusted for each BASE ZOOM setting. 1.00 H POS** Horizontal position. TIME - Some of time. HDMI, DVD/HD1, DVD/HD2, SCART, VIDEO1, VIDEO2, S-VIDEO inputs only OFF All inputs, except TV* Selecting "OFF" will be adjusted for the "SCHEDULE" function to operate. SCHEDULE OFF TIMER Sets the monitor to use. - OFF SCHEDULE SETTINGS Creates a working schedule for the monitor to power...
... "AUTO SETUP" if required. Can be "AUTO". MAIN AUDIO LINE OUT Selecting "VARIABLE" will be adjusted for each BASE ZOOM setting. 1.00 H POS** Horizontal position. TIME - Some of time. HDMI, DVD/HD1, DVD/HD2, SCART, VIDEO1, VIDEO2, S-VIDEO inputs only OFF All inputs, except TV* Selecting "OFF" will be adjusted for the "SCHEDULE" function to operate. SCHEDULE OFF TIMER Sets the monitor to use. - OFF SCHEDULE SETTINGS Creates a working schedule for the monitor to power...

Users Manual
Page 26
... monitor will have this function when picture model is present in the other video input port. When DVD/HD1, DVD/HD2, SCART, VIDEO1, VIDEO2 or S-VIDEO input signal is slightly expanded and moves in Eco Standby mode. ON Note: When connecting DVI, video card might not stop sending digital data even if image has disappeared. RESET POWER SAVE, STANDBY MODE, FAN CONTROL, SCREEN SAVER, SIDE BORDER COLOR, AUTO BRIGHTNESS, DDC/CI. DISPLAY PROTECTION POWER SAVE All inputs...
... monitor will have this function when picture model is present in the other video input port. When DVD/HD1, DVD/HD2, SCART, VIDEO1, VIDEO2 or S-VIDEO input signal is slightly expanded and moves in Eco Standby mode. ON Note: When connecting DVI, video card might not stop sending digital data even if image has disappeared. RESET POWER SAVE, STANDBY MODE, FAN CONTROL, SCREEN SAVER, SIDE BORDER COLOR, AUTO BRIGHTNESS, DDC/CI. DISPLAY PROTECTION POWER SAVE All inputs...

Users Manual
Page 27
... devices using SCART connectors. VIDEO1, VIDEO2, S-VIDEO inputs only AUTO Automatically chooses Color System setting based on the screen. The whole image is best suited for motion pictures, but increases the risk of synchronized signal. BNC MODE Selects the kind of the input signal. HDMI SIGNAL RAW/EXPAND SCAN CONVERSION All inputs except VGA, RGB/HV Selects the IP (Interlace to best display the image. English GAIN Adjusts gain value. INTERLACE Disables...
... devices using SCART connectors. VIDEO1, VIDEO2, S-VIDEO inputs only AUTO Automatically chooses Color System setting based on the screen. The whole image is best suited for motion pictures, but increases the risk of synchronized signal. BNC MODE Selects the kind of the input signal. HDMI SIGNAL RAW/EXPAND SCAN CONVERSION All inputs except VGA, RGB/HV Selects the IP (Interlace to best display the image. English GAIN Adjusts gain value. INTERLACE Disables...

Users Manual
Page 28
... SET. 5. PICTURE MODE: - - - - Unlike CRT monitors, LCD monitors' image persistence is not permanent, but when fixed image is to choose the input source. Lower environmental temperatures prolong the lifespan of LCD, the following are overlapping then the schedule with all personal display devices, NEC DISPLAY SOLUTIONS recommends displaying moving images and using a moving screen saver at different times. Enter the SCHEDULE menu. Use the + and - If a weekly schedule is installed...
... SET. 5. PICTURE MODE: - - - - Unlike CRT monitors, LCD monitors' image persistence is not permanent, but when fixed image is to choose the input source. Lower environmental temperatures prolong the lifespan of LCD, the following are overlapping then the schedule with all personal display devices, NEC DISPLAY SOLUTIONS recommends displaying moving images and using a moving screen saver at different times. Enter the SCHEDULE menu. Use the + and - If a weekly schedule is installed...

Users Manual
Page 29
... DISPLAY" menu in normal mode would send signals to operate this feature to 100 individual MultiSync monitors. This MONITOR ID number allows the remote control to every monitor at the same time (see Figure 2). If the REMOTE CONTROLID is designated as the primary monitor. This LCD monitor can be controlled via RS-232C connection. 1. Set Monitor ID and IR Control mode. For example: if there are many monitors being used to operate the monitor having that specific Monitor ID number...
... DISPLAY" menu in normal mode would send signals to operate this feature to 100 individual MultiSync monitors. This MONITOR ID number allows the remote control to every monitor at the same time (see Figure 2). If the REMOTE CONTROLID is designated as the primary monitor. This LCD monitor can be controlled via RS-232C connection. 1. Set Monitor ID and IR Control mode. For example: if there are many monitors being used to operate the monitor having that specific Monitor ID number...

Users Manual
Page 35
... the monitor with size and weight limitations. NEC recommends using any VESA standard (FDMIv1) third party mounting arm or bracket. RS-232C daisy chain: You can control the multiple monitors by long cable lengths. VESA Standard (FDMIv1) Mounting Interface: Allows users to connect their LCD monitor to use on a wall or an arm using mounting interface that the colors displayed on computer displays and other peripherals. English-33 DVI-D: The digital-only subset of your screen...
... the monitor with size and weight limitations. NEC recommends using any VESA standard (FDMIv1) third party mounting arm or bracket. RS-232C daisy chain: You can control the multiple monitors by long cable lengths. VESA Standard (FDMIv1) Mounting Interface: Allows users to connect their LCD monitor to use on a wall or an arm using mounting interface that the colors displayed on computer displays and other peripherals. English-33 DVI-D: The digital-only subset of your screen...

Users Manual
Page 36
... monitor for one hour to erase the image. Use new cable if necessary. When the display mode is changed, the OSD Image Adjust settings may need to be aware that the appropriate resolution has been selected. English-34 Troubleshooting No picture • The signal cable should be completely connected to the display card/computer. • The display card should be completely seated in its slot. • Front Power Switch...
... monitor for one hour to erase the image. Use new cable if necessary. When the display mode is changed, the OSD Image Adjust settings may need to be aware that the appropriate resolution has been selected. English-34 Troubleshooting No picture • The signal cable should be completely connected to the display card/computer. • The display card should be completely seated in its slot. • Front Power Switch...

Users Manual
Page 37
... stand) Weight 29.3 Kg (without stand) VESA compatible arm mounting interface 300 mm x 300 mm (M6, 4 Holes) Complied Regulatory and Guidelines UL60950-1/CSA C22.2 No.60950-1/ TUV-GS/EN60950-1 FCC-A/DOC-A/EN55022-A/EN55024/EN61000-3-2/EN61000-3-3/CE/GOST-R Power Management VESA DPM Plug & Play VESA DDC2B, DDC/CI Accessories Setup manual, Power Cord, Video Signal cable, Stereo Mini plug cable (3.5 ), Clamp x 3, Screw x 9, CD-ROM, Thumbscrew for stand x 2, Cable cover NOTE: Technical specifications are subject to change...
... stand) Weight 29.3 Kg (without stand) VESA compatible arm mounting interface 300 mm x 300 mm (M6, 4 Holes) Complied Regulatory and Guidelines UL60950-1/CSA C22.2 No.60950-1/ TUV-GS/EN60950-1 FCC-A/DOC-A/EN55022-A/EN55024/EN61000-3-2/EN61000-3-3/CE/GOST-R Power Management VESA DPM Plug & Play VESA DDC2B, DDC/CI Accessories Setup manual, Power Cord, Video Signal cable, Stereo Mini plug cable (3.5 ), Clamp x 3, Screw x 9, CD-ROM, Thumbscrew for stand x 2, Cable cover NOTE: Technical specifications are subject to change...


