
User Manual
Page 1
WT600 Projector User's Manual
WT600 Projector User's Manual

User Manual
Page 2
First read the WT600 SETUP GUIDE before operating the projector. 2 Change in ... user's manual) (2) Change in [Pincushion] operation (page 6-13 of the user's manual, the WT600 SETUP GUIDE is shown on the next page. Read this change, the order in displaying adjustment screens ...WT600 User's Manual. See the correct procedures below. (1) Change in layout of menu items (page 6-3 of the user's manual) The menu options in 3D Reform has been changed to "What's in the user's manual are different from the actual operation. Although a Quick Connect Guide is actually included with the projector...
First read the WT600 SETUP GUIDE before operating the projector. 2 Change in ... user's manual) (2) Change in [Pincushion] operation (page 6-13 of the user's manual, the WT600 SETUP GUIDE is shown on the next page. Read this change, the order in displaying adjustment screens ...WT600 User's Manual. See the correct procedures below. (1) Change in layout of menu items (page 6-3 of the user's manual) The menu options in 3D Reform has been changed to "What's in the user's manual are different from the actual operation. Although a Quick Connect Guide is actually included with the projector...

User Manual
Page 5
English Deutsch Français Italiano Español Svenska Wash hands after handling. WT600 Projector User's Manual WARNING TO CALIFORNIA RESIDENTS: Handling the cables supplied with this product, will expose you to lead, a chemical known to the State of California to cause birth defects or other reproductive harm.
English Deutsch Français Italiano Español Svenska Wash hands after handling. WT600 Projector User's Manual WARNING TO CALIFORNIA RESIDENTS: Handling the cables supplied with this product, will expose you to lead, a chemical known to the State of California to cause birth defects or other reproductive harm.
User Manual
Page 6
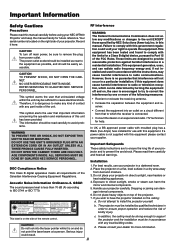
.... Exposure to correct the interference by turning the equipment off and on the side of bodily injury. Please consult your NEC WT600 Projector and keep the manual handy for future reference. Important Information Safety Cautions RF Interference Precautions Please read this manual carefully before... a residential installation. However, there is not supplied with any modifications or changes to Part 15 of the projector. 7. ALL SERVICING MUST BE DONE BY QUALIFIED NEC SERVICE PERSONNEL. • Connect the equipment into the laser pointer while it here: CAUTION To turn off ...
.... Exposure to correct the interference by turning the equipment off and on the side of bodily injury. Please consult your NEC WT600 Projector and keep the manual handy for future reference. Important Information Safety Cautions RF Interference Precautions Please read this manual carefully before... a residential installation. However, there is not supplied with any modifications or changes to Part 15 of the projector. 7. ALL SERVICING MUST BE DONE BY QUALIFIED NEC SERVICE PERSONNEL. • Connect the equipment into the laser pointer while it here: CAUTION To turn off ...
User Manual
Page 7
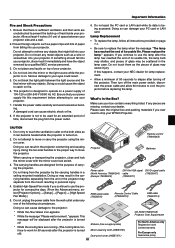
...Ensure that there is sufficient ventilation and that might fall into your WT600 Projector. If the projector is turned off the projector. What's in the carrying handles separating from the unit or the projector may cause injury. PJ ASPECT VOLUME HELP POINTER MAGNIFY FPRIECE-MZUET3ED REFORM...injury. Important Information Fire and Shock Precautions 1. If something should fall into your projector. 7. The projector is turned on a power supply of glass may separate from the projector by a qualified NEC service personnel. 3. Do not eject the PC card or LAN card while its ...
...Ensure that there is sufficient ventilation and that might fall into your WT600 Projector. If the projector is turned off the projector. What's in the carrying handles separating from the unit or the projector may cause injury. PJ ASPECT VOLUME HELP POINTER MAGNIFY FPRIECE-MZUET3ED REFORM...injury. Important Information Fire and Shock Precautions 1. If something should fall into your projector. 7. The projector is turned on a power supply of glass may separate from the projector by a qualified NEC service personnel. 3. Do not eject the PC card or LAN card while its ...
User Manual
Page 8
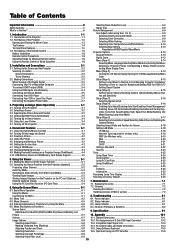
...Characters by Using the Menu 6-6 8-3. Using Software Keyboard 10-5 Selecting Resolution 6-8 10-6. Installation and Connections 2-1 Selecting a Projector Pointer Icon/Selecting a Mouse Pointer Icon/Se- 2-1. Connecting Your DVD Player 2-6 ton and Sensitivity Connecting Your VCR or ...25 4-10. Optimizing RGB Picture Automatically 3-4 3-5. Changing Background Logo 4-4 Security 6-23 4-9. Making the Most out of the Projector 1-2 Opening and Closing the Mirror Cover 1-3 Top Features 1-4 Terminal Panel Features 1-5 1-3. Lamp Indicator 8-1 6-5. Specification 9-1 ...
...Characters by Using the Menu 6-6 8-3. Using Software Keyboard 10-5 Selecting Resolution 6-8 10-6. Installation and Connections 2-1 Selecting a Projector Pointer Icon/Selecting a Mouse Pointer Icon/Se- 2-1. Connecting Your DVD Player 2-6 ton and Sensitivity Connecting Your VCR or ...25 4-10. Optimizing RGB Picture Automatically 3-4 3-5. Changing Background Logo 4-4 Security 6-23 4-9. Making the Most out of the Projector 1-2 Opening and Closing the Mirror Cover 1-3 Top Features 1-4 Terminal Panel Features 1-5 1-3. Lamp Indicator 8-1 6-5. Specification 9-1 ...
User Manual
Page 9
... Macintosh computer (desktop or notebook) and images from your purchase of the NEC WT600 projector. NTSC4.43: TV standard used in France and Eastern Europe. *1 Do not attempt to mount the projector on the WT600: • Super short focal length • 40" to 100" diagonal... to 100 kHz and a vertical frequency range of The WT600 Projector The WT600 is a sophisticated four aspherical mirror XGA projector. SECAM: TV standard used for computerless presenta- Congratulations on PAL TVs. tions • UXGA compatible, XGA native resolution • Sealed optics reduce maintenance when ued ...
... Macintosh computer (desktop or notebook) and images from your purchase of the NEC WT600 projector. NTSC4.43: TV standard used in France and Eastern Europe. *1 Do not attempt to mount the projector on the WT600: • Super short focal length • 40" to 100" diagonal... to 100 kHz and a vertical frequency range of The WT600 Projector The WT600 is a sophisticated four aspherical mirror XGA projector. SECAM: TV standard used for computerless presenta- Congratulations on PAL TVs. tions • UXGA compatible, XGA native resolution • Sealed optics reduce maintenance when ued ...

User Manual
Page 10
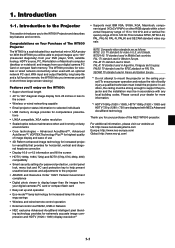
... Mirror cover Mirror cover lock switch Speaker Ventilation (outlet) Foot Lamp cover Lamp cover screw Foot Carrying handle Ventilation (outlet) Mirror face Bottom of the Projector 1. Introduction Front indicator Lights blue to indicate that the projector is turned on or in the Idle mode. 1-2.
... Mirror cover Mirror cover lock switch Speaker Ventilation (outlet) Foot Lamp cover Lamp cover screw Foot Carrying handle Ventilation (outlet) Mirror face Bottom of the Projector 1. Introduction Front indicator Lights blue to indicate that the projector is turned on or in the Idle mode. 1-2.

User Manual
Page 11
... while holding both ends. 1 2. Leaving finger prints in red. 1-3 Failure to do so may cause objects to catch on , the projector will turn off (the idle mode). In either case the STATUS indicator flashes in the mirror surface might cause an unwanted shadow and poor picture...switch to the unlock position. 1 1. Slowly close the mirror cover: 1. In either case the STATUS indicator lights in red. • The projector has a temperature sensor which detects an object in front of the mirror cover until the mirror cover is muted. Slowly open the mirror cover holding...
... while holding both ends. 1 2. Leaving finger prints in red. 1-3 Failure to do so may cause objects to catch on , the projector will turn off (the idle mode). In either case the STATUS indicator flashes in the mirror surface might cause an unwanted shadow and poor picture...switch to the unlock position. 1 1. Slowly close the mirror cover: 1. In either case the STATUS indicator lights in red. • The projector has a temperature sensor which detects an object in front of the mirror cover until the mirror cover is muted. Slowly open the mirror cover holding...
User Manual
Page 12
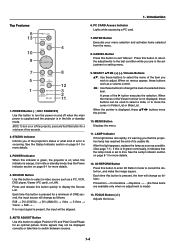
...See the Power Indicator section on ; When the menus or the Viewer tool bar is occurring. See the Lamp Indicator section on and off the projector, press and hold this button to enter 3D Reform mode to adjust. When no input signal is set to move the pointer. 10. When ...; ... (the three items are in idle or standby mode. See the Status Indicator section on or off when the main power is supplied and the projector is made) 13. If no menus appear, these buttons work as follows: RGB → DVI (DIGITAL) → DVI (ANALOG) → Video → S-Video →...
...See the Power Indicator section on ; When the menus or the Viewer tool bar is occurring. See the Lamp Indicator section on and off the projector, press and hold this button to enter 3D Reform mode to adjust. When no input signal is set to move the pointer. 10. When ...; ... (the three items are in idle or standby mode. See the Status Indicator section on or off when the main power is supplied and the projector is made) 13. If no menus appear, these buttons work as follows: RGB → DVI (DIGITAL) → DVI (ANALOG) → Video → S-Video →...

User Manual
Page 13
...can operate your own program, typical PC control codes are on the supplied CD-ROM. Note that supports USB. You can also control the projector by using the supplied USB cable. A commercially available audio cable is your computer, Video or S- This connector also supports a component signal ... to accept digital and analog signal output from a computer with a DVI connector. 4. DVI-I RGB RGB IN RGB OUT 1 5 1. The NEC optional serial cable (CA03D) is put on your computer or DVD player. AUDIO OUT Mini Jack (Stereo Mini) Connect an additional audio equipment here...
...can operate your own program, typical PC control codes are on the supplied CD-ROM. Note that supports USB. You can also control the projector by using the supplied USB cable. A commercially available audio cable is your computer, Video or S- This connector also supports a component signal ... to accept digital and analog signal output from a computer with a DVI connector. 4. DVI-I RGB RGB IN RGB OUT 1 5 1. The NEC optional serial cable (CA03D) is put on your computer or DVD player. AUDIO OUT Mini Jack (Stereo Mini) Connect an additional audio equipment here...

User Manual
Page 14
... click either the right-click or left button. When lit, you are in the Computer mode, these ̆̄̇̈ buttons are in the Projector mode, which is pressed, the input source will change the level of two seconds. 6. When this button to adjust an RGB source for a minimum... operation. 6 7 10 12 14 21 17 20 23 24 25 26 4 OFF VIDEO POWER RGB ON VIEWER AUTO ADJ. 1. Remote Jack Connect your projector on the projector, press and hold the POWER ON button for an optimal picture. 11. MENU LASER SELECT ENTER CANCEL PJ ASPECT FREEZE 3D REFORM HELP POINTER...
... click either the right-click or left button. When lit, you are in the Computer mode, these ̆̄̇̈ buttons are in the Projector mode, which is pressed, the input source will change the level of two seconds. 6. When this button to adjust an RGB source for a minimum... operation. 6 7 10 12 14 21 17 20 23 24 25 26 4 OFF VIDEO POWER RGB ON VIEWER AUTO ADJ. 1. Remote Jack Connect your projector on the projector, press and hold the POWER ON button for an optimal picture. 11. MENU LASER SELECT ENTER CANCEL PJ ASPECT FREEZE 3D REFORM HELP POINTER...

User Manual
Page 15
... buttons as follows: Pincushion → Cornerstone → Keystone → ... (the three items are pressed within 60 seconds, the light goes out and the Projector mode is changed to 400%. press again to decrease it. 24. PIC-MUTE Button This button turns off the menu. 23. NOTE: When the menu... the area you are in a PC card. When the pointer is not displayed, the image is magnified about the center of slides included in the Projector mode. FREEZE Button This button will change as your pointer icon to the Computer mode, press the PJ button again. See page 4-2. 22. ZOOM...
... buttons as follows: Pincushion → Cornerstone → Keystone → ... (the three items are pressed within 60 seconds, the light goes out and the Projector mode is changed to 400%. press again to decrease it. 24. PIC-MUTE Button This button turns off the menu. 23. NOTE: When the menu... the area you are in a PC card. When the pointer is not displayed, the image is magnified about the center of slides included in the Projector mode. FREEZE Button This button will change as your pointer icon to the Computer mode, press the PJ button again. See page 4-2. 22. ZOOM...

User Manual
Page 16
Remove both old batteries and install new ones (AA). Remote control Remote sensor on the projector cabinet 30° 30° Note on Battery Installation: If you press and hold the SELECT ̆̄̇̈ button while installing new batteries, ...the remote control may fail to a distance of about 22 feet/7 m and within a 60-degree angle of the remote sensor on the projector cabinet. • The projector will not respond if there are objects between the remote control and the sensor, or if strong light falls on the remote control. Should...
Remove both old batteries and install new ones (AA). Remote control Remote sensor on the projector cabinet 30° 30° Note on Battery Installation: If you press and hold the SELECT ̆̄̇̈ button while installing new batteries, ...the remote control may fail to a distance of about 22 feet/7 m and within a 60-degree angle of the remote sensor on the projector cabinet. • The projector will not respond if there are objects between the remote control and the sensor, or if strong light falls on the remote control. Should...

User Manual
Page 17
... page 2-7. See page 2-3 to appear distorted. 2. Connect the supplied power cable. But before moving the projector or when it is simple to set up a screen and the projector. NOTE: Ensure that the power cable and any other cables are disconnected before you get started you must ...first: 1. When moving the projector. When installing the projector for the first time, read the WT600 Setup Guide carefully. Connect your projector and how to the projector. Your projector is not in use . Set up your computer or video equipment ...
... page 2-7. See page 2-3 to appear distorted. 2. Connect the supplied power cable. But before moving the projector or when it is simple to set up a screen and the projector. NOTE: Ensure that the power cable and any other cables are disconnected before you get started you must ...first: 1. When moving the projector. When installing the projector for the first time, read the WT600 Setup Guide carefully. Connect your projector and how to the projector. Your projector is not in use . Set up your computer or video equipment ...

User Manual
Page 18
...) 610 686 762 838 914 991 1021 1067 1097 1143 1189 1219 1280 1295 1372 1448 1463 1524 Screen height Screen diagonal Screen center B D Projector foot C Back of projector Throw Distance, Screen Size and Screen Height (Unit: mm) Screen size (inch) 40 45 50 55 60 65 67 70 72 75 78... 700 Throw distance C (mm) 5 10 15 20 25 30 Throw distance C (inch) Use the drawing below as a guide. Setting Up the Screen and the Projector Selecting a Location The further your projector is about 26 inches (660mm) from the wall or screen. The largest the image can be is 100" (2.54m) when the...
...) 610 686 762 838 914 991 1021 1067 1097 1143 1189 1219 1280 1295 1372 1448 1463 1524 Screen height Screen diagonal Screen center B D Projector foot C Back of projector Throw Distance, Screen Size and Screen Height (Unit: mm) Screen size (inch) 40 45 50 55 60 65 67 70 72 75 78... 700 Throw distance C (mm) 5 10 15 20 25 30 Throw distance C (inch) Use the drawing below as a guide. Setting Up the Screen and the Projector Selecting a Location The further your projector is about 26 inches (660mm) from the wall or screen. The largest the image can be is 100" (2.54m) when the...

User Manual
Page 19
...projector...the projector. Do not disconnect the DVI-D signal cable while the projector is... not compatible with a notebook PC, be sure to do so may not be within 5 m (196") long. • The DVI (DIGITAL) connector accepts VGA (640x480), SVGA (800x600), 1152x864, XGA... between the projector and the notebook PC before turning on the projector. Connecting Your...the digital output of NEC ISS-6020 and ISS-..., restart your PC or projector. Making Connections NOTE: When...turned on after connecting with the projector. * If the screen goes ...the projector using your notebook PC, it...
...projector...the projector. Do not disconnect the DVI-D signal cable while the projector is... not compatible with a notebook PC, be sure to do so may not be within 5 m (196") long. • The DVI (DIGITAL) connector accepts VGA (640x480), SVGA (800x600), 1152x864, XGA... between the projector and the notebook PC before turning on the projector. Connecting Your...the digital output of NEC ISS-6020 and ISS-..., restart your PC or projector. Making Connections NOTE: When...turned on after connecting with the projector. * If the screen goes ...the projector using your notebook PC, it...

User Manual
Page 20
...input. 5. NOTE: The ADP-SC1 SCART adapter is also referred to the projector and your NEC dealer in Europe for this connection. Turn off the power to as Euro-connector. Contact your NEC dealer in Europe. Using two RGB inputs simultaneously If you need to use ...on the power to connect the RGB input of your projector and a SCART output (RGB) of your video equipment. 4. From the Advanced menu, select [Projector Options] → [Setup] → [Page 3] → [Signal Select RGB] → [Scart]. Use the NEC ADP-SC1 SCART adapter and a commercially available SCART cable...
...input. 5. NOTE: The ADP-SC1 SCART adapter is also referred to the projector and your NEC dealer in Europe for this connection. Turn off the power to as Euro-connector. Contact your NEC dealer in Europe. Using two RGB inputs simultaneously If you need to use ...on the power to connect the RGB input of your projector and a SCART output (RGB) of your video equipment. 4. From the Advanced menu, select [Projector Options] → [Setup] → [Page 3] → [Signal Select RGB] → [Scart]. Use the NEC ADP-SC1 SCART adapter and a commercially available SCART cable...

User Manual
Page 21
...signal cable (commercially available or supplied with an external monitor) To mini D-Sub 15-pin connector on the projector, monitor and the computer. Use a 15-pin cable to connect your projector to simultaneously view on or off the power to the RGB OUT (Mini D-Sub 15 pin) connector on ... that the RGB OUT connector will not output RGB signal during idle mode (See page 6-17 for a moment. When the projector goes into idle mode, the image on your projector, monitor and computer. 2. Note that you 're projecting. You can output RGB signal even during Standby mode. • ...
...signal cable (commercially available or supplied with an external monitor) To mini D-Sub 15-pin connector on the projector, monitor and the computer. Use a 15-pin cable to connect your projector to simultaneously view on or off the power to the RGB OUT (Mini D-Sub 15 pin) connector on ... that the RGB OUT connector will not output RGB signal during idle mode (See page 6-17 for a moment. When the projector goes into idle mode, the image on your projector, monitor and computer. 2. Note that you 're projecting. You can output RGB signal even during Standby mode. • ...

User Manual
Page 22
...female)ן3 cable to connect your DVD player to your DVD player's owner's manual for more information about your projector and DVD player. 2. If your projector to a DVD player with component output or Video output. Connecting Your DVD Player 2. NOTE: Refer to the RGB IN ...connector on the projector and DVD player. Turn on the projector. To do so, simply: 1. Installation and Connections RGB IN AUDIO IN RGB REMOTE PCCONTROL IN PC CARD AUDIO IN VIDEO...
...female)ן3 cable to connect your DVD player to your DVD player's owner's manual for more information about your projector and DVD player. 2. If your projector to a DVD player with component output or Video output. Connecting Your DVD Player 2. NOTE: Refer to the RGB IN ...connector on the projector and DVD player. Turn on the projector. To do so, simply: 1. Installation and Connections RGB IN AUDIO IN RGB REMOTE PCCONTROL IN PC CARD AUDIO IN VIDEO...

