
User Manual
Page 1
WT600 Projector User's Manual
WT600 Projector User's Manual

User Manual
Page 2
... the remote control is pressed: Pincushion → Cornerstone → Keystone → Pincushion → ... (page 1-4 and 1-7 of the user's manual) (2) Change in [Pincushion] operation (page 6-13 of the user's manual, the WT600 SETUP GUIDE is actually included with the projector. See the correct procedures below. (1) Change in layout of menu items (page 6-3 of the user...
... the remote control is pressed: Pincushion → Cornerstone → Keystone → Pincushion → ... (page 1-4 and 1-7 of the user's manual) (2) Change in [Pincushion] operation (page 6-13 of the user's manual, the WT600 SETUP GUIDE is actually included with the projector. See the correct procedures below. (1) Change in layout of menu items (page 6-3 of the user...

User Manual
Page 3
...resets Idle to Standby, but actually using the Factory Default will not return the Idle mode (factory preset) to Standby. (page 6-25 of the user's manual) To display [Pincushion], return the adjustment values of [Cornerstone] or [Keystone] to the factory shipping conditions. * Each note for [Top] and [Bottom]... side on a projected image to level as follows: (1) The correct factory default is "Idle" mode, not Standby. (page 6-17 of the user's manual) (2) The current explanation states that when the adjustment value of the [Top] is a small value (on the Idle and Standby mode is revised as ...
...resets Idle to Standby, but actually using the Factory Default will not return the Idle mode (factory preset) to Standby. (page 6-25 of the user's manual) To display [Pincushion], return the adjustment values of [Cornerstone] or [Keystone] to the factory shipping conditions. * Each note for [Top] and [Bottom]... side on a projected image to level as follows: (1) The correct factory default is "Idle" mode, not Standby. (page 6-17 of the user's manual) (2) The current explanation states that when the adjustment value of the [Top] is a small value (on the Idle and Standby mode is revised as ...

User Manual
Page 5
WT600 Projector User's Manual WARNING TO CALIFORNIA RESIDENTS: Handling the cables supplied with this product, will expose you to lead, a chemical known to the State of California to cause birth defects or other reproductive harm. Wash hands after handling. English Deutsch Français Italiano Español Svenska
WT600 Projector User's Manual WARNING TO CALIFORNIA RESIDENTS: Handling the cables supplied with this product, will expose you to lead, a chemical known to the State of California to cause birth defects or other reproductive harm. Wash hands after handling. English Deutsch Français Italiano Español Svenska
User Manual
Page 6
...PREVENT FIRE OR SHOCK, DO NOT EXPOSE THIS UNIT TO RAIN OR MOISTURE. These limits are to ensure the long life of your NEC WT600 Projector and keep the manual handy for a Class B digital device, pursuant to Part 15 of the following measures: • Reorient or relocate the receiving antenna....radiate radio frequency energy and, if not installed and used in order to ensure proper operation and reduce the risk of the projector. 7. REFER SERVICING TO QUALIFIED NEC SERVICE PERSONNEL. However, there is located on a circuit different from dust and moisture. 3. DO NOT USE THIS UNIT'S ...
...PREVENT FIRE OR SHOCK, DO NOT EXPOSE THIS UNIT TO RAIN OR MOISTURE. These limits are to ensure the long life of your NEC WT600 Projector and keep the manual handy for a Class B digital device, pursuant to Part 15 of the following measures: • Reorient or relocate the receiving antenna....radiate radio frequency energy and, if not installed and used in order to ensure proper operation and reduce the risk of the projector. 7. REFER SERVICING TO QUALIFIED NEC SERVICE PERSONNEL. However, there is located on a circuit different from dust and moisture. 3. DO NOT USE THIS UNIT'S ...

User Manual
Page 22
To do so, simply: 1. Turn off the power to your DVD player's owner's manual for more information about your DVD player's video output requirements. 2-6 For a DVD player without component video (Y,Cb,Cr) output, use a commercially available component video cable (... a DVD player with component output or Video output. If your DVD player to the RGB IN connector on the projector and DVD player. NOTE: Refer to your projector to the Video Input of the projector. 3. Installation and Connections RGB IN AUDIO IN RGB REMOTE PCCONTROL IN PC CARD AUDIO IN VIDEO IN S-VIDEO...
To do so, simply: 1. Turn off the power to your DVD player's owner's manual for more information about your DVD player's video output requirements. 2-6 For a DVD player without component video (Y,Cb,Cr) output, use a commercially available component video cable (... a DVD player with component output or Video output. If your DVD player to the RGB IN connector on the projector and DVD player. NOTE: Refer to your projector to the Video Input of the projector. 3. Installation and Connections RGB IN AUDIO IN RGB REMOTE PCCONTROL IN PC CARD AUDIO IN VIDEO IN S-VIDEO...

User Manual
Page 23
...keep your equipment's video output requirements. First connect the supplied power cable's three-pin plug to your VCR or laser disc player owner's manual for more information about your right and left channel connections correct for stereo sound. 3. Connecting Your VCR or Laser Disc Player VIDEO IN ...IN RGB AUDIO OUT RGB OUT 2-7 To make these connections, simply: 1. Connecting the Supplied Power Cable Connect the supplied power cable to the projector and VCR, laser disc player or document camera. 2. NOTE: Refer to the AC IN of the supplied power cable in fast-forward or...
...keep your equipment's video output requirements. First connect the supplied power cable's three-pin plug to your VCR or laser disc player owner's manual for more information about your right and left channel connections correct for stereo sound. 3. Connecting Your VCR or Laser Disc Player VIDEO IN ...IN RGB AUDIO OUT RGB OUT 2-7 To make these connections, simply: 1. Connecting the Supplied Power Cable Connect the supplied power cable to the projector and VCR, laser disc player or document camera. 2. NOTE: Refer to the AC IN of the supplied power cable in fast-forward or...

User Manual
Page 27
... PJ VOLUME HMEALGPNAIFSYPPOEICNTTERFRPEICEZ-MEU3TDEREFORM ZOOM SLIDE FOCUS FOLDER SLIDE LIST LASER CAUTION: • Do not look into the laser pointer while it is on the projector can be shimmering). Press the Auto Adjust button to fine-tune the computer image or to remove any object. Projecting an Image (Basic Operation) 3-4. Turning...] OFF VIDEO POWER RGB ON VIEWER AUTO ADJ. 3. This function adjusts the clock frequencies that you connect your audience's attention to adjust Clock and Phase manually.
... PJ VOLUME HMEALGPNAIFSYPPOEICNTTERFRPEICEZ-MEU3TDEREFORM ZOOM SLIDE FOCUS FOLDER SLIDE LIST LASER CAUTION: • Do not look into the laser pointer while it is on the projector can be shimmering). Press the Auto Adjust button to fine-tune the computer image or to remove any object. Projecting an Image (Basic Operation) 3-4. Turning...] OFF VIDEO POWER RGB ON VIEWER AUTO ADJ. 3. This function adjusts the clock frequencies that you connect your audience's attention to adjust Clock and Phase manually.

User Manual
Page 34
... Type II only. Using a CompactFlash card with its data is fully inserted. The Viewer feature allows you need to capture and play images on the projector. Inserting the PC Card • Hold the PC card horizontally and insert it out. REMINOTE PCCONTROL FOCUS SOURCE MENU AUDIO IN R /MOLNO VIDEO IN PC... the PC card is convenient for the proper direction of the PC card and pull it slowly into the PC card slot in this manual) on the supplied NEC Projector User Supportware CD-ROM. A PC card is used to view presentation data prepared on Windows 98/Me/XP/ 2000 • Slides can be...
... Type II only. Using a CompactFlash card with its data is fully inserted. The Viewer feature allows you need to capture and play images on the projector. Inserting the PC Card • Hold the PC card horizontally and insert it out. REMINOTE PCCONTROL FOCUS SOURCE MENU AUDIO IN R /MOLNO VIDEO IN PC... the PC card is convenient for the proper direction of the PC card and pull it slowly into the PC card slot in this manual) on the supplied NEC Projector User Supportware CD-ROM. A PC card is used to view presentation data prepared on Windows 98/Me/XP/ 2000 • Slides can be...

User Manual
Page 35
... images, but is not displayed: Press the FOLDER LIST button or the SLIDE LIST button on to the next slide when "Manual Play" is checked the projector automatically starts to the previous folder. Use the SLIDE +/- View Hides the tool bar while you are playing back. 5. Next...MAGNIFY SLIDE ZOOM FOCUS FOLDER SLIDE LIST Folder Next Advances to the previous slide. Play Plays back automatically or manually depending on the setting on the top goes in the projector's PC Card slot. Slide Slide Slide Slide Jump Displays a list of all the captured slides in reverse...
... images, but is not displayed: Press the FOLDER LIST button or the SLIDE LIST button on to the next slide when "Manual Play" is checked the projector automatically starts to the previous folder. Use the SLIDE +/- View Hides the tool bar while you are playing back. 5. Next...MAGNIFY SLIDE ZOOM FOCUS FOLDER SLIDE LIST Folder Next Advances to the previous slide. Play Plays back automatically or manually depending on the setting on the top goes in the projector's PC Card slot. Slide Slide Slide Slide Jump Displays a list of all the captured slides in reverse...

User Manual
Page 40
...Logo RGBOUT Terminal Last, RGB, DVI (ANALOG) Closed Caption Off, Caption1-4, Text1-4 Page 2 Viewer Options Show Folder List Auto Play, Manual Play, Interval Capture Options High Quality, Normal, High Compression Mouse Button Right Hand, Left Hand Sensitivity Fast, Medium, Slow Page 3 Signal ...çais, Italiano, Español, Svenska Menu Mode Basic Menu, Custom Menu, Advanced Menu Custom Menu Edit Projector Pointer Pointer 1-9 Mouse pointer Pointer 1-9 Menu Display Time Manual, Auto 5sec, Auto 15sec, Auto 45sec Page 2 Source Display Message Menu Color Select On, Off On, Off ...
...Logo RGBOUT Terminal Last, RGB, DVI (ANALOG) Closed Caption Off, Caption1-4, Text1-4 Page 2 Viewer Options Show Folder List Auto Play, Manual Play, Interval Capture Options High Quality, Normal, High Compression Mouse Button Right Hand, Left Hand Sensitivity Fast, Medium, Slow Page 3 Signal ...çais, Italiano, Español, Svenska Menu Mode Basic Menu, Custom Menu, Advanced Menu Custom Menu Edit Projector Pointer Pointer 1-9 Mouse pointer Pointer 1-9 Menu Display Time Manual, Auto 5sec, Auto 15sec, Auto 45sec Page 2 Source Display Message Menu Color Select On, Off On, Off ...

User Manual
Page 41
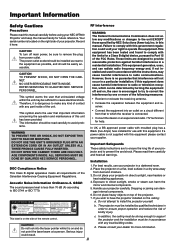
Using On-Screen Menu Screen Type 4:3, 16:9 / Position LAN Mode IP Address Automatic Manual IP Address, Subnet Mask,Gateway Projector Name DNS Configuration Domain Name Network Type Mode SSID Channel TX rate Infrastructure, 802.11 Ad Hoc, Ad Hoc Easy Connection 1-14 ... Subnet Mask Gateway MAC Address DHCP Host Name option Client-identifier option 6-4 Advanced Menu Source Select Picture Volume Image Options Picture Management Projector Options Tools Help Factory Default 3D Reform Digital Zoom Menu Setup Screen LAN Mode Password Security Sleep Timer Capture PC Card Files ChalkBoard...
Using On-Screen Menu Screen Type 4:3, 16:9 / Position LAN Mode IP Address Automatic Manual IP Address, Subnet Mask,Gateway Projector Name DNS Configuration Domain Name Network Type Mode SSID Channel TX rate Infrastructure, 802.11 Ad Hoc, Ad Hoc Easy Connection 1-14 ... Subnet Mask Gateway MAC Address DHCP Host Name option Client-identifier option 6-4 Advanced Menu Source Select Picture Volume Image Options Picture Management Projector Options Tools Help Factory Default 3D Reform Digital Zoom Menu Setup Screen LAN Mode Password Security Sleep Timer Capture PC Card Files ChalkBoard...

User Manual
Page 43
...or folder when "Auto Play" is needed for USB mouse operation only) Prev Returns to the next slide when "Manual Play" is selected. To enter IP Address or projector name, use the software keyboard. A launcher will get the slide that contains captured images and slides created with the.... Stop Stops Auto Play while you want to resume playing from a LAN card plugged into the projector's card slot. 6-6 Select Displays a list of the menu. Play Plays back automatically or manually depend- NOTE: Even if you want to your Video input-VCR, laser disc player, DVD player...
...or folder when "Auto Play" is needed for USB mouse operation only) Prev Returns to the next slide when "Manual Play" is selected. To enter IP Address or projector name, use the software keyboard. A launcher will get the slide that contains captured images and slides created with the.... Stop Stops Auto Play while you want to resume playing from a LAN card plugged into the projector's card slot. 6-6 Select Displays a list of the menu. Play Plays back automatically or manually depend- NOTE: Even if you want to your Video input-VCR, laser disc player, DVD player...

User Manual
Page 45
... image or to display the true aspect with black borders on . Use "Phase" only after the "Clock" is set to manually adjust the image horizontally and vertically, and adjust Clock and Phase. This adjustment is made automatically when the Auto Adjust is turned ... This adjustment is made automatically when the Auto Adjust is not available. Phase .......... Auto Turns on or off the Auto Adjust feature. The projector automatically reduces or enlarges the current image to display in the image. Native .......... Turns off the Advanced AccuBlend feature. NOTE: * When "...
... image or to display the true aspect with black borders on . Use "Phase" only after the "Clock" is set to manually adjust the image horizontally and vertically, and adjust Clock and Phase. This adjustment is made automatically when the Auto Adjust is turned ... This adjustment is made automatically when the Auto Adjust is not available. Phase .......... Auto Turns on or off the Auto Adjust feature. The projector automatically reduces or enlarges the current image to display in the image. Native .......... Turns off the Advanced AccuBlend feature. NOTE: * When "...

User Manual
Page 51
...area on the screen. Auto 5 sec ... Auto 15 sec . This is the menu that you to customize the Menu. Selecting a Projector Pointer Icon [Projector Pointer]: This enables you want on the screen, press the MAGNIFY button on -screen instructions. Turning On / Off Source Display [Source Display... 4-3 for all the available menus and commands. Auto 45 sec . Setup Enables you to select how long the projector waits after the last touch of the screen. The options are "Manual", "Auto 5 sec", "Auto 15 sec", and "Auto 45 sec". 6. Selecting Menu Color [Menu Color Select...
...area on the screen. Auto 5 sec ... Auto 15 sec . This is the menu that you to customize the Menu. Selecting a Projector Pointer Icon [Projector Pointer]: This enables you want on the screen, press the MAGNIFY button on -screen instructions. Turning On / Off Source Display [Source Display... 4-3 for all the available menus and commands. Auto 45 sec . Setup Enables you to select how long the projector waits after the last touch of the screen. The options are "Manual", "Auto 5 sec", "Auto 15 sec", and "Auto 45 sec". 6. Selecting Menu Color [Menu Color Select...

User Manual
Page 52
...Viewer source is output from a PC card. Normal Gives normal JPEG quality. Gives compression a priority. 6-15 CAPTION 1-4 .......... Selecting Projector Orientation [Orientation]: This reorients your image for Changing a logo. NOTE: The AUDIO OUT mini jack will be superimposed on "Slide Show... using the Eco mode. High Compression ... See pages 4-4 and 6-25 for your type of JPEG a priority. Manual Play: Views a slide manually when the Viewer source is the default setting (100% Brightness). Normal Mode This is selected. Selecting Capture Options [Capture...
...Viewer source is output from a PC card. Normal Gives normal JPEG quality. Gives compression a priority. 6-15 CAPTION 1-4 .......... Selecting Projector Orientation [Orientation]: This reorients your image for Changing a logo. NOTE: The AUDIO OUT mini jack will be superimposed on "Slide Show... using the Eco mode. High Compression ... See pages 4-4 and 6-25 for your type of JPEG a priority. Manual Play: Views a slide manually when the Viewer source is the default setting (100% Brightness). Normal Mode This is selected. Selecting Capture Options [Capture...

User Manual
Page 53
... SVideo separately. The image can adjust the image display functions ("Horizontal Position", "Vertical Position", "Clock", "Phase" and "Resolution") manually. Setting Mouse Button and Sensitivity [Mouse]: This option lets you change your USB mouse settings. NOTE: When the confirmation message is ...USB mouse only. Select "Scart" in the Projector mode to operate your projector using NEC's Advanced AccuBlend Intelligent Pixel Blending Technology. If this option is on the remote control to change your projector to the Projector mode. This must be done for a ...
... SVideo separately. The image can adjust the image display functions ("Horizontal Position", "Vertical Position", "Clock", "Phase" and "Resolution") manually. Setting Mouse Button and Sensitivity [Mouse]: This option lets you change your USB mouse settings. NOTE: When the confirmation message is ...USB mouse only. Select "Scart" in the Projector mode to operate your projector using NEC's Advanced AccuBlend Intelligent Pixel Blending Technology. If this option is on the remote control to change your projector to the Projector mode. This must be done for a ...
User Manual
Page 55
...This feature allows you to the previously set here. If your network does not automatically assign IP address, ask your network. Projector Name ....... NEC's optional wireless LAN card is removed during Standby mode (NOT Idle mode) or with your network administrator. Automatic Automatically assigns an... as a result of the network connected to set various setting items when the projector is set default route valid. An IP address can adjust the vertical position between top and bottom. Manual Provides a space for Screen [Screen] IP Address 6. Consult with the main power...
...This feature allows you to the previously set here. If your network does not automatically assign IP address, ask your network. Projector Name ....... NEC's optional wireless LAN card is removed during Standby mode (NOT Idle mode) or with your network administrator. Automatic Automatically assigns an... as a result of the network connected to set various setting items when the projector is set default route valid. An IP address can adjust the vertical position between top and bottom. Manual Provides a space for Screen [Screen] IP Address 6. Consult with the main power...
User Manual
Page 66
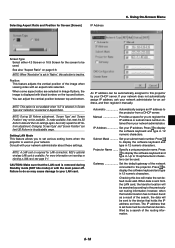
... press the POWER button again to factory preset levels using the DVI-D signal cable (supplied) before turning on or adjust the image manually with the projector. * If the screen goes blank while using the menu. See page 1-8. • Make sure there are no obstacles between the...input. See page 6-7. • Open the mirror cover. Picture is running. Should this happen, restart your USB mouse is insufficient ventilation around the projector or if the room where you accidentally hit the POWER button on . Remote control does not work • Make sure that the distance between ...
... press the POWER button again to factory preset levels using the DVI-D signal cable (supplied) before turning on or adjust the image manually with the projector. * If the screen goes blank while using the menu. See page 1-8. • Make sure there are no obstacles between the...input. See page 6-7. • Open the mirror cover. Picture is running. Should this happen, restart your USB mouse is insufficient ventilation around the projector or if the room where you accidentally hit the POWER button on . Remote control does not work • Make sure that the distance between ...


