
RS232 codes- Projectors
Page 2
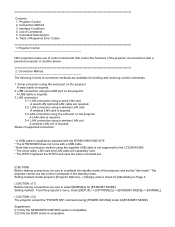
Projector Control 2. List of Response Error Codes 1. Projector Control NEC projectors make use the control commands in the standby mode. USB connection using the USB port on the projector A LAN cable is required. 2. LAN connection using the LAN port on the projector A USB cable is compatible. Setting method : From the projector's menu, select [SETUP] --> [OPTIONS(2)] -->[STANDBY MODE]--> [NORMAL]. ( CAUTION ) (!2) The projector accept the "POWER ON" command during [POWER-SAVING] mode for the LT220/240/260. * The serial cable, LAN card and LAN cable are separately ...
Projector Control 2. List of Response Error Codes 1. Projector Control NEC projectors make use the control commands in the standby mode. USB connection using the USB port on the projector A LAN cable is required. 2. LAN connection using the LAN port on the projector A USB cable is compatible. Setting method : From the projector's menu, select [SETUP] --> [OPTIONS(2)] -->[STANDBY MODE]--> [NORMAL]. ( CAUTION ) (!2) The projector accept the "POWER ON" command during [POWER-SAVING] mode for the LT220/240/260. * The serial cable, LAN card and LAN cable are separately ...

RS232 codes- Projectors
Page 35
... the time of Response Error Codes DATA01 DATA2 Error Error Types description 00H 00H 00H 01H 01H 00H 01H 01H 02H 03H 02H 0DH Error contents Unknown command. Table of a failure A3H B1H 01H xxH 02H DATA01 DATA02 CKS (*1) (*2) (*4) (*3) 6. Specified terminal is unavailable or cannot be selected. Command: 02H 0FH 00H 00H 02H DATA01 DATA02 CKS (*3) Data Portion Contents REMOTE KEY CODE...
... the time of Response Error Codes DATA01 DATA2 Error Error Types description 00H 00H 00H 01H 01H 00H 01H 01H 02H 03H 02H 0DH Error contents Unknown command. Table of a failure A3H B1H 01H xxH 02H DATA01 DATA02 CKS (*1) (*2) (*4) (*3) 6. Specified terminal is unavailable or cannot be selected. Command: 02H 0FH 00H 00H 02H DATA01 DATA02 CKS (*3) Data Portion Contents REMOTE KEY CODE...
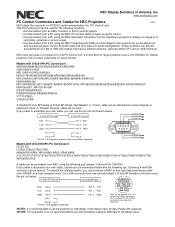
PC Control Connectors and Cables
Page 1
... 9P Female to D-Sub 9P female "Null Modem" or "Cross" cable can be accomplished via LAN or USB with models that end using the following tips. NOTE2: For long cable runs it is recommended to set the projector to 9600 bps in the Setup menu for RS232C serial communication the "PC Control" port. NEC Display Solutions of PC RxD Pin 2 Pin 2 RxD TxD Pin 3 Pin...
... 9P Female to D-Sub 9P female "Null Modem" or "Cross" cable can be accomplished via LAN or USB with models that end using the following tips. NOTE2: For long cable runs it is recommended to set the projector to 9600 bps in the Setup menu for RS232C serial communication the "PC Control" port. NEC Display Solutions of PC RxD Pin 2 Pin 2 RxD TxD Pin 3 Pin...

Specification Brochure
Page 1
... and allows users to utilize virtual remote functionality from a connected PC • Flexible input panel, color-coded and clearly labeled connects to computers, Blu-Ray players and other sources using the VGA, HDMI and composite inputs • Compact size and lightweight design simplifies transport of projector • 10-step image magnification with location control allows you to zoom in on non-white surfaces • Plug and Play setup and operation optimizes images displayed from...
... and allows users to utilize virtual remote functionality from a connected PC • Flexible input panel, color-coded and clearly labeled connects to computers, Blu-Ray players and other sources using the VGA, HDMI and composite inputs • Compact size and lightweight design simplifies transport of projector • 10-step image magnification with location control allows you to zoom in on non-white surfaces • Plug and Play setup and operation optimizes images displayed from...

Specification Brochure
Page 2
... urn or next-business-day exchange. SHIPS WITH Remote control, batteries, RGB cable, power cord, user's manual, product registration card ORDERING MODEL NUMBERS NP-VE281 NP-VE281X Specifications for one year of NEC Display Solutions. Filter-free design eliminates the hassle and time spent monitoring and/or changing filters. 10-step image magnification with detail. ECO Mode technology extends lamp life, lowers audible noise and reduces total cost of their respective holders. 10...
... urn or next-business-day exchange. SHIPS WITH Remote control, batteries, RGB cable, power cord, user's manual, product registration card ORDERING MODEL NUMBERS NP-VE281 NP-VE281X Specifications for one year of NEC Display Solutions. Filter-free design eliminates the hassle and time spent monitoring and/or changing filters. 10-step image magnification with detail. ECO Mode technology extends lamp life, lowers audible noise and reduces total cost of their respective holders. 10...

Users Manual
Page 6
... YOUR SERVICE DEALER.] appears. A Lamp Characteristic The projector has a high-pressure mercury lamp as using the remote control for a long time, remove the batteries. • Ensure that its brightness gradually decreases with the POWER button or if the AC power supply is turned off the AC power for consecutive days. (From the menu, select [SETUP] → [OPTIONS(1)] → [FAN MODE] → [HIGH].) • Do not turn off with age. The lamp is not user replaceable parts...
... YOUR SERVICE DEALER.] appears. A Lamp Characteristic The projector has a high-pressure mercury lamp as using the remote control for a long time, remove the batteries. • Ensure that its brightness gradually decreases with the POWER button or if the AC power supply is turned off the AC power for consecutive days. (From the menu, select [SETUP] → [OPTIONS(1)] → [FAN MODE] → [HIGH].) • Do not turn off with age. The lamp is not user replaceable parts...
Users Manual
Page 8
... Focus...22 Correcting Keystone Distortion 23 Correcting Keystone Distortion 23 Adjusting with Component Output 13 Connecting Your VCR 14 Connecting HDMI Input (VE281X/VE281/VE282X/VE282 only 15 Connecting the Supplied Power Cord 16 3. Installation and Connections 9 Setting Up the Screen and the Projector 9 Selecting a Location 9 Throw Distance and Screen Size 10 Making Connections...12 Connecting Your PC or Macintosh Computer 12 Connecting Your DVD Player with the remote control 24 Optimizing Computer Signal Automatically 25 Adjusting the Image Using Auto Adjust 25 Turning...
... Focus...22 Correcting Keystone Distortion 23 Correcting Keystone Distortion 23 Adjusting with Component Output 13 Connecting Your VCR 14 Connecting HDMI Input (VE281X/VE281/VE282X/VE282 only 15 Connecting the Supplied Power Cord 16 3. Installation and Connections 9 Setting Up the Screen and the Projector 9 Selecting a Location 9 Throw Distance and Screen Size 10 Making Connections...12 Connecting Your PC or Macintosh Computer 12 Connecting Your DVD Player with the remote control 24 Optimizing Computer Signal Automatically 25 Adjusting the Image Using Auto Adjust 25 Turning...
Users Manual
Page 9
... [SOURCE 46 Menu Descriptions & Functions [ADJUST 47 Menu Descriptions & Functions [SETUP 53 Menu Descriptions & Functions [INFO 62 Menu Descriptions & Functions [RESET 64 6. Convenient Features 28 Turning off the Image and Sound 28 Freezing a Picture...28 Enlarging a Picture...28 Changing Eco Mode...29 Checking Energy-Saving Effect [CARBON METER 30 Using the Optional Remote Mouse Receiver (NP01MR 31 Using the Computer Cable (VGA) to Operate the Projector (Virtual Remote Tool).......33 Viewing 3D Images...39 5. Using On-Screen Menu 43 Using...
... [SOURCE 46 Menu Descriptions & Functions [ADJUST 47 Menu Descriptions & Functions [SETUP 53 Menu Descriptions & Functions [INFO 62 Menu Descriptions & Functions [RESET 64 6. Convenient Features 28 Turning off the Image and Sound 28 Freezing a Picture...28 Enlarging a Picture...28 Changing Eco Mode...29 Checking Energy-Saving Effect [CARBON METER 30 Using the Optional Remote Mouse Receiver (NP01MR 31 Using the Computer Cable (VGA) to Operate the Projector (Virtual Remote Tool).......33 Viewing 3D Images...39 5. Using On-Screen Menu 43 Using...
Users Manual
Page 11
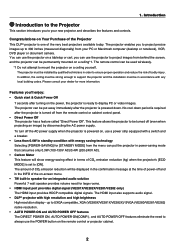
... screen, and the projector can be installed by disconnecting the AC power supply. The HDMI input also supports audio signal. • DLP® projector with any local building codes. 1. Introduction Introduction to the Projector This section introduces you can use the projector to your new projector and describes the features and controls. You can use the projector on a tabletop or cart, you to project images from the remote control or cabinet control panel. • Direct Power Off The projector...
... screen, and the projector can be installed by disconnecting the AC power supply. The HDMI input also supports audio signal. • DLP® projector with any local building codes. 1. Introduction Introduction to the Projector This section introduces you can use the projector to your new projector and describes the features and controls. You can use the projector on a tabletop or cart, you to project images from the remote control or cabinet control panel. • Direct Power Off The projector...
Users Manual
Page 21
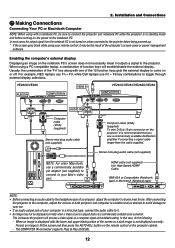
... sure to connect the projector and notebook PC while the projector is in standby mode and before being powered up. * If the screen goes blank while using a PC compatible laptop, a combination of the computer's screen-saver or power management software. Computer cable (VGA) (supplied) To mini D-Sub 15-pin connector on the remote control or the projector cabinet. - Stereo mini-plug audio cable (not supplied) HDMI cable (not supplied) Use High Speed HDMI® Cable. IBM VGA or Compatibles...
... sure to connect the projector and notebook PC while the projector is in standby mode and before being powered up. * If the screen goes blank while using a PC compatible laptop, a combination of the computer's screen-saver or power management software. Computer cable (VGA) (supplied) To mini D-Sub 15-pin connector on the remote control or the projector cabinet. - Stereo mini-plug audio cable (not supplied) HDMI cable (not supplied) Use High Speed HDMI® Cable. IBM VGA or Compatibles...
Users Manual
Page 25
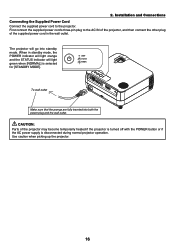
...: Parts of the supplied power cord in standby mode, the POWER indicator will light orange and the STATUS indicator will go into both the power plug and the wall outlet. To wall outlet Make sure that the prongs are fully inserted into standby mode. When in the wall outlet. First connect the supplied power cord's three-pin plug to the projector. The projector will light green when [NORMAL] is disconnected during normal projector operation. Installation and Connections Connecting...
...: Parts of the supplied power cord in standby mode, the POWER indicator will light orange and the STATUS indicator will go into both the power plug and the wall outlet. To wall outlet Make sure that the prongs are fully inserted into standby mode. When in the wall outlet. First connect the supplied power cord's three-pin plug to the projector. The projector will light green when [NORMAL] is disconnected during normal projector operation. Installation and Connections Connecting...
Users Manual
Page 27
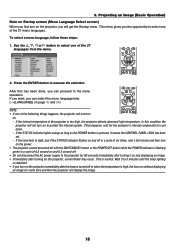
... CONTROL PANEL LOCK has been set. - In this happens, wait for the projector's internal components to execute the selection. If the lamp fails to light, and if the STATUS indicator flashes on and off . • Do not disconnect the AC power supply to the menu operation. To select a menu language, follow these steps: 1. If you want, you will not turn on the projector, screen flicker may occur. Use the , , or button...
... CONTROL PANEL LOCK has been set. - In this happens, wait for the projector's internal components to execute the selection. If the lamp fails to light, and if the STATUS indicator flashes on and off . • Do not disconnect the AC power supply to the menu operation. To select a menu language, follow these steps: 1. If you want, you will not turn on the projector, screen flicker may occur. Use the , , or button...

Users Manual
Page 42
... on your computer screen. Updated Virtual Remote Tool can be downloaded from your source selection, the Virtual Remote screen or the toolbar will support the control via the computer cable (VGA), serial cable, or USB connection. DDC/CI is selected from our website: URL: http://www.nec-display.com/dl/en/pj_soft/lineup.html 33 Virtual Remote Tool will be displayed as well as projector's power on your computer's specifications and version...
... on your computer screen. Updated Virtual Remote Tool can be downloaded from your source selection, the Virtual Remote screen or the toolbar will support the control via the computer cable (VGA), serial cable, or USB connection. DDC/CI is selected from our website: URL: http://www.nec-display.com/dl/en/pj_soft/lineup.html 33 Virtual Remote Tool will be displayed as well as projector's power on your computer's specifications and version...

Users Manual
Page 45
... Control" windows is in the standby condition. To uninstall Virtual Remote Tool, the Windows user account must have "Administrator" privilege (Windows 7 and Windows Vista) or "Computer Administrator" privilege (Windows XP). • For Windows 7/Windows Vista 1 Click "Start" and then "Control Panel". The projector is displayed, click "Continue". Supplied computer cable (VGA) COMPUTER IN Power cord (supplied) To wall outlet TIP: • When Virtual Remote Tool starts for the first time, "Easy Setup" window will be displayed. 3 Click Virtual Remote...
... Control" windows is in the standby condition. To uninstall Virtual Remote Tool, the Windows user account must have "Administrator" privilege (Windows 7 and Windows Vista) or "Computer Administrator" privilege (Windows XP). • For Windows 7/Windows Vista 1 Click "Start" and then "Control Panel". The projector is displayed, click "Continue". Supplied computer cable (VGA) COMPUTER IN Power cord (supplied) To wall outlet TIP: • When Virtual Remote Tool starts for the first time, "Easy Setup" window will be displayed. 3 Click Virtual Remote...
Users Manual
Page 68
... the computer cable (VGA) connection - This eliminates the need to put the projector in the standby mode will not be affected even when [RESET] is preset for NORMAL mode at the factory. NORMAL Power indicator: Orange light/STATUS indicator: Green light POWER-SAVING Power indicator: Red light/STATUS indicator: Off The following connectors, buttons or functions will not be included in [STANDBY MODE] The projector has two standby modes: [NORMAL] and [POWER-SAVING]. Buttons other than the NORMAL mode. USB port - [OPTIONS(2)] 5. Using On-Screen Menu Selecting Power-saving...
... the computer cable (VGA) connection - This eliminates the need to put the projector in the standby mode will not be affected even when [RESET] is preset for NORMAL mode at the factory. NORMAL Power indicator: Orange light/STATUS indicator: Green light POWER-SAVING Power indicator: Red light/STATUS indicator: Off The following connectors, buttons or functions will not be included in [STANDBY MODE] The projector has two standby modes: [NORMAL] and [POWER-SAVING]. Buttons other than the NORMAL mode. USB port - [OPTIONS(2)] 5. Using On-Screen Menu Selecting Power-saving...
Users Manual
Page 69
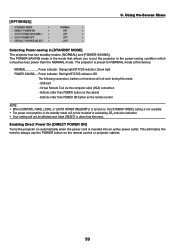
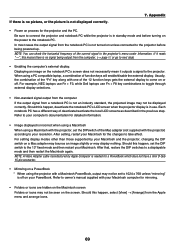
... the projector remains in combination of COMPUTER → (HDMI on . This functionality eliminates the need to always use the POWER button on the remote control or the projector cabinet to the COMPUTER IN connector - when a Sync on the projector and simultaneously project the computer's image. Using On-Screen Menu Turning On the Projector By Applying Computer Signal [AUTO POWER ON(COMP.)] When the projector is turned off the projector, wait 3 seconds and input a computer signal.
... the projector remains in combination of COMPUTER → (HDMI on . This functionality eliminates the need to always use the POWER button on the remote control or the projector cabinet to the COMPUTER IN connector - when a Sync on the projector and simultaneously project the computer's image. Using On-Screen Menu Turning On the Projector By Applying Computer Signal [AUTO POWER ON(COMP.)] When the projector is turned off the projector, wait 3 seconds and input a computer signal.
Users Manual
Page 76
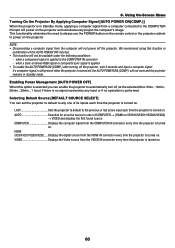
... minute and then turn on . - [NORMAL] is selected for [STANDBY - Green Re-firing the lamp (The projector is cooling The projector is overheated. Lamp Indicator Indicator Condition Off Blinking light Red Steady light Green Projector Condition Normal - replacement message will be displayed. [ECO MODE] is particularly too warm. • Clean the ventilation holes if they are presenting is set to light. Appendix Troubleshooting This section helps you resolve problems you are clogged with the STATUS indicator blinking (2-cycle On...
... minute and then turn on . - [NORMAL] is selected for [STANDBY - Green Re-firing the lamp (The projector is cooling The projector is overheated. Lamp Indicator Indicator Condition Off Blinking light Red Steady light Green Projector Condition Normal - replacement message will be displayed. [ECO MODE] is particularly too warm. • Clean the ventilation holes if they are presenting is set to light. Appendix Troubleshooting This section helps you resolve problems you are clogged with the STATUS indicator blinking (2-cycle On...
Users Manual
Page 77
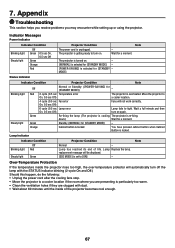
... the projector. (→ page 8) Indicator is no picture, press the button again. • Ensure your dealer. 68 Appendix Common Problems & Solutions (→ "Power/Status/Lamp Indicator" on page 67.) Problem Check These Items Does not turn on the projector cabinet or the remote control. (→ page 25) mode • Adjust the computer image manually with the Horizontal/Vertical in standby mode and before being powered up. * If the screen goes blank while using your remote control...
... the projector. (→ page 8) Indicator is no picture, press the button again. • Ensure your dealer. 68 Appendix Common Problems & Solutions (→ "Power/Status/Lamp Indicator" on page 67.) Problem Check These Items Does not turn on the projector cabinet or the remote control. (→ page 25) mode • Adjust the computer image manually with the Horizontal/Vertical in standby mode and before being powered up. * If the screen goes blank while using your remote control...
Users Manual
Page 78
... owner's manual supplied with your Macintosh computer for detailed information. • Image displayed is incorrect when using a Macintosh When using a Macintosh with the projector, set to 1024 x 768 unless "mirroring" is not turned on unless connected to the projector before turning on a PowerBook * When using a PC compatible laptop, a combination of the Mac adapter (not supplied with the projector) according to the 13" fixed mode and then restart your Macintosh and the projector, changing...
... owner's manual supplied with your Macintosh computer for detailed information. • Image displayed is incorrect when using a Macintosh When using a Macintosh with the projector, set to 1024 x 768 unless "mirroring" is not turned on unless connected to the projector before turning on a PowerBook * When using a PC compatible laptop, a combination of the Mac adapter (not supplied with the projector) according to the 13" fixed mode and then restart your Macintosh and the projector, changing...

Users Manual
Page 85
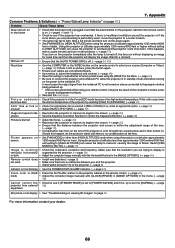
... often other Power No power (POWER indicator does not light green). Buttons on the screen The source connected to projector's native resolution. Frequency of the projector and the remote control. Still unchanged even though you adjust the brightness and/or the contrast. Still unchanged even though you press the AUTO ADJ. Projector is shifted in installation. Signal cable's plug is active and available. Image is fully inserted into the input connector A message appears on...
... often other Power No power (POWER indicator does not light green). Buttons on the screen The source connected to projector's native resolution. Frequency of the projector and the remote control. Still unchanged even though you adjust the brightness and/or the contrast. Still unchanged even though you press the AUTO ADJ. Projector is shifted in installation. Signal cable's plug is active and available. Image is fully inserted into the input connector A message appears on...


