
User Manual
Page 47
... ̇ or ̈ button to the factory default, press and hold the 3D REFORM button for 3D Reform are adjusted separately. Selecting "Reset" will return to the factory default. The adjustable ranges for a minimum of 2 seconds. This completes the keystone correction. Second repeat the 3D...each setting. A combination of the following are met • Image is projected in Wide (Zoom) • Resolution is XGA (SVGA on LT220) Higher resolution than XGA (SVGA on LT220) limits 3D Reform in its adjustable range. PROJECTING AN IMAGE 9. NOTE: To return the 3D Reform correction...
... ̇ or ̈ button to the factory default, press and hold the 3D REFORM button for 3D Reform are adjusted separately. Selecting "Reset" will return to the factory default. The adjustable ranges for a minimum of 2 seconds. This completes the keystone correction. Second repeat the 3D...each setting. A combination of the following are met • Image is projected in Wide (Zoom) • Resolution is XGA (SVGA on LT220) Higher resolution than XGA (SVGA on LT220) limits 3D Reform in its adjustable range. PROJECTING AN IMAGE 9. NOTE: To return the 3D Reform correction...

User Manual
Page 74
... again to highlight "Cancel" and press the ENTER button. However, you to custom tailor the menu items to the factory default, select "Reset" then press the ENTER button. E-74 To cancel the changes, use the SELECT ̇ or ̈ button on the main menu item....The default Custom Menu items are: Source Select (RGB 1/2, Video, S-Video, Viewer and LAN), Picture, Volume, Image Options (Aspect Ratio), Picture Management, Projector Options (3D Reform, Menu, Setup, Screen and LAN Mode), Tools (Sleep Timer, Capture, PC Card Files and ChalkBoard) and Help (Contents and Information). ...
... again to highlight "Cancel" and press the ENTER button. However, you to custom tailor the menu items to the factory default, select "Reset" then press the ENTER button. E-74 To cancel the changes, use the SELECT ̇ or ̈ button on the main menu item....The default Custom Menu items are: Source Select (RGB 1/2, Video, S-Video, Viewer and LAN), Picture, Volume, Image Options (Aspect Ratio), Picture Management, Projector Options (3D Reform, Menu, Setup, Screen and LAN Mode), Tools (Sleep Timer, Capture, PC Card Files and ChalkBoard) and Help (Contents and Information). ...

User Manual
Page 87
..." on page E-98 for turning on . Adjust the Top, Bottom, Left or Right blanking with the SELECT ̇ or ̈ button. Should this happen, first reset the 3D Reform data and then do setting again. Changing the aspect ratio can limit 3D Reform in its adjustable range. This adjustment is made...
..." on page E-98 for turning on . Adjust the Top, Bottom, Left or Right blanking with the SELECT ̇ or ̈ button. Should this happen, first reset the 3D Reform data and then do setting again. Changing the aspect ratio can limit 3D Reform in its adjustable range. This adjustment is made...
User Manual
Page 100
...than the idle mode. Select the appropriate baud rate for ten seconds to reset the lamp clock back to 38400 bps. NOTE: The projector will not output signal during the Standby mode. * Via the serial interface the projector can be turned on . It supports data rates from your PC using ... Standby at the factory. USING ON-SCREEN MENU Ͼ Menu Descriptions & Functions Enabling Idle Mode [Idle Mode]: The projector has two standby modes: Standby and Idle. The projector is 38400 bps. Clearing Lamp Hour Meter [Clear Lamp Hour Meter]: Resets the lamp clock back to any one of service. To...
...than the idle mode. Select the appropriate baud rate for ten seconds to reset the lamp clock back to 38400 bps. NOTE: The projector will not output signal during the Standby mode. * Via the serial interface the projector can be turned on . It supports data rates from your PC using ... Standby at the factory. USING ON-SCREEN MENU Ͼ Menu Descriptions & Functions Enabling Idle Mode [Idle Mode]: The projector has two standby modes: Standby and Idle. The projector is 38400 bps. Clearing Lamp Hour Meter [Clear Lamp Hour Meter]: Resets the lamp clock back to any one of service. To...

User Manual
Page 101
...black borders on . See also "Aspect Ratio" on or off the Control Panel Key Lock function. Displays the selected source input every time the projector is displayed with an aspect ratio selected. NOTE: This option is available only when "16:9" is turned on the top and bottom. Changing ... Lock]: This option turns on page E-86. To make available, first reset the 3D Reform data and then do settings again. Auto Searches for the screen to the previous or last active input each time the projector is selected in its adjustable range. Select ......... Position: This feature adjusts ...
...black borders on . See also "Aspect Ratio" on or off the Control Panel Key Lock function. Displays the selected source input every time the projector is displayed with an aspect ratio selected. NOTE: This option is available only when "16:9" is turned on the top and bottom. Changing ... Lock]: This option turns on page E-86. To make available, first reset the 3D Reform data and then do settings again. Auto Searches for the screen to the previous or last active input each time the projector is selected in its adjustable range. Select ......... Position: This feature adjusts ...

User Manual
Page 117
...in "Picture", "Volume", "Image Options" and "Picture Management" can be reset. USING ON-SCREEN MENU Ͼ Menu Descriptions & Functions NOTE: The progress indicator shows the percentage of lamp and projector usage respectively. Resets the adjustments for all the signals to the factory preset except Remaining Lamp ...Time, Lamp Hour Meter, Projector Usage, Language, Background, Entry List, Communication Speed, LAN Mode, Security and Password. (To reset the lamp usage time, see "Clear Lamp Hour Meter" on regardless of whether the...
...in "Picture", "Volume", "Image Options" and "Picture Management" can be reset. USING ON-SCREEN MENU Ͼ Menu Descriptions & Functions NOTE: The progress indicator shows the percentage of lamp and projector usage respectively. Resets the adjustments for all the signals to the factory preset except Remaining Lamp ...Time, Lamp Hour Meter, Projector Usage, Language, Background, Entry List, Communication Speed, LAN Mode, Security and Password. (To reset the lamp usage time, see "Clear Lamp Hour Meter" on regardless of whether the...

User Manual
Page 121
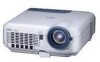
...; [Setup] → [Page 4] → [Clear Lamp Hour Meter] to zero. If heavily soiled, use strong detergents or solvents such as alcohol or thinner. 3. If the projector will not be careful not to scratch or mar the lens. ON STAND BY PO SWTEALRTAUMSP ALIGNMENT AUTO ADJUST PC-CARD TER SELECT CANCE L SOURCE... hours (up to 2100 hours : Eco mode) of service, press and hold the [Help] button on the remote control for ten seconds or longer to reset the lamp time clock to reset the lamp usage hours.
...; [Setup] → [Page 4] → [Clear Lamp Hour Meter] to zero. If heavily soiled, use strong detergents or solvents such as alcohol or thinner. 3. If the projector will not be careful not to scratch or mar the lens. ON STAND BY PO SWTEALRTAUMSP ALIGNMENT AUTO ADJUST PC-CARD TER SELECT CANCE L SOURCE... hours (up to 2100 hours : Eco mode) of service, press and hold the [Help] button on the remote control for ten seconds or longer to reset the lamp time clock to reset the lamp usage hours.

User Manual
Page 125
... until there is properly connected to the projector. See page E-19. • Make sure there are connected properly. • Use menus to the screen. work • Install new batteries. See page E-85. • Remove the lens cap. • Reset the settings or adjustments to 2100 hours : Eco ...mode). screen • Use the 3DReform function to input. Picture is within 22 feet (7 m) of the lens. See page E-42 or 43. • Ensure that you and the projector. • Stand within the adjustment...
... until there is properly connected to the projector. See page E-19. • Make sure there are connected properly. • Use menus to the screen. work • Install new batteries. See page E-85. • Remove the lens cap. • Reset the settings or adjustments to 2100 hours : Eco ...mode). screen • Use the 3DReform function to input. Picture is within 22 feet (7 m) of the lens. See page E-42 or 43. • Ensure that you and the projector. • Stand within the adjustment...

