

NP115 : RS232 codes- Projectors
Page 10
... MUTE ON 021. ONSCREEN MUTE OFF 030. LAMP INFORMATION REQUEST 3 037-7. LAMP MODE SET 046. SETTING REQUEST 078-2. INPUT STATUS REQUEST 078-4. PROJECTOR INFORMATION REQUEST 00H 81H 00H 00H 00H 81H 00H C0H 00H 00H 00H C0H 00H 88H 00H 00H 00H 88H 02H 00H 00H 00H 00H...REQUEST 078-3. MODEL NAME REQUEST 078-6. WXGA MODE SETTING SET 098-198. POWER OFF 018. LAMP MODE REQUEST 039. WXGA MODE SETTING REQUEST 049. REMOTE KEY CODE 060. SOUND MUTE ON 023. LAMP INFORMATION REQUEST 4 038. AUTO FUNCTIONS EXECUTE 111. BASE MODEL TYPE REQUEST 305-3. SOUND MUTE OFF...
... MUTE ON 021. ONSCREEN MUTE OFF 030. LAMP INFORMATION REQUEST 3 037-7. LAMP MODE SET 046. SETTING REQUEST 078-2. INPUT STATUS REQUEST 078-4. PROJECTOR INFORMATION REQUEST 00H 81H 00H 00H 00H 81H 00H C0H 00H 00H 00H C0H 00H 88H 00H 00H 00H 88H 02H 00H 00H 00H 00H...REQUEST 078-3. MODEL NAME REQUEST 078-6. WXGA MODE SETTING SET 098-198. POWER OFF 018. LAMP MODE REQUEST 039. WXGA MODE SETTING REQUEST 049. REMOTE KEY CODE 060. SOUND MUTE ON 023. LAMP INFORMATION REQUEST 4 038. AUTO FUNCTIONS EXECUTE 111. BASE MODEL TYPE REQUEST 305-3. SOUND MUTE OFF...

NP115 : RS232 codes- Projectors
Page 34
Specified terminal is unavailable or cannot be selected. Command: 02H 0FH 00H 00H 02H DATA01 DATA02 CKS (*3) Data Portion Contents DATA01 .. 02 : Remote control key code (Word type) Key number DATA01 DATA02 Key name 1 01H 00H POWER 2 02H 00H POWER ON (!!) 3 03H 00H POWER OFF (!!) 4... 2BH 00H IMAGE 44 2CH 00H TEST Setting not possible. Power Off inhibited. 050. Invalid values specified. REMOTE KEY CODE Function: This command sends remote control key codes of projector. DATA01 DATA2 Error Error Types description 00H 00H 00H 01H 01H 00H 01H 01H 02H 03H 02H 0DH Error...
Specified terminal is unavailable or cannot be selected. Command: 02H 0FH 00H 00H 02H DATA01 DATA02 CKS (*3) Data Portion Contents DATA01 .. 02 : Remote control key code (Word type) Key number DATA01 DATA02 Key name 1 01H 00H POWER 2 02H 00H POWER ON (!!) 3 03H 00H POWER OFF (!!) 4... 2BH 00H IMAGE 44 2CH 00H TEST Setting not possible. Power Off inhibited. 050. Invalid values specified. REMOTE KEY CODE Function: This command sends remote control key codes of projector. DATA01 DATA2 Error Error Types description 00H 00H 00H 01H 01H 00H 01H 01H 02H 03H 02H 0DH Error...
LT170 user's manual
Page 3
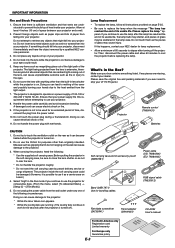
... FOCUS COMPUTER VIDEO IN S-VIDEO IN Projector AUDIO IN Remote control (7N900431) Batteries CAUTION 1. Misuses such as a wire or screwdriver into your projector. Before putting the projector in the lamp case. Soft carrying ...than the built-in the Box? Please replace the lamp." Make sure your LT170 Projector. When carrying the projector, heed the following circumstances. Do not unplug the power cable from the ... to mar the lens. * Do not handle the projector roughly. * Do not send the soft carrying case by a qualified NEC service personnel. 3. Do not insert any kind of abnormal...
... FOCUS COMPUTER VIDEO IN S-VIDEO IN Projector AUDIO IN Remote control (7N900431) Batteries CAUTION 1. Misuses such as a wire or screwdriver into your projector. Before putting the projector in the lamp case. Soft carrying ...than the built-in the Box? Please replace the lamp." Make sure your LT170 Projector. When carrying the projector, heed the following circumstances. Do not unplug the power cable from the ... to mar the lens. * Do not handle the projector roughly. * Do not send the soft carrying case by a qualified NEC service personnel. 3. Do not insert any kind of abnormal...

LT170 user's manual
Page 4
...APPENDIX E-40 Cabinet Dimensions E-40 Pin Assignments of the Remote Control E-8 Battery Installation E-9 Remote Control Precautions E-9 Operating Range for Wireless Remote Control E-9 INSTALLATION AND CONNECTIONS E-10 Setting Up the Screen and the Projector E-10 Selecting a Location E-10 Throw Distance and ...RGB E-13 Connecting Your DVD Player E-14 Connecting Your VCR or Laser Disc Player E-15 Attaching the Projector to the Projector E-5 Part Names of the Projector E-6 Top Features E-7 Terminal Panel Features E-7 Part Names of D-Sub COMPUTER Input Connector .......... TABLE OF...
...APPENDIX E-40 Cabinet Dimensions E-40 Pin Assignments of the Remote Control E-8 Battery Installation E-9 Remote Control Precautions E-9 Operating Range for Wireless Remote Control E-9 INSTALLATION AND CONNECTIONS E-10 Setting Up the Screen and the Projector E-10 Selecting a Location E-10 Throw Distance and ...RGB E-13 Connecting Your DVD Player E-14 Connecting Your VCR or Laser Disc Player E-15 Attaching the Projector to the Projector E-5 Part Names of the Projector E-6 Top Features E-7 Terminal Panel Features E-7 Part Names of D-Sub COMPUTER Input Connector .......... TABLE OF...
LT170 user's manual
Page 5
...-M: TV standard used in Brazil. NTSC4.43: TV standard used wirelessly. *1 Do not attempt to mount the projector on a ceiling yourself. The remote control can be installed by unauthorized individuals. offers image display from your PC or Macintosh computer (desktop or notebook...to UXGA (1600 ן1200) resolution*2. • Supports most IBM VGA, SVGA, XGA , SXGA/UXGA (with NEC's Advanced AccuBlend. Please consult your new LT170 Projector and describes the features and controls. an extremely accurate image compression technology - NOTE: Composite video standards are...
...-M: TV standard used in Brazil. NTSC4.43: TV standard used wirelessly. *1 Do not attempt to mount the projector on a ceiling yourself. The remote control can be installed by unauthorized individuals. offers image display from your PC or Macintosh computer (desktop or notebook...to UXGA (1600 ן1200) resolution*2. • Supports most IBM VGA, SVGA, XGA , SXGA/UXGA (with NEC's Advanced AccuBlend. Please consult your new LT170 Projector and describes the features and controls. an extremely accurate image compression technology - NOTE: Composite video standards are...
LT170 user's manual
Page 6
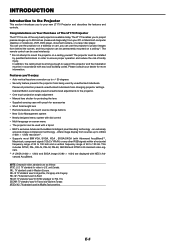
MicroSaver® is trademarked and owned by Kensington Microware Inc. The logo is a registered trademark of the Projector Zoom Ring Focus Ring Remote Sensor Lens Lens Shutter Lever Opens or closes the lens shutter. CLOSE Adjustable Tilt Foot FOCUS PUSH ZOOM SELECT Adjustable Tilt Foot Button Controls POWESRTATLUASMP ...
MicroSaver® is trademarked and owned by Kensington Microware Inc. The logo is a registered trademark of the Projector Zoom Ring Focus Ring Remote Sensor Lens Lens Shutter Lever Opens or closes the lens shutter. CLOSE Adjustable Tilt Foot FOCUS PUSH ZOOM SELECT Adjustable Tilt Foot Button Controls POWESRTATLUASMP ...

LT170 user's manual
Page 8
...an RGB source for a short period of the screen. AUTO ADJ. See page E-21. 8. PIC-MUTE Button This button turns off the projector, press the POWER OFF button twice. 4. When an image is magnified about the center of time. MAGNIFY (+)(-) Button Use this button to select... Computer input. 7. Infrared Transmitter Direct the remote control toward the remote sensor on the projector, press and hold the POWER ON button for various settings and adjustments. POWER OFF Button You can use this button ...
...an RGB source for a short period of the screen. AUTO ADJ. See page E-21. 8. PIC-MUTE Button This button turns off the projector, press the POWER OFF button twice. 4. When an image is magnified about the center of time. MAGNIFY (+)(-) Button Use this button to select... Computer input. 7. Infrared Transmitter Direct the remote control toward the remote sensor on the projector, press and hold the POWER ON button for various settings and adjustments. POWER OFF Button You can use this button ...
LT170 user's manual
Page 9
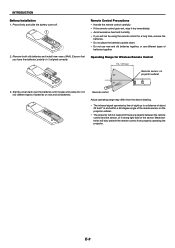
...8226; Do not use new and old batteries together, or use different types of the remote sensor on the projector cabinet. • The projector will also prevent the remote control from properly operating the projector. Do not mix different types of batteries or new and old batteries. Weak batteries ...respond if there are objects between the remote control and the sensor, or if strong light falls on 30° projector cabinet 30° 3. Ensure that you will not be using the remote control for Wireless Remote Control 7m / 22 feet Remote sensor on the sensor. Slip the ...
...8226; Do not use new and old batteries together, or use different types of the remote sensor on the projector cabinet. • The projector will also prevent the remote control from properly operating the projector. Do not mix different types of batteries or new and old batteries. Weak batteries ...respond if there are objects between the remote control and the sensor, or if strong light falls on 30° projector cabinet 30° 3. Ensure that you will not be using the remote control for Wireless Remote Control 7m / 22 feet Remote sensor on the sensor. Slip the ...

LT170 user's manual
Page 11
...This will harm the screen image. • Ensure that you have adequate ventilation around your remote control to reflect your projector on your projector so heat can be injured and the projector severely damaged. • Do not use the projector where temperatures vary greatly. Tele mm degree 46 9.7 - 8.7 61 9.5 - 8.7 ... - INSTALLATION AND CONNECTIONS Throw Distance and Screen Size The following shows the proper relative positions of installation. Contact your NEC dealer for desktop) α = Throw angle NOTE: Distances may vary +/-5%. (D) Screen Bottom Lens Center Throw Angle...
...This will harm the screen image. • Ensure that you have adequate ventilation around your remote control to reflect your projector on your projector so heat can be injured and the projector severely damaged. • Do not use the projector where temperatures vary greatly. Tele mm degree 46 9.7 - 8.7 61 9.5 - 8.7 ... - INSTALLATION AND CONNECTIONS Throw Distance and Screen Size The following shows the proper relative positions of installation. Contact your NEC dealer for desktop) α = Throw angle NOTE: Distances may vary +/-5%. (D) Screen Bottom Lens Center Throw Angle...
LT170 user's manual
Page 12
It is turned on the remote control, wait 60 seconds and then press the POWER button again to resume. To connect to the projector. 3. In most cases signal cannot be output from RGB output unless the notebook PC is recommended that you accidentally hit the POWER ...amplifier if connecting a signal cable longer than the supplied one. INSTALLATION AND CONNECTIONS Making Connections NOTE: When using with the projector. * If the screen goes blank while using your remote control, it may be the result of the computer's screen-saver or power management software. * If you use a commercially...
It is turned on the remote control, wait 60 seconds and then press the POWER button again to resume. To connect to the projector. 3. In most cases signal cannot be output from RGB output unless the notebook PC is recommended that you accidentally hit the POWER ...amplifier if connecting a signal cable longer than the supplied one. INSTALLATION AND CONNECTIONS Making Connections NOTE: When using with the projector. * If the screen goes blank while using your remote control, it may be the result of the computer's screen-saver or power management software. * If you use a commercially...
LT170 user's manual
Page 13
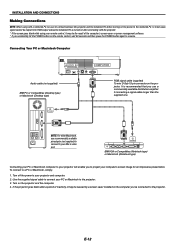
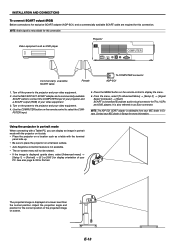
...SC1) and a commercially available SCART cable are required for more information. Use the NEC ADP-SC1 SCART adapter and a commercially available SCART cable to connect the COMPUTER input of your projector and a SCART output (RGB) of your NEC dealer in Europe. From the menu, select [To Advanced Menu] → ... for TVs, VCRs and DVD players. Turn off the power to the projector and your NEC dealer in Europe for this connection. NOTE: Audio signal is not available. • The on screen. Turn on the remote control to display the menu. 6. E-13 Press the MENU button on ...
...SC1) and a commercially available SCART cable are required for more information. Use the NEC ADP-SC1 SCART adapter and a commercially available SCART cable to connect the COMPUTER input of your projector and a SCART output (RGB) of your NEC dealer in Europe. From the menu, select [To Advanced Menu] → ... for TVs, VCRs and DVD players. Turn off the power to the projector and your NEC dealer in Europe for this connection. NOTE: Audio signal is not available. • The on screen. Turn on the remote control to display the menu. 6. E-13 Press the MENU button on ...
LT170 user's manual
Page 18
...60° from level. NOTE: If you want, you press the POWER (ON/STAND BY) button on the projector cabinet or POWER ON button on the remote control for the projector's internal components to cool down by plugging in a cycle of the 20 menu language later. Use the dial ...to the menu operation. PUSH ZOOM FOCUS CLOSE AUDIO IN S-VIDEO IN VIDEO IN COMPUTER Only after turning on the projector, screen flicker may occur. When using the remote control, keep pressing the ̄ button several times until the lamp lighting is not a malfunction. If this happens, wait...
...60° from level. NOTE: If you want, you press the POWER (ON/STAND BY) button on the projector cabinet or POWER ON button on the remote control for the projector's internal components to cool down by plugging in a cycle of the 20 menu language later. Use the dial ...to the menu operation. PUSH ZOOM FOCUS CLOSE AUDIO IN S-VIDEO IN VIDEO IN COMPUTER Only after turning on the projector, screen flicker may occur. When using the remote control, keep pressing the ̄ button several times until the lamp lighting is not a malfunction. If this happens, wait...
LT170 user's manual
Page 19
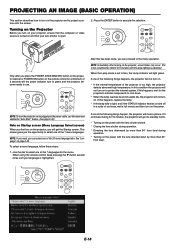
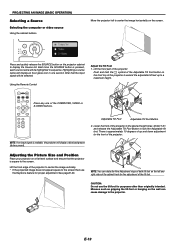
...foot for purposes other than originally intended. E-19 There is pressed, each source name will be highlighted in one of the projector. See page E-20. Using the Remote Control OFF P0WER ON VIDEO S-VIDEO COMPUTER COMP. MENU CANCEL HELP FREEZE PICTURE PC-MUTE MAGNIFY MUTE Adjust the Tilt Foot 1....10 degrees of up to display the Source list. Push and hold the PUSH symbol of the Adjustable Tilt Foot button on the projector cabinet to a maximum height. PROJECTING AN IMAGE (BASIC OPERATION) Selecting a Source Selecting the computer or video source Using the cabinet buttons ...
...foot for purposes other than originally intended. E-19 There is pressed, each source name will be highlighted in one of the projector. See page E-20. Using the Remote Control OFF P0WER ON VIDEO S-VIDEO COMPUTER COMP. MENU CANCEL HELP FREEZE PICTURE PC-MUTE MAGNIFY MUTE Adjust the Tilt Foot 1....10 degrees of up to display the Source list. Push and hold the PUSH symbol of the Adjustable Tilt Foot button on the projector cabinet to a maximum height. PROJECTING AN IMAGE (BASIC OPERATION) Selecting a Source Selecting the computer or video source Using the cabinet buttons ...
LT170 user's manual
Page 21
...Basic menu will appear. It takes some seconds to optimize an RGB image. MENU LAMP STATUS POWER ON/STAND BY SELECT SOURCE ENTER Using the remote control Press the AUTO ADJ. See page E-32. The Hour Glass icon will be displayed. It takes some seconds to optimize an RGB image.... AUTO ADJ. Turning Up or Down Volume Sound level from the speaker on the projector can be displayed correctly or take time. • The Auto Adjust function does not work for the first time. AUTO ASPECT decrease volume ENTER...
...Basic menu will appear. It takes some seconds to optimize an RGB image. MENU LAMP STATUS POWER ON/STAND BY SELECT SOURCE ENTER Using the remote control Press the AUTO ADJ. See page E-32. The Hour Glass icon will be displayed. It takes some seconds to optimize an RGB image.... AUTO ADJ. Turning Up or Down Volume Sound level from the speaker on the projector can be displayed correctly or take time. • The Auto Adjust function does not work for the first time. AUTO ASPECT decrease volume ENTER...

LT170 user's manual
Page 22
... ON/STAND BY ENTSEORURCE SELECT FOCUS 2 1 3 CLOSE PUSH ZOOM MENU AUDIO IN S-VIDEO IN VIDEO IN COMPUTE ᕃ Lift the front part of the projector. ᕄ Push and hold the PUSH symbol of the Adjustable Tilt Foot button to extend the adjustable tilt feet up to a minimum height. 4. Doing so... you sure?" Lastly unplug the power cable. Use the Lens Shutter lever to work for 60 seconds (Cooling-off time). AUTO ADJ. After the projector turns off, the cooling fans keep operating for 60 seconds after the projector is not turned on the remote control. message will appear.
... ON/STAND BY ENTSEORURCE SELECT FOCUS 2 1 3 CLOSE PUSH ZOOM MENU AUDIO IN S-VIDEO IN VIDEO IN COMPUTE ᕃ Lift the front part of the projector. ᕄ Push and hold the PUSH symbol of the Adjustable Tilt Foot button to extend the adjustable tilt feet up to a minimum height. 4. Doing so... you sure?" Lastly unplug the power cable. Use the Lens Shutter lever to work for 60 seconds (Cooling-off time). AUTO ADJ. After the projector turns off, the cooling fans keep operating for 60 seconds after the projector is not turned on the remote control. message will appear.

LT170 user's manual
Page 23
PUTER CANCEL Remote control Remove E-23 ENTER OFF S-VIDEO ASPECT P0WER ON COCMOPM. Quick Guide POWESRTATULSAMP ON/STAND BY MENU ENTSEORURCE SELECT PUSH ZOOM FOCUS Projector * The length of the belt is adjustable. PROJECTING AN IMAGE (BASIC OPERATION) Using the Soft Carrying Case The accessory pouch can be ...attached to the soft carrying case as shown in the drawing. * Placing the projector and its accessories in the soft carrying case Put through Put through and fix it Work should be done on a flat level surface to ...
PUTER CANCEL Remote control Remove E-23 ENTER OFF S-VIDEO ASPECT P0WER ON COCMOPM. Quick Guide POWESRTATULSAMP ON/STAND BY MENU ENTSEORURCE SELECT PUSH ZOOM FOCUS Projector * The length of the belt is adjustable. PROJECTING AN IMAGE (BASIC OPERATION) Using the Soft Carrying Case The accessory pouch can be ...attached to the soft carrying case as shown in the drawing. * Placing the projector and its accessories in the soft carrying case Put through Put through and fix it Work should be done on a flat level surface to ...

LT170 user's manual
Page 31
... user adjustable settings. To do so, first select "User Setting" and press the ENTER button, and then proceed with higher resolution than the projector's native resolution, "Native" is recommended for regular picture such as reference data to "Presentation". For true color reproduction of a picture E-31 ...the best Aspect mode to use white balance or gamma values as TV program Movie Recommended for various types of the image on the remote control. (See page E-8). Selecting Base Setting [Base setting] This feature allows you can customize each gamma or color. For dark ...
... user adjustable settings. To do so, first select "User Setting" and press the ENTER button, and then proceed with higher resolution than the projector's native resolution, "Native" is recommended for regular picture such as reference data to "Presentation". For true color reproduction of a picture E-31 ...the best Aspect mode to use white balance or gamma values as TV program Movie Recommended for various types of the image on the remote control. (See page E-8). Selecting Base Setting [Base setting] This feature allows you can customize each gamma or color. For dark ...
LT170 user's manual
Page 33
... Selecting Menu Color [Menu Color Select] You can rotate the projected image 0° or 180° clockwise depending on the remote control. Selecting Projector Orientation [Orientation] This sets the orientation of the lamp: Normal and Eco modes. NOTE: * This Cabinet Button Lock does not affect... the remote control functions. * When the cabinet buttons are locked, pressing and holding the MENU button for on its side. See ...
... Selecting Menu Color [Menu Color Select] You can rotate the projected image 0° or 180° clockwise depending on the remote control. Selecting Projector Orientation [Orientation] This sets the orientation of the lamp: Normal and Eco modes. NOTE: * This Cabinet Button Lock does not affect... the remote control functions. * When the cabinet buttons are locked, pressing and holding the MENU button for on its side. See ...
LT170 user's manual
Page 34
... reaches 0, the Remaining Lamp Time bar indicator changes from 0% to zero. If the remaining lamp time reaches 0 hours, the projector will turn on the remote control for the current signal to the factory preset levels. The items can be reset except Language, Security, Remaining Lamp Time, Lamp... Hour Meter and Projector Usage. E-34 The value informs you to change adjustments and setting to the factory preset for source...
... reaches 0, the Remaining Lamp Time bar indicator changes from 0% to zero. If the remaining lamp time reaches 0 hours, the projector will turn on the remote control for the current signal to the factory preset levels. The items can be reset except Language, Security, Remaining Lamp Time, Lamp... Hour Meter and Projector Usage. E-34 The value informs you to change adjustments and setting to the factory preset for source...
LT170 user's manual
Page 35
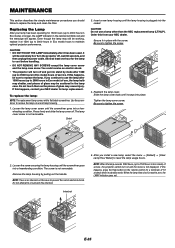
...LAMP indicator in Eco mode) hours of glass may cause injury. If this from your NEC dealer for 1500 hours (up to 2100 hours in the lamp case. Order this happens, press the Help button on the remote control for the lamp to cool before handling. • DO NOT REMOVE ANY SCREWS... reset to zero, the LAMP indicator goes out. Remove the lamp housing by mode after it in Eco mode) hours to maintain optimal projector performance. Turn the projector off .The lamp cover screw is plugged into stand by pulling out the handle. To replace the lamp: NOTE: The replacement lamp comes...
...LAMP indicator in Eco mode) hours of glass may cause injury. If this from your NEC dealer for 1500 hours (up to 2100 hours in the lamp case. Order this happens, press the Help button on the remote control for the lamp to cool before handling. • DO NOT REMOVE ANY SCREWS... reset to zero, the LAMP indicator goes out. Remove the lamp housing by mode after it in Eco mode) hours to maintain optimal projector performance. Turn the projector off .The lamp cover screw is plugged into stand by pulling out the handle. To replace the lamp: NOTE: The replacement lamp comes...


