

User Manual
Page 1
LCD Projector MultiSync MT840/MT1040/MT1045 User's Manual
LCD Projector MultiSync MT840/MT1040/MT1045 User's Manual
User Manual
Page 2
...required to ISO 3744 or ISO 7779. If a power cable is not supplied with this equipment please contact your NEC MultiSync MT840/MT1040/MT1045 Projector and keep the manual handy for future reference. THERE ARE HIGH-VOLTAGE COMPONENTS INSIDE. GSGV Acoustic Noise Information Ordinance:... regulation could void your MultiSync MT840/MT1040/ MT1045. IMPORTANT INFORMATION Precautions Please read carefully to radio communications. REFER SERVICING TO QUALIFIED NEC SERVICE PERSONNEL. Failure to comply with this equipment in a residential area is less than 70 dB (A) according to correct the...
...required to ISO 3744 or ISO 7779. If a power cable is not supplied with this equipment please contact your NEC MultiSync MT840/MT1040/MT1045 Projector and keep the manual handy for future reference. THERE ARE HIGH-VOLTAGE COMPONENTS INSIDE. GSGV Acoustic Noise Information Ordinance:... regulation could void your MultiSync MT840/MT1040/ MT1045. IMPORTANT INFORMATION Precautions Please read carefully to radio communications. REFER SERVICING TO QUALIFIED NEC SERVICE PERSONNEL. Failure to comply with this equipment in a residential area is less than 70 dB (A) according to correct the...
User Manual
Page 3
... carefully and heed all warnings. If you wish to have the projector installed on top of the projector. 7. c. In addition, the ceiling must be strong enough to use your projector and to install the projector yourself. Ensure that your power supply fits this requirement before cleaning.... darkened room. 2. If heavily soiled, use strong detergents or solvents such as alcohol or thinner. 3. Installation 1. Place the projector on a power supply of your projector in order to operate on a flat, level surface in - Dropping or jarring can cause electric shock or fire. 3. If...
... carefully and heed all warnings. If you wish to have the projector installed on top of the projector. 7. c. In addition, the ceiling must be strong enough to use your projector and to install the projector yourself. Ensure that your power supply fits this requirement before cleaning.... darkened room. 2. If heavily soiled, use strong detergents or solvents such as alcohol or thinner. 3. Installation 1. Place the projector on a power supply of your projector in order to operate on a flat, level surface in - Dropping or jarring can cause electric shock or fire. 3. If...

User Manual
Page 4
...heat emitted from the light output. • Do not look into your NEC dealer for lamp replacement. • Allow a minimum of the lens, can redirect light coming out of ONE minute to use the lamp after turning off the projector. E-4 Lamp Replacement • To replace the lamp, follow all instructions ... case. Prevent foreign objects such as a wire or screwdriver into the laser pointer while it immediately and have the object removed by a qualified NEC service personnel. 3. Do not attempt to your projector. Do not place any items such as the pieces of glass may cause injury.
...heat emitted from the light output. • Do not look into your NEC dealer for lamp replacement. • Allow a minimum of the lens, can redirect light coming out of ONE minute to use the lamp after turning off the projector. E-4 Lamp Replacement • To replace the lamp, follow all instructions ... case. Prevent foreign objects such as a wire or screwdriver into the laser pointer while it immediately and have the object removed by a qualified NEC service personnel. 3. Do not attempt to your projector. Do not place any items such as the pieces of glass may cause injury.
User Manual
Page 5
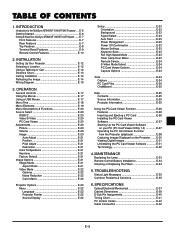
...Options E-21 Image Mode E-21 Aspect Ratio E-21 Video Mode E-22 Gamma E-22 Noise Reduction E-22 Color Matrix E-22 Projector Options E-22 Menu E-22 Language E-22 Projector Pointer E-22 Source Display E-22 Setup E-23 Orientation E-23 Background E-23 Signal Select E-23 Auto Start E-23 Power ...E-24 Capture Options E-24 Tools E-24 Capture E-24 PC Card Files E-25 ChalkBoard E-25 Help E-25 Contents E-25 Source Information E-25 Projector Information E-25 Using the PC Card Viewer Fucntion E-26 Features E-26 Inserting and Ejecting a PC Card E-26 Installing the PC Card Viewer ...
...Options E-21 Image Mode E-21 Aspect Ratio E-21 Video Mode E-22 Gamma E-22 Noise Reduction E-22 Color Matrix E-22 Projector Options E-22 Menu E-22 Language E-22 Projector Pointer E-22 Source Display E-22 Setup E-23 Orientation E-23 Background E-23 Signal Select E-23 Auto Start E-23 Power ...E-24 Capture Options E-24 Tools E-24 Capture E-24 PC Card Files E-25 ChalkBoard E-25 Help E-25 Contents E-25 Source Information E-25 Projector Information E-25 Using the PC Card Viewer Fucntion E-26 Features E-26 Inserting and Ejecting a PC Card E-26 Installing the PC Card Viewer ...
User Manual
Page 6
... laser disc player. You can be permanently mounted on a tabletop or cart, you to mount the projector on . E-6 NTSC4.43: TV standard used in accordance with NEC technology's Advanced AccuBlend on PAL TVs. The remote control can be installed by qualified technicians in order... to get started is one of bodily injury. PAL: TV standard used wirelessly. The projector must be used in remote mouse ...
... laser disc player. You can be permanently mounted on a tabletop or cart, you to mount the projector on . E-6 NTSC4.43: TV standard used in accordance with NEC technology's Advanced AccuBlend on PAL TVs. The remote control can be installed by qualified technicians in order... to get started is one of bodily injury. PAL: TV standard used wirelessly. The projector must be used in remote mouse ...

User Manual
Page 7
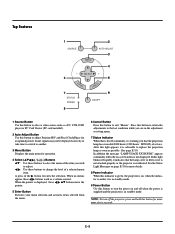
.../OFF Bilt-In Stereo Speaker (1W) Rear Foot Remote Sensor Rear Foot Bilt-In Stereo Speaker (1W) E-7 Getting to Know Your MultiSync MT840/MT1040/MT1045 Projector Front Features Controls USB (Mouse) Terminal Zoom Remote Sensor STATPUOSWER ENTER ON/OFF SELECT CANCEL SOURCE MENU USB PC Card Access Slot Slot for Kensington...
.../OFF Bilt-In Stereo Speaker (1W) Rear Foot Remote Sensor Rear Foot Bilt-In Stereo Speaker (1W) E-7 Getting to Know Your MultiSync MT840/MT1040/MT1045 Projector Front Features Controls USB (Mouse) Terminal Zoom Remote Sensor STATPUOSWER ENTER ON/OFF SELECT CANCEL SOURCE MENU USB PC Card Access Slot Slot for Kensington...
User Manual
Page 8
... this is lit red continually, it is in standby mode. 9 Power Button Use this button to turn off when the power is supplied and the projector is in standby mode. when the indicator is amber, it 's warning you wish to adjust. ᮤ ᮣ: Use these ᮤ ᮣ vw buttons move the... menus appear, these buttons to select the menu of the item you that the lamp cover or filter cover is not attached properly or the projector is overheated. See the Status Light Messages on -screen menu is not displayed. Some signals may not be displayed correctly or take time to switch...
... this is lit red continually, it is in standby mode. 9 Power Button Use this button to turn off when the power is supplied and the projector is in standby mode. when the indicator is amber, it 's warning you wish to adjust. ᮤ ᮣ: Use these ᮤ ᮣ vw buttons move the... menus appear, these buttons to select the menu of the item you that the lamp cover or filter cover is not attached properly or the projector is overheated. See the Status Light Messages on -screen menu is not displayed. Some signals may not be displayed correctly or take time to switch...

User Manual
Page 9
... card. 4 Eject Button Press to eject a PC memory card. 5 PC Control Port (Mini DIN 8 Pin) Use this port to connect your PC to control your projector. This also serves as your remote control cable here for wired operation. 8 RGB Audio Input 1 Connector This is the right channel audio input for stereo...
... card. 4 Eject Button Press to eject a PC memory card. 5 PC Control Port (Mini DIN 8 Pin) Use this port to connect your PC to control your projector. This also serves as your remote control cable here for wired operation. 8 RGB Audio Input 1 Connector This is the right channel audio input for stereo...

User Manual
Page 10
... operation. 16 15 6 E-10 For the Mouse button to exit "Menus". When the Pointer is displayed, the magnified image is indicated by lighting the Computer/Projector Select button. Press this button to 400%. Remote Control 16 11 15 POWER OFF ON 12 COMPUTER PJ... PROJECTOR SOURCE AUTO ADJ. 13 1 S A 2 3 MENU LASER 14 - + 6 4 (Underneath) 5 CANCEL R-CLICK 8 HELP POINTER PIC-MUTE ? 9 MAGNIFY + 7 10 Remote Jack Connect your remote control cable here for ...
... operation. 16 15 6 E-10 For the Mouse button to exit "Menus". When the Pointer is displayed, the magnified image is indicated by lighting the Computer/Projector Select button. Press this button to 400%. Remote Control 16 11 15 POWER OFF ON 12 COMPUTER PJ... PROJECTOR SOURCE AUTO ADJ. 13 1 S A 2 3 MENU LASER 14 - + 6 4 (Underneath) 5 CANCEL R-CLICK 8 HELP POINTER PIC-MUTE ? 9 MAGNIFY + 7 10 Remote Jack Connect your remote control cable here for ...

User Manual
Page 11
...information for a short period of two seconds. 12 LED Flashes when any object within 10 seconds, the light goes out and the Projector mode is canceled. NOTE: To turn your projector on . • Do not point the laser beam at a person. This also displays information how to use the Help. ... to a red dot that your computer mouse. NOTE: When either the Menu, Help or Pointer button is pressed. 13 Computer/Projector Select Use this button to switch between "Computer" and "Projector". E-11 In this mode only Mouse pad, Laser, R-Click and L-Click buttons are pressed within 30 feet (10 m). 15...
...information for a short period of two seconds. 12 LED Flashes when any object within 10 seconds, the light goes out and the Projector mode is canceled. NOTE: To turn your projector on . • Do not point the laser beam at a person. This also displays information how to use the Help. ... to a red dot that your computer mouse. NOTE: When either the Menu, Help or Pointer button is pressed. 13 Computer/Projector Select Use this button to switch between "Computer" and "Projector". E-11 In this mode only Mouse pad, Laser, R-Click and L-Click buttons are pressed within 30 feet (10 m). 15...

User Manual
Page 12
... size image you want , and release the button to connect video and audio sources. The minimum size the image can be is 300" (7.6 m) when the projector is simple to video sources are disconnected before you get started, you want . (Avoid having bright room lighting or sun light directly on the screen... or wall where you can be is approximately 30" (0.76 m) measured diagonally when the projector is from the wall or screen. Each of the image using the Zoom ring on the screen, rotate the foot. Adjust the size of the...
... size image you want , and release the button to connect video and audio sources. The minimum size the image can be is 300" (7.6 m) when the projector is simple to video sources are disconnected before you get started, you want . (Avoid having bright room lighting or sun light directly on the screen... or wall where you can be is approximately 30" (0.76 m) measured diagonally when the projector is from the wall or screen. Each of the image using the Zoom ring on the screen, rotate the foot. Adjust the size of the...

User Manual
Page 13
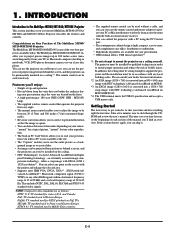
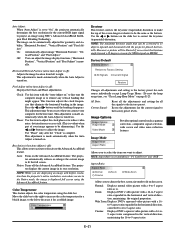
Distance Chart Screen Top Throwing Distance (S) Screen (inch) H V Q Screen center Throwing Angle (U) V D R Screen Bottom P=2.89"(73.5mm) Projector foot Lens Center MT840 Screen Size D Magnification K Throwing Distance S Throwing Angle U V Q R P Q+P MT1040 Screen Size D Magnification K Throwing Distance S Throwing Angle U V Q R P Q+P MT1045 Screen Size D Magnification K Throwing Distance S ...
Distance Chart Screen Top Throwing Distance (S) Screen (inch) H V Q Screen center Throwing Angle (U) V D R Screen Bottom P=2.89"(73.5mm) Projector foot Lens Center MT840 Screen Size D Magnification K Throwing Distance S Throwing Angle U V Q R P Q+P MT1040 Screen Size D Magnification K Throwing Distance S Throwing Angle U V Q R P Q+P MT1045 Screen Size D Magnification K Throwing Distance S ...

User Manual
Page 14
..." and "Select" buttons on your projector cabinet or vw button on your remote control to reflect your projector's image enables you have adequate ventilation around your projector on the side or the front of the projector. Contact your NEC dealer if you 're using a ...fied technician. If the projector falls to install the projector yourself. • Only use the projector where temperatures vary greatly. The projector must be injured and the projector severely damaged. • Do not use your projector so heat can be done by a quali- Contact your NEC dealer for more information...
..." and "Select" buttons on your projector cabinet or vw button on your remote control to reflect your projector's image enables you have adequate ventilation around your projector on the side or the front of the projector. Contact your NEC dealer if you 're using a ...fied technician. If the projector falls to install the projector yourself. • Only use the projector where temperatures vary greatly. The projector must be injured and the projector severely damaged. • Do not use your projector so heat can be done by a quali- Contact your NEC dealer for more information...

User Manual
Page 15
...1 Pin adapter for the Remote Control 1. It is turned on after a period of inactivity, it may be sure to connect between the projector and the notebook PC before turning on a laptop computer, the laptop's mouse, trackball or trackpad will have the 15 pin HD connector. NOTE...For IBM PS/2) IBM VGA or Compatibles (Desktop type or notebook type) AUDIO RGB INPUT 2 S-VIDEO L/MONO R VIDEO DVD Player (with the projector. For older Macintosh, use a commercially available distribution amplifier if connecting a signal cable longer than the supplied one full minute and then press the ...
...1 Pin adapter for the Remote Control 1. It is turned on after a period of inactivity, it may be sure to connect between the projector and the notebook PC before turning on a laptop computer, the laptop's mouse, trackball or trackpad will have the 15 pin HD connector. NOTE...For IBM PS/2) IBM VGA or Compatibles (Desktop type or notebook type) AUDIO RGB INPUT 2 S-VIDEO L/MONO R VIDEO DVD Player (with the projector. For older Macintosh, use a commercially available distribution amplifier if connecting a signal cable longer than the supplied one full minute and then press the ...
User Manual
Page 16
... to connect the audio from your computer, attach the Macintosh adapter to the mouse output port's serial cable, and connect the projector to your Macintosh computer for more information about your equipment's video output requirements. NOTE: Refer to your VCR or laser disc player...pin adapter for connecting to a PS/2 computer.) For Macintosh: Remove your current mouse from your VCR or laser disc player to the projector (if your right and left channel connections correct for more information about your computer's video output requirements and any special identification or configuring...
... to connect the audio from your computer, attach the Macintosh adapter to the mouse output port's serial cable, and connect the projector to your Macintosh computer for more information about your equipment's video output requirements. NOTE: Refer to your VCR or laser disc player...pin adapter for connecting to a PS/2 computer.) For Macintosh: Remove your current mouse from your VCR or laser disc player to the projector (if your right and left channel connections correct for more information about your computer's video output requirements and any special identification or configuring...

User Manual
Page 17
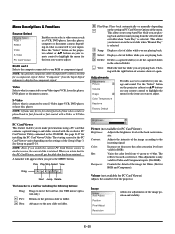
... with a mouse button displays the main menu. A commercially available USB mouse is closed. Clicking displays the pull-down menu. The display is required. The projector will show you the amount of USB mouse that your video source: "Video", "S-Video", "RGB1 / 2", or "PC Card Viewer". 3. Use the... a submenu or item. 4. The change is removed. 1. ENTER: Stores the setting or adjustments. CANCEL: Return to customize the menu or projector settings. Repeat steps 2-5 to adjust an additional item, or press "Cancel" on the full function remote control to quit the menu display. ...
... with a mouse button displays the main menu. A commercially available USB mouse is closed. Clicking displays the pull-down menu. The display is required. The projector will show you the amount of USB mouse that your video source: "Video", "S-Video", "RGB1 / 2", or "PC Card Viewer". 3. Use the... a submenu or item. 4. The change is removed. 1. ENTER: Stores the setting or adjustments. CANCEL: Return to customize the menu or projector settings. Repeat steps 2-5 to adjust an additional item, or press "Cancel" on the full function remote control to quit the menu display. ...

User Manual
Page 18
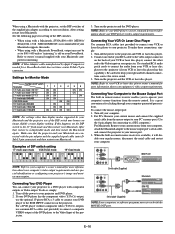
... Temperature All Keystone All Factory Default Image Options Image Mode Video Mode Projector Options Menu Setup Tools Capture PC Card Files ChalkBoard Help Contents Source Information Projector Information NOTE: Adjustable sources R=RGB V=Video/S-Video C=Component All=All sources... Signal R, V, C R, V, C V, C V, C V R R R R Aspect Ratio V, C Gamma Noise Reduction Color Matrix Language Source Display Projector Pointer Orientation Background Signal Select Auto Start Power Management Power Off Confirmation Mouse Button Mouse Sensitivity Clear Lamp Hour Meter Keystone Save Fan High Speed...
... Temperature All Keystone All Factory Default Image Options Image Mode Video Mode Projector Options Menu Setup Tools Capture PC Card Files ChalkBoard Help Contents Source Information Projector Information NOTE: Adjustable sources R=RGB V=Video/S-Video C=Component All=All sources... Signal R, V, C R, V, C V, C V, C V R R R R Aspect Ratio V, C Gamma Noise Reduction Color Matrix Language Source Display Projector Pointer Orientation Background Signal Select Auto Start Power Management Power Off Confirmation Mouse Button Mouse Sensitivity Clear Lamp Hour Meter Keystone Save Fan High Speed...
User Manual
Page 20
...Video source. Volume (not available for your image and sound. Press the "Select" button on the projector cabinet or vw buttons on your remote control to highlight the menu for a brief period of the projector. NOTE: An optional component cable (Component V cable) is used as a VCR, DVD player, ...PC Card Viewer This feature enables you to make presentations using a PC card that has been retained. Use the "Select" button on the projector cabinet or vw buttons on your remote control to highlight the menu for a component signal. Hue: Varies the color level from the Input Signal...
...Video source. Volume (not available for your image and sound. Press the "Select" button on the projector cabinet or vw buttons on your remote control to highlight the menu for a brief period of the projector. NOTE: An optional component cable (Component V cable) is used as a VCR, DVD player, ...PC Card Viewer This feature enables you to make presentations using a PC card that has been retained. Use the "Select" button on the projector cabinet or vw buttons on your remote control to highlight the menu for a component signal. Hue: Varies the color level from the Input Signal...
User Manual
Page 21
... input signal to project an image using the slide bar. Color Temperature This feature adjusts the color temperature using NEC's Advanced AccuBlend Intelligent Pixel Blending Technology. Resets the adjustments for all the adjustments and settings for the current signal..."Pixel Adjust." "Horizontal Position", "Vertical Position" and "Pixel Adjust." Auto Adjust: When "Auto Adjust" is set to "On", the projector automatically determines the best resolution for geometry and stability; The image can adjust the image display functions ("Horizontal Position", "Vertical Position" and "...
... input signal to project an image using the slide bar. Color Temperature This feature adjusts the color temperature using NEC's Advanced AccuBlend Intelligent Pixel Blending Technology. Resets the adjustments for all the adjustments and settings for the current signal..."Pixel Adjust." "Horizontal Position", "Vertical Position" and "Pixel Adjust." Auto Adjust: When "Auto Adjust" is set to "On", the projector automatically determines the best resolution for geometry and stability; The image can adjust the image display functions ("Horizontal Position", "Vertical Position" and "...

