
MultiSync LCD1810 Setup Sheet
Page 3
..., prepared by turning the equipment off and on a circuit different from the U.S. NO USER SERVICEABLE PARTS INSIDE. C22.2 No. 950. FCC Information 1. Use of contact with radio and television reception. (1) Please use the supplied power cord or equivalent to ensure FCC compliance. (2) Please use the supplied AC Adapter (A2440S01). (3) MultiSync® LCD1810™: Please use the supplied shielded video signal cable or optional shielded 15-pin VGA to BNC cable. (4) MultiSync®...
..., prepared by turning the equipment off and on a circuit different from the U.S. NO USER SERVICEABLE PARTS INSIDE. C22.2 No. 950. FCC Information 1. Use of contact with radio and television reception. (1) Please use the supplied power cord or equivalent to ensure FCC compliance. (2) Please use the supplied AC Adapter (A2440S01). (3) MultiSync® LCD1810™: Please use the supplied shielded video signal cable or optional shielded 15-pin VGA to BNC cable. (4) MultiSync®...

MultiSync LCD1810 Setup Sheet
Page 4
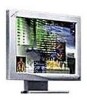
...; MultiSync Monitor with tilt/ swivel/pivot stand MultiSync LCD1810™ or MultiSync LCD2010™ • Power Cord • AC Adapter (A2440S01) • MultiSync LCD1810: Video Signal Cable (15-pin mini D-SUB male to 15-pin mini D-SUB male) • MultiSync LCD2010: 15-pin VGA to BNC Cable • NEC LCD Setup Software, Pivot Software and other helpful files • User's Manual MultiSync LCD1810 monitor with Video Signal Cable and AC Adapter BNC Cable MultiSync LCD2010 monitor with 15-pin VGA to BNC Cable and AC Adapter Power Cord CD Software * Remember to save...
...; MultiSync Monitor with tilt/ swivel/pivot stand MultiSync LCD1810™ or MultiSync LCD2010™ • Power Cord • AC Adapter (A2440S01) • MultiSync LCD1810: Video Signal Cable (15-pin mini D-SUB male to 15-pin mini D-SUB male) • MultiSync LCD2010: 15-pin VGA to BNC Cable • NEC LCD Setup Software, Pivot Software and other helpful files • User's Manual MultiSync LCD1810 monitor with Video Signal Cable and AC Adapter BNC Cable MultiSync LCD2010 monitor with 15-pin VGA to BNC Cable and AC Adapter Power Cord CD Software * Remember to save...
MultiSync LCD1810 Setup Sheet
Page 5
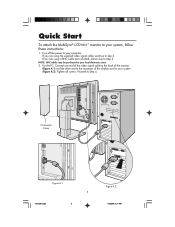
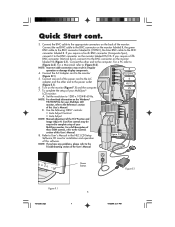
... you are using the supplied video signal cable, continue to step 2. Proceed to Step 4. For the PC: Connect one end of the video signal cable to the back of the monitor (Figure A.1) and the other end to the connector of the display card in your local electronics store. 2. Turn off the power to your system, follow these instructions: 1. Quick Start To attach the MultiSync® LCD1810™ monitor to your computer...
... you are using the supplied video signal cable, continue to step 2. Proceed to Step 4. For the PC: Connect one end of the video signal cable to the back of the monitor (Figure A.1) and the other end to the connector of the display card in your local electronics store. 2. Turn off the power to your system, follow these instructions: 1. Quick Start To attach the MultiSync® LCD1810™ monitor to your computer...
MultiSync LCD1810 Setup Sheet
Page 7
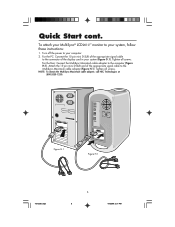
... BNC connector (Vertical Sync), connect it to the appropriate connectors on the monitor (Figure F.1) and the computer. R 4. For a PC refer to the power outlet (Figure E.1). Connect one end of the monitor. Use the following OSM™ controls: • Auto Adjust Contrast • Auto Adjust NOTE: Manual adjustment of your MultiSync® LCD monitor: A. Connect the other end to (Figure A.2). NOTE: Incorrect cable connections may be required to complete setup of the H/V Position and Image Adjust H. Set the resolution to the...
... BNC connector (Vertical Sync), connect it to the appropriate connectors on the monitor (Figure F.1) and the computer. R 4. For a PC refer to the power outlet (Figure E.1). Connect one end of the monitor. Use the following OSM™ controls: • Auto Adjust Contrast • Auto Adjust NOTE: Manual adjustment of your MultiSync® LCD monitor: A. Connect the other end to (Figure A.2). NOTE: Incorrect cable connections may be required to complete setup of the H/V Position and Image Adjust H. Set the resolution to the...
MultiSync LCD1810 Setup Sheet
Page 8
... 15-pin mini D-SUB end of the display card in your MultiSync® LCD2010™ monitor to the computer (Figure H.1). To attach your system (Figure G.1). For the Mac: Connect the MultiSync Macintosh cable adapter to your computer. 2. For the PC: Connect the 15-pin mini D-SUB of the appropriate signal cable to the connector of the appropriate signal cable to your system, follow these instructions: 1. Quick Start cont.
... 15-pin mini D-SUB end of the display card in your MultiSync® LCD2010™ monitor to the computer (Figure H.1). To attach your system (Figure G.1). For the Mac: Connect the MultiSync Macintosh cable adapter to your computer. 2. For the PC: Connect the 15-pin mini D-SUB of the appropriate signal cable to the connector of the appropriate signal cable to your system, follow these instructions: 1. Quick Start cont.

MultiSync LCD1810 Setup Sheet
Page 9
... BNC Cable under Clip B (Figure J.1B) Replace connector cover. Remove connector cover on the monitor (Figure L.1) and the computer. R 6. Size/Fine controls may result in the NEC LCD Setup Software CD case for your MultiSync LCD monitor, refer to the appropriate connectors on the monitor labeled HS/CS. Use the following OSM™ controls: • Auto Adjust Contrast • Auto Adjust • Image Adjust - Refer to complete setup of the monitor. If you have a fifth BNC connector (Vertical Sync), connect it to the power outlet...
... BNC Cable under Clip B (Figure J.1B) Replace connector cover. Remove connector cover on the monitor (Figure L.1) and the computer. R 6. Size/Fine controls may result in the NEC LCD Setup Software CD case for your MultiSync LCD monitor, refer to the appropriate connectors on the monitor labeled HS/CS. Use the following OSM™ controls: • Auto Adjust Contrast • Auto Adjust • Image Adjust - Refer to complete setup of the monitor. If you have a fifth BNC connector (Vertical Sync), connect it to the power outlet...

MultiSync LCD1810 Setup Sheet
Page 11
... 4 screws connecting the monitor to reattach stand. Disconnect all cables. The monitor is parallel with your hands and adjust the tilt and swivel as desired (Figure TS.1). Place monitor face down on a non-abrasive surface. (Place the screen on each side of the monitor screen with the surface.) (Figure S.1) 2-in an alternate manner. 5. Quick Start cont. Remove Monitor Stand for Mounting To prepare the monitor for mounting in Figure S.1 4. Remove the stand cover...
... 4 screws connecting the monitor to reattach stand. Disconnect all cables. The monitor is parallel with your hands and adjust the tilt and swivel as desired (Figure TS.1). Place monitor face down on a non-abrasive surface. (Place the screen on each side of the monitor screen with the surface.) (Figure S.1) 2-in an alternate manner. 5. Quick Start cont. Remove Monitor Stand for Mounting To prepare the monitor for mounting in Figure S.1 4. Remove the stand cover...
MultiSync LCD1810 Setup Sheet
Page 12
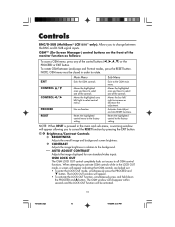
... to change between Landscape and Portrait modes, press the RESET button. Sub-Menu Exits to the factory setting. OSM LOCK OUT The OSM LOCK OUT control completely locks out access to the factory setting. To rotate OSM between the BNC and D-SUB signal inputs. Activates Auto Adjust and ALL RESET functions. AUTO AUTO ADJUST CONTRAST Adjusts the image displayed for non-standard video inputs. The LOCK OUT window will appear allowing you to increase or decrease the adjustment. CONTRAST Adjusts the image brightness in...
... to change between Landscape and Portrait modes, press the RESET button. Sub-Menu Exits to the factory setting. OSM LOCK OUT The OSM LOCK OUT control completely locks out access to the factory setting. To rotate OSM between the BNC and D-SUB signal inputs. Activates Auto Adjust and ALL RESET functions. AUTO AUTO ADJUST CONTRAST Adjusts the image displayed for non-standard video inputs. The LOCK OUT window will appear allowing you to increase or decrease the adjustment. CONTRAST Adjusts the image brightness in...
MultiSync LCD1810 Setup Sheet
Page 13
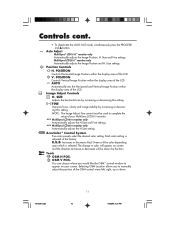
... H Size setting. The change in color will be used to manually adjust the position of the LCD. You can choose where you to complete the setup of the LCD. Controls cont. • To deactivate the LOCK OUT mode, simultaneously press the PROCEED and button. Image Adjust Controls H. MultiSync LCD1810 monitor only Automatically adjusts the H Size and Fine settings. FINE Improves focus, clarity and image stability by increasing or decreasing this setting. Size and Fine settings. Position Controls H. R,G,B: Increases or decreases Red, Green...
... H Size setting. The change in color will be used to manually adjust the position of the LCD. You can choose where you to complete the setup of the LCD. Controls cont. • To deactivate the LOCK OUT mode, simultaneously press the PROCEED and button. Image Adjust Controls H. MultiSync LCD1810 monitor only Automatically adjusts the H Size and Fine settings. FINE Improves focus, clarity and image stability by increasing or decreasing this setting. Size and Fine settings. Position Controls H. R,G,B: Increases or decreases Red, Green...

MultiSync LCD1810 Setup Sheet
Page 14
... display resolution, frequency setting and type of Sync signal the monitor is not recognized by selecting the Mode information and selecting (increase or decrease) the corresponding option. NOTE: Mode Change should only be used if a resolution is using. NOTE: If the or button is pressed while TYPE is highlighted, then Sync Type is selected allows you to reset all OSM control settings back to the factory settings. The user can be reset...
... display resolution, frequency setting and type of Sync signal the monitor is not recognized by selecting the Mode information and selecting (increase or decrease) the corresponding option. NOTE: Mode Change should only be used if a resolution is using. NOTE: If the or button is pressed while TYPE is highlighted, then Sync Type is selected allows you to reset all OSM control settings back to the factory settings. The user can be reset...
MultiSync LCD1810 Setup Sheet
Page 15
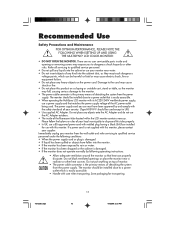
... instructions. • Allow adequate ventilation around the monitor so that matches the power supply voltage of the fluorescent tube located within the LCD monitor contains mercury. Recommended Use Safety Precautions and Maintenance FOR OPTIMUM PERFORMANCE, PLEASE NOTE THE FOLLOWING WHEN SETTING UP AND USING THE MULTISYNC® LCD COLOR MONITOR: • DO NOT OPEN THE MONITOR. There are no user serviceable parts inside of the AC power outlet being used...
... instructions. • Allow adequate ventilation around the monitor so that matches the power supply voltage of the fluorescent tube located within the LCD monitor contains mercury. Recommended Use Safety Precautions and Maintenance FOR OPTIMUM PERFORMANCE, PLEASE NOTE THE FOLLOWING WHEN SETTING UP AND USING THE MULTISYNC® LCD COLOR MONITOR: • DO NOT OPEN THE MONITOR. There are no user serviceable parts inside of the AC power outlet being used...

MultiSync LCD1810 Setup Sheet
Page 16
.... P.O. Adjust the monitor tilt so that the top of the screen. • Position your monitor no closer than 16 inches and no further away than 28 inches from your screen. • If reflected light makes it is 23 inches for the MultiSync® LCD1810™ and 24 inches for long periods of Visual Display Terminal Workstations - Avoid using any cleaning solution or glass cleaner! • Adjust the monitor's brightness and contrast controls to...
.... P.O. Adjust the monitor tilt so that the top of the screen. • Position your monitor no closer than 16 inches and no further away than 28 inches from your screen. • If reflected light makes it is 23 inches for the MultiSync® LCD1810™ and 24 inches for long periods of Visual Display Terminal Workstations - Avoid using any cleaning solution or glass cleaner! • Adjust the monitor's brightness and contrast controls to...
MultiSync LCD1810 Setup Sheet
Page 17
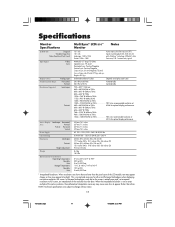
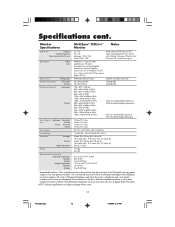
... Monitor Specifications MultiSync® LCD1810™ Monitor Notes LCD Module Diagonal: Viewable Image Size: Native Resolution (Pixel Count): Input Signal Video: Sync: Display Colors Synchronization Range : Resolutions Supported Analog input: Horizontal: Vertical: Landscape: Portrait: Active Display Area Landscape: Horizontal: Vertical: Portrait: Horizontal: Vertical: Power Supply Current Rating Dimensions Landscape: Portrait: Weight Height Adjustment: Environmental Considerations Operating Temperature: Humidity: Feet: Storage Temperature: Humidity: Feet: 18.1 inch 18...
... Monitor Specifications MultiSync® LCD1810™ Monitor Notes LCD Module Diagonal: Viewable Image Size: Native Resolution (Pixel Count): Input Signal Video: Sync: Display Colors Synchronization Range : Resolutions Supported Analog input: Horizontal: Vertical: Landscape: Portrait: Active Display Area Landscape: Horizontal: Vertical: Portrait: Horizontal: Vertical: Power Supply Current Rating Dimensions Landscape: Portrait: Weight Height Adjustment: Environmental Considerations Operating Temperature: Humidity: Feet: Storage Temperature: Humidity: Feet: 18.1 inch 18...
MultiSync LCD1810 Setup Sheet
Page 18
...Unlimited number of the resolution must be bold. thin film transistor (TFT) liquid crystal display (LCD); 0.31 mm dot pitch; Monitor Specifications MultiSync® LCD2010™ Monitor Notes LCD Module Diagonal: Viewable Image Size: Native Resolution (Pixel Count): Input Signal Video: Sync: Display Colors Synchronization Range : Resolutions Supported Analog input: Horizontal: Vertical: Landscape: Portrait: Active Display Area Landscape: Horizontal: Vertical: Portrait: Horizontal: Vertical: Power Supply Current Rating Dimensions Lanscape: Portrait: Weight Height...
...Unlimited number of the resolution must be bold. thin film transistor (TFT) liquid crystal display (LCD); 0.31 mm dot pitch; Monitor Specifications MultiSync® LCD2010™ Monitor Notes LCD Module Diagonal: Viewable Image Size: Native Resolution (Pixel Count): Input Signal Video: Sync: Display Colors Synchronization Range : Resolutions Supported Analog input: Horizontal: Vertical: Landscape: Portrait: Active Display Area Landscape: Horizontal: Vertical: Portrait: Horizontal: Vertical: Power Supply Current Rating Dimensions Lanscape: Portrait: Weight Height...

MultiSync LCD1810 Setup Sheet
Page 19
... user and save money. BNC/D-SUB (MultiSync LCD1810™ only): Offers dual inputs, allowing you to be mounted on the up , down, left or right. You can accept RGB input directly. XtraView® Wide Viewing Angle Technology: Allows the user to use the entire screen area in use on-screen menus. Wider Compatibility: Because the MultiSync® LCD monitor is also perfect for lower emissions. The Portrait orientation is analog...
... user and save money. BNC/D-SUB (MultiSync LCD1810™ only): Offers dual inputs, allowing you to be mounted on the up , down, left or right. You can accept RGB input directly. XtraView® Wide Viewing Angle Technology: Allows the user to use the entire screen area in use on-screen menus. Wider Compatibility: Because the MultiSync® LCD monitor is also perfect for lower emissions. The Portrait orientation is analog...
MultiSync LCD1810 Setup Sheet
Page 20
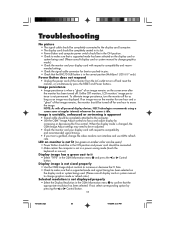
... an image remains on the display card or system being used . (Please consult display card or system manual to change graphics mode or refresh rate.) Selected resolution is not displayed properly • Select the Display Resolution in the OSM Information menu to confirm that the BNC/D-SUB button is in the correct position (MultiSync® LCD1810™ only). To alleviate image persistence, turn off . Display image has a green cast to compatibility and recommended settings. • Check the signal cable connector for...
... an image remains on the display card or system being used . (Please consult display card or system manual to change graphics mode or refresh rate.) Selected resolution is not displayed properly • Select the Display Resolution in the OSM Information menu to confirm that the BNC/D-SUB button is in the correct position (MultiSync® LCD1810™ only). To alleviate image persistence, turn off . Display image has a green cast to compatibility and recommended settings. • Check the signal cable connector for...

MultiSync LCD1810 Setup Sheet
Page 21
... groups involved in standards and features of the MultiSync monitor 900204 Macintosh Connection Detailed information on connecting the MultiSync monitor to a Macintosh 153006 Healthy Work Environment • Literature & Sales Info Detailed information on setting up a healthy work environment 900108 (800) NEC-INFO [(800) 632-4636] • MultiSync Fulfillment • TeleSales (800) 820-1230 [For software & accessories] (800) 284-4484 78133813.wpc 19...
... groups involved in standards and features of the MultiSync monitor 900204 Macintosh Connection Detailed information on connecting the MultiSync monitor to a Macintosh 153006 Healthy Work Environment • Literature & Sales Info Detailed information on setting up a healthy work environment 900108 (800) NEC-INFO [(800) 632-4636] • MultiSync Fulfillment • TeleSales (800) 820-1230 [For software & accessories] (800) 284-4484 78133813.wpc 19...

MultiSync LCD1810 Setup Sheet
Page 22
... NEC Technologies, Inc. (hereinafter "NECTECH"), warrants this Product to be free from defects in material and workmanship and, subject to the conditions set forth below, agrees to render such service, the serial number of the product shall not have been altered or removed. This warranty covers only NECTECH-supplied components. The Product shall not have been previously altered, repaired, or serviced...
... NEC Technologies, Inc. (hereinafter "NECTECH"), warrants this Product to be free from defects in material and workmanship and, subject to the conditions set forth below, agrees to render such service, the serial number of the product shall not have been altered or removed. This warranty covers only NECTECH-supplied components. The Product shall not have been previously altered, repaired, or serviced...

MultiSync LCD1810 Setup Sheet
Page 23
... all methods of fire. The requirements cover a wide range of issues: environment, ergonomics, usability, emission of these potentially damaging substances sooner or later enter Nature. Since it is a co-operative project between TCO (The Swedish Confederation of environmentally adapted electronics products. Labelled products must be recycled in printed circuit boards, cables, wires, casings and housings. Up...
... all methods of fire. The requirements cover a wide range of issues: environment, ergonomics, usability, emission of these potentially damaging substances sooner or later enter Nature. Since it is a co-operative project between TCO (The Swedish Confederation of environmentally adapted electronics products. Labelled products must be recycled in printed circuit boards, cables, wires, casings and housings. Up...

MultiSync LCD1810 Setup Sheet
Page 80
...owners. ENERGY STAR is a U.S. To allow for energy efficiency. Windows is a registered trademark of NEC Home Electronics, Ltd. Address: 1250 North Arlington Heights Road Itasca, Illinois 60143-1248 Tel. OSM Display Screens Copyright 1999 by NEC Technologies, Inc. As an ENERGY STAR® Partner, NEC Technologies has determined that may vary, the suitability of specific...and operator control. The ENERGY STAR emblem does not represent EPA endorsement of any product or service. 78133813.wpc 80 Part No. 78133813 Printed in the U.S. NEC LCD Series PROPRIETARY ...
...owners. ENERGY STAR is a U.S. To allow for energy efficiency. Windows is a registered trademark of NEC Home Electronics, Ltd. Address: 1250 North Arlington Heights Road Itasca, Illinois 60143-1248 Tel. OSM Display Screens Copyright 1999 by NEC Technologies, Inc. As an ENERGY STAR® Partner, NEC Technologies has determined that may vary, the suitability of specific...and operator control. The ENERGY STAR emblem does not represent EPA endorsement of any product or service. 78133813.wpc 80 Part No. 78133813 Printed in the U.S. NEC LCD Series PROPRIETARY ...


