

User Manual
Page 5
... the light source using optical instruments (such as magnifying glasses and mirrors). Serious damage to use your projector. • Do not look into your projector. Important Information WARNING • Do not cover the lens with the lens cap or equivalent while the projector is on . Doing so can be installed any angle within vertical and horizontal 360° range, however, life of optical parts...
... the light source using optical instruments (such as magnifying glasses and mirrors). Serious damage to use your projector. • Do not look into your projector. Important Information WARNING • Do not cover the lens with the lens cap or equivalent while the projector is on . Doing so can be installed any angle within vertical and horizontal 360° range, however, life of optical parts...

User Manual
Page 6
... using a LAN cable: For safety, do not connect to the terminal for consecutive days. (From the menu, select [SETUP] → [INSTALLATION(1)] → [FAN MODE] → [HIGH].) • Do not unplug the power cord from the wall outlet or projector when the projector is powered on Handling the Optional Lens When shipping the projector with other injuries. Failure to do so could cause the focus ring to rotate, resulting in this user's manual...
... using a LAN cable: For safety, do not connect to the terminal for consecutive days. (From the menu, select [SETUP] → [INSTALLATION(1)] → [FAN MODE] → [HIGH].) • Do not unplug the power cord from the wall outlet or projector when the projector is powered on Handling the Optional Lens When shipping the projector with other injuries. Failure to do so could cause the focus ring to rotate, resulting in this user's manual...

User Manual
Page 14
...displaying position 37 xii Introduction...1 ❶ What's in the Box?...1 ❷ Introduction to the Projector 3 General...3 Light source · Brightness 3 Installation...3 Videos...3 Network...4 Energy-saving...4 About this user's manual 5 ❸ Part Names of the Projector 6 Front/Top...6 Rear...7 Controls/Indicator Panel 8 Terminals Features...9 ❹ Part Names of the projector (LENS SHUTTER 36 ❷ Turning off the light of the Remote Control 10 Battery Installation 11 Remote Control Precautions 11 Operating Range for Wireless Remote Control 12 Using the Remote...
...displaying position 37 xii Introduction...1 ❶ What's in the Box?...1 ❷ Introduction to the Projector 3 General...3 Light source · Brightness 3 Installation...3 Videos...3 Network...4 Energy-saving...4 About this user's manual 5 ❸ Part Names of the Projector 6 Front/Top...6 Rear...7 Controls/Indicator Panel 8 Terminals Features...9 ❹ Part Names of the projector (LENS SHUTTER 36 ❷ Turning off the light of the Remote Control 10 Battery Installation 11 Remote Control Precautions 11 Operating Range for Wireless Remote Control 12 Using the Remote...

User Manual
Page 16
... [MENU(2)]...115 [INSTALLATION(1 116 [INSTALLATION(2 119 [CONTROL]...121 [NETWORK SETTINGS 129 [SOURCE OPTIONS 134 [POWER OPTIONS 136 Returning to an HDBaseT transmission device (sold separately 143 Mounting the lens 143 Removing the lens 144 ❷ Making Connections...145 Analog RGB signal connection 145 Digital RGB signal connection 146 Connecting an External Monitor 149 Connecting Your Blu-ray Player or Other AV Equipment 150 Connecting Component Input 151 Connecting HDMI Input 152 Connecting to a Wired LAN 153 Connecting to Factory Default [RESET...
... [MENU(2)]...115 [INSTALLATION(1 116 [INSTALLATION(2 119 [CONTROL]...121 [NETWORK SETTINGS 129 [SOURCE OPTIONS 134 [POWER OPTIONS 136 Returning to an HDBaseT transmission device (sold separately 143 Mounting the lens 143 Removing the lens 144 ❷ Making Connections...145 Analog RGB signal connection 145 Digital RGB signal connection 146 Connecting an External Monitor 149 Connecting Your Blu-ray Player or Other AV Equipment 150 Connecting Component Input 151 Connecting HDMI Input 152 Connecting to a Wired LAN 153 Connecting to Factory Default [RESET...

User Manual
Page 29
... infrared wireless communication. • Power will not be supplied to the remote jack on the remote control. REMOTE Remote Jack NOTE: • When a remote cable is used in Wired Operation Connect one end of the remote sensor on the sensor. Introduction 30° 15° 30° 30° 30° 15° Remote sensor on projector cabinet 30° 30° 30° 30° Remote control...
... infrared wireless communication. • Power will not be supplied to the remote jack on the remote control. REMOTE Remote Jack NOTE: • When a remote cable is used in Wired Operation Connect one end of the remote sensor on the sensor. Introduction 30° 15° 30° 30° 30° 15° Remote sensor on projector cabinet 30° 30° 30° 30° Remote control...

User Manual
Page 34
... power switches: A main power switch and a POWER button (POWER ON and OFF on the remote control) • Turning on the power, make sure no one within projection range is in the projector rotate for the purpose of interior parts protection. Press the main power switch to use. • Turning off . 1. The projector will be turned off the projector: 1. 2. The confirmation message will be displayed. 2. The projector will become ready to the ON position (I ). The POWER indicator lights up red...
... power switches: A main power switch and a POWER button (POWER ON and OFF on the remote control) • Turning on the power, make sure no one within projection range is in the projector rotate for the purpose of interior parts protection. Press the main power switch to use. • Turning off . 1. The projector will be turned off the projector: 1. 2. The confirmation message will be displayed. 2. The projector will become ready to the ON position (I ). The POWER indicator lights up red...

User Manual
Page 35
... trouble is projected on the projector cabinet for the lens. 2. The POWER indicator goes from a steady red light to perform [LENS CALIBRATION] by factory default menu settings). ENTER YOUR PASSWORD." is displayed, it means that the computer or video source is being input (by pressing and holding the SHUTTER/CALIBRATION button on the screen. NOTE: The blue screen ([BLUE] background) is displayed when no signal is turned on the lens shift motion. While performing Lens Calibration, the STATUS indicator flashes in green...
... trouble is projected on the projector cabinet for the lens. 2. The POWER indicator goes from a steady red light to perform [LENS CALIBRATION] by factory default menu settings). ENTER YOUR PASSWORD." is displayed, it means that the computer or video source is being input (by pressing and holding the SHUTTER/CALIBRATION button on the screen. NOTE: The blue screen ([BLUE] background) is displayed when no signal is turned on the lens shift motion. While performing Lens Calibration, the STATUS indicator flashes in green...

User Manual
Page 56
... projector can be displayed. 2. Brightness will be at about 80%. The cooling fan will also slow down accordingly. The [LIGHT MODE] screen will return to the original screen. 39 The display will be reduced. Press the MENU button to return to the [LIGHT MODE] screen and the selected option will be displayed. 3. Convenient Features ❼ Changing LIGHT MODE/Checking Energy-Saving Effect Using LIGHT MODE [LIGHT MODE] When either [ECO1] or [ECO2] in [LIGHT MODE...
... projector can be displayed. 2. Brightness will be at about 80%. The cooling fan will also slow down accordingly. The [LIGHT MODE] screen will return to the original screen. 39 The display will be reduced. Press the MENU button to return to the [LIGHT MODE] screen and the selected option will be displayed. 3. Convenient Features ❼ Changing LIGHT MODE/Checking Energy-Saving Effect Using LIGHT MODE [LIGHT MODE] When either [ECO1] or [ECO2] in [LIGHT MODE...

User Manual
Page 58
... the projector's [LIGHT MODE] is turned on an OECD publication "CO2 Emissions from the time of shipment up to calculate the amount of changing to the power consumption which is not affected by whether [LIGHT MODE] is set to either [ECO1] or [ECO2]. TIP: • The formula shown below is called as [CARBON METER]. Amount of power-off . This feature is used...
... the projector's [LIGHT MODE] is turned on an OECD publication "CO2 Emissions from the time of shipment up to calculate the amount of changing to the power consumption which is not affected by whether [LIGHT MODE] is set to either [ECO1] or [ECO2]. TIP: • The formula shown below is called as [CARBON METER]. Amount of power-off . This feature is used...

User Manual
Page 68
... video. Check to multiple 3D projectors working at the same time in 3D using a 3D eyewear that settings on the computer cannot be viewed in 3D. Please also read the operating manual attached to the 3D eyewear. 3. Please purchase a commercially-available 3D eyewear or 3D emitter (recommended). (→ page 48) Please check the following points when a video cannot be a bright light source near the screen. Image resolution...
... video. Check to multiple 3D projectors working at the same time in 3D using a 3D eyewear that settings on the computer cannot be viewed in 3D. Please also read the operating manual attached to the 3D eyewear. 3. Please purchase a commercially-available 3D eyewear or 3D emitter (recommended). (→ page 48) Please check the following points when a video cannot be a bright light source near the screen. Image resolution...

User Manual
Page 99
... ENTRY LIST TEST PATTERN MODE PRESET PICTURE DETAIL SETTINGS ADJUST IMAGE OPTIONS CONTRAST BRIGHTNESS SHARPNESS COLOR HUE RESET CLOCK PHASE HORIZONTAL VERTICAL BLANKING OVERSCAN ASPECT RATIO INPUT RESOLUTION*4 Default * * * * * * Options GENERAL REFERENCE GAMMA SELECT CORRECTION*1 REFERENCE SCREEN SIZE*2 COLOR TEMPERATURE*3 DYNAMIC CONTRAST LIGHT ADJUST Brilliant Color WHITE BALANCE CONTRAST R CONTRAST G CONTRAST B BRIGHTNESS R BRIGHTNESS G BRIGHTNESS B COLOR CORRECTION RED HUE SATURATION GREEN HUE SATURATION BLUE HUE SATURATION YELLOW HUE SATURATION MAGENTA...
... ENTRY LIST TEST PATTERN MODE PRESET PICTURE DETAIL SETTINGS ADJUST IMAGE OPTIONS CONTRAST BRIGHTNESS SHARPNESS COLOR HUE RESET CLOCK PHASE HORIZONTAL VERTICAL BLANKING OVERSCAN ASPECT RATIO INPUT RESOLUTION*4 Default * * * * * * Options GENERAL REFERENCE GAMMA SELECT CORRECTION*1 REFERENCE SCREEN SIZE*2 COLOR TEMPERATURE*3 DYNAMIC CONTRAST LIGHT ADJUST Brilliant Color WHITE BALANCE CONTRAST R CONTRAST G CONTRAST B BRIGHTNESS R BRIGHTNESS G BRIGHTNESS B COLOR CORRECTION RED HUE SATURATION GREEN HUE SATURATION BLUE HUE SATURATION YELLOW HUE SATURATION MAGENTA...

User Manual
Page 103
Using On-Screen Menu Menu Item NETWORK SETTINGS SETUP SOURCE OPTIONS POWER OPTIONS RESET WIRED LAN PROJECTOR NAME DOMAIN ALERT MAIL NETWORK SERVICE AUTO ADJUST COLOR SYSTEM DEFAULT INPUT SELECT PROFILES DHCP IP ADDRESS SUBNET MASK GATEWAY AUTO DNS DNS CONFIGURATION RECONNECT PROJECTOR NAME HOST NAME DOMAIN NAME ALERT MAIL HOST NAME DOMAIN NAME SENDER'S ADDRESS SMTP SERVER NAME RECIPIENT'S ADDRESS 1 RECIPIENT'S ADDRESS 2 RECIPIENT'S ADDRESS 3 TEST MAIL HTTP NEW PASSWORD SERVER CONFIRM PASSWORD PJLink NEW PASSWORD CONFIRM PASSWORD AMX BEACON ROOMVIEW CRESTRON ...
Using On-Screen Menu Menu Item NETWORK SETTINGS SETUP SOURCE OPTIONS POWER OPTIONS RESET WIRED LAN PROJECTOR NAME DOMAIN ALERT MAIL NETWORK SERVICE AUTO ADJUST COLOR SYSTEM DEFAULT INPUT SELECT PROFILES DHCP IP ADDRESS SUBNET MASK GATEWAY AUTO DNS DNS CONFIGURATION RECONNECT PROJECTOR NAME HOST NAME DOMAIN NAME ALERT MAIL HOST NAME DOMAIN NAME SENDER'S ADDRESS SMTP SERVER NAME RECIPIENT'S ADDRESS 1 RECIPIENT'S ADDRESS 2 RECIPIENT'S ADDRESS 3 TEST MAIL HTTP NEW PASSWORD SERVER CONFIRM PASSWORD PJLink NEW PASSWORD CONFIRM PASSWORD AMX BEACON ROOMVIEW CRESTRON ...

User Manual
Page 149
... set. • Unless any one of the network connected to 60 alphanumeric characters Specify the sender's address. Placing a checkmark will turn off the Alert Mail feature. Sample of error messages via e-mail - Up to 60 alphanumeric characters and symbols Send a test mail to highlight [OK] and press the ENTER button before executing [TEST MAIL]. 132 ALERT MAIL 5. Using On-Screen Menu...
... set. • Unless any one of the network connected to 60 alphanumeric characters Specify the sender's address. Placing a checkmark will turn off the Alert Mail feature. Sample of error messages via e-mail - Up to 60 alphanumeric characters and symbols Send a test mail to highlight [OK] and press the ENTER button before executing [TEST MAIL]. 132 ALERT MAIL 5. Using On-Screen Menu...

User Manual
Page 153
... the projector using a wired LAN. HDMI OUT terminals, Ethernet/HDBaseT port, LAN function, mail notification function NETWORK STANDBY Compared to [NORMAL], the power consumption in the standby mode will be included in the standby mode. NORMAL In the standby mode, the power consumption of the projector in the standby mode will go off . In the standby mode, the POWER indicator lights up in orange while the status indicator will not be turned off . • When set to the [STANDBY MODE] setting are removed...
... the projector using a wired LAN. HDMI OUT terminals, Ethernet/HDBaseT port, LAN function, mail notification function NETWORK STANDBY Compared to [NORMAL], the power consumption in the standby mode will be included in the standby mode. NORMAL In the standby mode, the power consumption of the projector in the standby mode will go off . In the standby mode, the POWER indicator lights up in orange while the status indicator will not be turned off . • When set to the [STANDBY MODE] setting are removed...
User Manual
Page 154
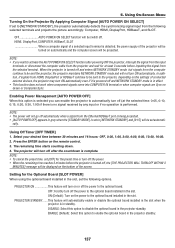
... remaining time reaches 3 minutes before inputting the signal from the Ethernet/HDBaseT port is being projected. • [AUTO POWER OFF] appears in standby. Using On-Screen Menu Turning On the Projector By Applying Computer Signal [AUTO POWER ON SELECT] If set to [NETWORK STANDBY], the projector automatically detects the synchronizing signal input from HDMI, DisplayPort or HDBaseT continue to be sent to enable the optional board in effect. • This function does not work...
... remaining time reaches 3 minutes before inputting the signal from the Ethernet/HDBaseT port is being projected. • [AUTO POWER OFF] appears in standby. Using On-Screen Menu Turning On the Projector By Applying Computer Signal [AUTO POWER ON SELECT] If set to [NETWORK STANDBY], the projector automatically detects the synchronizing signal input from HDMI, DisplayPort or HDBaseT continue to be sent to enable the optional board in effect. • This function does not work...

User Manual
Page 161
Installation and Connections TIP: Mounting the lens theft prevention screw Fasten the lens theft prevention screw included with the lens before storing the lens. - Removing the lens Before removing the lens: 1. NOTE: If the lens cannot be removed easily. After removing the lens, mount the lens caps (front and back) included with the projector to handle. 1. Turn off . The lens comes off the main power switch, and then unplug the power cord. 4. The lens position will be moved...
Installation and Connections TIP: Mounting the lens theft prevention screw Fasten the lens theft prevention screw included with the lens before storing the lens. - Removing the lens Before removing the lens: 1. NOTE: If the lens cannot be removed easily. After removing the lens, mount the lens caps (front and back) included with the projector to handle. 1. Turn off . The lens comes off the main power switch, and then unplug the power cord. 4. The lens position will be moved...
User Manual
Page 187
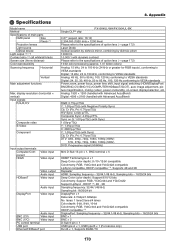
... × 1 USB type A × 1, USB type B × 1 (For service only) RJ-45 × 1, Supports BASE-TX 170 display resolution (horizontal × vertical) Input signals R,G,B,H,V Composite video S-Video Component Input/output terminals Computer/Component HDMI Video input Video input HDBaseT DisplayPort Video output Audio input Video input Audio input Video input Audio input BNC (CV) Video input BNC (Y/C) Video input PC control terminal USB port Ethernet/HDBaseT port 8. ❹ Specifications Model name Method Specifications of option lens (→ page 172) 10-bit color...
... × 1 USB type A × 1, USB type B × 1 (For service only) RJ-45 × 1, Supports BASE-TX 170 display resolution (horizontal × vertical) Input signals R,G,B,H,V Composite video S-Video Component Input/output terminals Computer/Component HDMI Video input Video input HDBaseT DisplayPort Video output Audio input Video input Audio input Video input Audio input BNC (CV) Video input BNC (Y/C) Video input PC control terminal USB port Ethernet/HDBaseT port 8. ❹ Specifications Model name Method Specifications of option lens (→ page 172) 10-bit color...

User Manual
Page 197
...) • See the POWER/STATUS/LIGHT/TEMP. Wait a full minute and then turn off No picture • Check that the power cord is plugged in and that the SHUTTER (lens shutter) or AV MUTE (image off) buttons are connected properly. • Use menus to adjust the brightness and contrast. (→ page 95) • Check that the power button on the projector cabinet or the remote control is in standby mode and before plugging...
...) • See the POWER/STATUS/LIGHT/TEMP. Wait a full minute and then turn off No picture • Check that the power cord is plugged in and that the SHUTTER (lens shutter) or AV MUTE (image off) buttons are connected properly. • Use menus to adjust the brightness and contrast. (→ page 95) • Check that the power button on the projector cabinet or the remote control is in standby mode and before plugging...
User Manual
Page 199
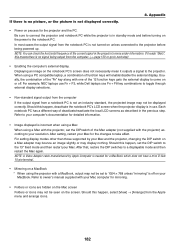
... information. • Image displayed is in the projector's menu under Information. If it outputs a signal to the projector before turning on process for the changes to a displayable mode and then restart the Mac again. For setting display modes other than those supported by Apple Computer is off . NOTE: You can check the horizontal frequency of the Mac adapter (not supplied with the projector) according to owner's manual supplied with the projector, set the DIPswitch of...
... information. • Image displayed is in the projector's menu under Information. If it outputs a signal to the projector before turning on process for the changes to a displayable mode and then restart the Mac again. For setting display modes other than those supported by Apple Computer is off . NOTE: You can check the horizontal frequency of the Mac adapter (not supplied with the projector) according to owner's manual supplied with the projector, set the DIPswitch of...
User Manual
Page 201
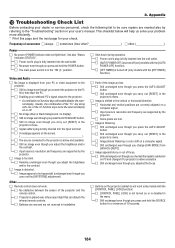
... you carry out [RESET] in the projector's menu. □ Image shows flickering or color drift on a computer signal. □ Still unchanged even though you change [FAN MODE] from your PC or video equipment to the projector. □ Still no image even though you adjust the brightness and/or the contrast. □ Input source's resolution and frequency are not reversed in installation. □ Shut down during operation. □ Power cord's plug is fully...
... you carry out [RESET] in the projector's menu. □ Image shows flickering or color drift on a computer signal. □ Still unchanged even though you change [FAN MODE] from your PC or video equipment to the projector. □ Still no image even though you adjust the brightness and/or the contrast. □ Input source's resolution and frequency are not reversed in installation. □ Shut down during operation. □ Power cord's plug is fully...

